- Building a 3D Digital Clock with ArduinoPosted 4 months ago
- Creating a controller for Minecraft with realistic body movements using ArduinoPosted 5 months ago
- Snowflake with ArduinoPosted 5 months ago
- Holographic Christmas TreePosted 5 months ago
- Segstick: Build Your Own Self-Balancing Vehicle in Just 2 Days with ArduinoPosted 6 months ago
- ZSWatch: An Open-Source Smartwatch Project Based on the Zephyr Operating SystemPosted 7 months ago
- What is IoT and which devices to usePosted 7 months ago
- Maker Faire Rome Unveils Thrilling “Padel Smash Future” Pavilion for Sports EnthusiastsPosted 7 months ago
- Make your curtains smartPosted 8 months ago
- Configuring an ESP8266 for Battery PowerPosted 8 months ago
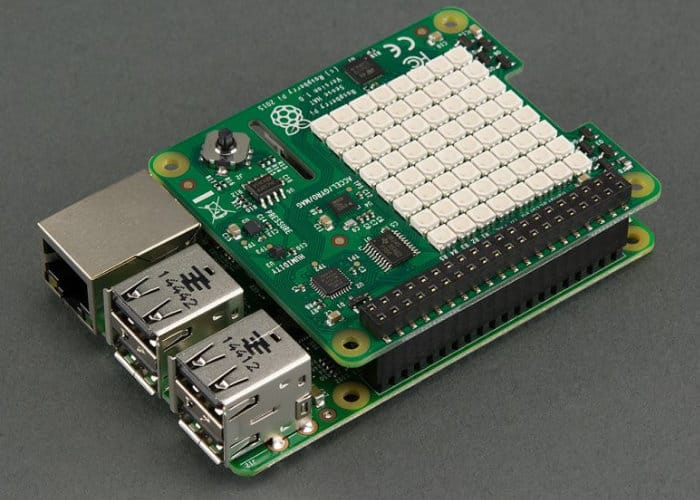
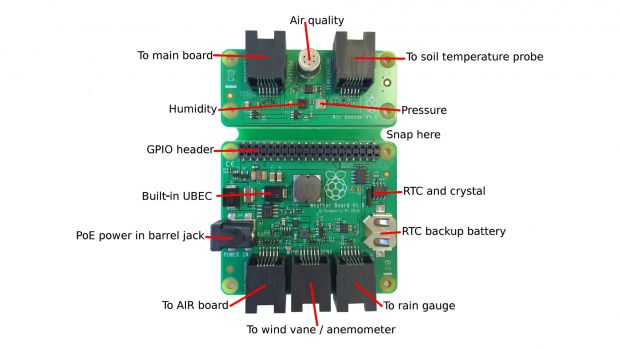
DIY a Quick Weather Station Using the Raspberry Pi Sense HAT
The maker John Wargo has recently published to the ITPro website a new tutorial to create your very own connected Raspberry Pi weather station.
The tutorial shows a quick approach to creating a connected Raspberry Pi whether station using the official Raspberry Pi Sense HAT.
“Although the Oracle Weather Station Kit is not available publicly, there are other options that deliver a similar HAT-experience, most notably the Raspberry Pi Sense HAT which, once plugged atop your Pi, gives you an ‘Astro Pi’, complete with sensors that can monitor orientation (yaw, pitch & roll) via an accelerometer, 3D gyroscope and magnetometer, pressure, humidity and temperature, as well as fronting an LED panel that can display pretty much anything you want.”
Thanks to the Pi Sense Hat you are able to quickly set up a connected weather station monitor that allows you to setup a station via the Weather Underground website. By default the application will start collecting data and uploading it to the Weather Underground every 10 minutes although you can tweak the settings to adjust this if you prefer.
“The basic equipment you’ll need is a Raspberry Pi 2 or 3, a Pi power supply, a Micro SD card (or SD for older Pi’s), a Sense HAT and some species of Pi case to hold it all together. If you plan to measure outdoor temperatures and humidity – perhaps from a windowsill or covered porch – then a weatherproof case would be a good idea at a minimum. It’s also worth considering getting a Pi 3 if you’re buying specially for this project, as the Pi 3 has inbuilt Wifi, which will save running Cat5 Ethernet cabling to your porch.”

Related Posts


-
 Arduino ISP (In System Programming) and stand-alone circuits
We use an Arduino to program other ATmega without...
- Posted 12 years ago
-

-

-
 GSM GPS shield for Arduino
Shield for Arduino designed and based on the module...
- Posted 12 years ago
-
 Small Breakout for SIM900 GSM Module
Some post ago we presented a PCB to mount...
- Posted 13 years ago
-
 Join Maker Faire Rome 2024: Innovation Unleashed at Gazometro Ostiense | Calls Now Open!
All Calls Now Open for Maker Faire Rome 2024...
- Posted 2 weeks ago
-
 Building a 3D Digital Clock with Arduino
Project to create a digital clock consisting...
- Posted 4 months ago
-
 Acoustic amplifier – in DIY Kit
This kit creates a microphone amplifier with an output...
- Posted 5 months ago
-
 Creating a controller for Minecraft with realistic body movements using Arduino
Project of a controller that maps body movements...
- Posted 5 months ago
-
