
Our Arduino compatible board Fishino acquires a new functionality, upload and updating of sketches over wireless, without the need of a wired connection.
Being able to program the Fishino board on the field, without physically connection to the USB port of a computer nor being limited to the IDE Arduino/Fishino, that was one of the “hidden” wishes of the creator of the popular prototyping board with integrated Wi-Fi and RTC, that you have seen originating with the Uno and then turning into the Mega, the Guppy and the 32. We will talk about the possibility to update and replace the firmware (i.e. the sketch) through the native Wi-Fi connection of the board. This allows huge advantages both for simplicity of use and for when the board is in such environments where there is no ease of access and, above all, when it is necessary to operate online remotely in order to save the direct intervention of technical staff.
Up until not long ago, the author of this article had just theorized it, but now it is a reality. Since we are certain that this might be interesting for a wide audience, we want to describe it in detail, starting from the origins, that is from the first idea of it.
Remotely programming Fishino
Despite being designed in the hardware for a long time, the activation of remote programming required remarkable effort on software level, partly because of hardware limits of the Wi-Fi module (one of the provided pins had being found not fitting for the purpose because it generates disturbing impulses at activation) and partly because of Arduino IDE, which is quite problematic when it comes to using dynamic IP’s in connection.
With version 5.0.0 of the firmware and the concurrent release 5.0.0 of the FishinoFlasher updater we finally managed to make it, and for all versions of Fishino, both 8-bit (Uno, Mega and Guppy) and 32-bit (Fishino32 and the incoming Fishino Piranha).
Fishino then becomes programmable, still using Arduino’s IDE, also over the WiFi network, without the need of a USB connection.
This opens up a lot of possibilities: just think of a remote sensor, maybe located in the attic or the basement, powered by a solar panel, that becomes reprogrammable without the need to take it apart nor to physically reach it with our laptop, maybe even assuming uncomfortable positions.
Activation of remote programmability
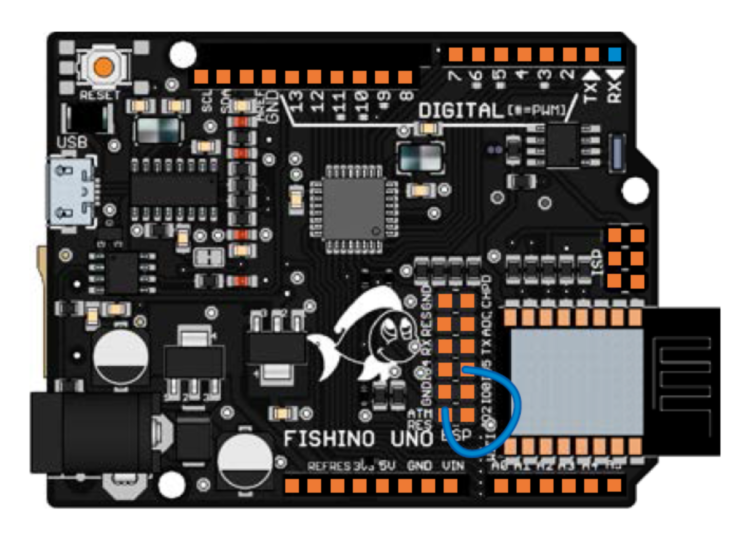
Before getting to the heart of OTA (Over the Air) programming, we must make a distinction between 8-bit versions and 32-bit versions of our Fishino board; in fact, while we don’t need any connections for the latter, thanks to the internal ISOs and the PIC used, for the 8-bit versions we have to “sacrifice” one I/O on the Wi-Fi module, the GPIO5 to be specific, that is to be connected to a reset input which was originally designed just for this purpose, the ATM-RES pin.
Connection with Fishino Uno board is illustrated in figure The same connection must be made on Mega and Guppy models, taken the Wi-Fi module orientation as a reference.
As we already mentioned, you don’t need to make any additional connection for 32-bit boards (where by the way there is no ESPCONN connector).
Installation of packages and Arduino IDE
The next step, already known to those who use the 32-bit model, is the installation of Arduino IDE in a package containing the definition of Fishino boards and related programs which are needed for wireless uploading.
Package installation is really simple; first of all you must open the setting dialogue in the IDE (open the File menu and give the Settings command) as shown in figure .

Note the item “additional URL for board manager”, with the text box on its right in the button; by clicking on it, you will see the dialogue shown in the figure.

As you can see from the image, in this window you can add more lines containing the URLs with the necessary packages for boards not originally provided by the IDE. In this case we have added the URL related to the Fishino package, which is:
http://www.fishino.it/arduinoide/package_fishino_index.json
After adding it, all you have to do is click on the OK button to go back to the preview screen, where you will now be able to see the added line with the URL.

In case you already used this function, perhaps to install hardware such as boards based on the WiFi ESP8266 chip, in the previous window you will find one or more lines already inserted, to which you will have to add our work path. By clicking on OK, we accept modifications and go back to the IDE’s main screen.
Once added the URL, you must open the board’s manager, by choosing the menu command Tools/Board>Boards manager…; If you have many boards installed it is possible that the above-mentioned Boards manager is outside your field of view, in this case, all you have to do is move the mouse pointer towards the top of the menu until you can locate it.
As you can see, there are two items at the end: Fishino_PIC32 and Fishino_AVR; Fishino_AVR is already installed, while Fishino_PIC32 is not yet installed; in your case, both will be shown as non-installed, so you will see the install button next to them.
Now you select the item you want, that is Fishino_AVR 48 bit models and Fishino_PIC32 432 bit models and click on the corresponding installed button. Of course, you can install both packages in case you have two different kinds of boards.
As for the AVR item, installation is really quick, while the PIC32 requires a bit more time since there are many packages to download; however, this takes place only the first time or when there are major package updates.
As for the version, always choose the latest available, which by the way should be the one proposed in the textbox, although checking once more doesn’t hurt.
And now, the only downside of the whole operation, the IDE has a bug that prevents (at least, up to the current version, which is the 1.8.2) a smooth package update: if you update it to a later version, more often than not you will get an error like “unknown Fishino board” during compiling.

Therefore, if such a problem arises, we suggest you follow the procedure below.
- Uninstall the two packages, clicking on the Remove button that will replace the Install button; if you can, select both versions available in the checkbox and, if the remove button appears, uninstall those as well.
- Close the IDE (this passage is mandatory).
- Open the arduino15 folder, which can be found in different paths based on the operating system:
• /home/username/.arduino15 for Linux OS;
• C:\Users\username\AppData\Local\Arduino15 for Windows 7, English version;
• /Users/username/Library/Arduino15 for Mac OS;
In case you have a different version of the operating system you must look for the folder which will always be called arduino15, with or without ‘.’ In front of it, and with the first letter in lowercase or uppercase. - Enter the subfolder staging/packages, and eliminate all .zip files which name contains the word Fishino;
- Go back to arduino15, entered the subfolder packages and delete the ‘fishino’ folder.
- Go back to arduino15 and delete the .json files containing the term Fishino.
Once completed the above passages, you will have completely cleaned the IDE from the packages (both old and new!) You will have to repeat the installation all over again.
Downloading the new FishinoFlasher
Fishino’s firmware updates have also been modified to handle settings for wireless sketches upload. In particular, as we will see shortly, it allows to set the board’s name (as it will be visible by the IDE), and the TCP port used for the upload.
The application can be downloaded as always from the Download page on the website www.fishino.it
There is (exclusive news) a better version requiring the XQUARTZ package for MAC OS/X
The application doesn’t need installation, all you have to do is decompress the archive, put it in a folder and execute it by double-clicking with your mouse.
FishinoFlasher opens with the screen shown in figure.

Compared to the previous version, you can notice the tree items related to remote programming that will appear only if you choose a firmware from version 5.0.0 onward.
The first item allows you to enable or disable to function, while the other two contains, respectively, the board name as it will appear on Arduino’s IDE and the TCP ports used.
For the first one, we suggest to use a unique name for each board available, the limitation is that you will only be able to use often alphanumeric characters, spaces and ‘.’ (The first character must be a letter). Max length is 45 characters.
As for the TCP port, we chose the number 7777S preset; you can always use any available port. Anyway, we suggest choosing high numbers, since low numbers are often reserved for operating system functions.
As for the functioning of FishinoFlasher, we refer you to the articles published in the previous issues (e.g. in issue # 210 where we described how to use the Fishino 32 board) or to the reference website (www.fishino.it), where you will find all necessary instructions.
Once remote uploading is enabled, and a name for the board has been added as well as the port number to use for the operation, you will be able to update firmware and start using the board with the new functionalities.
How to use remote programming
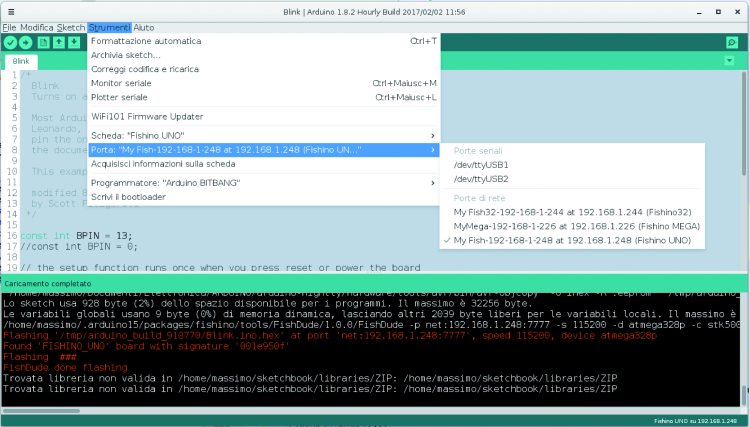
By launching the IDE you will notice right from the start that in the menu for choosing the serial port one or more network ports will appear, based on how many Fishino boards will be detected by the system.
Please note one detail, the Wi-Fi module connects to the last access point used or, in any case, to a limited number of “known” access points; this means that at first use (a board never used before and/or after firmware updates) the module won’t be able to connect. To solve the issue you have to load any sketch using the Wi-Fi by connecting to the access point that you want to use later for the access; you have to do this to the traditional way, over USB.
The boards are listed in the IDE window as shown in figure.
As we can see on the screen, they are shown in this order:
- board name as we inserted it in FishinoFlasher;
- a dash;
- current board IP;
- the word ‘at’ and the board’s IP once more between parenthesis;
- finally, the module board is shown (Fishino Uno etc.).
The “double IP” was necessary in order to avoid another bug of Arduino’s IDE causing it, once it detects a network card, to not able to replace it with another with the same name; therefore, we chose to “attach” the IP to the board’s name in order to make it unique and allow to use dynamic IP’s (which can therefore change between one sketch and the other) without having to close and open the IDE again for doing it.
In fact, you will see that by turning the board off the port will disappear (after a few seconds) and reappear once you connect the board again, using the same IP or with a new IP based on the sketch uploaded.
In order to upload the sketch over Wi-Fi, all you have to do is select the right port; in this regard, please pay attention to the board’s name: if you choose Fishino Uno as board type, you will have to choose a Wi-Fi port which name has Fishino Uno in parenthesis. Same goes for possible other types.
Conclusions
OTA programming of Fishino is now possible because the Wi-Fi module and its firmware execute controller programming via direct hardware, therefore using the ISP connector’s pins that were designed for this purpose, as if it was an external programmer connected to the board; so we can skip the procedure via the boot-loader contained in the controller, which is actually loaded with every Wi-Fi reprogramming this means that, even if your bootloader gets damaged (it happens sometimes) you will still be able to load sketches over Wi-Fi and, when the first sketch is uploaded, the original bootloader will be uploaded too once again.
One last note: the serial monitor does NOT work when connected with Fishino takes place over Wi-Fi; this is not due to the impossibility to “make it happen” on the Fishino side, but to an IDE limitation, which considers all remote connections of the serial monitor as SSH connections to an Arduino YùN.
In case Arduno’s IDE will be upgraded in the future in this regard, we’ll add that feature too.
So keep in touch on our website o our magazine, on the reference website of Fishino project, or on the Facebook page
From openstore
