
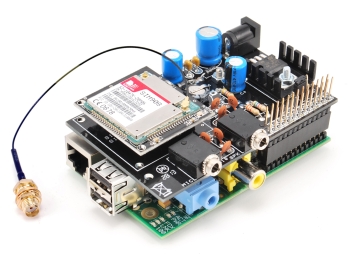
A few days ago we showed you how to use the Raspberry GSM shield using the arduPi library created by Libelium and available under the GNU General Public License that you can download from Cooking Hacks.
Now we’ll see a further functioning mode, one that allows you to interact directly with the serial port using the “CuteCom” program for TTY emulation.
Since we set the Raspberry Pi to be managed remotely via the SSH protocol, we will continue in the same way, in order to use the TTY emulator accordingly.
Installing the TTY serial emulator
As said before, we’ll use the “CuteCom” Program to manage the serial port. We can install it with the usual apt-get commands:
apt-get update
apt-get upgrade
apt-get install cutecom
Installing Xming
Xming is an open source X server for Windows that allows you to view applications running remotely on a GNU/Linux system on the desktop of Windows PC.
Note that it’s not the entire desktop that is transferred but only the graphics pertaining to the single application, that can be placed anywhere on the desktop of your local PC, along with the usual app windows or other remote systems. Fascinating functionality until you don’t try to use linux commands on windows or vice versa.
X is a client/server app that allows you to export the graphical front-end application running on a machine onto a different system. It relies on SSH protocol and Putty (or Kitty) that we saw earlier.
The client/server paradigm of X is often confusing: the Windows desktop of the user actually runs the “server” used by the application programs (clients). X provides a visualization service and, in this, it acts as a server, while the application program (which can also be operated via remote connection) acts as a client.
The communication protocol between the server and the client operates transparently to network connectivity: both can reside on the same machine or on different machines, with different architectures and operating systems. They can also communicate securely over the network using an encrypted tunnel (SSH is often used).
The X server can be:
-
A program that controls the video output of a computer
-
A dedicated hardware component (the so-called X terminals: computers equipped with the necessary hardware to run an X server, designed to display applications running on special application servers)
-
An application that displays data on a window of another window system.
You can download Xming from: http://sourceforge.net/projects/xming/ and install it like any other Windows application.
Our preference is that of using the XLaunch program, that you could find it in the Windows menu under Xming, which allows us to launch remote how many individual applications you want in separate windows. Once Xming is installed, launch CuteCom remotely on the desktop of your PC. Then open XLaunch.
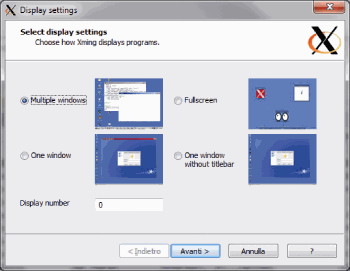
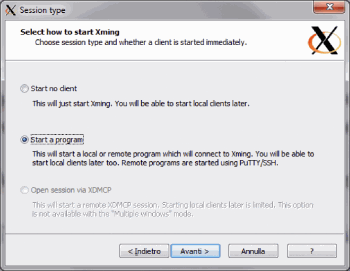
Select “Multiple Windows” and “Next”. In the next screen select “Start a program” and then still “Next”. Now select “Using Putty”.

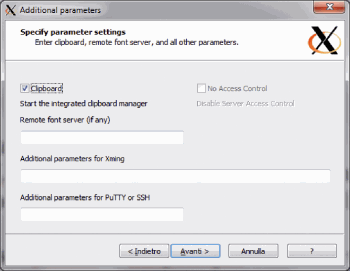
In the Start Program field, type “cutecom”, insert the IP address of Raspberry Pi in “Connect to PC”. In the “Login as user” field type “root” and then put the password in the password dedicated field. Click “Next” and “Next” also on the following page. We come to the last page where you can confirm by clicking “Finish”. Then click “OK” and a “NO” in the messages dialogs you get and wait.
Manage the GSM module from the TTY emulator
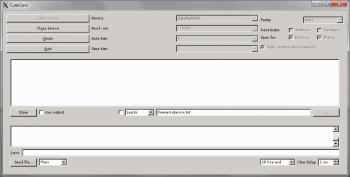
The CuteCom window is divided into functional “zones”. At the top you can find the fields and buttons to configure, enable and disable the serial communication, below you’ll see the text field to enter the commands to be sent on the serial port, an area with the commands history and some configuration commands that allow you to:
-
Enable and disable a log
-
Add control characters such as end of line
-
Transmit and/or receive data in ASCII or hexadecimal format.
Finally, at the center we can see the area where the incoming from the serial port messages are highlighted.
The first step to do is to configure the device name (and path) of the serial port to which we want to connect, in our case:
/dev/tty/AMA0
Configure the port setting 115200 for speed, 8 for the character length, 1 for the “Stop bit” and “none” for the parities. Don’t select any options for the handshake. Check instead both the check boxes to be open in reading and writing. Leave the “Hex output” and “Log to” unchecked. In the text field next to “Send file” select “Plain”, in the penultimate field at the bottom right select “CR line end” and the last one set “1 ms”. Well, we can start now. Before all, ensure that the SIM module is on and connected to the mobile network by checking that the LED flashes slowly. Otherwise start it up by running: /GSMOn
Now press the “Open Device” at the top left of the CuteCom dialog. If everything is ok we will see the configuration area on the top turn gray and we will be able to begin to send commands by inserting them into the field below. Let’s start with “AT”, by typing it in the field provided and by pressing the “Send file” button: we should receive an “OK”, otherwise it may be that the module is not in the command mode yet. In this case activate the “Command Mode” with the “+ + +” command. By referring to the commands manual for SIM900 and SIM908, we can try the effect of each, ranging from module configuration to operating commands execution. Let’s see some examples: connect a powered speaker to the audio output and a microphone to the MIC input or use a headset with separate plugs. Let’s try to place and answer a call.
Let’s first give the command:
AT+CALM=0
Which allows you to activate the alarm. You can also set a jingle (check the manual). Now enter the command:
ATD <phone number> followed by ;”
(eg ATD +1 ……. 7;)
When the called party accepts the call we can start the conversation. To stop the conversation just send the ATH command.
If an external phone calls us, we will hear the ring tone in the speaker and, for each ring, the message “RING” will show up in the central area. To answer the call send the ATA command.
To send a text message enter the following sequence of commands:
AT+CMGF=1
AT+CMGS=”<phone number>”
Remember to include your phone number between quotation marks. Wait for the return message:
“>”
Type the text of the message, for example ”SMS test”, this time without quotes, then choose the penultimate field at the bottom right “Hex Input” and enter:
Ox1A1D0D and enter, as it’s equivalent to CTRL -Z to close the SMS.
To continue to remember to reset the penultimate field at the bottom right to the value “CR line end.”
To see the list of SMS messages received and not yet read:
AT+CMGL=”REC UNREAD”
And you’ll get:
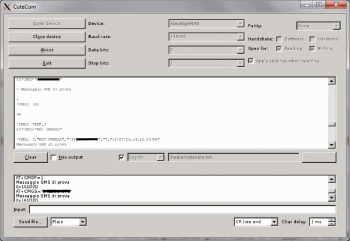
+CMGL: 3,”REC UNREAD”,”+1……..7″,””,”13/07/23,14:29:24+08″
SMS test
where “3” is the index of the message. We can read a single message, using the index, even with the command:
AT+CMGR=3
Finally, if you installed a SIM908 module equipped with GPS, you can try to read the position (if outdoor) using the command:
AT+CGPSINF=0
You will get a string composed from the fields mode, latitude, longitude, height, date/time, TTFF(TimeTo FirstFix),number of satellites , speed and direction of the compass.
You can then express your creativity and use the native commands to prototype functionality which you can then encode in structured programs.
Enjoy!


I have done evertything clearly and area on the top turned gray ,but when i wrote ‘AT’ to commant line it returned nothing,please help me