
Mike MacHenry built a project that’s pure pi(e) for Pi Day. Introducing: the Pie Pie Chart (powered by Pi).
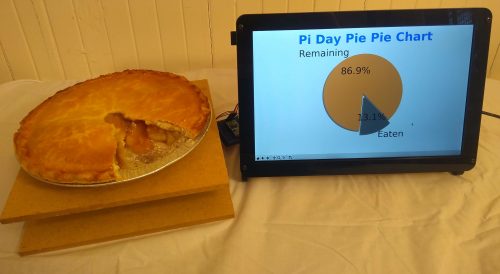
This is a simple little project, the sole purpose of which is to make a pie that outputs visual data to tell you how much of it’s been eaten. Which it does admirably, as you can see in the image above.
Mike’s made the code and instructions available under the MIT licence, so I’m just going to paste his text here, because it’s perfect and we can’t improve on it. (You can check it all out on his GitHub too if you like.) Thanks, Mike!
Materials needed
- 2 cups all-purpose flour
- Load Cell — 5kg
- 1 tablespoon sugar
- Load Cell Amplifier — HX711
- 1/2 teaspoon salt
- Raspberry Pi 3 Model B+
- 3/4 cup shortening
- 11.1″ LCD Screen
- 1 egg, lightly beaten
- 8GB microSD card
- 5 cups fresh or frozen unsweetened raspberries, thawed
- Tiny breadboard
- 1 tablespoon white vinegar
- Hookup wires
- 1-1/3 cups sugar
- Two 8″ × 8″ × 1/8″ pieces of wood or plastic
- 2 tablespoons quick-cooking tapioca
- Two 4M × 10mm screws
- 2 tablespoons cornstarch
- 1 tablespoon butter
- Two 5M × 10mm screws
- 1 tablespoon sugar
- Two 4M spacers
- 1 tablespoon 2% milk
- Two 5M spacers
- 3 tablespoons cold water
Tools needed
- Rolling pin
- Two large mixing bowls
- Soldering iron
- 9″ pie plate
- Refrigerator
- Oven
- Wire stripper
- Set of measuring cups and spoons
Instructions
- In a large bowl, combine the flour, sugar and salt; cut in shortening until mixture resembles coarse crumbs.
- Download and install Raspbian to an SD card and boot your Raspberry Pi following the instructions on their website. This project has been tested on version 2018-11-13-raspbian-stretch-full, but most any version should work.
- Combine the egg, water and vinegar; stir into flour mixture just until moistened.
- Drill holes in each 8″x8″ sheet to support load cell.
- Divide dough so that one ball is slightly larger than the other; wrap each in plastic wrap.
- Secure load cell between sheets separated by spacers.
- Refrigerate (dough, not load cell) for 30 minutes or until easy to handle.
- Use the breadboard and wires to connect the HX711 load cell to the Raspberry Pi. Follow this tutorial and test to make sure you’re getting a reading using their example script.
- Meanwhile, in another large bowl, combine the sugar, tapioca, cornstarch and raspberries; let stand for 15 minutes.
- Download this repository to the Raspberry Pi.
git clone https://github.com/mmachenry/pie-pie-chart.git - On a lightly floured surface, roll out larger ball of dough to fit a 9″ pie plate. Transfer dough to pie plate; trim even with edge. Add raspberry filling; dot with butter.
- Change working directory to the project code.
cd pie-pie-chart/ - Roll out remaining dough to fit top of pie; place over filling. Trim, seal, and flute edges. Cut slits in top. Brush with milk; sprinkle with sugar.
- Install dependencies.
pip3 install -r requirements.txt - Bake at 350° for 50-55 minutes or until crust is golden brown and filling is bubbly. Cool on a wire rack.
- Run script and place pie on scale when prompted.
python3 pie_pie_chart.py
The post Pi-powered pie-consumption pie chart appeared first on Raspberry Pi.
