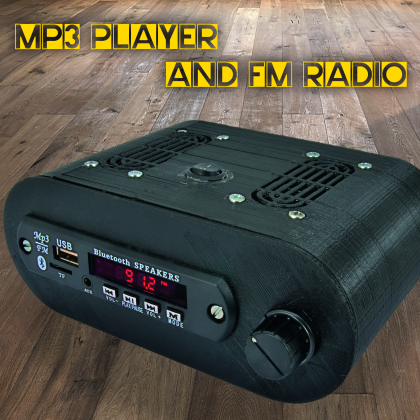
An audio file player based on an MP3 module with FM radio, Bluetooth and remote control; a 10 V stereo output and two speakers are used for the listening. The device can even work via outlet or using two 3.7 V rechargeable lithium batteries.
We all know we can find any kind of loudspeakers with MP3 players and Bluetooth on the market in every shape and size, waterproof, for underwater use, with various degrees of power, but especially at very low prices, so much so that a self-made solution is discouraged; however, we also know that the satisfaction to create something by ourselves is priceless. The project we propose in these pages is not aimed at competing with the countless commercial products but on the contrary, to give a starting idea to the electronic experimenter… The maker, as they say nowadays, pushed by the passion to invent and create devices using their own hands. The audience of electronic enthusiasts don’t really love to buy something already made that is powered and works without being able to put their hands on it, so they often prefer to spend a little more in order to create a device on their own terms and have the satisfaction to say “I make that and it works”, instead of having everything ready-made. Here, we decided to create the MP3 player described in this article just for that audience.
Everything is already built and tested (with the exception of the battery charger circuit that we are going to describe shortly): all you have to do is interconnect them as explained in the next pages.
The heart of the project
The starting base is the audio file player module composed of an MP3 player with built-in FM radio, wireless Bluetooth interface and remote control; this product, equipped with the dedicated front cover, is already capable to autonomously provide the audio signal that is going to be amplified and could be, for instance, send to the AUX input of the hi-fi car system or a normal car stereo. To be able to use loudspeakers to listen to the music, we have added a 10 W stereo amplifier to the module and to 3 W speakers; everything is powered by 12 Vcc (through network adapter or car-type battery) or using 2 3.7 V rechargeable lithium batteries, connected in series.
Using 3-D printing, we also created a case (160 x 110 x 61 mm) for our MP3 player; we have once again used Google Sketchup to design it and a 3-D printer to create it. The container is composed of three pieces: a central block, a front panel and a rear panel.

Music player with radio
The whole project is based on the integrated player module (2846-MP3FMBT), which, for what concerns the audio files decoding, is capable of reading MP3, WMA and WAV formats (Microsoft Windows audio files); this module is an electronic circuit equipped with a front cover you can use to access the command keys, besides a connector for USB pen drives and the slot for microSD cards. On the front panel, we also have the display that composes the user interface, along with the keys.
Fig. 1 shows the module and the sections in which its frontal panel is divided.
The MP3 player with FM radio is equipped with a superheterodyne radio receiver with digital sync covering all the frequency modulation radio spectrum, from 87.5 to 108 MHz. Channels are shown on the front display. Besides this, the module has a Bluetooth interface for wirelessly playing audio files from a smartphone (or another Bluetooth-enabled source), a USB Host port, a slot for SD cards (FAT16 e FAT32), a BF AUX input (to which we can connect, for instance, an external player or another external audio force), a front cover and a stereo audio input to connect to a board and a serial line output (to be amplified).
In the MP3 module, there is a built-in infrared receiver for the hand remote control included; the remote control is useful for home applications, while for mobile purposes (to use in the car or in the basket of a bicycle or for a picnic) we can use the rapid access keys found on the front panel. On the front panel, we have the module control keys (Play, Pause, Volume + and -, forward, rewind, mute, etc.), which constitute the user interface, along with the display.
The MP3 module requires a power voltage ranging from 5 to 12 Vcc.

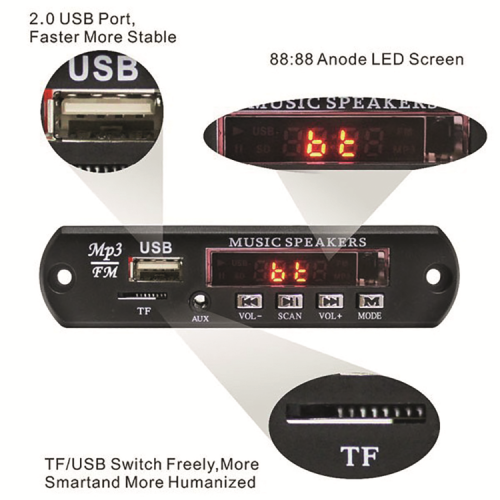
Fig. 1
Amplifier and loudspeakers
Since audio outputs of the MP3 player are not amplified, we need a power amplifier in order to listen to the sound with loudspeakers; because we are going to use three 3 W, 8 ohm speakers, we recommend to use in equal power amplifier such as the class D 3+3 W micro amplifier. The problem with this amplifier is that it must be powered using 5 V, while our power source is 7.4 V with rechargeable batteries and 9 – 12 V with external power. A solution may be to use a voltage regulator or a DC/DC step-down converter to adapt the input voltage to the 5 V power of the amplifier.
Instead, in order to make the circuit simpler, we chose to change the amplifier and went for the PAM8610 module, which is a class D terminal capable of providing 2×10 watts on 8 ohms, with standby consumption of around 20 mA, 90% efficiency and a frequency response ranging from 20 Hz to 50 kHz. it can be powered using the voltage ranging from 7,5 to 15 Vcc (recommended 12 Vcc). Fig. 2 shows the BF amplifier and its connections.
The circuit is equipped with a potentiometer for regulating volume, two jumpers (one for mute and the other one for the power switch), besides the terminal block for the speakers and input stereo jack.
Two 3 W, 8-ohm broad range of all loudspeakers take care of the listening, loudspeakers born for LCD TVs. The frequency response of this small loudspeakers ranges from 200 to 10,000 Hz, with a sensitivity of 86 dB (1W/0,5m). Because the amplifier can output a higher power than loudspeakers can withstand, you must set the volume using the dedicated keys of the player (VOL+ and VOL-) or avoid turning the amplifier volume too high.
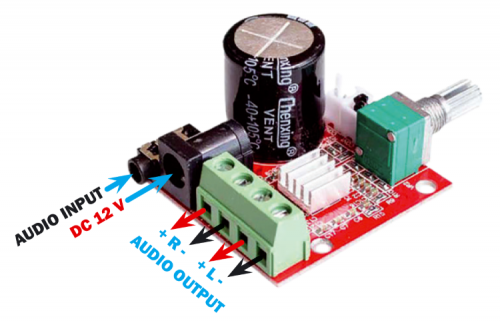
Fig. 2
Power source and battery recharger
The system is powered by two lithium batteries connected in series, which are recharged whenever external power is applied (through a 12 Vcc adapter) through the regulator of which you are going to see the circuit diagram in these pages, which also takes care of powering the device. The battery charger refers to the MCP73844-840I/MS IC by Microchip, capable of recharging the two 3.7 V elements connected in series; the circuit has a switch to activate/deactivate the output voltage for the load, a recharged status LED for the accumulators (LD1, connected to pin STAT of the U1), connector for power input (+/- PWR) from 9 to 12 Vcc and a connector for the 3.7 V Li-on batteries (BAT). The input/output pins for power and battery are also available through a 6 contact strip connector. Tej components to be mounted are SMD, therefore a bit of skill is required, besides a fine tip soldering iron, some 0.5 mm tin alloy wire and flux paste, to spread on the pads before applying the components (using tweezers) and solder them. A magnifier will help you check if the components are all in the right place and to check for the presence of tin smears could result in a short circuit.

3-D printed case
As previously mentioned, the case has been designed using Google Sketchup, we opted for this solution because we wanted to create it according to our specs, instead of adapting our projects to existing containers. It is composed of a central body for the grills of the two loudspeakers, a hole for the on/off switch and for holes for the fixing screws of the two panels.
The front panel has a cavity to insert the MP3 player and a hole in which we are going to insert the potentiometer of the mini amplifier, attached through the potentiometer nut and on which we are going to insert the black knob for regulating volume. The rear panel has three holes: one for inserting the DC plug for the external power source and the battery recharging, one for the 3.5 mm stereo jack for the audio input and one for the FM radio antenna wire. As for the antenna, we chose a 75 cm wire segment, which is great for receiving many radio stations. If you want, you can use an FM radio-specific telescopic antenna.
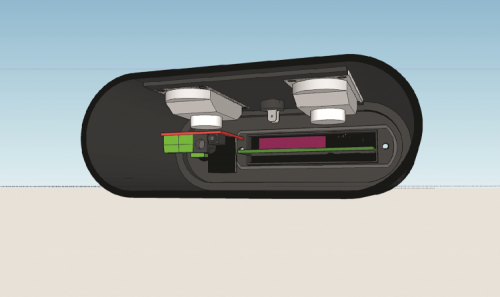
Fig. 3
Once printed the body of our MP3 player and the two panels (front and back) we can begin to mount the various parts in the following order.
Take the round panel switch and weld two wires (red recommended) long enough, now insert the switch in the middle hole of the player body, it should be able to fit without any problems. Take the two 8 ohm speakers and weld two wires (better if different colour for + and – or use a shielded cable), insert the speakers from inside the player body, insert the four screws to fix them and the nuts.
Now take the front panel, insert the MP3 player into the rectangular slot and fix it with two screws and nuts. In the hole at the side we insert the potentiometer of our 2×10 watt amplifier, this must be inserted with the component face downwards, ie the bottom of the body printed in 3D of the reader (see photo), screw it to the panel with its nut, now take the knob for the potentiometer and insert it to check that the potentiometer is turned to the left, so that the white dot on the knob is positioned almost all the lower left, so when you turn the knob to the right the volume will rise.
Let’s move to the rear panel: take the battery holder and insert it into the housing, insert a screw and let it pass through the hole of the battery charger board (with the component side down as shown in the prototype photos) and then screw a nut to lock the whole. Those who do not want to use rechargeable batteries can skip this step. Then take the DC socket from the panel and insert it into the larger hole and screw the nut; we do the same with the 3.5 mm audio jack. At this point, we can make the connections as shown in Fig. 4.
Once the set is wired, we can tension and verify that everything is working properly.

Fig. 4
From openstore
Rectangular Speaker – 3W / 4 ohm -70 x 30mm
Audio Stereo Amplifier Board Dual Channel – 2×10 watt
MP3 player with FM radio, USB, SDcard slot and remote control
7.4V Li-Ion or LiPo battery charger

Radio station equipment consists of a broadcast audio processor, microphones, and microphones. Often, the audio processing is the last piece of equipment before the transmission. These devices typically contain special multi-band compressors and other “magic features” to improve the quality of the audio. Most stations want to be as loud as possible, and most large manufacturers of Audio Processors will claim that theirs is the best. For smaller stations, fully functioning radio station equipment should be sufficient. The audio processing equipment can vary greatly in price and quality, but most radio stations are looking to be as loud as possible.
this radio is very nice and good long last