A small wind generator which can be installed on a balcony or on the roof, capable of providing electricity to store in accumulators in order to power, for instance, domestic utilizers such as the video surveillance system when we are away from home and we cut off the main power.
Second only to solar power and, to be specific, dependent on it, wind energy has been taken advantage of for a long time both in big wind farms and in small installations, sometimes integrated into buildings and urban design. Compared to solar energy, harvested in photovoltaic systems and thermal solar systems, wind energy is not as consistent, but it can have spikes that are particularly intense; however, its lack of consistency imposes to choose particularly windy geographic areas for large-scale wind turbines installations, however, it is also possible to consider the lack of consistency as an easy problem to solve in small installations designed as energy-harvesting solutions, i.e. to recuperate energy that would be otherwise lost.
This is where small wind turbines come into play, which are for instance placed in the countryside to power small water pumps and other utilizers that cannot be directly connected to the main power grid, as well as other utilizers integrated in the urban design (for instance, placed on top of street lights) and inside the building. This kind of generators acts as chargers for one or more batteries, in which excess energy is stored to be used for instance at night to power streetlights. The project we are going to illustrate was born within this context and it has been designed to produce a small amount of electricity to power low-absorption devices, by storing energy in a battery or group of batteries to guarantee power continuity even when the wind is still or weak, or in order to accumulate electricity by day and power LED lights in the garden or patio during the evening or night.
Unlike a photovoltaic system, which requires many hours of light for maximum efficiency (being, therefore, more efficient in springtime or summertime), a wind turbine can be used all year long, during the winter and at night, because the wind has no specific times or seasons.
The project
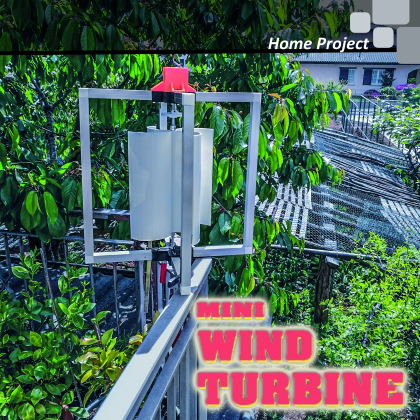
The wind generator we are proposing is not the classic propeller-type that you see on the roofs of houses or, on a larger scale, on hills and vast planes, but a variant called “vertical axis wind turbine” which distinguish itself because the rotor rotates horizontally and the axle is vertical. These wind turbines are very practical because they are fit to small spaces and therefore to be installed on balconies, terraces etc. and they are usually low-power generators, although, in some installations, we can make use of higher-powered systems than those used in typical vertical wind turbines for domestic or city use and for energy harvesting in general.
The conversion unit from mechanical energy on the wind-powered rotor to electric energy, which is the final goal of our project, is a brushed DC electric motor, with a power of 55 W, which can be powered up to 120 Vcc and characterized by a rotation of velocity of 2500 rpm (Fig. 1).
It is understood that, since the motor will be used to generate electricity, we would not have to power it but connect it using two wires in order to gain electricity from it, which will be produced when the wind will make its shaft rotate.

Fig. 1
We chose this motor due to the very low resistance opposed to the shaft rotation, so much so that we can make it rotate effortlessly just by lightly touching it, still obtaining a passable output voltage.
Applications for this engine are many since it can also work as a dynamo; in this case, the simple rotational movement of the shaft allows to produce electricity, as well as generates mechanical movement (rotation of the shaft) if externally powered. It is, therefore, possible to realize a crank-powered or pedal-powered generator, as is the case with bicycles.
Out of the many possible applications, we chose to create a small vertical wind turbine, as you can see from the diagram in Fig. 2: the main structure (i.e. the frame) has been made with square aluminum tubes with 23.5 x 23.5 mm square section, cut to measure (four are 43.5 cm in length, seven are 19.5 cm long and one is 16.5 cm long, placed on the engine side) and held in position with dedicated plastic corners.
The bars, the electric engine, the bearings and the threaded bar have been assembled using parts designed with Google SketchUp and printed in ABS using a 3-D printer which, in our specific case, is the 3Drag printer.

Fig. 2
Kinematics chain of the generator
As for the rotor, we have tried two solutions: for the first version we have used a PVC drain pipe with a section of 125 mm (Fig. 3) cut into four 300 mm long sections to act as propellers (Fig. 4), besides a threaded M8 bar to which we have applied a spur gear with a diameter of 67 mm and 44 teeth (drive gear). The propellers have been then fixed to the threaded bar (used as transmission shaft) through ABS supports made using a 3-D printer, then the threaded bar has been fixed to the frame using four 8 x 22 x 7 mm bearings.
A pinion (working as a drive gear) with a diameter of 16 mm and 10 teeth is fixed to the motor shaft and interlocked with the spur gear to couple the motor and the rotor of the wind turbine. The bigger spur gear, being in contact with the pinion’s teeth, allows us to make our motor shaft rotate, generating a voltage that is directly proportional to the speed of the wind. In the rotor we can, however, replace for parts of the PVC drain pipe with as many aluminium, steel, copper sheets, keeping dimensions at 300 x 220 x 1.5 mm, curved on the longer side to be inserted in the dedicated ABS supports.
Being unsatisfied with the first version, we have designed a variant, once again using Google SketchUp, which involves only one block with the wind propellers, i.e. a monoblock rotor; this has been made by printing the ABS router using the new 3D4040 printer (capable of producing 3-D prints up to a maximum of 40 x 40 x 40 cm). The solution allowed us to sensibly decrease the necessary parts to build our vertical wind turbine making it easier to assemble, keeping the rotor block more solid and stable over time.
Our wind generator, as you may notice from the photos and quotations in Fig. 2 and Fig. 3, is a small one, because it is designed to be installed on a balcony, but nothing stops us from building a version with a bigger rotor and use a more powerful motor in order to generate electricity, as long as it is a brushed DC motor.

Fig. 3
The energy storage system: energy without wind
It’s a known fact that the main issue with renewable energy is not just the power generated, but mostly the possibility to store it in order to use it later, when there is no wind (in our case) or when there is no sun for photovoltaic systems.
Our wind turbine suffers from this problem as well, and in order to solve it, we decided to store the energy produced by using batteries and a charge regulator.
The batteries capacity must be chosen accordingly to how much energy we want to store. The system is composed of a charge regulator, one or more batteries and, in case we want to power 220 Vca devices, an inverter capable of converting direct voltage (12/24 Vcc) in alternating voltage (220 Vca).

Fig. 4
Construction
As previously mentioned, the frame sustaining the motor and the propellers are built using square aluminium bars (23.5 x 23.5 mm). To build it, we are going to use four 435 mm bar sections, seven 195 mm sections, one 165 mm section (slightly shorter than the other sections because it is on the motor side) and eight plastic corners that can be found on the market specifically for this kind of aluminium bars.
Once we have all the necessary parts, we are going to insert the plastic corners in the aluminium bars, using a rubber hammer and tapping them slightly, in the correct sequence, in order to interlock them. Now we are going to assemble the ABS parts, created using a 3-D printer, then we fix the bearings, we fix the cross ABS component on the bottom side of the frame, we insert the aluminium bars. We insert a self-locking nut at around 5 cm on one hand of the threaded bar, we insert an M8 flat washer on the top of the bearing, then we pass the threaded bar through the M8 flat washer and the bearing.
Then, we push the threaded bar out of the bottom side of the bearing, just enough to insert a washer and a self-locking nut, we fasten the two self-locking nuts and insert the top half of the ABS cross through the threaded bar and, after that, we fix it to the frame by inserting the bolts in the dedicated holes, and then fastening the bolts.
Now we can insert a self-locking nut on the threaded bar, driving it to the bottom, at around 5 cm from the ABS cross.
Now we insert our printed, ABS wind turbine into the threaded bar.
In the top section of the turbine, we place a self-locking nut and we fasten the two nuts so that they block the turbine on the threaded bar. We are going to insert another self-locking nut on the threaded bar, then we insert the bigger spur gear and another self-locking nut. We fasten the two nuts to fix the bigger gear on the threaded bar.
Now we take our ABS component shaped like an elongated cross, we insert it so that the longer branch is facing towards the shorter aluminium bar. We drive the threaded bar through the bearing. We take the ABS body with housing for the motor, and after inserting and fixing the motor, we place everything on the top part of the frame, we place the bolts in the dedicated holes and fasten them.
We place the smaller spur wheel on the motor shaft and fix it. At the top and on the threaded bar we insert an M8 flat washer and another self-locking nut, we fasten it so that it is flush with the bearing. We close the top part of the motor with the ABS lid.
The structure is now complete: test the propeller to make it turn by hand to see if everything is assembled correctly, the rotor should turn without much friction, dragging the gears and the shaft along.
To check if everything works, you can connect a tester, an electronic voltmeter (as shown in Fig. 5, where you can see the 2.5 – 30 V mini voltmeter code 606-MINIVOLTROSSO, sold by openelectronics), to the generators output, i.e. the two wires of the electric motor; you can also use a 55 W, 24 V lightbulb, which should light up when you make the router spin fast with your hand, or if you blow on it using compressed air.

Fig. 5
The storage system
The energy produced by the wind generator is limited by the energy produced by the motor when used as a dynamo, therefore they can satisfy the needs of utilizers that don’t require more than around 50 W. However, if the energy is not used when produced but stored, you can make use of an instantaneous power that is remarkable and tens of times higher than the nominal motor/generator power; the energy can be stored in a group of batteries, by placing a dedicated charge regulator like those used in photovoltaic systems.
In our experiments with the wind turbine we used a charge regulator for 10 A photovoltaic solar panels sold by openelectronics, with product code 2846-SOLAREG10; it is a charge regulator for photovoltaic applications controlled by a microcontroller, equipped with LCD display and capable of displaying input voltages from 12 to 24 V, automatically switching from one value to the other.
This device allows to provide the right current value to the batteries and protect them from excessive charge or discharge and prolong their work life as much as possible.
The wiring diagram of the storage system and the voltage regulator, the wind turbine and the battery is recapped in Fig. 6.
the regulator stabilizes the current recharging the batteries, especially in order to prevent going over the maximum values allowed (although it is not our case, given the weak current the motor can provide) and which would compromise its integrity; it is also used to stabilize the voltage provided to the battery by compensating the generators output fluctuations, which are not implausible both in photovoltaic panels and wind turbines. Notice that, although the motor used for the generator is a nominal 120 Vcc motor, it actually doesn’t output more than 30 V, both because it doesn’t reach the corresponding rpm and because its power is low and the voltage at its terminals drops sensibly when a load is connected.

Fig. 6
The regulator we picked goes automatically in protection mode and stops when the load current exceeds the regulator’s range; furthermore, in order to prevent the battery from discharging completely, the regulator would automatically disconnect the load at a preset voltage which cannot be under 10.7 V for the battery and 12 V and 21.4 V for the 24 V batteries.
The charge regulator we selected has the following features:
- PWM charge mode;
- battery protection from accidental polarity inversion;
- protection mode in case of short-circuit;
- temperature compensation;
- adjusting of charge and discharge parameters;
- overcharge protection;
- input voltage: 12/24 V;
- max current: 60 A;
- max input voltage: < 50 V;
- disconnect voltage:
– full battery: 13,7 V (at 12 V) – 27,4 V (at 24 V);
-empty battery: 10,7 V (at 12 V) – 21,4 V (at 24 V); - reconnection voltage: 12,6 V (a 12 V) – 25,2 V (a 24 V);
- absorbed current without load: <40 ma;
- voltage drop: <170 mV.
The charge regulator must be connected, along with the input, to the two wires coming from the motor and the output must be connected to the battery, which must be a 12 V battery type; given the low output current value, there is no need for big capacities; 40 Ah will suffice.
Conclusions
The mini vertical wind turbine is a perfectly working model of wind generator for many applications, mainly home-scale applications; in these pages we have explained its purpose and how it has been designed and developed, laying a foundation for any kind of evolution for those of you who want to try experimenting with wind energy.
The model is perfectly scalable, with all due precautions, with an interesting potential in terms of power; of course, the mechanics must be customized to the weights and especially to tangential forces that the frame and particularly the shaft or the ground fixing would have to withstand from the wind when the resistant surface of the rotor propellers is increased.
You have the choice to take advantage of the wind turbine as it is or make it better and modify it based on your needs, maybe by coupling it with an electronic current storage system, starting from the base project we proposed. Enjoy!
From openstore
Motor / Dynamo 120 Vdc – 55 watt
Solar charge controller – 10 A
Square aluminium tube 23,5 mm – 1 meter
