
Let’s build a system able to detect the movement of people and objects through a video camera and send alarm e-mails with Raspberry Pi 3 B +.
The so-called Computer Vision or artificial vision is a research sector that deals with how computers can interpret visual reality exactly like a human being; it uses complex algorithms capable of processing still or moving images, in order to provide indications and information on people and objects, just as our perceptive system would do.
From a practical point of view, the computer vision developed by a computer tries to automate the activities that the human visual system naturally performs. The application fields of Computer Vision range from environmental digitalization, the virtual reconstruction of places and scenarios, to the recognition and visual monitoring of objects and people.
Real-time image acquisition and processing of visual information usually require high-resolution optical devices, powerful computers and tailor-made software.
In this article we will present an application of OpenCV 4, that is the most recent release of the widespread free library, released under a BSD license (Berkeley Software Distribution), which allows the development of artificial vision applications, even very complex ones.
THE OPENCV LIBRARY 4
First, let’s see the main features of the official OpenCV website (https://opencv.org).
- OpenCV is now a C ++ 11 library and requires a C ++ compliant compiler. 11. The minimum CMake version required has been upgraded to 3.5.1.
- Many OpenCV 1.x API C’s have been removed.
- Persistence (storing and loading of structured data from/to XML, YAML or JSON) in the main module has been completely re-implemented in C ++ 11 and has also lost the C API.
- The new G-API module has been added, which acts as a very efficient processing pipeline engine for graph-based images.
- The dnn module has been updated with Deep Learning Deployment Toolkit from the OpenVINO ™ R4 toolkit. Consult the guide on how to build and use OpenCV with DLDT support.
- The dnn module now includes the experimental Vulkan backend and supports networks in ONNX format.
- The famous Kinect Fusion algorithm has been implemented and optimized for CPU and GPU (OpenCL).
- A QR code detector and decoder was added to the object module
- The high-efficiency DIS dense optical flow algorithm has been moved from opencv_contrib to the video module.
- More details can be found in the announcements of the previous versions: 4.0-alpha, 4.0-beta, 4.0-rc and in the changelog.
We recall that OpenCV is available for C ++, Python and Java interfaces and supports Windows, Linux, Mac OS, iOS and Android platforms. For our project, we will use the Linux / Ubuntu version optimized for Raspberry Pi 3B + and Python 3 interface.
The choice to develop a home automation project with OpenCV and the Raspberry Pi board is based on two simple reasons: the first is related to the compactness of the microcomputer, which can easily be housed in a small container, perhaps printed at home with the 3D printer, the second is related to the presence of the Raspberry Pi GPIO port to which we can easily connect control and alarm devices.
Finally, let’s add the ease of developing in a Python environment, which is already integrated into its operating system.
RASPBIAN STRETCH
Before installing OpenCV 4 we thought it would useful to try it on the most recent version of Raspbian. From the official website of Raspberry Pi (https://raspberrypi.org) we recommend downloading the image of Raspbian Stretch in the version “with desktop and recommended software”.
This version is strongly recommended because, among the many system improvements, there is also the Italian localization of the desktop and the linguistic support for some applications. Furthermore, the initial wizard allows you to quickly configure the operating environment such as for example, the Italian keyboard, time zone, Wi-Fi network and more.
For those who know little about the Raspberry Pi environment and don’t know how to create an SD card burned with the Raspbian operating system, an excellent Help section is available on the official website.
VNC VIEWER
Even if you can operate directly with a mouse, a keyboard and an HDMI monitor, connected to the Raspberry Pi board, usually you prefer to create a connection to the Raspbian desktop through an SSH or VNC connection.
In this way, after configuring the Raspberry Pi Wi-Fi or Ethernet network, you can access the remote desktop using one of the many SSH terminals or through the convenient VNC Viewer, downloadable for free from the official website https: //www.realvnc. com is available for all platforms. For the record, we have used the Windows PC version, but the use is the same for all other OSs.
CONFIGURATION OF RASPBERRY PI INTERFACES
Before configuring the VNC connection it is necessary to activate the VNC interface from the Preferences> Raspberry Pi Configuration menu of Raspbian, as shown in Fig. 1. To do this, once you have opened the Raspberry Pi Configuration window, just click on the item VNC.
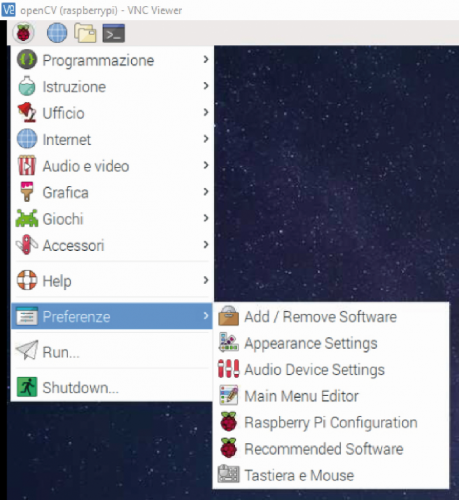
Fig. 1
In the same window, you can also activate all the other interfaces, including the Camera interface, as shown in Fig. 2. The other interfaces, even if they are not needed for this project, may be useful in the future.
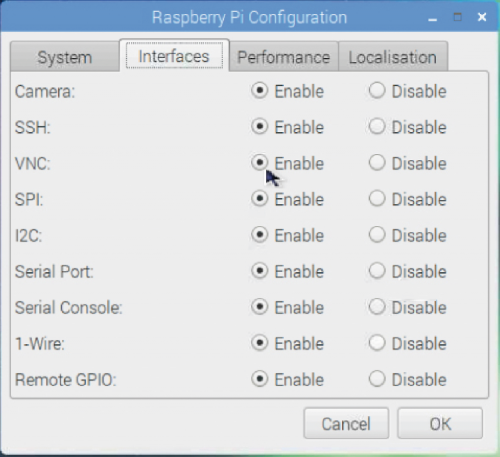
Fig. 2
To use the VNC connection you need to know the IP address that was automatically assigned to the board at the time of the first WLAN or LAN configuration. If you want to take advantage of the board’s Wi-Fi network, simply open the Network Preferences window (Fig. 3) where the address assigned by the WLAN connection is visible.

Fig. 3
VNC CONNECTION
To create a new connection with VNC Viewer, just enter the IP address of the Raspberry Pi board in the Properties window, as shown in Fig. 4. Once the VNC connection has been started, the user name and authentication password will be requested.
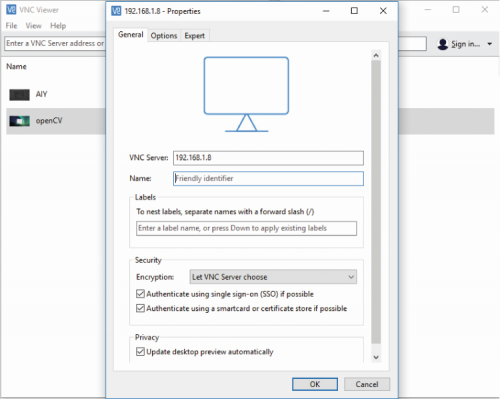
Fig. 4
which, by default, are “pi” and “raspberry” respectively (Fig. 5).
Once the connection is made, the Raspbian desktop will be visible in full screen on the PC monitor. From this moment on, you can disconnect the mouse, keyboard and monitor from the Raspberry Pi board and have total remote control. It may happen that the IP address assigned by the DHCP changes, so it is advisable to configure a static IP in the Raspberry Pi board.

Fig. 5
RASPBERRY PI 3B + E CAMERA MODULE V2
For this project we opted for the Raspberry Pi 3B + board and for the Raspberry Pi Camera Module v2. Version 2 of the camera offers a resolution of up to 8 Megapixels and 3,820 x 2,464-pixel resolution of the sensor. For all the other features, see the page on the official website https://www.raspberrypi.org/documentation/hardware/camera. The Camera Module v2 must be connected as shown in Fig. 6, using the flat cable supplied and paying attention to the direction of insertion to the CSI port of Raspberry Pi 3 B +.
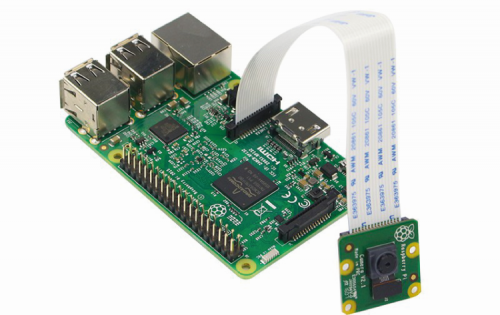
Fig. 6
VIDEO CAMERA TEST
To see if the camera works properly with Python, we recommend that you perform this simple test. In a new Python editor window write these few lines of code:
from picamera import PiCamera
from time import sleep
room = PiCamera ()
camera.start_preview ()
sleep (10)
camera.stop_preview ()
When the script starts, a preview window should open and close after 10 seconds.
If this does not happen, check that the flat cable is properly inserted in the right direction in the slot. If everything works properly, you can easily proceed with the installation of OpenCV 4.
INSTALLING OPENCV 4 ON RASPBIAN STRETCH
As with the previous versions, OpenCV 4 also requires a particular installation. So, if you don’t have the aforementioned Raspbian Stretch operating system, you need to update the operating system to take advantage of the new features.
Warning! OpenCV 4 has not been tested on versions of Raspbian prior to Stretch.
Given the young age of OpenCV 4, we did not find many online guides, so we relied on the experience of Adrian Rosebrock who runs his Deep Learning blog at https://www.pyimagesearch.com and Satya Mallick who runs the site https://www.learnopencv.com dedicated to Computer Vision and Machine Learning. Both report about the same installation procedure.
Note that for many terminal commands you must use the tilde (~) character. If it is not present on the keyboard, use the SHIFT + CTRL + u keys and enter the hexadecimal code 7e + ENTER.
INSTALL OPENCV DEPENDENCIES 4
Before starting any installation on Raspbian it is always advisable to update the repositories with the apt-get command, opening a terminal window:
sudo apt-get update && sudo apt-get upgrade
So, always with apt-get, you need to install all the development tools, including the latest version of CMake:
sudo apt-get install build-essential cmake unzip pkg-config
Next, we install a selection of libraries for image and video processing:
sudo apt-get install libjpeg-dev libpng-dev libtiff-dev
sudo apt-get install libavcodec-dev libavformat-dev libswscale-dev libv4l-dev
sudo apt-get install libxvidcore-dev libx264-dev
So, let’s install the GTK toolkits for the graphical interface:
sudo apt-get install libgtk-3-dev
sudo apt-get install libcanberra-gtk *
(the asterisk will acquire the GTK ARM specification)
At this point you need two packages that contain numerical optimizations for OpenCV:
sudo apt-get install libatlas-base-dev gfortran
Finally, we install the Python 3 development tools:
sudo apt-get install python3-dev
After installing all the prerequisites, you can download OpenCV 4.
OPEN CV4 DOWNLOAD
It is preferable to download the OpenCV4 archives in the Home folder. All OpenCV 4 libraries are available in two repositories Github called OpenCV and opencv_contrib. The contrib repository contains additional modules created by users.
Here are the commands to type to return to the Home folder and download the two repositories.
cd ~
wget -O opencv.zip https://github.com/opencv/opencv/archive/4.0.0.zip
wget -O opencv_contrib.zip https://github.com/opencv/opencv_contrib/archive/4.0.0.zip
Once the zip archives have been downloaded, they must be decompressed in the Home folder again:
unzip opencv.zip
unzip opencv_contrib.zip
This will create the directories opencv-4.0.0 and opencv_contrib-4.0.0. For practical reasons it is advisable to rename the folders as opencv and opencv_contrib:
mv opencv-4.0.0 opencv
mv opencv_contrib-4.0.0 opencv_contrib
At this point, before the actual compilation of the OpenCV 4 library, it is necessary to set up the virtual environment of Python 3.
CONFIGURE THE VIRTUAL ENVIRONMENT OF PYTHON 3
If you are not familiar with Python’s virtual environments and to know why it is advisable to work on a virtual environment see the dedicated box.
First, you need to install pip:
wget https://bootstrap.pypa.io/get-pip.py
sudo python3 get-pip.py
Then we install virtualenv and virtualenvwrapper which allow us to create virtual Python 3 environments:
sudo pip install virtualenv virtualenvwrapper
sudo rm -rf ~/get-pip.py ~/.cache/pip
To complete the installation of these tools, you need to update the ~ / .profile file, using these simple echo commands:
echo “export WORKON_HOME=$HOME/.virtualenvs” >> ~/.profile
echo “export VIRTUALENVWRAPPER_PYTHON=/usr/bin/python3” >> ~/.profile
echo “source /usr/local/bin/virtualenvwrapper.sh” >> ~/.profile
The additions to the profile indicate the path to the virtualenvs workbook, created by the virtualenv tool in the Home and the path to the virtualwrapper script located in the / usr / bin folder. Once the profile is updated, just activate it with the following co-command:
source ~/.profile
CREATING A VIRTUAL ENVIRONMENT TO CONTAIN OPENCV 4 AND ADDITIONAL PACKAGES
Now you can create an OpenCV 4 virtual environment for Python 3 and work independently from other environments.
This command-line simply creates a virtual Python 3 environment called “cv”.
mkvirtualenv cv -p python3
Any name can be given to the virtual environment, but it is advisable, for practical reasons, to keep a short name. If the profile is correctly activated and the “cv” virtual environment is created, we can verify that we are in the “cv” environment using the wor-kon command, as indicated by the arrow in Fig. 7:
workon cv

Fig. 7
INSTALLATION OF NUMPY
The Python package required by OpenCV 4 is NumPy. To install it, just type the following command:
pip install numpy
CMAKE AND COMPILATION OF OPENCV 4
To compile OpenCV 4, we will use CMake, followed by make. This is the most time-consuming step. First of all, go back to the OpenCV folder in the Home and create a build subdirectory:
cd ~/opencv
mkdir build
cd build
Then run CMake to create the release build.
cmake -D CMAKE_BUILD_TYPE=RELEASE \
-D CMAKE_INSTALL_PREFIX=/usr/local \
-D OPENCV_EXTRA_MODULES_PATH=~/opencv_contrib/modules \
-D ENABLE_NEON=ON \
-D ENABLE_VFPV3=ON \
-D BUILD_TESTS=OFF \
-D OPENCV_ENABLE_NONFREE=ON \
-D INSTALL_PYTHON_EXAMPLES=OFF \
-D BUILD_EXAMPLES=OFF ..
Note that the backslash character is used to continue the command with a newline. Also, note the presence of the path for compiling the additional opencv_contrib modules.
INCREASE SWAP ON RASPBERRY PI
Before starting the actual compilation it is advisable to increase the swap space. This is to prevent the compilation from being interrupted due to memory exhaustion. To do this it is sufficient to temporarily change the swap file located in this path / etc / dphys-swapfile:
sudo nano / etc / dphys-swapfile
… and then change the variable CONF_SWAPSIZE from 100 to 2,048 MB. With the # character the line is commented:
# CONF_SWAPSIZE = 100
CONF_SWAPSIZE = 2048
If you do not perform this step, it is very likely that the board hangs during compilation. Once the swap file has been modified, the swap service must be stopped and restarted:
sudo /etc/init.d/dphys-swapfile stop
sudo /etc/init.d/dphys-swapfile start
COMPILATION OF OPENCVES 4
Now everything is ready to build OpenCV 4. Simply type the following command:
make -j4
Note that the – j4 option specifies the use of 4 cores for compilation. If compilation errors occur or the board crashes, you can try without the -j4 option. Normally, the process of compiling OpenCV 4 is quite long and resource-intensive, so it is advisable to take a break and let the formwork without the external intervention of any kind, or without touching a mouse or keyboard. At the end of the compilation, if everything went well, you can see the 100% compilation percentage (Fig. 8).
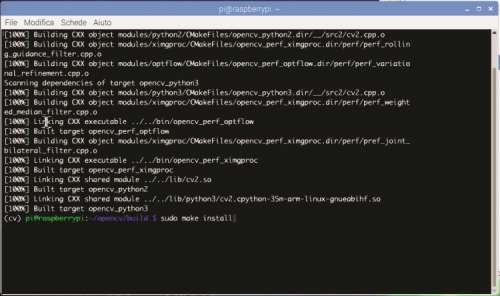
Fig. 8
Now we just have to install OpenCV 4 with two typical commands:
sudo make install
sudo ldconfig
Don’t forget to restore the swapfile, returning it to 100 MB, and restarting it:
sudo nano / etc / dphys-swapfile
CONF_SWAPSIZE = 2048
sudo /etc/init.d/dphys-swapfile stop
sudo /etc/init.d/dphys-swapfile start
SYMBOLIC CONNECTION
One last very important thing is the symbolic connection of OpenCV 4 with the package directory of our virtual environment. You need to enter the site-packages directory of the virtual environment and link to the cv2.so library. Here are the commands:
cd ~ / .virtualenvs / cv / lib / python3.5 / site-packages /
ln -s /usr/local/python/cv2/python-3.5/cv2.cpython-35m-arm-linux-gnueabihf.so cv2.so
cd ~
Notice the –s option to ln which stands for symbolic.
If you do not perform this step, OpenCV 4 will not recognize the packages of the Python 3 virtual environment. In this regard, check that the link to the library is present in the directory ~ / .virtualenvs / cv / lib / python3.5 / site-packages cv2.so.
CHECKING THE OPENCV INSTALLATION 4
To see if OpenCV 4 has been installed correctly, staying within the virtual cv environment, run the following from the terminal:
python
>>> import cv2
>>> cv2 .__ version__
‘4.0.0’
>>> exit ()
As shown in Fig. 9, the first command opens the Python 3 interpreter associated with the cv environment.

Fig. 9
The import cv2 command imports the library and the cv2 .__ version__ command shows the 4.0.0 version of the library. With the exit command () you exit the interpreter and return to the terminal.
Remember that when the system restarts, you must reactivate the virtual environment (in our case “cv”) and then start working, with the workon cv command:
source ~ /. Profile
workon cv
To use the IDLE interface of Python 3 inside the virtual environment it is necessary to type the following command:
python -m idlelib.idle
With the IDLE interface open, you can create new scripts or open those you have already done. If you try to open a script that imports the cv2 library outside the virtual environment, the Traceback will appear with the error message:
ImportError: No module named ‘cv2’.
VIDEO SURVEILLANCE WITH OPENCV 4
We have thought of this project as a valid alternative to alarm systems based on PIR sensors, ultrasonic sensors, touch sensors and so on. Once a movement is detected, the script photographs the intruder and sends the photo to an e-mail address to identify the person.
Whatever the purpose, we created the script based on OpenCV 4 to capture the movement for sending emails to an email address. At the same time, the detected movement activates a GPIO port to which a relay and an alarm system can be connected. Raspbian includes libraries for managing mail and the GPIO port, so there is no need to install anything else.
Below we comment on the salient parts of the script. Libraries imported at the beginning of the script are used only for SMTP management, or for sending e-mails via a known mail server. For this use, it is necessary to connect Raspberry Pi to the WiFi or Ethernet network.
from smtplib import SMTP_SSL as SMTP
from email.mime.text import MIMEText
from email.MIMEMultipart import MIMEMultipart
from email.MIMEBase import MIMEBase
from email import Encoders
In the following section, the parameters for the SMTP server must be changed. It is advisable to use the SMTP server normally used for sending mail from your home computer. The sender and destination variables contain the addresses of the sender and recipient, ie the address with which the e-mails and the address to which the message is to be sent are normally sent. The username and password variables are the username and password used to send to the SMTP server. The type of message is plain text and the content variable indicates the content of the message while the variable subject reports the subject of the message. The msg instance inherits the methods of the MIMEMultipart library.
SMTPserver = ‘smtps.server.xxx’
sender = ‘sender@email.com’
destination = ‘destination@email.com’
username = ‘my@email.com’
password = ‘myPassword’
text_subtype = ‘plain’
content=’Messaggio’
subject=’Allarme’
msg = MIMEMultipart()
The email_send () function is designed to send an email with an attachment, which in our case is a jpg image of the intruder or the object that has moved in the room. As we will see later, the e-mail sending function is optional and can be called or not in the script. If the sending is successful, “Sending executed” will be printed on the terminal otherwise “Sending failed” will appear.
def email_send():

     try:


               msg[‘Subject’]= subject

               msg[‘From’] = sender

               msg[‘To’] = destination

               msg.attach(MIMEText(content, ‘plain’))

               msg.attach(part)

               conn = SMTP(SMTPserver)

               conn.set_debuglevel(False)

               conn.login(USERNAME, PASSWORD)

               try:

                       conn.sendmail(sender, destination, msg.as_string())

                       print(“Invio eseguito”)

               finally:

                       conn.quit()

     except Exception: print(“Invio fallito”)
The following are the libraries that must be imported for the management of the video camera, the date, the time, the video effects, the json files, cv2 (OpenCV 4) and the GPIO port.
import cv2
import time
import datetime
import imutils
import json
import RPi.GPIO as GPIO
from picamera.array import PiRGBArray
from picamera import PiCamera
The following instructions set the GPIO26 output (you can, from here, choose another one):
GPIO.setmode (GPIO.BCM)
GPIO.setwarnings (False)
GPIO.setup (26, GPIO.OUT)
The script provides for the importation of some parameters through a configuration file, which we have called “con-figurazione.json”. Thanks to the json library it is, therefore, possible to parse the values assigned to the configuration parameters and assign them to the variables or functions. The following instruction allows the loading of the json file which is explained in the next paragraph.
conf = json.load (open (“configuration.json”))
THE CONFIGURATION.JSON FILE
Usually, a JSON (JavaScript Object Notation) file is used in the Javascript programming environment. Thanks to its versatility, it is very often used as a configuration file in other environments. It is a script that supports the Javascript language and therefore accepts the typical syntax of the language. Opening the “configuration.json” file with a simple text editor you can see the parameters to be assigned to variables and functions:
{

     “use_img”: true,

     “use_email”: true,

     “video_preview”: true,

     “min_time”: 3.0,

     “min_motion”: 8,

     “threshold”: 5,

     “resolution”: [640, 480],

     “fps”: 25,

     “min_area”: 5000

}
As you can see, some parameters are set to true or false and others contain numeric values and arrays. By reading these parameters with the aforementioned statement conf = json.load (open (‘configuration.json’)), you can set the features of the video surveillance script, without having to touch the code each time. For example, if you do not want to save the image capture files and use video surveillance only to turn on the alarm relay, just write the following statement in the json file:
“Use_img”: false
Similarly, if you do not want to send emails:
“Use_email”: false
If you don’t want to see the preview window:
“Video_preview”: false
The other parameters allow you to set:
- min_time: default value 3 seconds; is the minimum time to detect movement;
- min_motion: default value 8 frames; is the minimum number of frames before activating the switching on of the LED, saving the files and/or sending the email. You can increase or decrease the value to make the detection more or less sensitive;
- threshold: default value 5; defines the sensitivity threshold for motion detection. This value can be increased or decreased depending on whether you want to make the contrast more or less sensitive;
- resolution: (default 640×480 pixels) is the video resolution or the size of the preview frame (frame); it is advised to leave the resolution unchanged to avoid delays in the video stream or in the sending of e-mails;
- fps: set frames per second; it is recommended to leave the default value (25) to avoid delays in the video stream;
- min_area: default 5000. It is the minimum value of the area of the green box that is created around the detected subject. Usually, you don’t need to change it.
Let’s continue with the code analysis: the camera object inherits the picamera library methods. The camera parameters are set based on the reading of the resolution and fps parameters of the json file. Note the use of the tuple type which in Python allows you to create a list of values separated by commas:
camera = PiCamera()
camera.resolution = tuple(conf[“resolution”])
camera.framerate = conf[“fps”]
rawCapture = PiRGBArray(camera, size=tuple(conf[“resolution”]))
Then some variables are defined, which will be used in the script to establish the start and end time of frame capture.
count = 0
avg = None
motionCounter = 0
lastUploaded = datetime.datetime.now()
When the script starts, you will see on the terminal the word “Startup …” then the system waits 2 seconds and begins the video capture. It should be noted that in the preview window the text “Current status: No movement” is superimposed on the upper part, and the date and time (below) (Fig. 10).
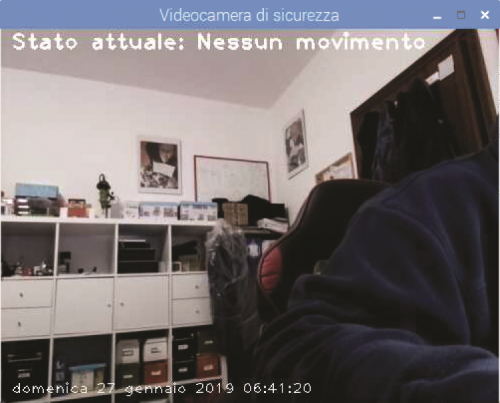
Fig. 10
For this purpose, the imutils library is used to resize the frame and the datetime library for the time from the Internet, so the time and date should be accurate. With the cv2 library, you set the mask to detect a moving object. It should be noted that the parameter tresh reads the threshold value, ie the threshold parameter from the configuration json file. The motionFlag variable is set to False.
print “Start …”
time.sleep(2)
The whole for iteration serves to count the frames and detect the differences in the grey mask that is superimposed on the captured image, as shown in Fig. 11. The value of the threshold sets the intervention threshold to detect the movement.

Fig. 11
for f in camera.capture_continuous(rawCapture, format=”bgr”, use_video_port=True):
frame = f.array

               timestamp = datetime.datetime.now()

               text = “Nessun movimento”

               motionFlag = False

               frame = imutils.resize(frame, width=500)

               gray = cv2.cvtColor(frame, cv2.COLOR_BGR2GRAY)

               gray = cv2.GaussianBlur(gray, (21, 21), 0)

               if avg is None:


                                             avg = gray.copy().astype(“float”)

                                             rawCapture.truncate(0)

                                             continue


               cv2.accumulateWeighted(gray, avg, 0.5)

               frameDelta = cv2.absdiff(gray, cv2.convertScaleAbs(avg))


               thresh = cv2.threshold(frameDelta, conf[“threshold”], 255, cv2.THRESH_BINARY)[1]

               thresh = cv2.dilate(thresh, None, iterations=2)

               (cnts, _) = cv2.findContours(thresh.copy(), cv2.RETR_EXTERNAL, cv2.CHAIN_APPROX_SIMPLE)

…

…
Motion detected the subject is highlighted with green boxes around the edges. When the threshold value is exceeded, the text “Current status: Motion detected” will appear and the motionFlag variable is set to True.
text = “Movement detected”
motionFlag = True
ts = timestamp.strftime (“% A% d% B% Y% I:% M:% S% p”)
At this point, if the motionFlag variable is True, the comparison between the current time (currentTime) and the time set for the detection (lastTime) set by the min_time parameter in the json file begins and the count of the movements detected with the variable starts. motionCounter.
if text == “Motion detected”:
if (currentTime – lastTime) .seconds> = conf [“min_time”]:
motionCounter + = 1
If the number of movements detected exceeds that set by the min_motion parameter in the json file, you can decide whether to save the subject jpg file. This option is set by the use_img parameter of the json file. Note that the file name img = ‘fo-to_’ + str (count) + ‘.jpg’ follows a progressive numbering.
The file names are saved locally with the instruction cv2.imwrite (img, frame) such as foto_1.jpg, foto_2.jpg and so on.
if motionCounter> = conf [“min_motion”]:
if conf [“use_img”]:
count + = 1
img = ‘foto_’ + str (count) + ‘.jpg’
cv2.imwrite (img, frame)
Meanwhile, the LED / relay on the GPIO26 pin is activated or deactivated, while “LED ON” is printed on the terminal, depending on whether the movement is detected or not:
GPIO.output (26, GPIO.HIGH)
print “LED ON”.
or:
print (“LED OFF”)
GPIO.output (26, GPIO.LOW)
If the sending of the email has been set with the parameter use_email, the part object that sets the MIME format (Multipurpose Internet Mail Extensions) is created to compose the mail message. The message is automatically encoded in base64 format and then sent via the email_send () function, seen above.
The e-mail message will send the file “foto_1.jpg” and then the file “foto_2.jpg” and so on, depending on the times the camera detects a new movement.
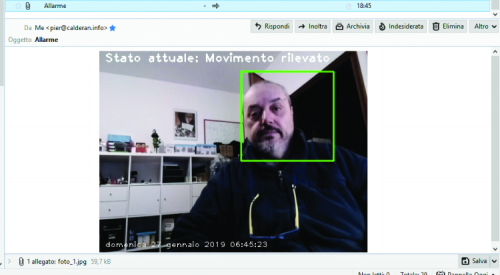
Fig. 12 shows an example of receiving an alarm e-mail.
if conf[“use_email”]:

part = MIMEBase(‘application’, “octet-stream”)

part.set_payload(open(t, “rb”).read())

Encoders.encode_base64(part)

part.add_header(‘Content-Disposition’, ‘attachment; filename=’+ img)

email_send()
CONCLUSIONS
That’s all for now. To get some experience, you can try editing the listing to add features or change the parameters of the json file to see what happens.
We are working on a facial recognition project and emotional expressions with OpenCV4. See you soon!
FROM OPENSTORE
Camera module 8 Megapixel for Raspberry Pi

[…] Read More […]
[…] Home automation with OpenCV 4Posted 3 days ago […]
[…] In the first episode of this series, dedicated to the creation of a video surveillance system, based on Raspberry Pi and the MotionEye application, we saw how to install the software necessary for our architecture and how to configure a first video camera connected via USB. We have seen how to configure the management of alarm notifications when detecting “suspicious” movement in the area controlled by the video camera. Always in the face of an event of a possible intrusion, we have described the possibility of sending a message via e-mail and/or executing a command or program. In Fig. 1 we propose the architecture of the video surveillance system, where a Raspberry Pi is visible which functions as the main concentrator of all the cameras, distributed in the environment to be monitored. Let’s briefly recall the description of the proposed architecture. The main MotionEye application works on the “concentrator”, to which users who can view the images captured by all cameras will connect via the web interface. Given the amount of data that must be processed, in particular, the recording of videos and images from the cameras, the use of a hard disk instead of the normal micro SDCard is strongly recommended as a support for the filesystem of the operating system. Obviously one or more cameras can be directly connected to the Raspberry Pi used as a concentrator, for example, a Camera Pi on the CSI (Camera Serial Interface) connector and one or more cameras on the USB connectors. In a video surveillance system, there is the need to distribute the cameras even to environments that exceed the distance allowed by the USB connections. In this case, cameras located in distant environments can also be connected to the Raspberry Pi concentrator via the local network. Three possible configurations are visible in the diagram. The first uses a Raspberry Pi, which also acts as a “concentrator” of the entire system, with one or more cameras connected to the USB port. The second configuration always rests on a Raspberry Pi with a Camera Pi connected to the CSI connector. Finally, the third configuration uses an IP camera with RTSP (Real-Time Streaming Protocol) and ONVIF (Open Network Video Interface Forum) protocol, via TCP/IP. […]
titlettxt
txt