
We introduce a programming language to optimize code for our Fishino boards. Part one.
What do squirrels and our appreciated little fishes have in common? Very little apparently, but actually, as you will see by reading this article, they have a lot in common, because the combination of the two “critters” can lead to surprising results! Of course, this is a figure of speech, because we are not talking about the two fauna species but we’re talking about Fishino (which symbol is a little fish) and Squirrel (which official logo is a squirrel). This is a software with two interesting features: it makes firmware development and compiling for 32-bit Fishino boards much more efficient, and allows for online IDE use, by directly integrated into the board!
In order to understand what Squirrel is and why is it so interesting for firmware development, allow us to make a brief introduction on the types of programming languages available for microcontrollers and, in more general terms, for any microprocessor system.
Interpretative systems
Those of you who are a little bit older will surely remember the very first beginnings of mass informatics, when if you were lucky you had computers like Apple II, ZX80, Commodore 64 and, a little later on, the Personal Computer IBM XT; those were, at least in the beginning, only programmable using Basic or, for the more adventurous, using the Assembler language, which is a minimal abstraction of machine language.
At the time, Basic was a purely interpretative language, and that means that the processor didn’t have a machine language code available to it, automatically generated by the compiler on Arduino boards, on that hand, it had to read the written text character by character and translate it “on-the-fly” in commands it could understand.
The first big difference compared to a compiled language is, in fact, the need for a preliminary operation, a quite demanding one for the processor, to “translate the text on the fly” in machine instructions.
What are the advantages and disadvantages of such a process? From the modern standpoint, the disadvantages would seem profound: the CPU “wastes a lot of time” to carry out an operation that has very little to do with the program execution and could very easily be carried out “on its own” and just once.
In order to better describe the concept, let’s provide an example of two Basic code lines on an Apple II:
10 TEXT: HOME
20 PRINT “HELLO WORLD”
We can notice the line numbers right away (mandatory in that language) and then a series of commands or, more appropriately, of instructions to follow. The microprocessor had to read, for instance, the word TEXT one character at the time and, once finished, it had to execute the corresponding command saved into a ROM; it is a quite demanding task, which however had the unquestionable advantage to limit the resources that are available: each text instruction responded to many machine instructions and the code taking care of the decoding was written inside a ROM memory, much cheaper than a RAM. Therefore, even with small amounts of RAM, you could handle applications of considerable size; let’s not forget that, at the time, having a 64 kB of RAM was an absolute luxury!
At the time, when the Apple II was around, it already became apparent that interpreted languages had big limitations, especially in terms of execution speed and arrow controls, that could be “found out” on your execution; a line non-executed, even if completely erroneous, did not signal any errors, which however could emerge maybe months later under particular conditions.
Therefore, what are the advantages, besides saving on RAM? Here are some.
- The possibility to test a command “on-the-fly” column simply by typing a line like digitalWrite(13, HIGH)” on the keyboard, you can instantly see the results, without having to launch an IDE, compile a program, upload this catch etc. It is very convenient for makers!
- The possibility to handle dynamic data. This is a more “subtle” advantage and especially difficult to explain, and we can partially get it from recently compiled languages also. In short, simple and very incomplete words, it is possible to assign a variable to a string value, an integer, a floating-point without worrying about the clearing and things; the processor can, using the interpreter, “understand” the type of data and act accordingly, on the fly. As mentioned, we can do the same thing using modern C++, with certain limitations, at the cost of an extremely complicated compiler and a machine code that often grows to considerable sizes.
- The “translation” program from text to the machine is the only thing (not THE only thing, but almost) that you have to edit when changing, for instance, the processor of our board. Therefore, if we have, for example, a certain amount of programs already written for PC, we can make them available on a Mac by simply rewriting the interpreter, i.e. the program taking care of translating the language “on-the-fly”. If you think this is feasible even with a compiled language, you are partially correct, it is possible, but it requires an awful lot of gimmicks, source code edits, etc., especially if that was not your original intention.
Compiled languages
These are currently the more well-known and those who exclusively use Arduino boards probably only know this kind of languages. In short, the part of “written text check” that is comprehensible to a human and translated in machine language, is separated from the execution of the program itself. On the contrary, it is almost always the case with microcontrollers that program compiling takes place on a different machine than the one tasked with executing the program.
Arduino’s IDE, for instance, contains a compiler for C++ capable of reading what we type (in terms of a human can understand), translate it into machine language and upload it on our board. The advantages of such a procedure are:
- The heavy translation work is carried out on a PC, which is substantially faster and has much more memory than the microcontroller;
- the microcontroller “only” has to read the machine instructions and execute them one by one, and it is very good at that!
Therefore, the only apparent disadvantage is the complexity of the procedure, which involves having a PC, a specific software uploaded, drivers etc., even for just a few lines of code. Another disadvantage, which is crucial although less apparent, is that a compiled program, in order to run on a 8-bit Fishino couldn’t be used, for instance, on a Fishino32 or on a board equipped with ESP8266; in order to adapt it, you will have to get source codes, install development systems for the new board, recompile the program after having finally adapted it. That’s a big a job, and it is also inevitable because the compiler compiles the file in machine language in a specific way for each CPU.
Semi-interpreted languages
In fairly recent times, a third category saw great developments: semi-interpreted languages. To be fair, those were born in the period of Apple II, but they didn’t have the success they deserved, outside of niche applications; one of these examples was the UCSD-P system, a compiler for Pascal language that was then run on a virtual machine capable of reading instructions in a code called P-CODE.
But what is this? It is simply something that allows to partially combine the advantages of the first two categories. Let’s try to recap the three procedures.
In Fig. 1, we can see how an interpreted language works: the controller analyzes the input data one character at a time and translates them, on-the-fly, in machine language that is then executed. The whole system is localized on the same controller, which carries out the whole task.

Fig. 1
On the other hand, Fig. 2 shows how a compiled language works: a computer reads all the source code, translates it into machine language and this is then uploaded on the controller, which executes it. As previously mentioned, compiler and executor can easily be located on two different machines.

Fig. 2
And here’s, in Fig. 3, the innovation: here we have a program that can run both on the destination microcontroller and on a separate computer, which is tasked with translating “human” language into an intermediate level, and another program, running on the destination microcontroller – the virtual machine – reading this intermediate level and translating it in machine instructions.
It looks like double the work, so what advantages would this actually have? Well, the “trick” is choosing a “good” intermediate level, in other worlds, we must make it “easy to understand” for the microcontroller without it having to carry out a heavy task, such is the case for purely interpreted languages, but we have to do so in such a way that each instruction of the intermediate level response to many machine code instructions!

Fig. 3
In order to better explain the concept, here is a layman example: let’s take a look of how a coffee is made; in “human” language, we can write down the process this way:
Make a coffee
Very easy for us, but incomprehensible for an automatic machine. For the automatic machine, things should be translated, for instance, into:
- take the coffee beans
- open the grinder
- put the coffee beans in
- close grinder
- turn on the grinder
- wait until coffee is grounded
- open the coffee maker
- empty coffee maker from possible previous coffee grounds
- pour water inside
- put ground coffee inside the coffee maker
- close the coffee maker
and so on. We see that a single “human” instruction corresponds to many machine instructions. If we insert an intermediate level, this might be:
- Grind the coffee
- Use the coffee maker to make coffee
- Pour coffee in the coffee cup
In this case, the compiler has less work to do to produce this intermediate code and the interpreter also has less work to translate the intermediate code in machine code. Not only that: the intermediate code is shorter, not as short as the “human” one but much shorter than machine code; and most of all, it is easily portable from one machine to the other!

Fig. 4
In our example, if we changed grinder or used a different coffee maker, all we would have to do would be changing the way in which instructions such as “grind the coffee” are perceived in order to adapt our program to another situation!
And what about speed? That is also at an intermediate level between interpreted languages and compiled languages; if we still accurately choose our intermediate level, we can have the micro processor execute one of the instructions in a fairly quick manner.
Basically, an interpreted language can be up to 100÷1000 times slower than a compiled language, while a semi-interpreted language is around 10 times slower than a compiled one, although you can get higher speeds using certain cautions.
Many modern languages are semi-interpreted, e.g. Pyhton; the “compiler” translates language in an intermediate code, which is then run on a “virtual machine” uploaded to the micro processor.
Without getting too much in depth, those of you who know Python can easily understand the advantages of the language, particularly the advantages of dynamic data types, giving much more freedom to the programmer and at the same time allowing to write much simpler code.
Why Squirrel?
At first we thought about creating our system in Python, but this is quite heavy and complex to implement on a microcontroller, which is the target device of Fishino; besides, Arduino board users are used to code on C/C++ and the passage to Python could have been too harsh for someone. This does not preclude a possible future Python variant for our Fishino boards.
Squirrel is a language which syntax strictly resembles C/C++, although it implements some concepts from Python and other motor languages, such as dynamic data types. Moreover, it has been created by an Italian developer, Alberto Demichelis, and a bit of patriotism is not out of context here!
For more details on the language you can visit www.squirrel-lang.org where you will find the full description, a form and more info; the language manual and some practical examples are also available on our website.
Here is a quick example of the classical program Blink, rewritten in Squirrel:
pinMode(13, OUTPUT);

while(true) {

digitalWrite(13, HIGH);

delay(500);

digitalWrite(13, LOW);

delay(500);

}
Very simple, right?! Now let’s see, in List 1, another example, a bit more complicated, describing the activity of a web server showing the analog inputs of our board on a page. As you can see, the code (taken from the example FishinoWiFiWebServer of the Fishino library) looks very similar to the C++ code; the first noticeable differences are:
- The whole initialization stage usually needed in the Setup() is missing;
- The way an object of class FishinoServer is created;
- the symbol <- used in the server line <- FishinoServer(80);
- variable declarations using the keyword ‘local’.
Point 1 is not a necessity but a convenience coming from the automatic initialization of the Wi-Fi module carried out by the system, as we will see later. Point 2 is more interesting because it shows that, in Squirrel, an object of a class is created via the name of the class itself, called as a function, with the current structure parameters between parenthesis (the server port, in this case).

Fig. 5
Points 3 and 4, on the other hand, show one of the main features of Squirrel, i.e. it is a language that doesn’t need type declaration for variables.
In point 3, a GLOBAL variable (server) is created using the operator <- which creates it and set it to the desired value; in point (d) it is created, on that hand, a LOCAL variable, i.e. only valid within the function in which it is declared, as it is the case with C.
We will see later on other main features of the language. Now, let’s take a look at how to install everything on our Fishino.
Listing1
server <- FishinoServer(80);
server.begin();
while(true) {
if(server.hasClients()) {
local client = server.available();
Serial.print(“New client\n”);
local currentLineIsBlank = true;
while(client.connected()) {
if (client.available()) {
local c = client.read();
Serial.print(c.tochar());
if (c == ‘\n’ && currentLineIsBlank) {
// invia uno header standard http
client.println(“HTTP/1.1 200 OK”);
client.println(“Content-Type: text/html”);
client.println(“Connection: close”);
client.println(“Refresh: 0.5”);
client.println(“”);
client.println(“<!DOCTYPE HTML>”);
client.println(“<html>”);
// invia il valore di tutti i pins analogici
for (local analogChannel = 0; analogChannel < 6; analogChannel++) {
local sensorReading = analogRead(analogChannel);
client.print(“analog input “);
client.print(analogChannel);
client.print(“ is “);
client.print(sensorReading);
client.println(“<br />”);
}
client.println(“</html>”);
break;
}
if (c == ‘\n’) {
// inizio di una nuova linea
currentLineIsBlank = true;
}
else if (c != ‘\r’) {
// sono stati ricevuti dei caratteri nella linea corrente
currentLineIsBlank = false;
}
}
} // while connected
// lascia tempo al browser per ricevere i dati
delay(100);
// chiudi la connessione
client.stop();
Serial.print(“client disonnected\n”);
}
}
Launching the graphics interface
In order to launch our web IDE, all we have to do is open the browser (tested on Chrome, Firefox and Internet Explorer 11) and open the Fishino address, on port 8080, opening the Squirrel page:
192.168.1.251:8080/SQUIRREL
(Of course, you will have to replace the IP with yours). The first upload might take a while since our Fishino will have to upload many files to the browser; it will, however, take around 10 seconds… 20 seconds tops. Later on, it will be basically instantaneous.

Fig. 6
Once we exit the beta phase of the interface, we will compress the files sent and save them in the cache, in order to have them launching immediately at the start.
As you can see in Fig. 7, we chose a different port from the standard one (8080 and not 80) on purpose and a subfolder of the SD for being able to use both port 80 and the rest of the memory card for other purposes. The interface will be slightly different from what is shown in the image, since, as we mentioned before, the application is still in development; however, the main elements are those described below.
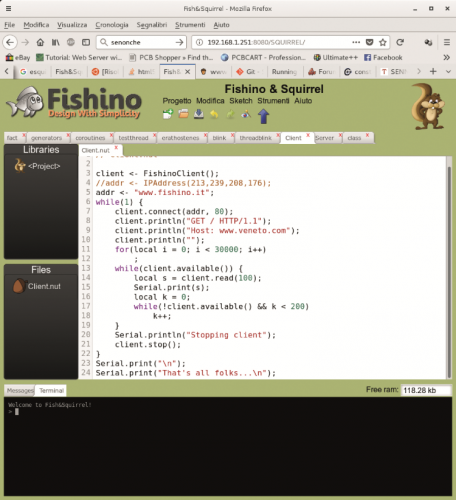
Fig. 7
Let’s start with the menu bar, which you can see in Fig. 8.
From left to right, we find the following icons: create a new project, open an existing project, save current project, undo, redo, sketch test (currently not active) and sketch upload.

Fig. 8
Let’s move on to the project selector that you can see in Fig. 9.
This selector uses tabs to show all the project currently open. There can be other possible projects on the SD card, which must be open using the Open icon previously mentioned. If you click on one of the tabs the desired project will be selected, while if we click on the red X icon, the project will be close (and saved, if it has been edited).
![]()
Fig. 9
Each project has AT LEAST one corresponding file (.nut), that has the same name as the project; there might be other files and/or libraries for more complex projects.
All these files can be displayed in the IDE by clicking on the dedicated tab of the five selectors. Clicking on the red X icon works will also close the file. Now, let’s see how we can open a file which tab has been closed.
The libraries area (Fig. 10) contains a list of libraries used by the project, also, in the first line, there is the <Project> field indicating the files of the project itself. Since it is a small example sketch, you will only find the <Project> field for this example.

Fig. 10
By selecting an element of the libraries area, you will be able to see the list of the files related to the selection in the file area (in the next paragraph).
A contextual menu, that you can recall by right-clicking in the area, allows to add libraries and/or create new ones.
Those of you who have already used our FishIDE will notice the identical method for managing files.
The files area shows files correlated to the selected element in the libraries area; in this case, by selecting the field <Project> first, we can see here the files for the current project (just one file, Client.nut).
We can also use the right button of our mouse to add and delete files to the project and/or the selected library.
Now, let’s move to the Terminal area, shown in Fig. 11.

Fig. 11
Here, we can see two tabs, the first one (Messages) is currently not active and probably will be deleted it in the final version of the IDE, since the Terminal area is more than enough.
The latter uses a proper terminal that we can use to interact with our Fishino in real time and display its messages.
In fact, the application has, besides the usual serial monitor through the USB port, the possibility to display messages in this area, therefore acting as an actual remote serial monitor!
Moreover, using the same terminal we can send comments from Squirrel to our Fishino which will be immediately interpreted and executed by our controller, after interrupting the execution of the current sketch.
For instance, if we want to turn on the orange LED on a Fishino32, we can type the following commands (followed by Enter):
pinMode(25, OUTPUT);
digitalWrite(25, HIGH);
And we will see the orange LED instantly turning on!
If we were to make some typos, we would see an error message on the terminal.
Conclusions
In this first part we have introduced you to Squirrel, which is not only a programming language for Fishino but, above all else, it allows to write code and compile it directly on the Fishino, supposed it is a 32-bit board, by taking advantage of the availability of an IDE which can be accessed online through the Wi-Fi connection on the board, and therefore in remote mode, from a Personal Computer or tablet connected to the Internet.
It surely is very convenient, especially because the IDE is integrated into the board and we don’t need any computer to write and compile the firmware.
Squirrel’s qualities can be appreciated especially when you know the other three programming languages categories existing today, that we have described as a preparatory step in order to understand the design choices made with the integration of the IDE in 32-bit Fishino.
In the next part, we will conclude the project with an in-depth analysis of the Squirrel programming language and explaining to you how to use it.
Enjoy!
From openstore
