
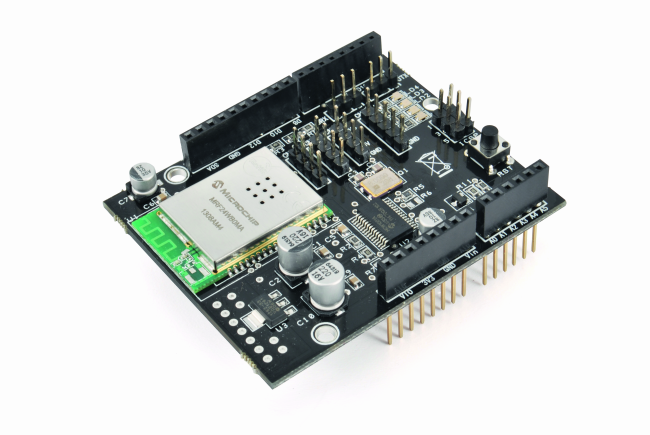
We’ll show you today how to use the WiFi shield and its libraries to turn Arduino into a Web Server; in addition, we are going to use the I/O Expander shield to provide more input and outputs to the platform.
We will describe how to handle the specific library to use the WiFi shield as a WEB client for a public website that will collect data coming from sensors.
The Arduino-based WEB server can be accessed using a normal browser, displaying sensors values or activating outputs.
In the examples provided with the library, there is already a code sketch that shows how to create a WEB server. The shortcoming of this example, however, is that the functions used only allow you to build and load the entire web page, including the values to be shown. If you need to check the updated values, you are forced to refresh the page manually. Besides, the activation of a digital or PWM output is made by posting values through a “web form”, which returns the “Refreshed” page.

To overtake these limitations we have implemented the WiFi library in a more efficient way, by using Javascript functions embedded in the HTML code, and controlling the browser – server communication through AJAX mechanisms (using Javascript XMLHttpRequest object).
This basically means that part of the graphic rendering is performed by the browser. The browser is normally running on a much more powerful hardware then Arduino and therefore it is requested to perform algorithms and animations unthinkable for the Arduino standard use. This shortcoming is balanced by an important advantage: with this solution, we help you also reduce the network traffic.
Having part of the code to be executed in the client browser, naturallyimplies a greater debugging difficulty. It is worth then building and testing scripts independently (stand-alone code) and then integrating them into the sketch. To draw HTML pages and test scripts you can use several commercial software like Adobe Dreamweaver or Microsoft FrontPage, or even free editors either visual such as Eclipse, PageBreeze, KompZer (portable), or textual like PSPad, Notepad ++.
For scripts debugging you can use the browser directly, because all browsers are equipped with the “development tools” that allow you to open a window to execute step-by-step the scripting code.
The new functions implemented in the HttpLib library (Version 2.4) are of two types: functions for HTML pages modular construction and functions for fast data exchange to be used with AJAX requests.
The first category was introduced because after the introduction of complicated HTML pages containing Javascript functions, it was very easy to saturate the 32K program memory because commonly those functions are shared among different pages. So it is much more comfortable to structure the HTML pages in blocks (for example header, JavaScript routines, body, footer) and compose them according to the target (scope) of each page.
The second category, called “response functions”, was introduced to send back data (often in JSON format) using a whole and not fragmented package (chunk) as it had been thought for the entire HTML pages in order to improve efficiency.
| void sendResponse (int sk, prog _char *amodule[], uint8_t nm);void sendDynResponse (int sk, prog _char *amodule[], uint8_t nm, int npar, char *param[]); | Respond to the “request” with a sequence of HTML code modules, stored in prog_char variables (Nm is the number of modules, i.e. the size of amodule[] array) |
| void sendShortResponse (int sk, char *data); | Responds a “Request” with a buffer of data (in string format ) |
I/O Expander
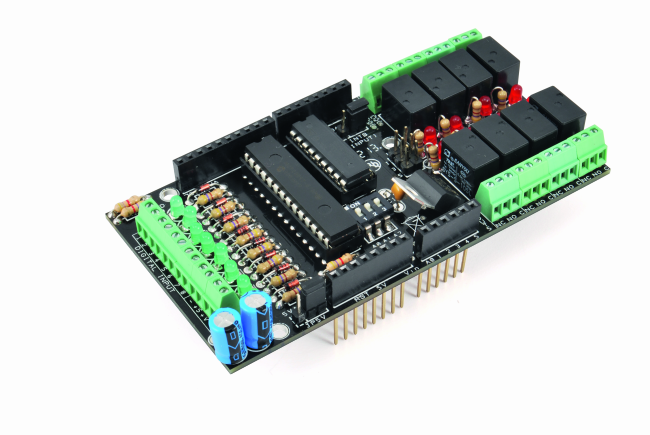
To implement the example described on these pages, we will need one additional board necessary to read the state of a certain number of digital inputs and to set outputs: the I/O Expander Shield for Arduino.
WEB Server

Keeping in mind that A4 and A5 are used by I2C bus and that D2, D3 and D7 are used by WiFi shield, we can assign a function to the remaining Arduino pins to have a system capable of interacting with significant number of Input / Output.
| 4 Analog Input | A 0, A 1, A 2, A 3 on Arduino |
| 8 Digital Input | D 0, D 1, D 2, D 3, D 4, D 5, D 6, D 7 on IOExpander |
| 8 Digital Output | D 0, D 1, D 2, D 3, D 4, D 5, D 6, D 7 on IOExpander |
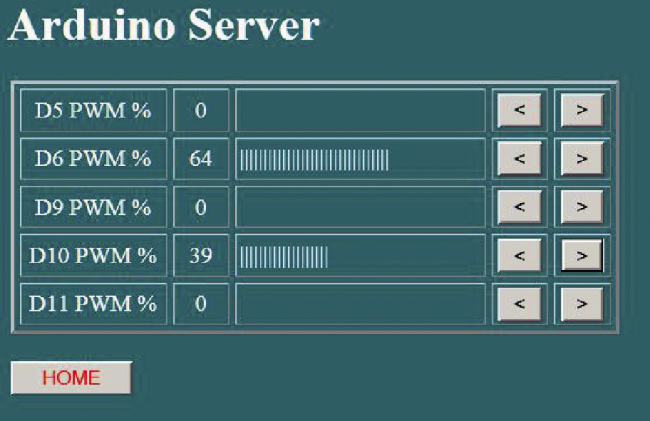
| 5 PWM Output | D 5, D 6, D 9, D 10, D 11 on Arduino |

Of course, you can abstract this sketch to a software code template whenever you need to use Arduino with AJAX methods for the data exchange, even when using additional I/O shields. Both the menu and the activation pages have an automatic refresh rate (every minute), avoiding that the browser could terminate the communication after a long time of inactivity.
All other pages are static, only the values (or their colors, representing on – off status) shall be automatically updated with a hidden refresh command based on AJAX functions.
The analog input value is updated every second while the digital input is checked and updated every 300ms. The digital output triggering is performed through a page, on which the relays are activated or deactivated by using a hidden function. their status is updated according to this response function.
On the PWM management page, we have implemented a JavaScript animation, as follows:
- By pressing on button “>” or “<” the value and the related graphical bar are modified only locally
- When the button is released, the current value is sent to Arduino (that will acknowledge the message with a response).
In this way, with light network traffic load, we have realized a real time I/O remote monitoring window on Arduino, without using proprietary protocols based on sockets.
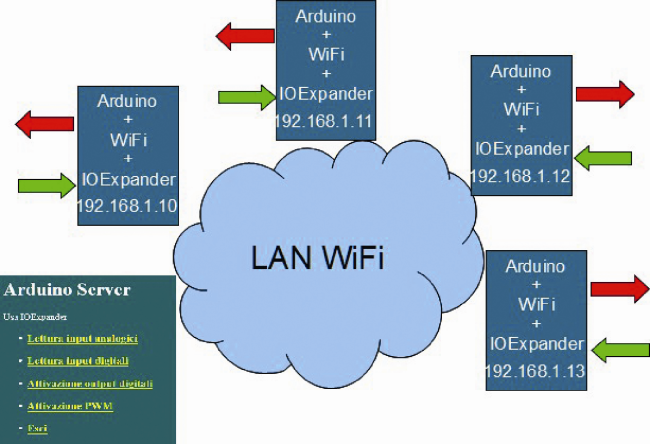
You can imagine many of these Arduino – Webserver connected on a local network though an access point and managed by a single desktop pc. Implementation based on WAN (geographic distribution) is too complex and not suggested. In fact, Arduino cannot support HTTPS security (strongly recommended on Internet connections) while on a local network WAP protection and WEB authentication represent a reasonable security level to manage sensors and actuators. If you need a WAN implementation, we suggest the use of Raspberry as interface.
Let’s look at the example now, analyzing the general structure first and few significant points too.
The program size is really consistent (31KB, very close to the limit of 32K) because of the many libraries included and the HTML pages stored on program memory. The code itself is compact indeed.
The sketch allows the connection to both unprotected and password-protected waypoints (WPA). In the latter case, if a keyword is already stored on the EEPROM then it is directly used, otherwise it connects using the password and the keyword calculated is stored on the EEPROM. This concept is important since a keyword connection is really fast while the calculation task is time consuming (even up to 1 minute). The EEPROM keyword management and the WEB authentication based on username/password have been implemented from library version 2.2.
| Define and Global variables | Access point, wifi password, WEB username and password, etc. |
| HTML blocks | Style header and definition block; block to create and launch XMLHttpRequest object (AJAX); Javascript blocks for the page request; blocks with the body of pages; final block . |
| Setup | Wifi and IOExpander initialize, encoding the username – password (if any) for authenticated access), connects to the accesspoint and activates the server on port 80. |
| Loop | Re-connect if not connected, handles the requests; if the request is a page GET or an AJAX POST it will call the right function that will send back a page or interact with I/O and reply with a shortResponse |
| Connection functions | Connects to access point and listens on port 80 |
| Response/Resource functions | Stack the page blocks and send them |
| AJAX functions | If the command is a value refresh, check the values, format to JSON string and send as shortResponse; if the command is a trigger, activate the corresponding pin and send back a refresh of all values |
prog_char Prologue[] PROGMEM=
"<html><head>"
"<title>Arduino WEB Server</title>" //Titolo finestra
"<style type='text/css'>"
"body,td,th {color: #FFF;}"         //Colore caratteri
"body {background-color: #066;}"    //Colore sfondo
"a:link {color: #FF0;}"             //Colore link
"a:visited {color: #FF0;}"          //Colore link già visitato
".on {background-color:#00FF00;}"   //Colore pin input on (verde)
".off {background-color:#000;}"     //Colore pin off
".onr {background-color:#FF0000;}"  //Colore pin out on (rosso)
"</style>";
prog_char Ajax[] PROGMEM=
"<script type='text/javascript'>"
"var fbusy=0;"                 //Semaforo
"var REFRESH=null;"
"function waitReq()"           //Stop eventuale refresh
"{if (REFRESH != null) clearInterval(REFRESH);return fbusy;}"
"function ajax(resource,cmd,pin,val)" //XMLHttpRequest
"{"
 "if (fbusy==1) return;" //Stop se ancora attiva precede richiesta
 "var params=null;"      //Inizializzazione eventuali parametri
 "if (cmd!=null)"
 "{params=\"cmd=\"+cmd;"
  "if (pin!=null) params=params+\"&pin=\"+pin;"
  "if (val!=null) params=params+\"&val=\"+val;}"
 "Req=new XMLHttpRequest();"    //Creazione oggetto XMLHttpRequest
 "Req.onreadystatechange= function()"
 "{if ((Req.readyState == 4)&(Req.status == 200)){fbusy=0;setData(Req.responseText.trim());}};" //Callback function
 "Req.open('POST',resource,true);"
 "Req.timeout=1000;"                  //Timeout
 "Req.ontimeout = function() {fbusy=0;};"
 "fbusy=1;"                           // Set semaforo
 "if (params==null) Req.send();else Req.send(params);" //Spedisce
"}"
"</script>";
In the code listing, you can see the HTML block and the AJAX functions, that is common to every page.
In any case, we do note that using an asynchronous management for XMLHttpRequest we are forced to implement a semaphore since Arduino is single task and can manage only one task every cycle.
The Javascript function ajax() has four parameters: the requested resource plus three additional parameters corresponding respectively to a command code, a pin number and a value.
Those three parameters will be handled by Arduino resource function to execute the request.
The callback function is activated after the response is received. It has always the same name but different implementations according to the web page that embeds it. Besides, it also resets the semaphore to step over the next request.
prog_char ScriptARead[] PROGMEM=
"<script type='text/javascript'>"
"var nr=4;"
"var data=new Array();" //ogg.JSON: array di 4 coppie num-stringa
"function update()"
 "{ajax('/getAnalog',null,null,null);}"
"function setData(resp)"
"{"
  "if (resp==null) return;"
  "data=eval(resp);"    //stringa [[nnn,”aa”],...] in array data
  "for (i=0;i<4;i++)"   //aggiorna valori nei campi
  "{"
    "el=document.getElementById('AV'+i);"
    "el.innerHTML=data[i][0];"
    "el=document.getElementById('AU'+i);"
    "el.innerHTML=data[i][1];"
  "}"
 "}"
"function make()"       // costruisce la tabella
 "{document.write(\"<table width='300' border='2' cellpadding='2' cellspacing='4'>\");"
 "for (i=0;i<nr;i++)"  //tabella di 4 righe di 3 colonne
  "{"
    "document.write(\"<tr align='center'>\");"
    "document.write(\"<td width='30%'>A\"+i+\"</td>\");"
    "document.write(\"<td width='50%' id='AV\"+i+\"'> </td>\");"
    "document.write(\"<td id='AU\"+i+\"'> </td>\");"
    "document.write(\"</tr>\");}"
    "document.write(\"</table>\");"
  "}"
"</script>";
On the listing, you can look at one of the javascript functions block needed to build and manage a page (specifically, the “analog values read” page). You can note the implementation of “setData” (callback function for XMLHttpRequest) and “make”, common to any page to build up the page when requested. In fact, taking into account the table format of each page and the Arduino limited memory resources, we preferred to implement the page construction by using a “for” cycle.
void setup()
{
  Serial.begin(9600);

  WIFI.begin();               // startup wifi shield

  pinMode(5,OUTPUT);          // pin 5 come output PWM
  pinMode(6,OUTPUT);          // pin 6 come output PWM
  pinMode(9,OUTPUT);          // pin 9 come output PWM
  pinMode(10,OUTPUT);         // pin 10 come output PWM
  pinMode(11,OUTPUT);         // pin 11 come output PWM

  IOExpanderSetting();        // inizializzazione IOExpander

                              // se richiesta autenticazione
                              // codifica username-password
  if (FAUTH) Wkey=WIFI.codeWebKey(WUSER,WPASSW);

  netConnection();            // entra in rete
}
void loop()
{
  char *req=NULL;
                   // se non già connesso prova a connettersi
  if(!fc) {delay (10000);netConnection();}
                   // altrimenti procede
  if(fc)
  {
                   // se non inizializzato come server inizializza
    if (!fserver) serverStartup();
    if (!fs){listenConnect();}  //ascolta
    if (fs)                     // se arriva richiesta la gestisce
    {
                   // in modo diverso se usata o no autenticazione
     if(FAUTH)
          req=WIFI.getRequest(csocket,10,rs,Wkey);
     else
          req=WIFI.getRequest(csocket,10,rs);
    }
  }
}
Let’s analyze now the Arduino functions. In “listing” you can look at the setup() function and the loop() function.
WEBRES rs[]=
{
 {"/index",PIndex},        //pagine (richieste con un GET)
 {"/AnalogRead",PAnalogR},
 {"/DigitalRead",PDigitalR},
 {"/DigitalWrite",PDigitalW},
 {"/PWMWrite",PPwmW},
 {"/End",PEnd},

 {"/getAnalog",getAna},    //risorse richieste da XMLHttpRequest
 {"/getDigital",getDig},
 {"/setDigital",setDig},
 {"/setPWM",setPwm}
};
The main function called in loop() is “getRequest”. As already seen on WiFi library post, this function is responsible of receiving the message, decoding the request and finally activating the target resource. To bind the resource name to the corresponding Arduino function, it uses a matching array. A part of these resources reply with entire pages, the other are managed by AJAX background activity.
void PAnalogR(char *query)
{
   module[0]=Prologue;    //pagina composta da 5 moduli
   module[1]=Ajax;
   module[2]=ScriptARead;
   module[3]=PageAnaRead;
   module[4]=Footer;
   WIFI.sendResponse(csocket,module,5);
}
prog_char jsonFormat1[] PROGMEM=
"[[%d,%s],[%d,%s],[%d,%s],[%d,%s]]";  //formato dati da spedire

void getAna(char *query)
{
  int AV0=(analogRead(0)*4.88);char AU0[]="'mV'";
  int AV1=(analogRead(1)*4.88);char AU1[]="'mV'";
  int AV2=(analogRead(2)*4.88);char AU2[]="'mV'";
  int AV3=(analogRead(3)*4.88);char AU3[]="'mV'";
  char json[50];  // buffer da spedire
  snprintf_P(json,50,jsonFormat1,AV0,AU0,AV1,AU1,AV2,AU2,AV3,AU3);
  WIFI.sendShortResponse(csocket,json); //spedisce buffer dati
}
Eventually you can look at a “page request” reply and at a “data refresh request” example code.
From the store

[…] Equipping Arduino with a powerful Web server thanks to the Wi-Fi Shield. […]
[…] Equipping Arduino with a powerful Web server thanks to the Wi-Fi Shield. We’ll show you today how to use the WiFi shield and its libraries to turn Arduino into a Web Server; in addition, we are going to use the I/O Expander shield to provide more input and outputs to the platform. […]
[…] Equipping Arduino with a powerful Web server thanks to the Wi-Fi Shield. We’ll show you today how to use the WiFi shield and its libraries to turn Arduino into a Web Server; in addition, we are going to use the I/O Expander shield to provide more input and outputs to the platform. […]
great article. a pity that the webserver in the examples of the MWIFI library doesnt compile: “No matching function for call to HTTP::getParameter….”
Have you import the library?
[…] другого места при подключении телефона к интернету. Equipping Arduino with a powerful Web server thanks to the Wi-Fi Shield. We’ll show you today how to use the WiFi shield and its libraries to turn Arduino into a Web […]