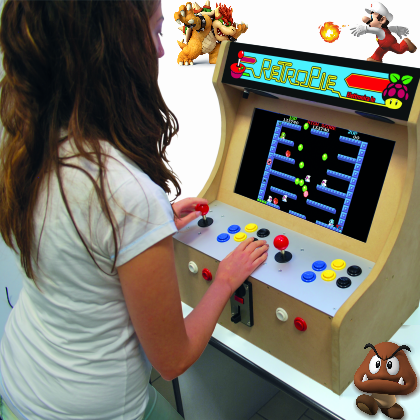
We will rebuild a BarTop arcade coin-op machine to rediscover the charm of the 90s: just a Raspberry Pi, one shield described here, a LCD screen and a few buttons.
What is an Arcade game? Probably you heard or read this term many times, but if you aren’t at least 35-40 years old, you may not know the meaning. An arcade game machine or simply arcade game, is a microprocessor based game rack, put in a public area, physically constituted by an electronic board (and later by personal computers) in a wood or plastic and metal cabin. These machines are also called coin-op, short for coin-operated (because you had to insert coins to play).
The arcade games reached their greatest splendor, both in quality and popularity, from the late seventies to the late eighties. The most successful titles who have written the history of video games are Space Invaders (released in 1979), Pac-Man (1980), Donkey Kong (1981), Burger Time (1982) followed by many, many others.
The first racks were produced specifically for the “hosted” game but that choice proved soon to be too expensive, because it was difficult to adapt the cabined to the players fast changing needs; that’s why a new generation of devices was build, hosting the Jamma standard connector (Japan Amusement Machinery Manufacturers Association, a Japanese association that collected the main arcade video games manufacturers).
When the coin-op arcade game fashion went over, a lot of devotees have tried to grasp a sample and restore it to show it in the tavern or in their own room, like a hunting trophy; those who could not find an exemplar, looked for an alternative and we are sure they will appreciate this revival we are proposing, that takes advantage of the wide availability of a powerful but affordable embedded computing board like Raspberry Pi. Just one interface shield with buttons, joystick and coin holder to recreate a bartop cabinet: we give you the electronics scheme and few suggestions to build the box; you have to add your fantasy!
The software used is based on the most popular Arcade emulators that have been existing already for over 10 years in the PC world: Mame is one example, but there are many other very valid.
The project
For the electronics, we have chosen Raspberry Pi 2 and Retropie 3.5 software, being the most complete Linux image in terms of arcade games emulation and very easy to use if compared to other “images” that can request a long and complex programming. With Retropie 3.5 you can emulate different types of past consoles, including Nintendo, Game Boy, Sega Master System, Amiga, Commodore etc. In this case, we will focus on MAME emulator ( Multiple Arcade Machine Emulator), famous throughout the world for its ability to emulate virtually every arcade from the 80s and 90s.
In this project we will make a MAME rack, here is the bill of materials we need to start creating a piece of video game history.
Here are the hardware specs:
– Raspberry Pi 2 B;
– SD Card, 8 Gb or greater;
– Power supply for Raspberry Pi (5V 2A microUSB);
– Arcade style joystick;
– Arcade buttons;
– Joystick and buttons cables to Raspberry Pi;
– case to host joystick, buttons and Raspberry Pi;
– HDMI cable;
– Audio cable (optional, you can use the speakers of a normal TV with HDMI connection);
– USB keyboard (for programming only).
About the software:
– Retro-Pie V3,5 optimized for Raspberry Pi (derived from Debian);
– I²C customized to MCP23017 software for the input processing;
– ROM Emulation software;
– Game ROMs.
Please note that “game ROMs” are the files containing the game for a certain emulator; that name, although improper, was adopted to commemorate the read-only memories containing the code that the microprocessor of the coin-op machine was running; so as in the old games you could re-program the unit by replacing the ROM, the emulators changes the game by loading a file called ROM.
Once we have found all the stuffs listed above, we can start installing the image, and do some tests before starting playing.
Before proceeding let’s focus on Retropie, saying first that the image can be downloaded for free from petrockblock site.
The RetroPie project began with the idea of turning the Raspberry Pi into a retro-gaming console and in a short time has evolved to version 3.5, giving to the retro gaming community a blast from the past, when younger we went to the arcade game place and we inserted a 100/200 lire coin into the machine to play.
In addition to emulators, developers have built a front-end, a file system, a compact operating system dedicated to retrogaming. So the vintage arcade player can browse through different emulators and games by using a simple and intuitive interface. This is a great and immersive retrogaming experience, but the most nostalgic ones will have to make it even more realistic by building a “BarTop” rack.
The project uses Raspbian as base operating system and integrates a broad set of emulators for a wide range of computer systems in recent decades.
The RetroPie Setup Script is the core software for the installation and configuration of all components of the distribution.
The RetroPie installation script lets you install and configure all emulators, the front-end, drivers and other components for our console. Technically, it is a “bash” script that consists of a few thousand lines of code and is run from the command line. The complete source code can be downloaded from Github to collaborate, give feedback, ask questions and have support, or to be able to create your own image based on their scripts.

There is already an image with a complete RetroPie installation that comes with all emulators and supported features.
The RetroPie SD Card image is ready to use, providing a full installation of all gaming systems and functions supported by RetroPie. Here are the main features:
- full installation of all available emulators that are supported by the installation script (see “Supported Systems / emulators for details”);
- automatic start of the emulation station, the front-end for ROM images navigation and execution. Emulation station is run by Aloshi, which also manages the sources in Github;
- pre-configured splash screen that can be customized with the RetroPie-setup script;
- SAMBA shares for each system to copy ROMs on the RPI via the network;
- USB daemon to copy the ROM RPI via USB drive
Emulators
With Retropie you can emulate many old consoles and games that you used to find in the beloved penny arcades or running on the old gaming platforms in the 90s.
- 3do (lr-4do)
- Amiga (UAE4ALL2), (UAE4ARM)
- Amstrad CPC (CapriceRPI), (lr-cap32)
- Apple II (Linapple)
- Atari 2600 (Stella), (lr-stella)
- Atari 5200, and Atari 8 bit series: 400, 800, 1200XL, 600XL, 800XL, 130XE, XEGS (Atari800)
- Atari 7800 (lr-prosystem)
- Atari Jaguar (lr-virtualjaguar)
- Atari Lynx (lr-handy)
- Atari ST/STE/TT/Falcon (Hatari)
- CoCo (XRoar)
- Colecovision
- Commodore 64 (Vice)
- Daphne (Daphne)
- Dragon 32 (XRoar)
- Dreamcast (Reicast)
- FinalBurn Alpha (PiFBA), (lr-fba), (lr-fba-next)
- Genesis/Megadrive (DGEN), (lr-Genesis-Plus-GX), (lr-picodrive)
- Game Gear (Osmose), (lr-Genesis-Plus-GX)
- Game Boy (lr-gambatte)
- Game Boy Color (lr-gambatte)
- Game Boy Advance (gpSP), (lr-gpSP), (lr-vba-next), (lr-mgba)
- Intellivision (jzIntv)
- Macintosh (BasiliskII)
- MAME (AdvanceMAME), (MAME4ALL-Pi), (lr-imame4all), (lr-mame2003), (lr-mame2010)
- MasterSystem (lr-Genesis-Plus-GX), (lr-picodrive), (Osmose)
- MSX (lr-fmsx), (lr-bluemsx)
- Neo Geo (GnGeo-Pi), (PiFBA), (lr-fba), (lr-fba-next)
- Neo Geo Pocket (lr-mednafen-ngp)
- Neo Geo Pocket Color (lr-mednafen-ngp)
- Nintendo 64 (Mupen64plus), (lr-mupen64plus)
- Nintendo DS (lr-desmume)
- Nintendo Entertainment System (lr-fceumm), (lr-nestopia)
- PC (DOSBox), (rpix86)
- PC Engine/TurboGrafx-16 (lr-mednafen-pce-fast) (lr-beetle-supergrafx)
- PlayStation 1 (lr-pcsx-rearmed), (pcsx-rearmed)
- PSP (lr-ppsspp), (ppsspp)
- ScummVM
- Sega 32X (lr-picodrive)
- Sega CD (lr-picodrive)
- Sega Saturn (lr-yabause)
- Sega SG-1000 (lr-Genesis-Plus-GX)
- Super Nintendo Entertainment System (PiSNES), (snes9x-rpi), (lr-armsnes), (lr-catsfc), (lr-pocketsnes), (lr-snes9x-next)
- Vectrex (lr-vecx)
- Videopac or Odyssey2 (lr-o2em)
- Virtual Boy (lr-beetle-vb) (EXPERIMENTAL)
- WonderSwan (lr-mednafen-wswan)
- WonderSwan Color (lr-mednafen-wswan)
- Zmachine (Frotz)
- ZX Spectrum (FBZX), (Fuse), (lr-fuse)
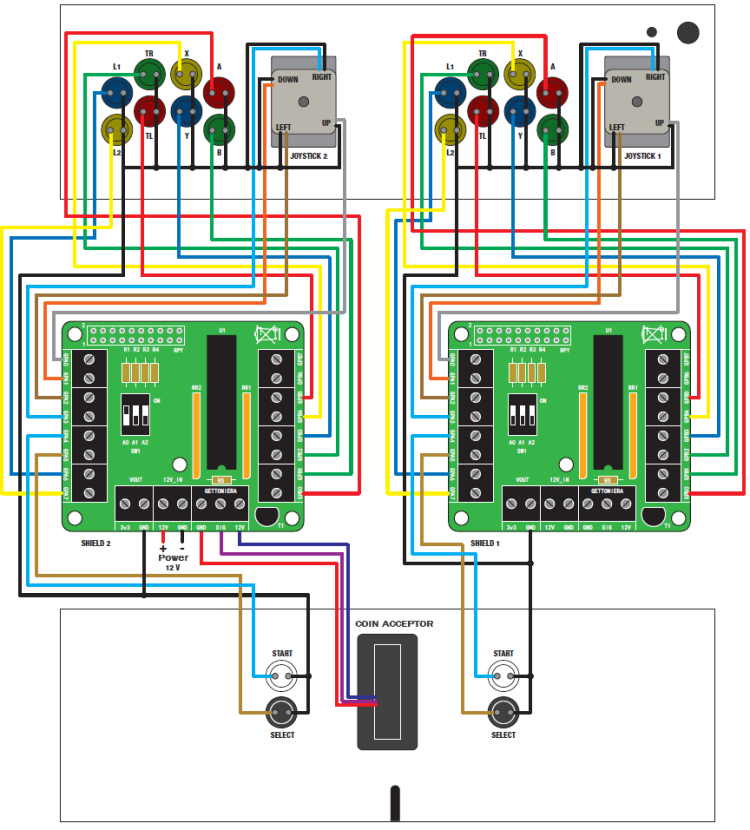
In this project we’ll interface Raspberry Pi through a specially made shield hosting the MCP23017 chip.

MAME Shield
In addition to the software aspects, the RetroPie project consists of a hardware solution too, to connect a joystick or different gamepads to the controller (Raspberry Pi).
The “MAME shield” is a small board that supports the connection of an arcade joystick having a “stick” for the 4 directions and up to 12 buttons. Remember that for most of MAME games you need 2 or 3 buttons, while if you want to emulate other platforms we recommend the use of 6 additional “game buttons” and 2 “start and select” buttons.
Below we see the wiring diagram. The shield connects to Raspberry Pi I²C-Bus through the MCP23017 and closes a contact (connecting the high level to ground) to simulate a button pressing.
L ‘MCP23017 is a 16-bit port-expander with I²C interface. As you can see from the datasheet, there are 2 groups of 8 pins each.
A0-A1-A2 are the pins to define the shield address; The Raspberry Pi through this shield is capable of connecting 8 arcade joysticks with 12 buttons each. For the communication to work correctly you need to set the right lines combination to achieve the desired address; if you mount two shield you must clearly compose different addresses. The address is set through the dip switches on SW1, connected to the three lines, each of which has a pull-up resistor that maintains it at a high logic level when the corresponding dip is OFF (open).

Instead, pins from GPB0 to GPB7 and GPBA0 to GPB7 will be connected to our buttons.
From the diagram you can see that we have a pin (SIG) for the coin holder (find the details of this device in the box below) which is optional. If we do not want to insert coins we can replace it with a button bypassing the transistor T1, so connecting it between GPB7 and ground.
All of the MCP23017 input lines are equipped with a pull-up resistor, thanks to RR1 and RR2 resistive networks.
Image installation
Once you have found all the necessary material and have assembled one of our cases you can create the image file to start using the emulators. First, download the RetroPie Project image file from our site, then unzip and install the .iso file to the SD card. On MS Windows you can use Win32DiskImager, on Mac RPI-sd card builder, while on Linux you can use the command:
sudo dd if = of = IMG_FILE_PATH SD_CARD_PATH bs = 1m
We recommend to choose an 8GB+ SD Card, since the OS occupies about 4GB and you need enough space to store ROMs.
For Windows users, here are the installation steps:
- open Win32DiskImager
- select the image you want to write to the SD Card (you need to unzip it first)
- select the SD Card drive; make sure it is the correct device, because the procedure will completely erase all SD card data;
- click on “Write” and wait until the process ends

Now you have a bootable SD Card for your system. Once the installation is complete, insert the SD Card into the Raspberry Pi slot.
From our site you can download the full and already configured Retropie image file, with buttons configured according to this layout:
The button names shown in the figure are the original arcade games ones. Mame uses the first three top buttons, while Nintendo uses the first 6. Actually, when opening the games, the correspondence indicated on the instructions is A = A; B = X, C = TR.
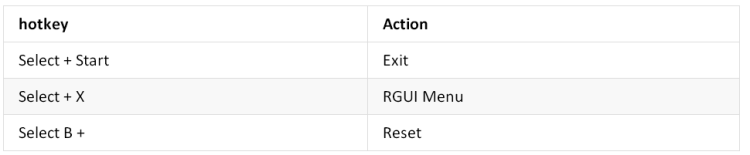
Then there are the Start (white, bottom left) and Select (black, top left), duplicated for the two possible players; pressing them both resets the system and forces the exit from game.
For all the games, A selects and B exits; the Start and Select combo goes back to the emulator menu or to the system menu; pressing B in the emulator menu exits to the emulator selection menu, that can be browsed by the joystick.
To make connections between shield and buttons follow the Table.

Correspondence between the shield GP I / O and the buttons;
Retroarch buttons column indicates the value assigned in the Retroarch configuration file to the related button.
As you can see from the table, the Retroarch and the MAME emulators buttons have been configured already, so we just need to make the rack and insert the (original, beware of the copyright!) game ROM to start playing. If available we’ll activate the coin holder, otherwise we’ll simply connect a button to GPB7 input.
For the real nerds, who would like to recreate the Retropie image from scratch, to change the number of players or the graphics settings etc, they will have to follow this procedure:
– download the “Retropie” V3.x version from http://blog.petrockblock.com/retropie/retropie-downloads/
– install the image on a SD-Card as described above;
– insert the SD Card into Raspberry Pi and connect keyboard and LAN cable, you will get the screen in figure after the boot. You can’t use the joystick yet, but only the keyboard;

– double-press the F4 key to enter the command prompt and check the Raspberry Pi IP address;
– with the keyboard, type this command that allows you to enter the distro advanced configurations: Sudo raspi-config;
– Click “expand file system” to use all the SD Card size, otherwise we will have no space to install the various packages and ROMs , and then click OK when done;

Use arrows to move down and click <Finish> , then reboot when requested by selecting <Yes>.

Reboot Raspberry Pi and disconnect the keyboard: pay attention to always keep the keyboard unplugged because after the two controllers have been configured, if you boot the Retropie with keyboard connected it will not recognize and configure properly the buttons. In that case, you need to unplug the keyboard and reboot. Viceversa, if you need the keyboard to make settings, you have to connect it only after Emulstation started. Later, this will help us to configure the MAME buttons.
At this point install MobaXterm on your PC, a terminal emulator to remotely control Raspberry Pi; Launch it and click on “session” at the top left. In the newly opened window, click SSH: enter the IP address of your Raspberry Pi then click OK.
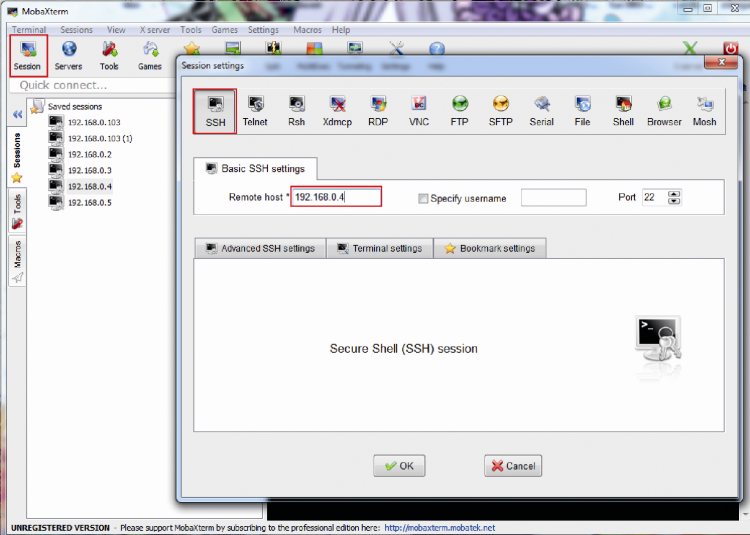
Click the address you just created (it’s on the left in the window) and enter as user “pi” and password: “raspberry”.
Now we can send commands to install and configure the drivers for the joystick (through MCP23017); install the DKMS (Dynamic Kernel Module Support) Linux kernel by running:
sudo apt-get install -y –force-yes dkms cpp-4.7 gcc-4.7 git joystick
If you will receive an error in the installation of a kernel component, simply repeat the command. Otherwise, jump directly to the next:
sudo apt-get install -f
We install the correct joystick drivers:
wget http://www.niksula.hut.fi/~mhiienka/Rpi/linux-headers-rpi/linux-headers-`uname -r`_`uname -r`-2_armhf.deb
sudo dpkg -i linux-headers-`uname -r`_`uname -r`-2_armhf.deb
sudo rm linux-headers-`uname -r`_`uname -r`-2_armhf.deb
Now you’ll have to go on our site and download the “build” folder. In this folder you will find the necessary files for the joystick. Unzip the folder and copy it by using MobaXterm in the folder:
../home/pi
Enter the “DEBIAN” directory with the command:
cd /home/pi/build/mk-arcade-joystick-rpi-0.1.4/DEBIAN/
change the two files rights, otherwise during the installation you cannot configure the joystick:
chmod 775 postinst
chmod 775 prerm
Go back to the main folder with the “cd” command and then launch the command:
cd build
Authorize the installation of the following drivers:
sed -i “s/\$MKVERSION/0.1.4/g” /home/pi/build/mk-arcade-joystick-rpi-0.1.4/usr/src/mk_arcade_joystick_rpi-0.1.4/* /home/pi/build/mk-arcade-joystick-rpi-0.1.4/DEBIAN/control /home/pi/build/mk-arcade-joystick-rpi-0.1.4/DEBIAN/prerm
create the two controllers’ management file:
sudo dpkg-deb –build “mk-arcade-joystick-rpi-0.1.4/”
sudo dpkg -i mk-arcade-joystick-rpi-0.1.4.deb
Now create the two joysticks addresses:
sudo modprobe mk_arcade_joystick_rpi map=0x20,0x21
In this case we have considered two joysticks in the example, with addresses 0x20 and 0x21 respectively; the address is chosen by configuring the dip-switch mounted on the MAME shield, according to Table.

We must edit the “modules” file with the command:
sudo nano /etc/modules
and insert the following strings:
mk_arcade_joystick_rpi map=0x20,0x21
i2c-bcm2708
i2c-dev
Save the file by pressing “CTRL + O” and overwrite the file. Press CTRL + X to exit.
Edit “raspi-blacklist.conf” and insert the pound sign (#) in the string “i2c-bcm2708”:
sudo nano /etc/modprobe.d/raspi-blacklist.conf
#i2c-bcm2708
Save the file by pressing “CTRL + O” and overwrite the file.
CTRL + X to exit
Now we can test buttons and check that all installations are successful, with the command:
jstest /dev/input/js0
Typing JS1 you will test the other joystick.
CTRL + Z to exit
Restart Raspberry Pi with sudo reboot command.
First start and controller configuration
When Raspberry Pi is off, connect the arcade controller. Obviously insert the SD card. Turn on the Raspberry Pi; at the first boot it will display the screen in figure . This menu will setup both Emulationstation (operating system front-end) and RetroArch Emulators controls, system that manages the configuration of all the emulators except MAME, whose we will see later how to configure the buttons.

Press a button on the arcade controller and configure the buttons to be able to “move” between the various emulators and choose the game that we like (Fig. 10).

The buttons used if compared to those required by the software are much less, so when you have configured the DIRECTION – A-B-X-Y-LB-LT-RB-LB-START and SELECT buttons, by holding down an already configured button it will show the message “hold for 2S to skip “, so the remaining buttons will be skipped and not configured since they are not needed in our project. The buttons that are not configured now can be configured later using the same procedure, by inserting a normal USB PC controller or DIY making an arcade controller with 12 buttons, but this is not our case because we are making a MAME cabinet.
Let’s see what the various buttons do:
– A button: allows us to confirm selections;
– B button: it allows us to exit from emulators and go back on the config screens;
– START: allows us to enter the menu to change buttons, or to reboot system;
– SELECT: it allows us to enter the menu and make some less important settings, like inserting images for each Rom, or in case of a long ROM list, to choose the desired letter.
The software also provides the key combinations to exit from the emulators, to save, etc.
There are also some hotkeys or keyboard shortcuts to activate certain functions, shown in Table.
After you configured the controller, we will have access to the emulator selection screen, do not worry if you do not find anything because you will have to load the various ROM before start playing.
Let’s focus now on the Retropie “fake” emulator, since it is the one that let our system to be configured (Fig. 12):

We recommend using a keyboard for the configurations (much faster), otherwise you could use the newly installed arcade controller. Let’s see one by one the individual settings:
– Configure audio settings: You can configure whether to force the audio output to HDMI or to analog jack, and select the output volume. The default setting is HDMI output.
– Configure retroarch / launch retroarch rgui: you can change the various emulators, audio, video, controller etc. settings. Only the MAME emulator is not affected by these setting: you have to manually change its various settings.
– Configure retroarch / joystick: settings to be changed only if you use a standard keyboard or a standard USB analog joystick (PS3 controller, PC, XBOX etc.) as game control.
– Configure retroarch net play: you can change the network settings.
– Configure splashscreen: Here you will find over 30 different themes, choose one and press enter twice. It is the initial image when you start your operating system.
– Configure access: through a dongle, the Raspebrry Pi can be constantly connected to WiFi networks; Simply choose the desired connection and credentials to access network.
– Raspberry pi configuration (raspi-config), it is the standard Raspberry pi config tool (sudo raspi-config)
In the screen you will find the following items:
- Expand Filesystem:uses all the SD Card capacity, it is a must to have enough storage capacity for all the game ROMs
- Internationalization Options:to set location, keyboard layout and time-zones.
- Advanced Options:on Memory Split change the number to 192 or 256, 192 recommended for raspberry B and 256 for type B + and 2.
- Overclock:set the overclocking level. Select “medium”, a reasonable level. If the OC is too high, you can have temperature problems and damage the Pi. In our test we did not overclock the Raspberry Pi.
- Advanced Options:enable also the SSH access
- Advanced Options> Audio:decide whether to force audio to HDMI or to stereo jack. We have already chosen this in a previous setting
- Finish:exits
- Reboot:reboots
The remaining settings will change linux kernel defaults, do not modify them.
– Show Ip addres: To view the IP address assigned
Finally, for those who have created their own image for a few emulators, they have to load the BIOSes they can find online on wiki-retropie
and selecting the desired emulator. For example, the BIOSes to be added are PSX, Game Boy.
Instead those who choose the full version (we are using in this project) will find all BIOSes already installed.
ROMs Transfer
At this point we must load the game ROMs. There are two ways to load them:
-with a USB pendrive;
-with an SSH connection with MobaXterm or PuTTY.
Our tests were made with MobaXterm, being simpler and intuitive.
With the pendrive
On a formatted USB memory drive, create a folder named “retropie” At this point insert it into a Raspberry Pi port.
Reboot Raspberry Pi and automatically it will create ROMS folders for each emulator.
Remove the USB drive and plug it into your PC. When you access the USB drive you will notice that there is the ROMS folder containing subfolders for the various emulators.
Get the mame romset 037b5. For other emulators you need to make your own tests. Transfer the ROM that you want in the appropriate folder (eg mame).
You can find on internet many retro-gaming websites offering games files. Be always sure that the ROM is compatible with your emulator version otherwise it will not run. Be careful also about copyrighting issues!
When the ROM copy is done, insert the USB drive into Raspberry Pi and turn it on. All the USB drive content will be transferred to the SD card. Wait until completed, it can take a long. You can check the flashing green light on the Pi. When it turns off, the process is finished.
You just have to select the emulator and start a game.
Through moba xterm
The procedure is :
- make sure that the Raspberry Pi is on and connected to the router;
- from the main PC run MobaXterm Personal Edition and then connect to Raspberry Pi, by typing the IP address (assigned by DHCP) and entering Username: “pi” and password “raspberry”;
- reach the RetroPie/roms folder;
- copy the ROMs to their respective emulators folders;
- restart Raspberry Pi to view and launch the available ROMs.

CAUTION: Some emulators may not recognize the ROMs because they need the right BIOS, like Playstation or NeoGeo. For the latter, just save the bios files “NeoGeo.zip” directly into the roms folder and you’re done.
Other emulators such as NES needs rom with .NES extension, SNES ROM requires the .smc extension.
If you don’t see a specific emulator on the Emulationstation list do not worry, just repeat the process by saving on the USB drive at least one ROM in the specified emulator folder.
At the next boot it will be visible and selectable. In figureyou see Emulationstation graphical interface after loading the ROMs.
With the joystick you can move left and right, while pressing “A” you select and emulator. Select a game and start it by pressing “A” button again.
The “B” button is used by the Emulationstation to “go back”, so exits from an emulator and returns to the selection screen menu (main screen).

On www.mamedev.org you can find the free ROMs released under free licenses (ROM use is allowed only if you own the original game and you use it for non-commercial purposes).
To test the emulator, let’s download the STAR FIRE free ROM, after you have checked the option ” I understand That These ROM images are for non-commercial use only “.
Many sites provide all the ROMs you want in compliance with copyrighting.
MAME, ROMs AND COPYRIGHT
MAME is a perfectly legal and free software. You can download it from the official website or other alternatives and use it freely because emulating another platform, in itself, it is not illegal. It is not illegal to have MAME on your computer, on your website or give it to your friends. The source code is freely available.
It is illegal to sell MAME or its source code and take profit from its distribution. As for Web or other media distribution, there are restrictions: ” The distribution of MAME on the same physical support hosting also illegal ROMs copies is strictly prohibited. You may not distribute MAME in any way if you sell or advertise illegal CD- ROMs or other mediums containing ROMs. Note that this restriction applies even if you do not receive directly or indirectly, a gain from the sale. It is allowed to make MAME and ROMs available on the same website, but only alerting users on ROMs copyright statements, and making it clear that users must not download any ROM if they are not entitled to do so. “
About the ROMs, it is a different matter. Possession of games memory image files belonging to logic boards that you do not own can be a violation of copyright. It’s like making a copy of a game or a musical CD purchased by a friend rather than buying it.
About the Web distribution of ROMs, we must point out that many sites were kindly contacted by copyrights owners being asked to remove them. So far, we know, no site was forcedly closed or prosecuted. The policy of this site is clear: we insert only links to free ROMS in the dedicated page , and we give information on how to find other ROMS only for those entitled to have them.
How can you acquire the right to use one or more ROMs? There are various ways. You can be authorized by the legitimate owners of copyright but this is a bit complicated.
You can buy the original logic boards and legally use the corresponding ROM. Warning, you will acquire the rights even if a logic board is not functioning. Simply, then, buy the failed original board for few euros each and be legally allowed to download and use their ROMs.
A third way is to buy the HotRod Joystick control panel produced by Hanaho, that is sold with absolutely legal Capcom’s ROMs.
Practical implementation
Years ago there were different types of Bartop racks (only dashboard and screen), the big cabinet we used to see in arcades coin-ops, then finally we have seen the first “consoles” or desktop PC as Commodore 64, Amiga, Nintendo etc.
In this case we have prototyped two racks: the first is the prototype for the dashboard and the overall gaming system. It has a HDMI output to connect it to any TV, easily transportable and less bulky.
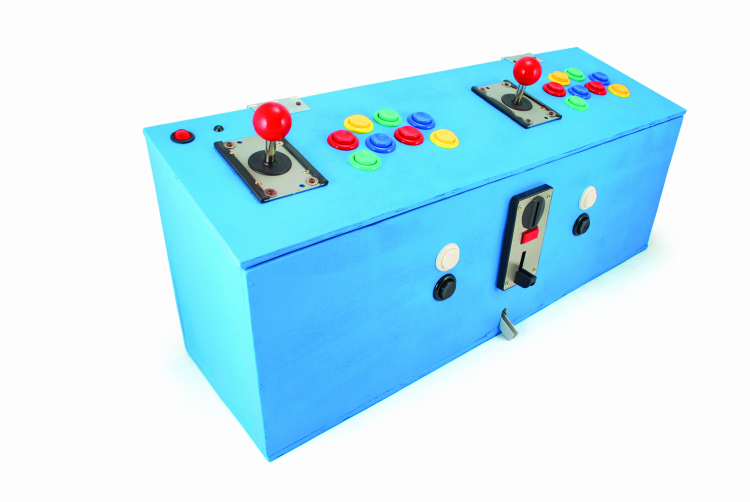
The dashboard size is 70×21, we put eight game buttons.
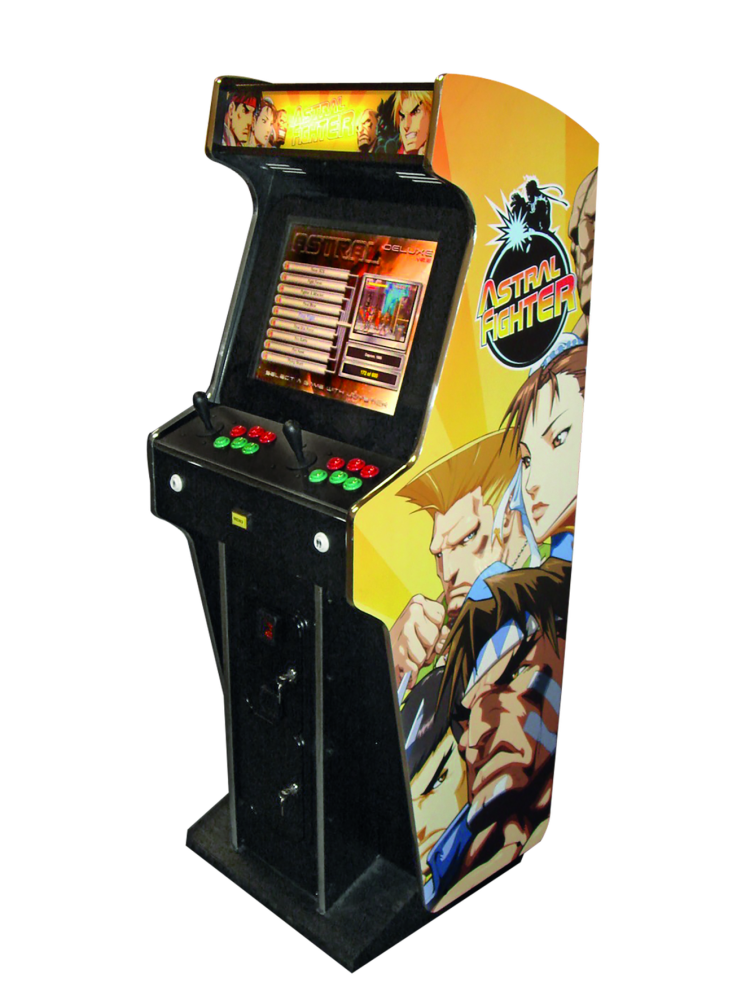
The second model is the classic Bartop rack, with a recess monitor for the most nostalgic ones!
It is a bit more complex to make, but we are offering you the rack dimensions so you can easily make it. The frame can be made with MDF or chipboard wooden panels, 18mm thick.
About the Raspberry Pi shield, the PCB layout is available at openstore and then you can easily mount all the traditional components on it. The chip socket has a reference mark for the right mounting as shown on these pages. The transistor T1 is only installed if you intend to connect the coin holder; the same for R5 resistance and the terminal marked “COIN”.
The shield must be completed by assembling the requested terminal blocks and, where RPY is marked, a 20-pin female connector on two lines spaced 2,54×2,54 mm, which can be simply obtained from two 10-pin female 2,54 mm pitch strips.
Once the shield is finished, insert it on the Raspberry Pi GPIO connector matching the contacts 1 and 2, then connect on the terminal blocks the game control buttons which meanwhile we have assembled on the console we made on purpose. Do the same for the joystick and the optional coin holder (or the “play again” button to be put on its place).

Installing the coin holder
If you do not want to put a button on JPB7 to simulate the coin insertion, you need to make the coin holder device.
The coin holder used in our project is a rack modular add-on to recreate the ‘80s-‘90s game rooms atmosphere, physically inserting coins to see credits increasing.
The coin simulates the pushing of a button and sends to Raspberry Pi a number of pulses (i.e. button hits) corresponding to the value of the currency that we have set. For example, in this project we planned 3 coin sizes: 50 cent – 1 credit, 1 euro – 2 credits and 2 euro – 5 credits.

Let’s see how to program the coin: it can work with RS232 or as a simple contact, the latter is the mode we want to use. On the left side, there are two buttons and a small 7-segment display that will allow us to program the coins at will and on top there is a “dip-switch” to decide how to use the coin, in our case we will have to put the dip number 1 to ON and the remaining to OFF.
Let’s program the first coin.
Press and hold the button “A” until you see “CP” on display, press the “A” button once and you will see “C1” (it means first coin), at this point we press the “B” button to increase a number, this number is the number of pulses that the coin will send when it is inserted. For example, we put 05 and insert the 2-euro coin, you will hear “beep” that means that the coin value has been accepted. Now every time you insert the 2-euro coin, Raspberry Pi receives 5 pulses, the equivalent of 5 credits.
Repeat this process for all other currencies. For example:
C1: 01 is equivalent to 1 credit (50 cents)
C2: 02 equals two credits (1 euro)
C3: 05 equals five credits (2 EUR)

To recap, for those who want to start now to “play” without having to set up anything, they can download the full image, made for two players, the coin and a total of 12 buttons.
In our project we configured 8 “Game” buttons and 2 for “START and SELECT”.
All emulators are working, you need only to load the (original) ROMs to start using them, the sound will be set to HDMI output, so if you connect to a TV with HDMI connection, the sound will be played directly from it.
Video
From openstore
RETROPIEKIT – Kit RetroPie for Arcade Videogame
Shield RetroPie For Raspberry Pi – kit
Coin Acceptor – Programmable (6 coin types)
DC cable with micro USB connector
Joystick Arcade with pink knob

Is it possible to run more than one CoinOp compatible shield with emulationstation/retropie so as to have more players, and have them all be compatible with the CoinOp?
[…] Take a look to different SNES-inspired cases, most of them are made for Raspberry pi 2 or 3. We also posted some alternatives few months ago, about a coin-op machine! […]
[…] the PiCade to take care of the physical build details. Another option would be to simply set up RetroPie or another emulator and attach it to your own TV or monitor. As small as the Pi, or even Pi Zero […]
I know this is a long shot but do you have the details/measurements for the cabinet itself?