
Let’s discover the potential of the instant messaging app, Telegram, by creating a remote control, based on a smartphone and a WiFi powered demoboard.
We may say that, when we have our smartphone in our hands, we have a door opened to the world. This is not just because of the global connectivity (mobile phone functions, Internet, Social Networks, Instant Messaging) that it provides us, but also for the capabilities offered by the wireless networking functions, that is to say the Bluetooth and the WiFi. Thanks to them and to the specific apps proliferating for some time now, the smartphone may be used as a remote control for units placed under the wireless coverage or connected via a cable. This article was born from the idea to use a smartphone in order to create a control system via Wifi, and to take advantage of a development board hosting an ESP8266-based wireless module, that we already applied – in different versions – to some projects in the past. It is not the first time that we propose a system for the purpose of remotely sending commands, by taking advantage of messaging and social services: we already did such a thing with Twitter and Fishino; this time, however, we propose a direct control based on wifi, that takes advantage of an instant messaging software that we may consider as Whatsapp’s competitor: Telegram.
The development board we will use is the Espresso Lite V2.0, that may be directly purchased from our store; it may be operating as a stand-alone board or along with an Arduino board since it is Arduino-compatible.
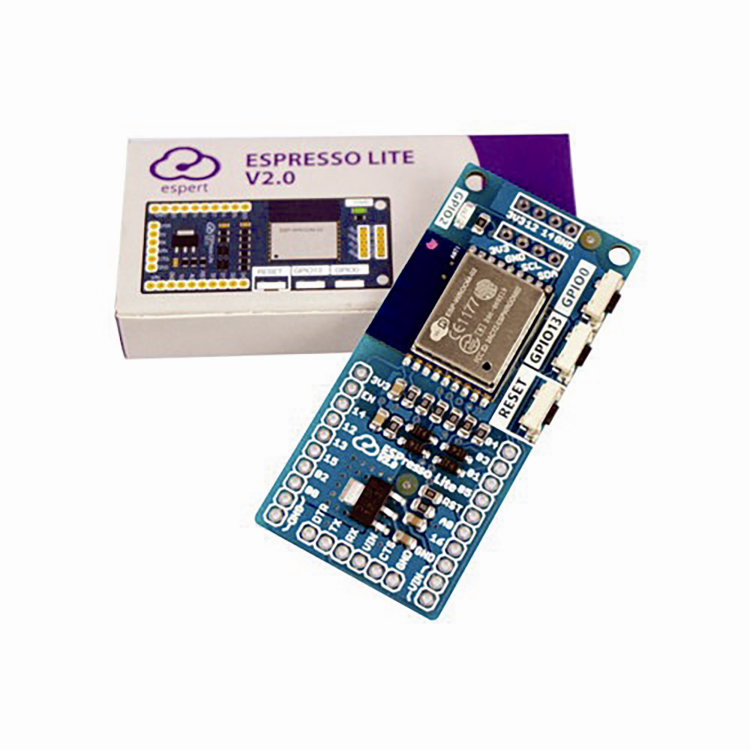
The espresso Lite v 2.0 demoboard
The board mounts an ESP8266 WROOM-02 module (FCC, CE and TELEC certified), with a 4 Mb Flash memory and it has been designed for IoT applications, its main features are:
- Arduino IDE and its libraries are supported;
- the bootloader for the Arduino IDE is supported;
- power voltage from 5 and up to 12 Vcc;
- 3,3V (800 mA) onboard regulator;
- reset button and two user-programmable buttons.
One of the peculiarities of the board is that its pinout has a 2.54 mm spacing; this makes it easy to insert it if we need to test it with components that may be arranged on the stripboards. In order to facilitate the insertion, Espresso Lite may be supplied with a male and female pin-strip.
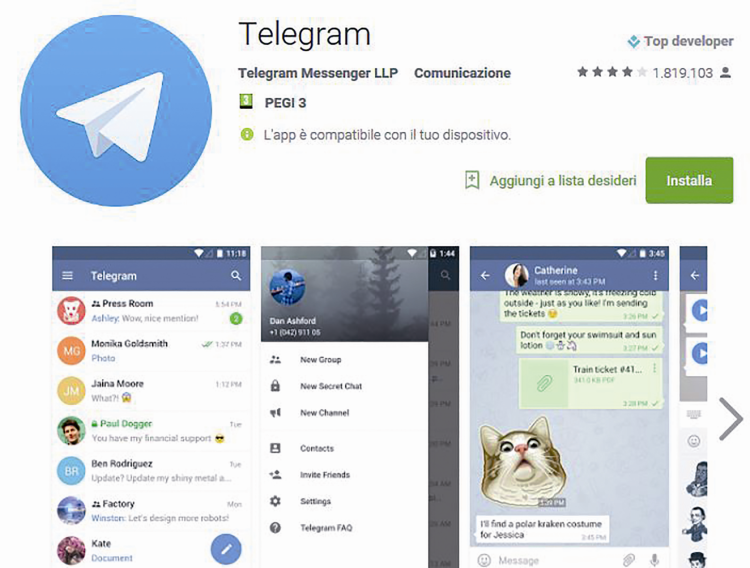
Once the hardware we will use has been defined, we may see what is possible to do and how to make the most out of our demoboard, and we will do it thanks to a project that is capable of interfacing Telegram. Telegram is an instant messaging application that is focused on speed and security (it has been the first one to implement the message encryption) and is very quick, easy-to-use and free. Its functioning is based on an open source communication protocol, that was developed so to reduce to the minimum a number of bytes sent per message.
The advantage of this system consists in taking advantage of the WiFi network, without having to use phone modules or SIMs (while with Whatsapp we would have had to register a telephone number and therefore to bind a SIM).

Telegram and the bots
Telegram’s greatest asset lies in the possibility to create some Bots as well, in addition to the classic accounts that are associated with telephone numbers. A Bot is an automated reply system, that offers the users the possibility to find information or contents by means of commands that are indicated by the Bot itself at the start of the research. More precisely, a Bot is a virtual user, that is to say, an automated client that connects to the service in our place; for this reason, it is considered as a robot, and it’s not a case that Bot is a shortening of a robot.
The user may interact with Bots as if they were other users, by sending them messages, commands or requests, by using HTTPS.
Bots may be used in order to obtain custom notifications and news; a Bot may act as a smart newspaper, and send only relevant contents as soon as they are published. In brief, you may tell it which subjects or messages you’re interested in, and among all of them, it will send only the chosen ones.
A Bot may also enrich the telegram chats with contents coming from external services, and therefore it offers an integration with other services. This is what the Image Bots, GIF Bots, IMDB Bots, Wiki Bots, Music Bots, Youtube Bots, GitHub Bots deal with.
A Bot enables the creation of custom tools: as an example, it may supply warnings, weather forecasts, translations, formatting or other services. By means of the Bots, it is also possible to create games: a Bot may play chess or checker against you, it may act as a host in quizzes, or may even take part in a roleplaying game (Trivia Bot). A Bot may even connect people looking for someone else with which to speak, on the basis of common interests or on the fact that they are close (HotOrBot). By summarizing, the following ones are the Bot categories:
– @ImageBot, for the image search;
– @TriviaBot, for playing quizzes;
– @PollBot, for the creation of surveys in the groups;
– @Rate StickerBot, for the sticker search;
– @AlertBot, that is a memo message, so to not forget the obligations.
The users may interact with the Bots in two ways:
– by sending them messages and commands and by opening a chat with them (as if they were other users) or by adding them to groups; this is useful for the chat bots or the news bots such as TechCrunch and the Forbes bot;
– by directly sending requests from the input field, and by typing the bot @username and the request; this enables the sending of contents from the online bots.
In order to use the Bots it is needed to add them to the chats: in the window in which there is a list of the chats, please look for the Search field; here we have to type the Bot’s name, preceded by the @ character. At the start, the Bot will give the instructions to follow in order to use it. In our case, we will go create a custom bot (that’s a creation of ours) that will enable us to interface our board and in particular the WROOM-02 module.
The application
Let’s make a step forward, and try to understand what we could actually do with this project: let’s imagine that it’s winter and that it’s very cold, we are at work and we remember of not having turned the heating system’s boiler on; the first idea that comes to mind is to call a neighbour or a friend and to ask him to turn it on. But since we are electronics enthusiasts, we would like to be the ones to remotely give the command. We could, therefore, use one of our TDG remote controls or install a GSM thermostat with a SIM900 module that receives SMS commands for the activation and deactivation of the boiler; but in that case, we would need a phone SIM and the corresponding plan. The alternative is the one to create a switching on/off system from our mobile phone, one that would do without of the phone network but that would use a WiFi or the Internet. This may be carried out by choosing among three solutions:
- to create an application on our smartphone (even if not everyone would be able to develop it) and a firmware on the board, but the system would turn out to be a very complex one and would need a fair proficiency, a quite long development time effort;
- to use a dedicated web page and create a firmware on the Espresso Lite v2.0 demoboard, so to connect to the page for the purpose of exchanging information, but that would not be very convenient since if we wanted some notifications, we would have to open and update the web page, to login, etc.;
- to use an instant messaging service such as Telegram, and to rely on a Bot.
We adopted the latter solution, since it enables the receiving of notifications (the WiFi module may send spontaneous notifications to our smartphone and the latter will warn us as if it were a message), it grants the security (only by means of an authentication – that is carried out only the first time – it is possible to communicate with the module), and it is convenient (we do not have to open a web page but an application with all of its functions).
Let’s see in detail what this is all about. You can use TelegramBot from a mobile phone (it may be used both on Android and on iOS-based smartphones): it’s an app, therefore, it does not need programming, while as for the Demoboard you may use the firmware we provide.
The first thing to be done is to try to understand it (many people just copy/paste) and to improve it, that being the case. As previously said, the objective of this article is the one to let you understand how the proposed system works, by trying to make you remotely send and receive messages.
Let’s proceed, by small steps: if you didn’t do that already, please install Telegram on your smartphone. Now, from the Contacts option, we will type and select @BotFather.
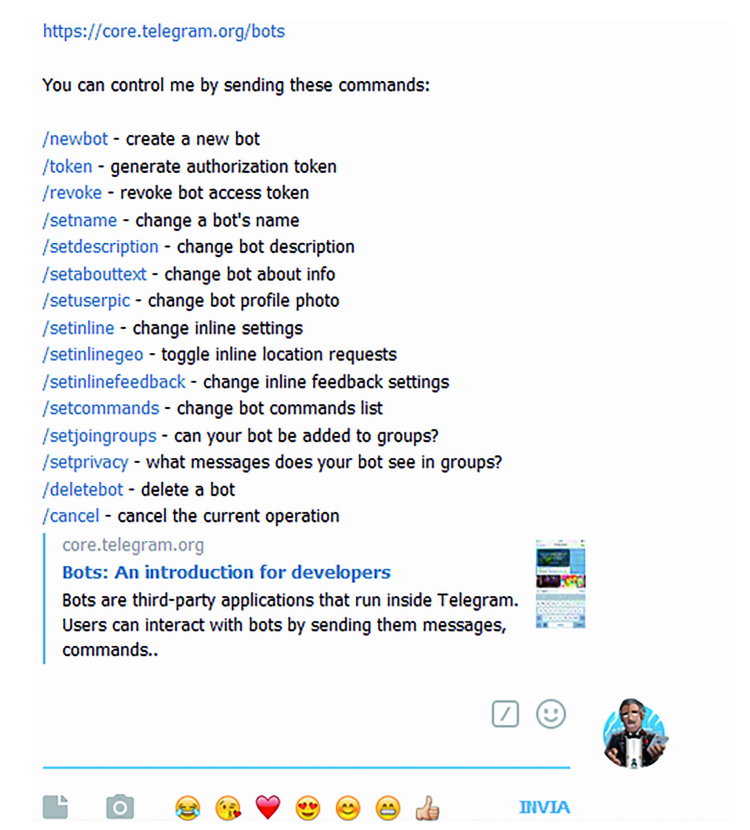
We are now talking with a Bot (the Botfather, in this case) that is to say, a virtual account, capable of creating and modifying Bots; as a first thing, we will write the command proposed by the Botfather in the chat: /newbot. The BotFather will reply us, by asking a name for our Bot, and then the username (simply put, that’s the name after the @) with which it is possible, for the people we choose, to add it.
The latter will necessarily end with “Bot”.
Therefore, some valid names are Ardubot, superbot, etc., unless they have already been chosen by another user (in that case, please choose a different name). Once the creation of the Bot is ended, @BotFather will reply with a window such as the one in the picture.
If you followed the creation procedure to the detail, you will have noticed a 45-character long string that is the “token” and that will enable the authentication on the server and the communication. Well, from the point of view of the application we have all the ingredients we need in order to create our “recipe”, for the moment.
Do you remember when we talked about compatibility with Arduino? Well, our board may be directly programmed from Arduino IDE and therefore used by all the electronics enthusiasts, without having to deal with using other languages (such as for example, LUA, that is used for the programming of the ESP8266 by means of the derived NodeLua).

That being said, we may start to create our application.
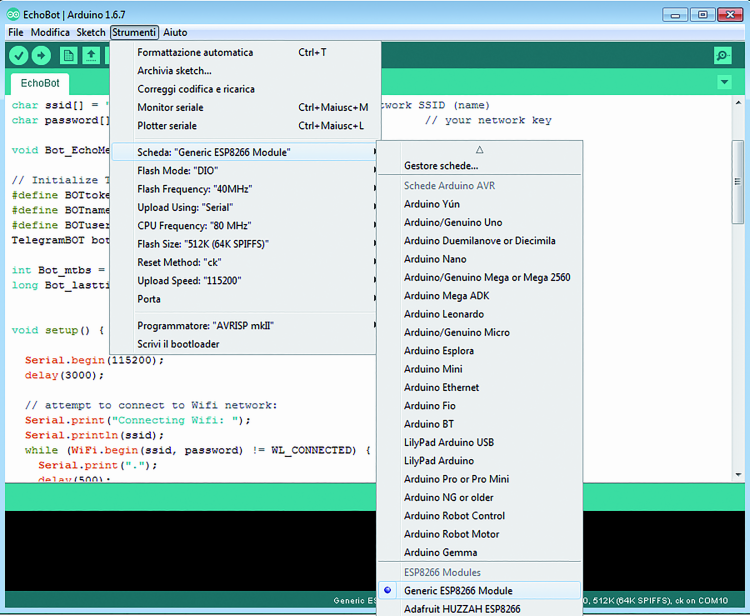
As a first thing, we would have to update Arduino IDE, so to have our board being recognized:
- please make sure to have downloaded the last Arduino IDE’s version;
- please select “Setting” from the “File” menu;
- please add the http://arduino.esp8266.com/package_esp8266com_index.json address in the “Additional Boards Manager URLs” field.
After that, please set the parameters as per figure. The firmware enables the connection to a WiFi network, and once the desired temperature has been reached, a demoboard exit will be activated: we will then need it, in order to activate the relay that will turn the boiler on. As we will see in detail, the following code lines have been added:
#define MAX_TEMP_OFF_CALDAIA 23
#define MIN_TEMP_ON_CALDAIA 22
These two define commands enable the management of the turning on and off boiler temperature. We would like to remind you, moreover, that the greater the temperature offset, the greater the applied hysteresis (stability of the ON/OFF relay). The available commands are:
- boiler on (activates the boiler);
- boiler off (deactivates the boiler);
- temp (sends the room temperature);
- all the other messages sent will be managed by an echo.
It is possible to add other commands by comparing the bot.message[i][5] bot with the text to be recognized. As an example, if we want to activate the output 13, by sending the Exit ON command, it is needed to insert the following code lines in the routine named as Bot_EchoMessages()
if (bot.message[i][5] == “Exit ON”) {
 digitalWrite(13, LOW);
 }

Program Start
As a first thing we have to connect ourselves to the existing WiFi network, after that we will insert our network’s name (SSID) and password, as shown in the following code section:
char ssid[] = “Your SSID”;
char password[] = ”Your Password”;
The first line contains the network’s name, that is to say, the WiFi SSID, while in the second one the login password to the network itself must be indicated. Finally, let’s type in the data concerning our bot: the code lines that concern this operation may be seen here:
// Initialize Telegram BOT
#define BOTtoken "Paste the code generator from botfather"
#define BOTname "Name of the bot"
#define BOTusername "Username bot (to understand what ends up in bot)"
#define ID_TELEGRAM This id it is obtained the first time that we send the message
Start and allows to answer only bot that we want.
Giving the start command, the bot responds by telling her id.
Download the Telegram Firmware for ESP8266
Let’s load the firmware
If there are no compiling errors, we may proceed with the upload on the Espresso Lite v2.0 board; on the subject, we would like to remind you that you have to keep the “prog” button pressed, and to press the “reset” button for a second.
Once this has been done, please download and, in the moment in which the dots are shown (ongoing upload) it is possible to release the “prog” button.
We finally reached the most beautiful and satisfying part of this work! We created our beloved communication between the ESP module and our smartphone.
Let’s see in detail:
- let’s open the serial now and set the baud-rate to 115.200;
- let’s move on to Telegram and write the “start” command (without quotation marks);
- we may notice that the message has been received from the serial console and therefore the echo reply:
GET Update Messages
…. connected to server
Sent Update request messages up to: 94650296
{“update_id”:XXXXXXXX,
“message”:{“message_id”:669,”from”:{“id”:XXXXXXXX,”first_name”:”Gianluca”,”last_name”:”XXXXXXXX”,”username”:”XXXXXXXX”},”chat”:{“id”:XXXXXXXX,”first_name”:”Gianluca”,”last_name”:”XXXXXXXX”,”username”:”XXXXXXXX”,”type”:”private”},”date”:1466755441,”text”:”start”}}]}
Let’s copy the numerical code after the “update_id” and set the #define ID_TELEGRAM with that value. If everything reached a successful conclusion, a notification should reach us on our smartphone, coming from our module, with a sequence of messages, that is to say, the available commands that have actually been implemented in our program, and an ID_TELEGRAM code that we should type in the program’s define command. Now Telegram accepts the commands (exception made for the start one) from our smartphone only: think of how many projects may be developed, when having a “remote terminal” that may command our ESP2866-based module, from anywhere ; we may talk of home automation with full rights, and think about the wide range of possible applications!
You will remember that our final objective is the one to remotely activate the thermostat, so to activate and deactivate the heating at home, and without any effort; well, let’s acquire the needed hardware now, that is to say:
- a DS18B20 temperature sensor;
- 1 4.7 kohm resistor;
- 1 relay board that may be commanded by TTL (3.3V/5V) signals;
- an ESP2866-based module.

Let’s connect now the One-Wire DS18B20 temperature sensor to our module, by following the shown wiring diagram. We now have to connect the GND pin (that’s the black wire if you are using the sensor in the One-Wire waterproof version) to the GND contact; after that let’s connect the +5/3.3v pin (the red one in the case of the One-Wire waterproof) to the 3V3 pin.
After that, please connect the Data central pin (the white one, in the case of the one-wire waterproof) to the digital pin (14); let’s verify now that the sensor detects the correct temperature, by giving the temp command from our smartphone.
The getTemp() function returns a float type value, given that we need to know the value in the decimals as well.
Such a function is recalled every x seconds (with x that may be set by changing the value of Bot_mtbs) in the loop and is always compared with the two define commands:
#define MAX_TEMP_OFF_CALDAIA 23
#define MIN_TEMP_ON_CALDAIA 22
We may now control the temperature in any moment of the day.
All that is left to do is to connect the relay board to the output of another digital pin and to set it in the #define PIN_GESTIONE_CALDAIA line (we chose pin 13); the board is the 2846-RELAY2CH and it is supplied and onboard has two relays with a switch at 10A/250Vca (10A/30Vcc), that may be activated via TTL or 0/3V logic levels (it integrates the logic of the case); it is powered by 5 volt DC, therefore we may connect it in parallel to the power source of the Espresso Lite. As for the connection please refer yourself to the diagram, and remember that the relay board’s Vcc goes in the Espresso Lite’s Vin and the GNDs of two boards must be joined; since we are using a single relay, let’s connect Espresso Lite’s pin 13 – that we designated as output – to the relay board’s IN1. When the Espresso Lite activates the output and the relay along with it, you will see the relay board’s LED lights up; this will occur if the detected temperature goes under the one that has been set and if the deactivation exceeds the maximum value set.
If we send the “boiler on” command, the relay is activated and the boiler is turned on. In the case in which the temperature is higher than MAX_TEMP_OFF_BOILER Telegram will send a message and say “Starting boiler turning off”
but the relay remains active and it must be the user to send a “Boiler off” message. Such a management remains to the user, since if the boiler turning off was connected to the MAX_TEMP_OFF_BOLIER and the “Boiler on” message had been sent, the boiler would have returned to the off mode. The management could be solved in various other ways: to reset the various temperatures, to divide the thermostat modes, etc.

Conclusions
We have finally created a WiFi thermostat that informs us of the boiler status (or the air conditioner’s one: in that case, the relay’s changeover switch must be reversed, that is to say, C and NC are used), in addition to the temperature of the monitored place. The system we proposed in these pages works already, but if you choose so, you may try to modify the two define commands that concern the temperature: you will be able to redefine them at int and to create two commands along the lines of the existing ones, that will enable you to remotely set the two temperatures, or you may create dedicated programs for a possible rolling shutters/light management, and much more.
From openstore
