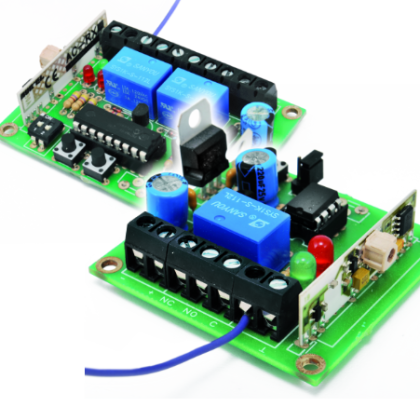
Single and double channel 433.92 MHz Receivers able to be matched to a maximum of 10 transmitter each. Monostable or bistable.
Specifications
– Number of outputs: 1-2
– Output Mode: Monostable, Bistable
– Power supply: 12 V DC
– Power consumption: 40 mA max.
– Memory: 10 codes per channel
– Encryption: MM53200/HT-12
That based on MM53200 IC is one of the oldest and proven coding adopted in general and radio gate controls: many transmitters available on the market for these applications adopt it. Being on the market for quite a long time, integrated encoders have been taken out of production and were replaced for example by UM3750 or UM86409 (both from UMC).
For this reason, it is good to have a receiver microcontroller able to adapt to this encoding, learning it in automatic mode; protecting us from chips aging and also allowing you to replicate receivers even without having the decoder.
This is one of the reasons why we have engaged in the production of single-and dual-channel receivers that you find in this post. The other reason is that by learning the code directly from a transmission you can limit the size of the receiver (you don’t need the 12-pin dip-switches instead required in manual setting) and to pair the receiver to transmitter quickly and without errors.
Both receivers described in this article are compatible, as well as with MM53200, UM3759 UM86409 encoders even with the latest Holtek HT-12, which have coding bit compatible setting.
The 1 channel diagram

Let’s start with the analysis of the single channel circuit, based on a PIC12F683 microcontroller and a hybrid module radio receiver AC-RX2, tuned to 433.92 MHz. The U2 module contains the radio part of the circuit and is a specific AC-RX2 Aurel receiver equipped with an antenna signal amplifier (which gives a sensitivity of -106 dB), super regenerating tuning stage tuned to 433.92 MHz with factory-calibrated compensator equipped with RF filter (the filter serves to improve the selectivity, which is not high in super regenerating) and amplitude demodulator. Completes the module, one digital signal squaring comparator (TTL level) coming from pin 14 and an LF amplifier output for the AM demodulator signal.
Immediately after ignition, the micro initializes its I/O, setting GP0 and GP1 as used outputs, respectively, for controlling the signaling LD2 LED (which indicates both the mode of operation, and the state of the self-learning procedure) and the NPN transistor T1 which drives the control relay of the load.
Continuing with initialization, the PIC sets GP2, GP3 and GP5 as inputs, respectively devoted to the reading of the P1 button, the J1 jumper and the output data of the AC-RX2; for the first two the active internal pull-up is active. The GP4 line is initialized as an input assigned to the A/D converter and is designed to accommodate future enhancements of the firmware. At the moment it is irrelevant to the operation of the circuit.
The circuit is completed by the power supply unit, which starts from the points + and – PWR (power supply terminal block) and reaches the three-terminal integrated regulator U1.
The firmware, after I/O initialization, flashes LD2 five times to indicate the correct start-up and normal operation, which corresponds to the execution of the distance provided command; then runs the main loop by checking both the changes in level on pin 4 (ie, the change in the state of J1 jumper) and the possible pressure of P1. A special routine periodically tests the status of the pin 2, or the arrival of data from AC-RX2; when we press one of the buttons on the transmitter, the RF signal radiated by the latter reaches the receiving antenna module AC-RX2, which demodulates the data component and sends it to pin 14 to make it available to the microcontroller, which reads from the Pin 2.
The Micro acts as a code for the code corresponding to the key pressed on the remote (but the firmware also provides a routine to automatically learn the code base without setting dip-switches) and work in this way: the microcontroller takes the TTL pulses, places them in RAM and analyzes them with an appropriate firmware routine that first of all discerns, among many signals picked up if this is compatible with the UM3750 encoding, then, if so check if the code is a those stored during self-learning, and if not deletes the data from the RAM and prepares to a new analysis.
Now let’s see what happens if the received signal contains one of the codes learned and kept by the working EEPROM: in this eventuality, appropriate handling routine of the relay starts, which determines different actions depending on whether the operation mode is monostable or bistable: mode setting is done with J1 (jumper open means monostable). If the transmission stops simultaneously but a signal from another remote control is received, matching one of the 10 learned codes, within the time-out granted by the firmware, the microcontroller considers that the transmission has never stopped.
Notice that the mode of operation of the output can also be changed during operation, ie you do not need to turn off and restart the circuit, because the status of jumper J1 is read continuously.
BOM

R1: 4,7 kohm
R2: 1 Kohm
R3: 470 ohm
R4: –
C1: 100 nF
C2: 100 µF 35 VL
C3: 100 nF
C4: 10 µF 35 VL
U1: 7805
U2: AC-RX2
U3: PIC12F683
D1: 1N4007
D2: 1N4148
LD1: LED 5 mm red
LD2: LED 5 mm green
T1: BC547
P1: Microswitch
RL1: Relè 12V
Learning procedure for Single Channel

Seen as the receiver behaves when a command arrives, let’s see how to insert the code: how learning takes place.
This can be done at any time by pressing and holding the P1 button until the green LED (LD2) lights up: then a self-learning phase began. At this point you have to transmit with the receiver to which the code is to be learnt; if the TX has more buttons and then more channels, you can learn the codes of all; So, you have to press the button of the remote control that you want to learn, and wait until the LED flashes, indicating that the learning has been successful. If the LED is flashing, it means that the memory is full or the transmitted code is not valid (it’s not the format required by since sent by transmitter with a MM53200, UM3750, UM86409 or HT-12 encoder).
Pay attention to detail: the circuit can store the transmitter codes without exceptions, except for one that provides all the bits to 1 (all the dip-switches on the radio control set to ON); then the transmitter you can use just 4,095 instead of 4,096 combinations.
To erase the EEPROM and then remove the codes already learned, you have to disconnect the power supply to the circuit and turn it back on after pressing the button P1, the latter should be issued only when the green LED remains lit fixed for 2 seconds to indicate the cancellation of memory. At this point you can release the button and the green LED will flash 5 times to indicate the exit from the procedure of cancellation and the normal start of the receiver.
| LED | Normal operation | Programming |
| LD1 | activity OUT1:on =RL1 excitedoff = RL1 at rest | – |
| LD2 | At startup or exit from learning procedure or deletion of codes, signals with 5 flashes a normal mode boot | is turned on for 2 seconds when you get into programming; flashes when the circuit has learned the code transmitted; is still if learning didn’t work |
The 1 channel firmware
'****************************************************************
'*                                                     *
'*  Author  : Alessandro Sottocornola    *
'*                                                     *
'****************************************************************

INCLUDE "modedefs.bas"

'************************** D E F .    R E G I S T R O *************************
DEFINE OSC 4
DEFINE PULSIN_MAX 1350
'OSCCON=%01110111

ADCON0 = %00000000
OPTION_REG.7=0
CMCON0 =%00000111
ANSEL=%01011000
WPU=%00000100
IOC=%00000000

INTCON=%00000000
PIE1=%00000000
T1CON.0=0
T2CON.2=0

'********************** Definizione porte del PIC *****************************
symbol SERIALE = GPIO.0
symbol LED = GPIO.0
SYMBOL RELE = GPIO.1
SYMBOL PULSANTE = GPIO.2
SYMBOL RF = GPIO.5
SYMBOL TRIMMER = GPIO.4
SYMBOL JUMPER = GPIO.3

INPUT PULSANTE
INPUT TRIMMER
INPUT JUMPER
INPUT RF
OUTPUT LED
OUTPUT RELE


'************************* D E F .    V A R I A B I L I ************************
TX_MAX CON 10       'Numero di TX memorizzabili
TEMPO CON 40       'aumentarlo se in monostabile il relè va ad intermittenza

CONTA VAR WORD      'Contiene la lunghezza dell'impulso
ERRORE VAR BYTE     '0:Nessun errore nel segnale - 1:Segnale non valido
I VAR BYTE          'Varibile di comodo per i conteggi e accessi all'array
TRENO VAR WORD[25]  'Contiene la lunghezza di tutti gli impulsi
COD_A VAR BYTE      'Parte alta codifica RF
COD_B VAR BYTE      'Parte bassa codifica RF
COD_1B var byte     'Parte alta codifica RF letta da memoria
COD_2B var byte     'Parte bassa codifica RF letta da memoria
TROVATO VAR BIT     '1:Dato in memoria corrispondete a quello ricevuto
LOC VAR BYTE        'Locazione memoria
RICEVUTO VAR BIT    '1: segnale RF ricevuto
CH VAR BYTE         'Identifica il pulsante (1,2,3,4) premuto
TEMPO_RX VAR BYTE   'Tempo trascorso dall'ultima ricezione codice RF


TEMpO_RX=0
CONTA=0
TROVATO=0
RICEVUTO=0
errore=0


'********************************* I N I Z I O *********************************
CLEAR
eeprom 0,[255,255,255,255,255,255,255,255,255,255,255,255,255,255,255,255,255,255,255,255]
low led
low rele

'RESET COMPLETO SE PULSANTE PREMUTO ALL'AVVIO
IF pulsante=0 THEN
    high led
    loc=0
    for i=1 to TX_MAX
        write loc,255
        loc=loc+1
        write loc,255
        loc=loc+1
    next i
    pause 1000
    low led
endif

'Inizializzo facendo lampeggiare il LED
for i=1 to 10
    TOGGLE LED
    PAUSE 200
NEXT I
LOW LED

'*********************************** M A I N ***********************************
'Main che gestisce sia il bistabile che monostabile
MAIN:
    RICEVUTO=0
    gosub CONTROLLO_PULSANTE
    gosub CONTROLLO_RF
    if ricevuto=1 then
        high led
        pause 5
        GOSUB COMPRIMI_CODICE
        GOSUB CERCA_SENSORE
        IF TROVATO=1 THEN
            if tempo_rx=0 then
                if jumper=1 then
                    'Monostabile
                    high rele
                else
                    'Bistabile
                    Toggle rele
                endif
            endif
            tempo_rx=TEMPO
        ENDIF
    endif
    if tempo_rx>0 then
        tempo_rx=tempo_rx-1
    endif
    if tempo_rx=0 then
        select case jumper
            case 0  'Bistabile
            case 1  'Monostabile
                low rele
        end select
    endif
    low led
GOTO MAIN


'********************* C O N T R O L L O _ P U L S A N T E *********************
'Verifica la pressione del pulsante durante il funzionamento
CONTROLLO_PULSANTE:
    WHILE pulsante=0
        HIGH LED
        GOSUB CONTROLLO_RF
        IF RICEVUTO=1 THEN
            GOSUB COMPRIMI_CODICE
            LOC=0
            for I=1 TO TX_MAX
                read LOC,COD_1B
                LOC=LOC+1
                read LOC,COD_2B
                LOC=LOC+1
                IF COD_1B=255 AND COD_2B=255 THEN
                    LOC=LOC-2
                    WRITE LOC,COD_A
                    LOC=LOC+1
                    WRITE LOC,COD_b
                    WHILE PULSANTE=0
                        TOGGLE LED
                        PAUSE 50
                    WEND
                    I=TX_MAX
                ENDIF
            NEXT I
        ENDIF
    WEND
    LOW LED
RETURN


'*************************** C O N T R O L L O _ R F ***************************
'Decodifica il segnale RF ricevuto
CONTROLLO_RF:
'    for i=1 to 5
        PULSIN RF,0,CONTA
        TRENO[0]=CONTA
'        if conta>1100 then i=100
'    next i

    SELECT CASE CONTA
        CASE IS >1350
            RICEVUTO=0
        CASE IS >1100
            FOR I=1 TO 12
                PULSIN RF,1,CONTA
                IF CONTA<20 or CONTA>85 THEN
                    GOTO FINE
                ENDIF
                TRENO[I]=CONTA
            NEXT I
            GOSUB CODIFICA_MM53200
        CASE ELSE
            RICEVUTO=0
'    SEROUT SERIALE,T9600,[13,10]
'    FOR I=0 TO 12 step 1    'Visualizzo solo il dato identificativo del codice
'        SEROUT SERIALE,T9600,["-",#TRENO[I]]
'    NEXT I
FINE:
    END SELECT
RETURN


'************************** C E R C A _ S E N S O R E **************************
CERCA_SENSORE:
    'Controllo tra tutti i radiocomandi se c'è quello trasmesso
    LOC=0
    TRoVATO=0
    CH=0
    for I=1 TO TX_MAX
        CH=CH+1
        read LOC,COD_1B
        LOC=LOC+1
        read LOC,COD_2B
        LOC=LOC+1
'        SEROUT SERIALE,T9600,[13,10,#COD_A,"/",#COD_1B,"-",#COD_B,"/",#COD_2B]
        IF COD_A=COD_1B AND COD_B=COD_2B THEN
            TROVATO=1
            goto FINE_CERCA
        ELSE
            TROVATO=0
        ENDIF
    NEXT I
FINE_CERCA:
RETURN


'********************* C O D I F I C A _ M M 5 3 2 0 0 ************************
'Decodifica il segnale dei sensori MM53200 e invia su seriale il codice
'identificativo <02:..........>
CODIFICA_MM53200:
    ERRORE=0
    FOR I=1 TO 12
'        IF TRENO[I]<=28 or TRENO[I]>=80 THEN
'            ERRORE=1
'        ENDIF
'        IF TRENO[I]>=40 AND TRENO[I]<=58 THEN
'            ERRORE=1
'        ENDIF
'        IF TRENO[I]>28 AND TRENO[I]<40 THEN
'            TRENO[I]=0
'        ENDIF
'        IF TRENO[I]>58 AND TRENO[I]<80 THEN
'            TRENO[I]=1
'        ENDIF

        IF TRENO[I]<=20 or TRENO[I]>=85 THEN
            ERRORE=1
        ENDIF
        IF TRENO[I]>=45 AND TRENO[I]<=50 THEN
            ERRORE=1
        ENDIF
        IF TRENO[I]>20 AND TRENO[I]<45 THEN
            TRENO[I]=0
        ENDIF
        IF TRENO[I]>50 AND TRENO[I]<85 THEN
            TRENO[I]=1
        ENDIF
    NEXT I
    IF ERRORE=0 THEN
        RICEVUTO=1
    ELSE
        RICEVUTO=0
    ENDIF
RETURN

'********************** C O M P R I M I _ C O D I C E *************************
COMPRIMI_CODICE:
    COD_A=255
    COD_B=255
    COD_B.0=TRENO[1]
    COD_B.1=TRENO[2]
    COD_B.2=TRENO[3]
    COD_B.3=TRENO[4]
    COD_B.4=TRENO[5]
    COD_B.5=TRENO[6]
    COD_B.6=TRENO[7]
    COD_B.7=TRENO[8]
    COD_A.0=TRENO[9]
    COD_A.1=TRENO[10]
    COD_A.2=TRENO[11]
    COD_A.3=TRENO[12]
RETURN
Double Channle Diagram

Let’s take a look at the circuit in 2 channels without repeating what has already been explained for the single-channel receiver; taking a look at the diagram we note the power stage for which is the argument made for the single-channel scheme. We find the stage receiver, which is also the same. The microcontroller is different, as it is a PIC16F688, whose choice was dictated by the greater number of I / O which is available with respect to the PIC12F683 used in the single-channel version.
Obviously we have two stages relay, operating as already described, and an equal protection diodes in parallel to its coils.
We also find a two-way dip-switch, which is used to set the mode of activation of the outputs of the two channels, and two trimmers, which as mentioned in the description of the single channel circuit, are currently intended for future development and are not used.
Immediately after activation (signaled by a sequence of 5 flashes of the green LED to indicate a proper boot) the micro controller initializes its I/O by setting RA4 as input to the data acquisition arrival from AC-RX2, RB4 and RB5 as inputs (equipped with integrated pull-up) to read the status of the dip-switches (such lines are activated with the internal pull-up), and the RB6, RB7 to read the state of the P1 (start learning codes to activate channel 1) and P2 buttons (start learning the codes for channel 2); also these last few lines of the I/O have active internal pull-up.
For the two relays the all is similar to the situation of the RL1 from the single channel circuit, given that the two stages are equal to that of it: T1, which pilots relay 2, is sent to saturation when RA6 is located in a high logic level, while T2 is activated by a logic high on the line RB0. Do not miss the diodes D2 and D3.
Continuing with initialization, the PIC sets GP2, GP3 and GP5 as inputs, respectively devoted to the reading of the P1 button, the jumper J1 and the output data of the AC-RX2; for the first two is the active internal pull-up.
DS1 Dip-switches are used to set the desired mode of operation for each channel; more precisely, the Dip1 allows the setting of the OUT1 and Dip2 sets the activity of OUT1. Dip closed means bistable operations, while dip open means monostable.
As in the single-channel circuit, in monostable mode the output is not timed, so it is activated by pressing the button on the transmitter and back to rest when you release the button.
Both red LEDs follow the state of the outputs during operation. LD1 lights up when the OUT1 relay is energized and LD2 lights up when the OUT2 relay is energized.
BOM

R1: 4,7 kohm
R2: 4,7 kohm
R3: 470 ohm
R4: –
R5: –
R6: 470 ohm
R7: 470 ohm
C1: 100 nF
C2: 100 µF 35 VL
C3: 100 nF
C4: 100 µF 35 VL
U1: 7805
U2: AC-RX2
U3: PIC16F88
D1: 1N4007
D2: 1N4148
D3: 1N4148
LD1: LED 3 mm red
LD2: LED 3 mm red
LD3: LED 3 mm green
T1: BC547
P1: Microswitch
P2: Microswitch
RL1: Relè 12V
RL2: Relè 12V
DS1: Disp-switch 2 vias
Procedure learning module 2 CH

To match transmitters to the circuit you must proceed as follows: press and hold the button for the channel you want to store (P1 for the OUT1 channel and P2 for the OUT2 channel). The Red LED relative to output (LD1 for OUT1 and LD2 for OUT2) turns on to indicate that it is self-learning. Once done this you have to press the button on the remote control you want to learn and wait until the LED flashes, indicating that learning is unsuccessful. If the LED is still, it means that the memory is full or the transmitted code is not valid.
To erase the memory of a channel you have to turn on the circuit by pressing and holding the button for the channel you want to delete: P1 for channel 1 (OUT1) or P2 for channel 2 (OUT2). Release the button when the green LED (LD3) remains lit for 2 seconds to indicate successful deletion of the memory bank of the chosen channel. The green LED will flash 5 times to indicate the exit from the procedure of cancellation and the start of the normal state of receiver.
| LED | Normal operation | Programming |
| LD1 | activities OUT1:on =RL1 excitedoff = RL1 to rest | – |
| LD2 | activities OUT2:on =RL2 energizedoff = RL2at rest | – |
| LD3 | At startup or exit from learning procedure or deletion of codes, signals with 5 flashes a normal mode boot | is turned on for 2 seconds when you enter programming; flashes when the circuit has learned the code transmitted; is still if learning failed |
The 2 channel firmware
'****************************************************************
'*  Author  : Alessandro Sottocornola          *
'*                                                           *
'****************************************************************

INCLUDE "modedefs.bas"

'************************** D E F .    R E G I S T R O *************************
DEFINE OSC 4
DEFINE PULSIN_MAX 1350

OSCCON=%01101110
OPTION_REG.7=0
INTCON=%00000000
ANSEL=%00000000
ADCON0=%111100000
PIE1=%00000000
PIE2=%00000000
CMCON=%00000111
T1CON.0=0
T2CON.2=0
TRISA.0=1
WDTCON=0

'********************** Definizione porte del PIC *****************************
'symbol SERIALE = GPIO.0
symbol LED = PORTB.1
symbol LED1 = PORTB.2
symbol LED2 = PORTB.3
SYMBOL RELE1 = PORTB.0
SYMBOL RELE2 = PORTA.6
SYMBOL P1 = PORTB.6
SYMBOL P2 = PORTB.7
SYMBOL RF = PORTA.5
SYMBOL DIP1 = PORTB.4
SYMBOL DIP2 = PORTB.5

INPUT P1
INPUT P2
INPUT DIP1
INPUT DIP2
INPUT RF
OUTPUT LED
OUTPUT LED1
OUTPUT LED2
OUTPUT RELE1
OUTPUT RELE2


'************************* D E F .    V A R I A B I L I ************************
TX_MAX CON 10       'Numero di TX memorizzabili per ogni uscita
TEMPO CON 40        'Aumentarlo se in monostabile il relè va ad intermittenza

CONTA VAR WORD      'Contiene la lunghezza dell'impulso
ERRORE VAR BYTE     '0:Nessun errore nel segnale - 1:Segnale non valido
I VAR BYTE          'Varibile di comodo per i conteggi e accessi all'array
TRENO VAR WORD[25]  'Contiene la lunghezza di tutti gli impulsi
COD_A VAR BYTE      'Parte alta codifica RF
COD_B VAR BYTE      'Parte bassa codifica RF
COD_1B var byte     'Parte alta codifica RF letta da memoria
COD_2B var byte     'Parte bassa codifica RF letta da memoria
TROVATO VAR BIT     '1:Dato in memoria corrispondete a quello ricevuto
LOC VAR BYTE        'Locazione memoria
RICEVUTO VAR BIT    '1: segnale RF ricevuto
CH VAR BYTE         'Identifica il pulsante (1,2,3,4) premuto
TEMPO_RX1 VAR BYTE  'Tempo trascorso dall'ultima ricezione codice RF
TEMPO_RX2 VAR BYTE  'Tempo trascorso dall'ultima ricezione codice RF


TEMpO_RX1=0
TEMpO_RX2=0
CONTA=0
TROVATO=0
RICEVUTO=0
errore=0


'********************************* I N I Z I O *********************************
CLEAR
eeprom 0,[255,255,255,255,255,255,255,255,255,255,255,255,255,255,255,255,255,255,255,255]
eeprom 20,[255,255,255,255,255,255,255,255,255,255,255,255,255,255,255,255,255,255,255,255]
low led
low led1
low led2
low rele1
low rele2

'RESET COMPLETO SE PULSANTE PREMUTO ALL'AVVIO
IF P1=0 THEN
    high led1
    loc=0
    for i=1 to tx_max
        write loc,255
        loc=loc+1
        write loc,255
        loc=loc+1
    next i
    pause 1000
    low led1
endif

IF P2=0 THEN
    high led2
    loc=tx_max*2
    for i=1 to tx_max
        write loc,255
        loc=loc+1
        write loc,255
        loc=loc+1
    next i
    pause 1000
    low led2
endif

'Inizializzo facendo lampeggiare il LED
for i=1 to 10
    TOGGLE LED
    PAUSE 200
NEXT I
LOW LED

'*********************************** M A I N ***********************************
'Main che gestisce sia il bistabile che monostabile
MAIN:
    RICEVUTO=0
    gosub CONTROLLO_PULSANTE1
    gosub CONTROLLO_PULSANTE2
    gosub CONTROLLO_RF
    if ricevuto=1 then
        high led
        pause 5
        GOSUB COMPRIMI_CODICE
        GOSUB CERCA_SENSORE
        IF TROVATO=1 THEN
            select case ch
                case 1
                    if tempo_rx1=0 then
                        if DIP1=1 then
                            'Monostabile
                            high rele1
                        else
                            'Bistabile
                            Toggle rele1
                        endif
                    endif
                    tempo_rx1=TEMPO
                case 2
                    if tempo_rx2=0 then
                        if DIP2=1 then
                            'Monostabile
                            high rele2
                        else
                            'Bistabile
                            Toggle rele2
                        endif
                    endif
                    tempo_rx2=TEMPO
            end select
        ENDIF
    endif
    if tempo_rx1>0 then
        tempo_rx1=tempo_rx1-1
    endif
    if tempo_rx1=0 then
        select case DIP1
            case 0  'Bistabile
            case 1  'Monostabile
                low rele1
        end select
    endif
    if tempo_rx2>0 then
        tempo_rx2=tempo_rx2-1
    endif
    if tempo_rx2=0 then
        select case DIP2
            case 0  'Bistabile
            case 1  'Monostabile
                low rele2
        end select
    endif

    led1=rele1
    led2=rele2
    low led
GOTO MAIN


'******************** C O N T R O L L O _ P U L S A N T E 1 ********************
'Verifica la pressione del pulsante durante il funzionamento
CONTROLLO_PULSANTE1:
    WHILE P1=0
        HIGH LED1
        GOSUB CONTROLLO_RF
        IF RICEVUTO=1 THEN
            GOSUB COMPRIMI_CODICE
            LOC=0
            for I=1 TO TX_MAX
                read LOC,COD_1B
                LOC=LOC+1
                read LOC,COD_2B
                LOC=LOC+1
                IF COD_1B=255 AND COD_2B=255 THEN
                    LOC=LOC-2
                    WRITE LOC,COD_A
                    LOC=LOC+1
                    WRITE LOC,COD_b
                    WHILE p1=0
                        TOGGLE LED1
                        PAUSE 50
                    WEND
                    I=TX_MAX
                ENDIF
            NEXT I
        ENDIF
    WEND
'    LOW LED1
RETURN

'******************** C O N T R O L L O _ P U L S A N T E 2 ********************
'Verifica la pressione del pulsante durante il funzionamento
CONTROLLO_PULSANTE2:
    WHILE P2=0
        HIGH LED2
        GOSUB CONTROLLO_RF
        IF RICEVUTO=1 THEN
            GOSUB COMPRIMI_CODICE
            LOC=TX_MAX*2
            for I=1 TO TX_MAX
                read LOC,COD_1B
                LOC=LOC+1
                read LOC,COD_2B
                LOC=LOC+1
                IF COD_1B=255 AND COD_2B=255 THEN
                    LOC=LOC-2
                    WRITE LOC,COD_A
                    LOC=LOC+1
                    WRITE LOC,COD_b
                    WHILE p2=0
                        TOGGLE LED2
                        PAUSE 50
                    WEND
                    I=TX_MAX
                ENDIF
            NEXT I
        ENDIF
    WEND
'    LOW LED2
RETURN


'*************************** C O N T R O L L O _ R F ***************************
'Decodifica il segnale RF ricevuto
CONTROLLO_RF:
    PULSIN RF,0,CONTA
    TRENO[0]=CONTA

    SELECT CASE CONTA
        CASE IS >1350
            RICEVUTO=0
        CASE IS >1100
            FOR I=1 TO 12
                PULSIN RF,1,CONTA
                IF CONTA<20 or CONTA>85 THEN
                    GOTO FINE
                ENDIF
                TRENO[I]=CONTA
            NEXT I
            GOSUB CODIFICA_MM53200
        CASE ELSE
            RICEVUTO=0
'    SEROUT SERIALE,T9600,[13,10]
'    FOR I=0 TO 12 step 1    'Visualizzo solo il dato identificativo del codice
'        SEROUT SERIALE,T9600,["-",#TRENO[I]]
'    NEXT I
FINE:
    END SELECT
RETURN


'************************** C E R C A _ S E N S O R E **************************
'Zone via filo: da locazione 1 a locazione 4
'Zone Wireless: da locazione 48 a locazione 276 (3 locazioni ogni zona) > 4 sensori per zona
'Zone Panico: da locazione 300 a locazione 319 (2 locazioni ogni zona) > 10 panico
'Zone Radiocomando: da locazione 320 a locazione 399 (2 locazioni ogni zona) > 40 radiocomandi
CERCA_SENSORE:
    'Controllo tra tutti i radiocomandi se c'è quello trasmesso
    LOC=0
    TRoVATO=0
    CH=0
    for I=1 TO TX_MAX*2
        CH=CH+1
        read LOC,COD_1B
        LOC=LOC+1
        read LOC,COD_2B
        LOC=LOC+1
'        SEROUT SERIALE,T9600,[13,10,#COD_A,"/",#COD_1B,"-",#COD_B,"/",#COD_2B]
        IF COD_A=COD_1B AND COD_B=COD_2B THEN
            TROVATO=1
            if ch<=TX_MAX then
                ch=1
            else
                ch=2
            endif
            goto FINE_CERCA
        ELSE
            TROVATO=0
        ENDIF
    NEXT I
FINE_CERCA:
RETURN


'********************* C O D I F I C A _ M M 5 3 2 0 0 ************************
'Decodifica il segnale dei sensori MM53200 e invia su seriale il codice
'identificativo <02:..........>
CODIFICA_MM53200:
    ERRORE=0
    FOR I=1 TO 12
'        IF TRENO[I]<=28 or TRENO[I]>=80 THEN
'            ERRORE=1
'        ENDIF
'        IF TRENO[I]>=40 AND TRENO[I]<=58 THEN
'            ERRORE=1
'        ENDIF
'        IF TRENO[I]>28 AND TRENO[I]<40 THEN
'            TRENO[I]=0
'        ENDIF
'        IF TRENO[I]>58 AND TRENO[I]<80 THEN
'            TRENO[I]=1
'        ENDIF

        IF TRENO[I]<=20 or TRENO[I]>=85 THEN
            ERRORE=1
        ENDIF
        IF TRENO[I]>=45 AND TRENO[I]<=50 THEN
            ERRORE=1
        ENDIF
        IF TRENO[I]>20 AND TRENO[I]<45 THEN
            TRENO[I]=0
        ENDIF
        IF TRENO[I]>50 AND TRENO[I]<85 THEN
            TRENO[I]=1
        ENDIF
    NEXT I
    IF ERRORE=0 THEN
        RICEVUTO=1
    ELSE
        RICEVUTO=0
    ENDIF
RETURN

'********************** C O M P R I M I _ C O D I C E *************************
COMPRIMI_CODICE:
    COD_A=255
    COD_B=255
    COD_B.0=TRENO[1]
    COD_B.1=TRENO[2]
    COD_B.2=TRENO[3]
    COD_B.3=TRENO[4]
    COD_B.4=TRENO[5]
    COD_B.5=TRENO[6]
    COD_B.6=TRENO[7]
    COD_B.7=TRENO[8]
    COD_A.0=TRENO[9]
    COD_A.1=TRENO[10]
    COD_A.2=TRENO[11]
    COD_A.3=TRENO[12]
RETURN

Hi
The 1 channel diagram
Is it working with ev1527 codes?
No, only MM53200/HT-12