More and more often we find the opportunity to create Internet-connected projects by ourselves, in that category known as the Internet of Things (IoT), within which you can find smart appliances, home automation systems, medical devices, security systems and many others: a complex world, sharing the ability of being connected to the Internet. The world of makers has been interested by the IoT, since quite a while, so it is possible to find a lot projects, based on Arduino or similar boards, that can connect your fridge, your washing machine or even your coffee machine to the Internet. In spite of the heterogeneity of these projects, almost all of them share a feature, that is, the need to communicate with the user.
If the fridge was capable of sending us a notification when our son used the last milk bottle, we could buy it when returning from work, thus avoiding to go out another time.
That’s why we decided to engage ourselves and you by means of an application based on the popular and performing Raspberry Pi: what we will do in this article will be to use an experimentation shield for Raspberry PI, named FT1060M, so to simulate the conditions connected to the variation of physical quantities, such as temperature, by sending warnings on the basis of predefined thresholds.
To be accurate, the issue or warning the user remotely is not new at all. The most used systems until now have been SMSs and, in some minor cases, e-mails. Both solutions are efficient in their own way but today, thanking in particular the diffusion of smartphones, we have a new possibility: push notifications.
What push notifications are
With the terms push notification we identify a specific mechanism that considers the possibility to send messages with the connected devices. Their diffusion is due to the adoption by smartphone operating systems: the first one to introduce them was Apple with iOS version 3.0. They can be distinguished from the above said methods for various reasons, but the most important one is probably the functional model. To send a SMS we just need the recipient’s phone number, and the same goes for the e-mail whose address we need to know. In the case of push notifications the mechanism is what is technically called “publish/subscribe”: it is the user to “subscribe” a certain topic (or channel) for which he would like to receive the notifications, and he is capable of canceling the subscription at any moment.
Push notifications operate in a quite complex way, but luckily we can describe the application without having to go into technical details. What we will see instead, and in depth, is Pushetta, a service born with the specific task to make push notifications simple to use by anyone.
Pushetta can be considered as a sort of gateway that intermediates the communications between him who sends the notifications and him who receives them. The problem at the roots of push notifications is that a specific application to receive them does not exist, such as it happens with SMSs or e-mails, for example. More than anything else, they are a tool of the App developer who decides the data format to send and how to understand them when receiving. This implies a big complication for the previously described scenario, and in fact to see that our fridge is capable of sending us a notification, we should also create a specific App for our smartphone!
Pushetta solves this problem: it offers the applications that are enabled to receive notifications and a a simple mechanism to send them. Both the Apps and the service are completely free: the first step, in practice, is to go to download page, to register and download the App for smartphone.
By registering to Pushetta you obtain an authentication token, called API Key, that is needed to authorize the API calls that we will use hereafter. The API Key can be displayed by accessing your own Dashboard on the Website.

Let’s take note of the API Key, then, so to avoid to have to return to the Dashboard each time, when we will be writing the code for notification sending.
The notifications sending with Pushetta is based on the idea of “channel”; let’s resume for a moment the example of the smart fridge. We have to create a channel that will serve for identification purposes for the “publish/subscribe” mechanism; as regards the example we will name it “Fridge” (following an original impulse). When sending a notification we will specify that we are using the “Fridge” channel, from the App we will subscribe to the same channel and every notification to it will automatically be delivered to us.
The creation of a channel is a very simple process: from the “Channels” menu you may access the list of those pertaining the user (when registering for the first time it is obviously empty). With the “Add a channel” button we access the page to create a new one requiring a picture to identify it, a name not yet used by others, and a description. We may create public or private channels; these last ones require the owner’s authorization to be subscribed. Finally, we may decide to keep the channel hidden to the search system, and in this case to subscribe you will need to know the name a priori (or to use the univocal url, automatically generated for each channel).

The steps to allow us to use Pushetta are all here; once we are registered and we have created one or more channels, the system is ready to send notifications.
Let’s Configure Raspberry Pi
Let’s get now on to the configuration of Raspberry Pi, that we will not explain from the basics, given the availability of tutorials you can found on the Web, but we will limit ourselves to provide only the specific indications for our project. In our project we use the Raspbian distribution dated 31.01.2015; please take into account that different releases may require small adaptations.
Let’s start from the assumption, therefore, that the board has the operating system installed, that it is connected to the Internet and that the user is capable of using the system shell, be it directly by means of the keyboard or with a remote connection via SSH.
The experimentation shield uses the I²C bus for communication with some sensors (in particular, NTC as for temperature, and a photoresistor as for luminosity). Therefore, we have to configure the distribution so that it may load the drivers for the usage of this bus.
In the previous Raspbian releases the I²C bus didn’t require boot parameters as for Kernel, and it was only necessary to operate on the loading of the needed modules. In the last version the situation has changed a bit, and the modules still have to be explicitly loaded, but a boot parameter for the kernel is also needed, in order to activate the bus, thus let’s modify /boot/config.txt by adding the line dtparam=I2C_arm=on as shown in figure.

To modify the various files we will use the Dwarf Editor: without dwelling upon the subject as a course on its usage would, let’s say that what we need is to know how to open a file, by stating precisely nano nomefile, and to save the modifications made with the combination of keys: CTRL + X. The editor offers many other functions, but I’ll leave it to the reader to find further readings, as always available on the Internet. A final note before going on: some files cannot be modified by a user who is different from the system administrator; in these cases we will use sudo nano nomefile that, after a password request, will execute the editor as if it was launched from root.
As anticipated, we also have to activate the modules loading, in this case the file to modify is /etc/modules where the modules loaded at boot are listed. Actually, they can be manually loaded by using the modprobe command, but this would imply the need to remember its execution each time we reboot Raspberry Pi, it is therefore preferable to activate the automatic loading described before. Thus, let’s execute sudo nano /etc/modules and add i2c-bcm2708 e i2c-dev as shown in figure.

If we rebooted now, the system would load the I²C modules, with relative creation of a new device file in /dev This device file, that we will use in an indirect way to communicate with the bus, may only be accessed by default via root or by the users pertaining the I²C group. To avoid using sudo each time that we have to read or write from the bus, let’s add the pi user to the specific group by means of the following command:
sudo adduser pi i2c
The bus configuration is now complete; let’s install again the tools that we will need to make the first communication tests and verify that everything is working properly by using sudo apt-get install i2c-tools and the distribution is ready for our tests.

As already anticipated, in the previous Raspbian releases the I²C configuration steps were a bit different. In particular, it was needed to modify the /etc/modprobe.d/raspi-blacklist.conf file, by removing the spi-bcm2708 and i2c-bcm2708 modules, so to avoid that their loading is blocked, since they are blacklisted. If you have these releases, it is good to refer yourself to the specific indications for I²C configuration that can be found on the Internet.
Shield usage
Let’s pass on to connecting the shield to the Raspberry Pi, now. The connection is a very simple one, the shield is supplied with a connector that has to fit in the row of GPIO pins, available on the board. In the case you have the B+ or A+ versions that implement a longer connector, you will have to pay attention and line up pin 1 with the corresponding one on the board.
Amongst other things, the shield has a pair of buttons, the luminosity and temperature sensors, and this last one is the one we are going to use. Let’s configure the three dip switches that define the I²C bus address by setting them all ON. It is not compulsory to set them like this, but in this way it will be easier to use the code without having to make modifications for your case.
Let’s write the code of the Python examples by making use of some already available libraries, in order to interact with both Pushetta and the sensors bus. Let’s proceed by installing these prerequisites.
The first library is the one that is needed to interact with Pushetta, thus let’s execute the pip command to install pushetta, as shown in the figure.

If the installation reached a successful conclusion we are already capable of sending our first notification, and given that we weren’t expecting anything else, we proceed immediately. The operation requires only three lines of code (of which one is needed to import the library)):
from pushetta import Pushetta
p = Pushetta(“aabbccddeeff0011223344556677889900aabbcc”)
p.pushMessage(“Fridge”, “Buy the milk!”)
Let’s explain what the code does: the first line imports the Pushetta library from the homonymous module, that is quite a common thing in Python. The “true” code starts at the following line that instantiates the item for communication with Pushetta’s API. Here we have to substitute the fictitious API Key (“aabbccddeeff0011223344556677889900aabbcc”) related in the example with our read of the website Dashboard.
The last line is the one that actually makes the call and that sets off the notification sending, and even here we have to substitute the example channel, “Fridge”, with the one we created after registering on Pushetta. If we correctly executed all the steps our telephone will give out a sound and we will display a notification with the “Buy the milk!” message.
Good! Our first objective has been reached.
Let’s get on to the code
Now that we are capable of sending push notifications we may implement the sensor reading, so to finally reach the final objective. So to simplify this activity let’s install another Python library, in this case we will use apt-get, that is to say the package management tool used by Raspbian, since what we are looking for is not available with pip.
Thus let’s execute:
sudo apt-get python-smbus
Once the installation is complete, we may proceed to the code implementation, but first it is needed to identify the I²C address that has been used by our shield. When we configured our distribution we worried about installing the i2c-tools package, too; this package provides a series of diagnostics commands for the I²C bus, and the time to use them has come, in particular let’s use i2cdetect that will probe the bus, thus showing the address of all the detected devices; we will obtain a result similar to the one shown in figure.
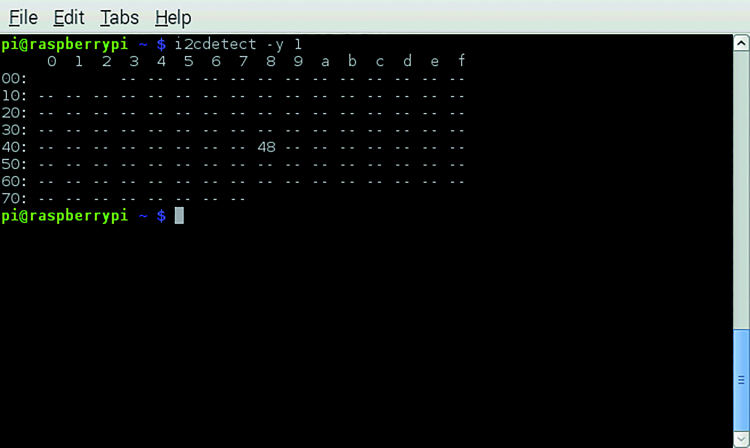
In the example related above, i2cdetect has been launched with the -y 1 parameters, the number (1) points to the I²C bus on which to execute the probe. In the first Raspberry Pi revisions, the bus being used was 0, if you have one of these boards the command to execute becomes i2cdetect -y 0.
Now that we have identified the address used by our shield we have everything we need to start to interact with the sensors.
Aiming to supply tools that can be reused as much as possible, we will write the code by following the modes of the object oriented programming (OOP). This does not imply a greater code complexity, but we will purposely avoid those characteristics that may impact on comprehension.
In a nutshell, and much simplifying, we can consider a sensor as an item that allows to acquire the measurement of a physical quantity. Hence, let’s create the interface that formalizes the sensor’s behaviour:
class GenericSensor:
def readValue(self):
raise NotImplementedError(‘readValue method to be implemented’)
def measureUnit(self):
raise NotImplementedError(‘measureUnit method to be implemented’)
The GenericSensor class represents exactly what we described: each sensor has a readValue method that shows the physical quantity and measureUnit that tells us the unit of measurement. Hence let’s start by implementing the class for the temperature sensor.
Listing 1

TemperatureSensor is what they would call a concrete implementation of the GenericSensor interface, this class is de facto a small component that we may reuse in our projects. Its usage is trivial, as it can be seen from the following example:
sensor = TemperatureSensor()
print “The temperature reading is “ + str(sensor.readValue())
We could adopt the same approach with the luminosity sensor but, now that we have all the elements to realize the final objective, as they say let’s get to the point and write the needed code:
pushetta = Pushetta(“0011223344556677aabbccddeeff001122334455”)
sensor = TemperatureSensor()
while True:
temp = sensor.readValue()
if temp < 18.0:
pushetta.pushMessage(“Camera”, “Brrrr…it is cold here”)
time.sleep(5)
The complete code is the one showed in Listing 2.

As promised, the final code does not need explanations, in practice. Let’s create the two items to interact with Pushetta and the temperature sensor, respectively, and let’s start an infinite cycle afterwards. The cycle makes the temperature reading and, if under the threshold of 18° C it sends a notification to the “Camera” channel; as a last thing let’s wait five seconds before resuming the execution of the following cycle and so on, endlessly (or until we manually stop the program by using CTRL + C).
We now have reusable components to easily adapt what has been done here to the most different cases. As a first usage example for Pushetta, it is important to remember that the API Key (“0011223344556677aabbccddeeff001122334455”) and the name of the channel (“Camera”) must be substituted with your own.
Conclusions
We have reached the objective that we set: we are now capable of sending push notifications to an iOS or Android smartphone from Raspberry Pi. And not only that: we learned how, by structuring the code with items and by following the OOP paradigm, it is possible to build over time a set of components that will be reusable later. An exercise that we propose consists in implementing the LightSensor class that, along the same lines of TemperatureSensor, may read the value of the luminosity sensor. It will prove clear how the usage of different sensors does not imply any further difficulty in respect to what has been done in the previous examples. Now that we learned how to send push notifications the use cases are unlimited. Probably many projects that have already been created, in particular in the field of domotics, are already candidates for improvementes with minimal interventions.
From the store
Raspberry Pi shield for dummies

I hope someone out there reads this. I want to do this but with a light sensor (tsl2561). I want the notification to be triggered when a light comes on. PLEASE HELP! I am not a programmer and do not know python. I do have the sensor hooked up to my pi, and I have code that displays the visible light value – I just need help with the code that would make the light “sensing” repeat, and make it sent the push notification. ANY help will be appreciated.