- makeITcircular 2024 content launched – Part of Maker Faire Rome 2024Posted 2 weeks ago
- Application For Maker Faire Rome 2024: Deadline June 20thPosted 2 months ago
- Building a 3D Digital Clock with ArduinoPosted 7 months ago
- Creating a controller for Minecraft with realistic body movements using ArduinoPosted 7 months ago
- Snowflake with ArduinoPosted 8 months ago
- Holographic Christmas TreePosted 8 months ago
- Segstick: Build Your Own Self-Balancing Vehicle in Just 2 Days with ArduinoPosted 8 months ago
- ZSWatch: An Open-Source Smartwatch Project Based on the Zephyr Operating SystemPosted 9 months ago
- What is IoT and which devices to usePosted 9 months ago
- Maker Faire Rome Unveils Thrilling “Padel Smash Future” Pavilion for Sports EnthusiastsPosted 10 months ago
Microsoft tastes the raspberry
Let’s experiment with the embedded version of Microsoft operating system, by installing it on Raspberry Pi, and by building our first applications.
In our previous installment we could see some of the movements that are putting Microsoft in contact with the open source world, and we anticipated the release, by Microsoft, of a new Windows 10 version, specifically thought for Raspberry Pi: it is only the private “core” of the graphical interface the Microsoft users are used to. In this article we will see what it is about and the possibilities it offers. Before throwing ourselves headlong in the field of the technical features, we will list the requirements needed to test the operating system:
- Windows 10 Insider Preview installed on a PC;
- Raspberry Pi 2 and corresponding power supply;
- 8 GB micro SD;
- HDMI cable;
- Ethernet cable;
- a monitor to which to connect the Raspberry Pi board.
The official installation procedure requires the usage of a machine having Windows 10 installed; in truth there are some non official methods (found on the Internet) in order to install Windows 10 on Raspberry Pi, even if having previous Windows versions, OS X or Linux. In this occasion, however, we will limit ourselves to the official method.
Environment preparation
Let’s start, therefore, by preparing our Raspberry Pi for the installation: the first operation to execute regards the download of the tools and of the operating system, that must be carried out. An ISO will be downloaded from it, that is named “IOT Core Rpi”; by double clicking on the file the image will be mounted and a virtual drive will be assigned to it: there we will find the installation file. The following step concerns the execution of the “Windows_ 10_IoT_Core_Rpi2” installation file, that will install the tools and will put the veritable image in “C:\Program Files (x86)\Microsoft IoT\FFU\RaspberryPi2”.
The file we are interested in is named “flash.ffu” and represents the operating system image.
The FFU format has been specifically created by Microsoft for the deployment of Windows.
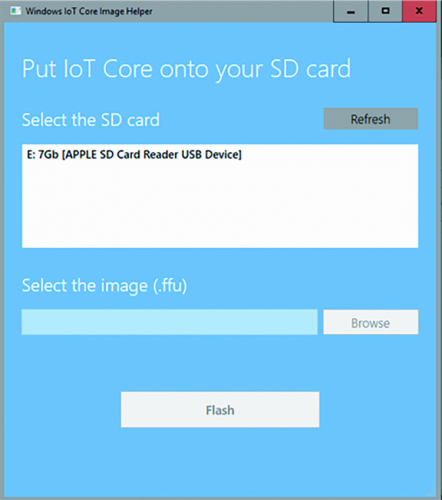
In order to create the SD card needed to boot the Raspberry Pi, it is needed to execute “WindowsIoTImageHelper”, that will present an interface with which to specify the SD card on which to write, and the FFU file path.
Once the two options have been indicated, it will be enough to select the “Flash” button and wait for the procedure to end.
First boot of Windows 10 IoT Core
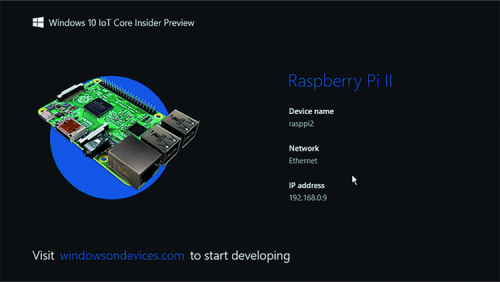
Once the transfer procedure for the image has been completed, we will have our SD ready to be inserted in the Raspberry Pi, in order to start Windows 10. The first booting requires some time and the selection of some settings (language and possible parameters for the Wi-Fi, if available). After booting we will find ourselves before a screen like the one in figure.
If someone expected the familiar start menu or the “tiles” à la Windows 8, he will be disappointed: Windows 10 IoT Core is, in fact, a “down to the bone” Windows 10 version and, among the things that have been eliminated, there is the whole user interface. The purpose of this version is not the one to install application packages such as Office, but rather to have all the power of the Windows engine available, in order to develop Universal Apps. The screen we see, in fact, is none other than the default Universal App, executed at the start; in time we will be able to substitute it with our own.
It must not be forgotten that this version of Microsoft operating system has been specifically thought for developers. Not for no reason the banner down in the main screen shows “Visit windowsondevices.com to start developing”.
What we have to do now is to follow the indication we just received: we have in fact to temporarily move ourselves on our PC, having a “full” version of Windows 10 installed on it, and to download the development environment with which to create our first experiment.
Microsoft’s official development environment is Visual Studio: it is a very powerful and complete IDE. Luckily, Microsoft made Visual Studio available in the Community edition, which is free and can be perfectly used for our purposes. Let’s download it and proceed with the installation.
If we correctly followed the previous steps, we should have the following tools at our disposal:
- Raspberry Pi with Windows 10 IoT Core installed, better if connected to a monitor, mouse and keyboard;
- a PC with Windows 10, having Visual Studio Community Edition and the Microsoft IoT components installed.
Ready to experiment
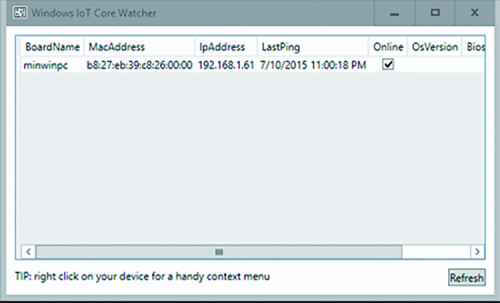
Once the stage concerning the environment preparation has been completed, we are ready to experiment; it is important to notice that, in order to follow the examples, it is needed that both Raspberry Pi and the PC having Windows 10 are connected to the same network. If this condition is met, we should see Raspberry PI listed in the Windows IoT Core Watcher tool. This tool was automatically installed when we initially installed the content of the “IOT Core Rpi”, and deals with the monitoring of the network, in order to search for devices having Windows 10 IoT Core installed; the fact that we see the board appearing in this tool is a confirmation that everything is ready and correctly configured.
Let’s start Visual Studio, then, and create our first project: in order to “warm up” we will start with a variation of the classic “Hello World”. We need to make a premise: when we will develop Apps for Windows 10 IoT Core, we will have two possibilities: to create headed or headless Apps. As it can be hinted by the name, the first ones are the ones that interact with the user by means of a user interface: in brief, they need at least the monitor and probably mouse and keyboard.
On the other hand, headless applications are more similar to what we are used to do, for example, with Arduino: that is to say, applications that do not benefit from a standard user interface but that directly interact with the hardware and the sensors. For now we will dwell upon the headed Apps that enable the interaction with the user, by means of a user interface.
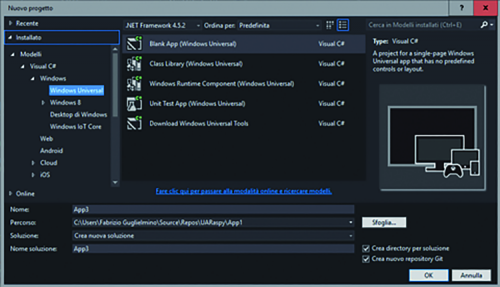
Let’s create a new project, once Visual Studio has been started: we have to choose between “Windows Universal” and the creation of a project starting from the “Blank App” model.
Visual studio will create our project that, even if starting from the “Blank App” template, will turn out to be composed by a certain number of files. Among the generated files we will find MainPage.xaml, the XAML files being the files used to describe the user interface. In our case the file is composed only by the basic skeleton, but de facto it doesn’t have any content. As a first test we simply want the “Hello World” writing to appear in the center of the screen; let’s modify MainPage.xaml then, as shown in Listing 1.
Listing 1
<Page
x:Class=”App2.MainPage”
xmlns=”http://schemas.microsoft.com/winfx/2006/xaml/presentation”
xmlns:x=”http://schemas.microsoft.com/winfx/2006/xaml”
xmlns:local=”using:App2”
xmlns:d=”http://schemas.microsoft.com/expression/blend/2008”
xmlns:mc=”http://schemas.openxmlformats.org/markup-compatibility/2006”
mc:Ignorable=”d”>
<Grid Background=”{ThemeResource ApplicationPageBackgroundThemeBrush}”>
<TextBlock Foreground=”Blue” HorizontalAlignment=”Center”
VerticalAlignment=“Center” FontSize=“64”>Hello World</TextBlock>
</Grid>
</Page>
With respect to the original file, we added a TextBlock, that is to say a control capable of displaying a text. Its colour has been set to blue (with Foreground=“Blue”) and aligned to the center of the page (with HorizontalAlignment=“Center” and VerticalAlignment=“Center”).
Our first Universal App is ready: we may test it out. In the Visual Studio toolbar are the commands to control the App’s execution; as a first test we will execute it on our computer, for the purpose it is enough to click on the run button, that is to say, the small arrow that is similar to a “play” button.
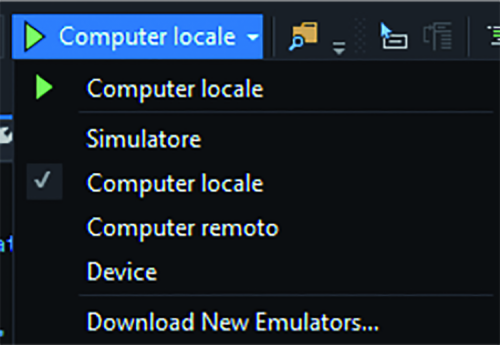
If we didn’t make mistakes, we will see a white page with a nice “Hello World” blue writing, in the center: it is a good result, but our objective was the one to create an App for Raspberry Pi. It is a very short step to get there. Always from the menu we used before, we find a drop down menu that indicates for which architecture to compile our App. As is known, Raspberry Pi is based on ARM technology, thus let’s select this architecture from the menu. Close to the button that we used to execute the App there is a label that claims “Local Computer” and here as well is the small icon, used in order to open a drop down menu.
Since we want to execute our code on Raspberry Pi, we have to select “Remote Computer”: a dialogue box will appear, to be used in order to set the board’s IP and the authentication (let’s select none for now). We are be ready again to press the execution button, but this time the App will be directly executed on Raspberry, and we will see the blue “Hello World” label to appear in the center of the monitor connected to the board.
Even if what we developed is something that is very simple from a functional point of view, we reached a very important stage. To be able to execute the App both on the local computer and on the remote device is something very important in the prototyping phase, and it enables a much greater speed, for example, in the interface design stages. Obviously, as we add the functions for the interaction with the board’s hardware to the App, it will be our duty to conditionally manage the presence or the absence of the required devices.
Let’s go on, therefore, by expanding the starting example a bit, in order to interact with the hardware; after all one of the main purposes of what we are examining is just to supply a simple and powerful tool to the Makers.
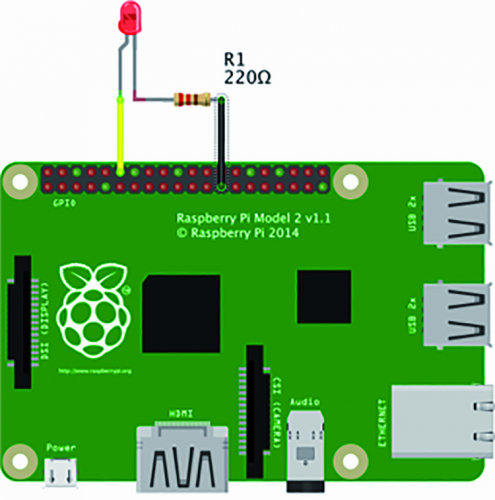
What we want to do now is to try to turn on a LED, via a click on a button displayed on the monitor’s screen. For this example we should connect a LED to one of Raspberry Pi’s GPIOs: we will use pin 18.
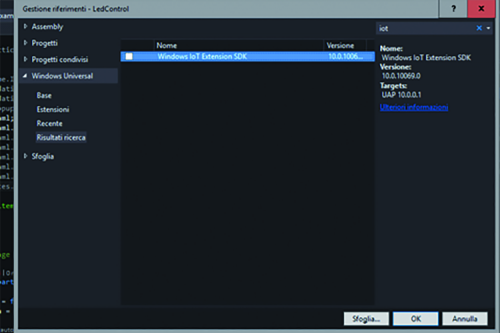
Given that we haven’t yet interacted with the board’s hardware, we didn’t consider the package needed to do that until now. To do that, as a first thing, let’s click with the right mouse button on “References” (while in Visual Studio’s “View Solution Explorer”) and let’s make the context menu appear. From it we will select “Add Reference”, once a dialogue box appears with a list of entries on the right. Let’s select “Windows Universal” and type in “IoT” in the search text box that is up and on the right; in this way the list should show us a single element: “Windows IoT Extension SDK”. Let’s select it and click on OK, in order to install it.
The “Windows IoT Extension SDK” package offers us all the specific extensions needed in order to work with the hardware; of them we will use the classes that enable the interaction with the board’s GPIOs.
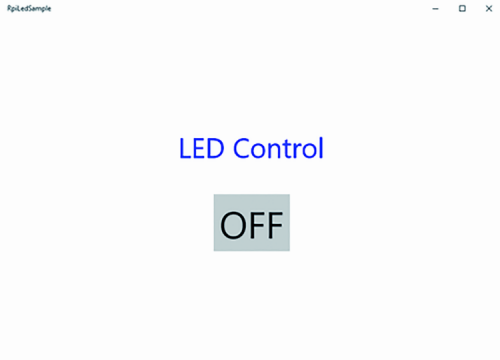
Let’s start, therefore, to modify the code, in order to adapt it to the new needs: as a first thing we will modify the XAML file in order to create the interface we want; the content of MainPage.xaml will be as shown in Listing 2.
Listing2
<Page
x:Class=”App2.MainPage”
xmlns=”http://schemas.microsoft.com/winfx/2006/xaml/presentation”
xmlns:x=”http://schemas.microsoft.com/winfx/2006/xaml”
xmlns:local=”using:App2”
xmlns:d=”http://schemas.microsoft.com/expression/blend/2008”
xmlns:mc=”http://schemas.openxmlformats.org/markup-compatibility/2006”
mc:Ignorable=”d”>
<Grid Background=”{ThemeResource ApplicationPageBackgroundThemeBrush}” >
<StackPanel HorizontalAlignment=”Center” VerticalAlignment=”Center”>
<TextBlock Foreground=”Blue” HorizontalAlignment=”Center”
FontSize=”48”>LED Control</TextBlock>
<Button Click=”Button_Click” HorizontalAlignment=”Center” Margin=”
0,50,0,0” FontSize=”64” >OFF</Button>
</StackPanel>
</Grid>
</Page>
We have added a StackPanel, that is a content control needed when we want to have more elements at our disposal in the interface. In particular, the StackPanel enables the disposition of the elements in a column, one after the other (it is possible to work with a horizontal orientation, if needed).
Inside the StackPanel there is the same TextBlock found in the first example, that simply serves as a title for the page. Under the TextBlock we will insert a Button, whose purpose is the one to create a button in the interface. The button is an active control, in the sense that it is capable of unchaining an action before an event. The Click=“Button_Click” attribute indicates that when the button will be pressed, the code of a method named Button_Click will be executed.
Let’s see then the code that is executed when clicking on a button, as shown in Listing 3.
Listing3
bool state = false;
const int LED_PIN = 18;
GpioPin pin;
private void Button_Click(object sender, RoutedEventArgs e)
{
state = !state;
var pinValue = state ? GpioPinValue.High : GpioPinValue.Low;
pin.Write(pinValue);
Button btn = (Button)sender;
btn.Content = state ? “ON” : “OFF”;
}
The button acts as a switch that turns the LED on and off, depending on the “state” variable. At the same time the button label is modified, and set to “ON” or “OFF”, in order to indicate the LED’s state; as it can be seen from the code used to modify the button’s label, the “Content” property is a valued one here.
The interaction with the GPIO is carried out by means of the “pin” item, obviously this item must be defined somewhere, and configured with the specification of the pin on which to work, and if in input or in output. All of this happens in a method named at the App’s boot, as shown by Listing 4.
Listing4
private void InitGPIO()
{
var gpio = GpioController.GetDefault();
pin = gpio.OpenPin(LED_PIN);
pin.SetDriveMode(GpioPinDriveMode.Output);
pin.Write(GpioPinValue.Low);
}
InitGPIO does exactly what has just been described, as a first thing it obtains an instance of the GpioController, that as you can imagine represents the GPIOs’ management class.
Once the controller’s instance has been acquired, it is used in order to create the “pin” item, and the pin on which it will have to act is specified (in our case LED_PIN, that is to say the number 18). By configuring the operating mode in Output, and by setting the pin at a low level, the initialization is complete. Obviously, InitGPIO will have to be recalled at the App’s boot.
The complete example of the LED control program can be downloaded.
Configuration Panel
We have experimented with the board and discovered that it is very simple to create Apps. By progressing towards more complex applications, however, one will have to confront with the need to control the system’s function parameters. Windows 10 IoT Core offers a management web interface as the default one, these are the parameters that can be reached at the following web address: http://minwinpc.local:8080.
The address is given by the default name that is assigned to the board; obviously it is possible to modify it and in that case the url changes as well, alternatively it is possible to use the IP address in the place of minwinpc.local.
The default access credentials are “Administrator” with “p@ssw0rd” as a password (and obviously it would be better to change it if using the board outside of your laboratory).
The interface is a very simple one, but it is no less efficient because of it: it allows to see the list of the processes being executed, to analyze the CPU load and the RAM consumption in real time, to execute or stop the Apps, and has many other interesting functions.
An interesting function is the one that enables the deployment of applications without having to go through Visual Studio: this is a great help when the board is not connected to the development environment.
Conclusions
In spite of such a superficial view of Windows 10 IoT Core, we could perceive some potentialities that we would define as exciting. The first thing to point out is that when talking about Universal Apps, we are talking about applications that can be virtually executed on all the devices that are supported by Windows 10. The simple examples that we showed in the article can be executed, for example, on a Windows Phone, obviously with the appropriate controls for the usage of specific hardware such as GPIOs. By considering only the field of the embedded boards, we will find that there is not just Raspberry Pi, but for example we will find Intel Galileo, and in this case our App can be executed on different platforms, with minimal modifications that in certain cases may even be unnecessary.
Another distinctive factor is the development efficiency, given by the usage of a professional tool such as Visual Studio, and by the work cycle that enables development, debugging and deployment in a totally integrated way. We didn’t consider the possibilities offered by the interaction with Microsoft’s Cloud, Azure, that enables to move the applications from a hobby level to the professional level, but keeping the same simplicity at work.
In conclusion, we feel sure that Windows IoT Core will soon carve out an important space for itself, in the already crowded world of tools used by the Maker’s community. We can’t but appreciate the efforts that Microsoft is putting in order to offer a legacy of competences and technologies that otherwise it would be impossible to reach.
From openstore
Starter kit for Raspberry PI 2 model B


