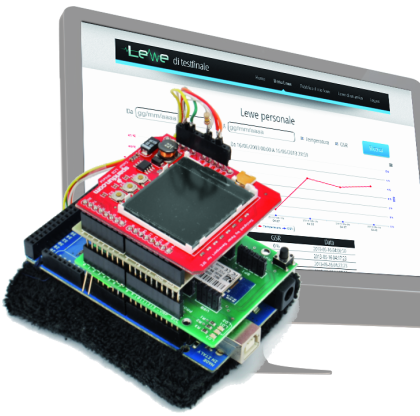
The Lewe project aims to collect and use available technologies to make a low cost idea that is applicable to all sectors using sensors for data collection. This project goal is the development of a communication protocol, named Jack, able to transport data reliably making communication between multiple devices easier and real-time.
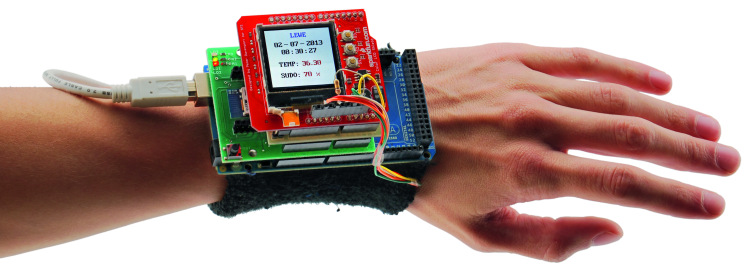
All this could be found in a wristband that reads biometric to be sent via bluetooth to an Android smartphone and, through it, to an online cloud for data storage and organization.
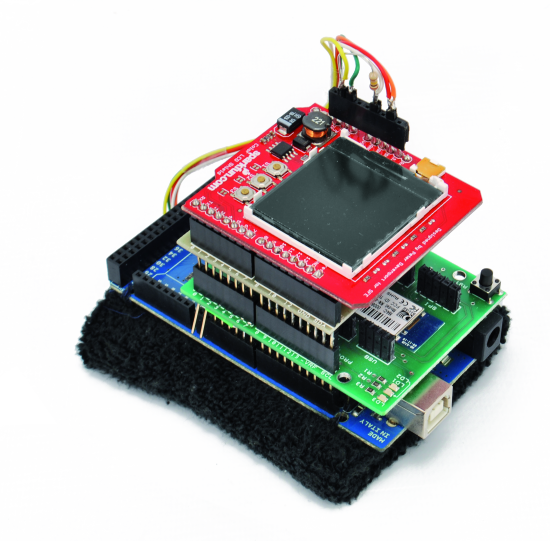
In this experimental version, this project has been carried out by an Arduino Mega board that has a bluetooth shield, a RTC shield and a Color LCD shield; clearly this version is quite hulking, but we want to explain you how to make the application, provided that everyone can make his own hardware with an Arduino Mega like architecture (the diagrams of the Arduino board are opensource) and integrate everything into a single board or two, in a more compact fashion that can be worn thanks to a special container with a wristband.
In this project the following functions have been implemented:
-
detection of temperature and body sweating;
-
local display of recorded data;
-
dispatch values to a smartphone application;
-
free data loading to a online cloud;
-
data organization in simple graphs that help you understand parameters trend over time and compare them with those of other users.
LEWE Hardware
The wristband has been developed around the Arduino Mega platform. For the communication with the smartphone a RN-42 Bluetooth module has been used interfaced with Arduino via the bluetooth shield, through serial hardware (pins 0 and 1). In this project, we choose to use a virtual software serial port on pins 6 and 10, to allow the serial hardware to communicate freely with the PC even during the Bluetooh communication, a function that is useful for software debugging.


To do this, you have to interrupt the slopes coming out from pins 0 and 1 and connect them respectively to pins 10 and 6 of the shield. For your convenience, you can use the pins of the connector named RS232, that is already on the shield. To prevent the pins 0 and 1 of the bluetooth shield to touch the Arduino contacts below, you can cut them (see the picture of the prototype) or bend on the outside.

To read the temperature we used a common LM35 in a TO92 case, whose output is connected to the Arduino analog input A0. To detect sweating two electrodes connected to a voltage divider connected to the Arduino analog input A1 have been used. The operating principle of the sweating detection system is based on the conductivity of sweat, which, being a saline solution, leaves the current flowing from one electrode to another. The higher the level of perspiration, the lower the resistance detected between the electrodes. These two electrodes must have the same size of a penny and obviously good conductivity characteristics and oxidation resistance. With the voltage divider we get a voltage value dependent on the level of sweating which in turn is related to emotional stimuli of the person, and is a good indicator of the physical pressure on the athlete. Obviously, the voltages and currents involved are so small as not to create any danger to the person wearing the wristband.
In the circuit diagram, you will notice that the sensors are powered via the 5V pin of Arduino, but since the entire wristband will be battery powered, we have provided the ability to check the power of the sensors, activating them only when you need to make the sampling. The power supply of the LM35 sensor can be get from pin 12, while the perspiration sensor can be powered by pin 7. These pins are always kept at a low level and activated by software only when necessary to perform the sampling. The 40mA output current indicated on the data sheets of Atmel microcontroller is sufficient for their power supply.
To correlate temporally the recorded data, we used a RTC shield in communication with Arduino through the I²C bus, using the analog pins A4 and A5. We also added a LCD Color shield to display real-time biometric values and the operating status, as well as date and time. The measurements obtained at regular intervals, of adjustable duration, are sent in real time to a smartphone for archiving. Pins 8,9,11,13 (data transfer) with pin 3,4,5 (buttons) are used by the Color LCD Shield.
The wristband, when there is no bluetooth connection with the smartphone, can store up to 12 samples; then sends them as soon as it gets connected.
The entire system is powered by a battery module, which could be be recharged both via USB port or with the small built-in solar panel, ideal for outdoor use. If necessary, the same module can charge the smartphone.

LEWE Firmware
The firmware implementation was carried out with the Arduino IDE using different standard libraries and some external libraries. The LCD color library has been used to manage the Color LCD shield from Sparkfun, the HashMap library has been used to manage the strings array and finally the Wrapper library has been used to facilitate the extraction of string values encapsulated in array.
For the use of the bluetooth module the SoftwareSerialJack library has been created, based on SoftwareSerial, present in the Arduino SDK: this is used to implement a more secure communication due to the addition of the Jack communication protocol that guarantees a reliable connection between sender and receiver, by implementing a system of received messages acks.
This protocol has been developed in order to use any means of transmission and provides for the implementation of functions boolean available (void), String getMessage (void) and void sendMessage (String).
The boolean available (void) returns a boolean value that is true if there are messages available for download from the transmission medium, and false otherwise.
The String getMessage (void) function returns strings, one at a once, as the messages received from the transmission medium. Finally, the sendMessage (String) sends the messages in the transmission medium, as strings, coming from the instance of the Protocol Jack.
The latter provides a class that acts as data container named jdata and uses wrapper classes to store the data and the type.
The send (jdata) method of the protocol creates a message string putting together the actual message and a univocal identifier, which is composed of date and time of capture plus the values of temperature and sweating. The message is then sent to the receiver and processed. Upon receiving, the function available is invoked and this will pass the message to the function getMessage that will save the received message. To process the received message the execute (String) method is used, which will check whether the message complies with the standard, then will extract the univocal code and data contained in the message. To confirm that the message has been received, the univocal identifier is sent to the sender. If the message does not arrive or is corrupt, there won’t be the return receipt and the transmitter will understand that the message is lost and must be retransmitted.
In this way, even a temporary loss of the bluetooth connection will not result in the loss of information, which will be returned as soon as the connection is restored. Thus the time code in the message will allow the reconstruction of the correct temporal sequence.

To successfully compile the Arduino sketch you need to install the additional libraries ColorLCDShield, HashMap, Jack, RTClib, SoftwareSerialJack and Wrapper, all supplied with the project files. The considerable number of lines increases the space occupied by the sketch which can only run on an Arduino Mega 2560 which has a space of 256 kB for the program; Arduino UNO does not have enough space for the sketch.
When it is working, the wristband constantly sends via USB the strings sent and received via bluetooth, so you can verify the correctness of the used protocol. The “id” field is the identifier of the message, the key value used to verify the quality of received messages. The bluetooth module uses all the default settings and the jumpers of the shield are positioned in the following way: AUTO = off, DEFAULT = off, MASTER = off and BAUDRATE = on. The module is then forced to work as slave with communication speed of 9600bps. If the module has been previously programmed, it needs to be reset to factory settings – the function is performed by the reset button located on the shield.
It is important, however, to assign it a Lewe compatible name that is like LEWE_idDevice, where idDevice is an identification number of the device. For this procedure we have written a special sketch with which you can assign a name, other than the default one, to the bluetooth module.
Letting this sketch run you can interface with an Android device and try a data exchange simply by installing an APP with bluetooth SPP function that is able to manage serial communications via BT. We did some tests with the free application “bluetooth spp pro”, by which can send and receive strings. This APP also allows the “Button” mode by which you can program the buttons to send predefined strings, useful to manage the outputs of the Arduino or more advanced controls.
The code
#include <Wire.h>
#include <RTClib.h>

#include <HashMap.h>
#include <SoftwareSerial.h>
#include <Wrapper.h>
#include <Jack.h>
#include <SoftwareSerialJack.h>

//COSTANTI

//GENERALI
//const long INTERVAL_BETWEEN_SURVEY = 30000; //30 secondi per debug
const long INTERVAL_BETWEEN_SURVEY = 300000; //5 min (tempo in ms)

const int DEBUG = 1; //1 stampa info di debug, 0 non stampa niente

//BT
const int BT_RX_PIN = 10; //bt rx
const int BT_TX_PIN = 6; //bt tx
const long BT_BAUDRATE = 9600; //bt baudrate

//LM35
const int TEMP_SWITCH_PIN = 8; //pin per comandare l'accensione del sensore
const int TEMP_PIN = A0; //pin sensore

//GSR
const int GSR_SWITCH_PIN = 7; //pin per comandare l'accensione
const int GSR_PIN = A1; //pin del sensore
const long GSR_R = 1000000; //1MOhm
const double GSR_VCC = 5.0; //ddp applicata al sensore

//COSTANTI PER JACK
const long TIME_BEFORE_RESEND_MESSAGE = 5000;

//CHIAVI PER IL PROTOCOLLO
const String TIMESTAMP_KEY = "TIMESTAMP";
const String TEMPERATURE_KEY = "TEMPERATURE";
const String GSR_KEY = "GSR";

//VARIABILI

//JACK
SoftwareSerialJack * mmJTM; //variabile contenente il metodo di trasmissione
Jack * jack; //varibile per il protocollo jack

//VARIABILI PER RTC
RTC_DS1307 RTC;

//variabili per l'invio dei dati
long timeLastSurvey; //varibile contenente il tempo per scandire gli invii
int sensorState;

//FUNZIONI

//JACK
void onReceive(JData * message) {} //funzione richiamata alla ricezione di un messaggio dati
void onReceiveAck(JData * message) {} //funzione richiamata alla conferma di un messaggio

//RILEVAZIONI
long getTimestamp() { //preleva il timestamp da RTC in unix timestamp

  long timestamp = RTC.now().unixtime();

  if (DEBUG) {
    Serial.print("Timestamp: ");
    Serial.println(timestamp);
  }

  return timestamp; //get unix timestamp (secondi a partire da mezzanotte di );

}

long getGSR() { //preleva il valore del sensore GSR

  int gsr = analogRead(GSR_PIN); //leggo il sensore

  if (DEBUG) {
    Serial.print("GSR tick: ");
    Serial.println(gsr);

  }

  gsr = (int) ((gsr * 100.0) / 1023.0); //traformo la lettura in percentuale

  return gsr; //ritorno il valore in percentuale
}

double getTemperature() { //preleva il valore della temperatura da LM35 con 1 cifra dopo la virgola

  double temp = analogRead(TEMP_PIN); //prelevo la lettura dal sensore

  temp = (temp * 5.0 / 1023.0) * 100.0; //converto la temperatura letta in gradi

  double decimalPart = temp - floor(temp); //ricavo la parte decimale

  temp = floor(temp) + (floor(decimalPart * 10) / 10); //sommo la parte intera e una cifra dopo la virgola

  if (DEBUG) {
    Serial.print("Temp: ");
    Serial.println(temp);
  }

  return temp; //restituisco la temperatura con un decimale

}

void getSurvey() { //funzione che esegue una rilevazione

  JData * survey = new JData(); // creo il contenitore per i dati

  survey -> addLong(TIMESTAMP_KEY, getTimestamp()); //inserisco il timestamp
  survey -> addLong(GSR_KEY, getGSR()); //inserisco il gsr
  survey -> addDouble(TEMPERATURE_KEY, getTemperature()); //inserisco la temperatura

  if (DEBUG) {
    Serial.println("survey getted");
  }

  jack -> send(survey); //invio il messaggio

  if (DEBUG) {
    Serial.println("survey send");
  }

}

//SLEEP E WAKEUP PER I SENSORI

void setupSensor() {

  //analogReference(INTERNAL1V1); //abbasso la sensibilità dei sensori da 5v a 1.1v

  //setup RTC
  Wire.begin();
  RTC.begin();

  if (! RTC.isrunning()) {
    Serial.println("RTC is NOT running!");

    RTC.adjust(DateTime(__DATE__, __TIME__)); //setto RTC con il data e ora di compilazione dello sketch
  }

}

void wakeupSensor() { //funzione che sveglia i sensor

  digitalWrite(TEMP_SWITCH_PIN, HIGH); //abilito i sensori accendendoli alimentandoli a 5v
  digitalWrite(GSR_SWITCH_PIN, HIGH);

  sensorState = 1;

  if (DEBUG) {
    Serial.println("sensori risveglio");
  }

}

void sleepSensor() { //funzione che addormenta i sensori

  digitalWrite(TEMP_SWITCH_PIN, LOW); //spengo i sensori togliendo la tensione
  digitalWrite(GSR_SWITCH_PIN, LOW);

  sensorState = 0;

  if (DEBUG) {
    Serial.println("sensori addormentati");
  }

}

int getSensorState() { //ritorna lo stato dei sensori

  return sensorState;
}

void setup() {

  Serial.begin(9600); //avvio Serial

  setupSensor(); //funzione che esegue il setup dei sensori.

  mmJTM = new SoftwareSerialJack(BT_RX_PIN, BT_TX_PIN, BT_BAUDRATE); //creo il metodo di trasmissione

  if (DEBUG) {
    Serial.println("mmJTM creato");
  }

  jack = new Jack(mmJTM, &onReceive, &onReceiveAck, &getTimestamp, TIME_BEFORE_RESEND_MESSAGE); //creo jack passando mmJTM e le funzioni

  if (DEBUG) {
    Serial.println("Jack creato");
  }

  jack -> start(); //faccio partire il protocollo

  if (DEBUG) {
    Serial.println("Jack partito");
  }

  sleepSensor(); //addormento i sensori

  timeLastSurvey = millis(); //imposto la variabile con il tempo così il prossimo invio è tra 10

}

void loop() {

  jack -> loop(); //funzione che invia i messaggi e riceve i messaggi (simulazione thread)

  long now = millis();

  if (now - timeLastSurvey > INTERVAL_BETWEEN_SURVEY) { //scaduto il tempo di attesa tra invii (invio la rilevazione)

    if (DEBUG) {
      Serial.println("invio rilevazione");
    }

    getSurvey(); //prelevo le rilevazioni e le invio

    sleepSensor(); //addormento i sensori

    timeLastSurvey = now;

  } else if (!getSensorState() && (now - timeLastSurvey > (int) (INTERVAL_BETWEEN_SURVEY / 2))) { //sono a metà del tempo di intervallo e sveglio i sensori

    if (DEBUG) {
      Serial.println("preparazione sensori");
    }

    wakeupSensor();

  }

}
The Smartphones App
The Android application is the very heart of Lewe, because it receives data from the wristband, stores them locally on the device and, if properly configured, uploads them on the online cloud. The App consists of a main activity, in which the last data received from the wristband are shown, and a secondary activity, that displays the diagram containing all the data. By clicking the icon of the gear, you can enter the app settings with which you can select the wristband to which to connect and configure the cloud access information.
The application has been built in Java with the help of the Eclipse provided with ADT Plugin, which allows the development of Android applications. For the graphics we chose to use the library AchartEngine, available under the Apache 2.0 license.

The app has four services running in background:
-
LeweService;
-
LewebluetoothService;
-
LeweDatabaseService;
-
LeweWebCloudService.
LeweService is the main service of the application that is started at the first start and stays in the background until its closing, starts the remaining services and terminates them after receiving the command to shutdown. The service communicates directly with the other services LeweWebCloudService and LewebluetoothService. In addition to this, it sends the commands of connection and disconnection of the aforementioned services, which communicate with the outside world.
LewebluetoothService uses the class bluetoothChatService for receiving data. The latter has been modified by adding the ability to recover the connection with the Bluetooth when missing and has also been made compatible to work with the Jack protocol.
LeweDatabaseService manages the database of the acquired data in SQLite.
LeweWebCloudService manages the communication between application and cloud. In particular it sends data to the cloud via HTML post requests and verifies that they have been loaded via the confirmation of data receiving, as provided for in the Jack protocol.

The online cloud allows the you to access data from anywhere by using credentials to log on your personal space made available for free. If you do not have an account, a registration service has been provided.
Data are represented both graphically and in the classic tabular form. There is also a module to perform a search by date. If no parameter is entered, it automatically displays the data for the last day of use of the wristband.
By configuring the application with the access data to your personal space, you can start uploading biometric data collected from the wristband.
You can also let other people access your data by filling the form on the web page with their username.

To start the wristband you just have to power it, while the Lewe.apk application must be installed on the Android device. First you need to connect the wristband to your smartphone by entering the settings screen (with the gear symbol in the upper right). From the settings menu you can configure the communication with the wristband and the web cloud. By clicking the Lewe button and then the ON button you start the search for Lewe devices. In the box below you can see the names of wristbands detected by the app. Thanks to a check on the bluetooth name of the device only those who fit the pattern LEWE_idDevice are shown, where idDevice is an identification number of the device. Selecting the wristband to connect, the connection is established and the application gets running.
This operation is required only at the first start of the app or when you change the device, since the app stores the BT device to which connect and attempts to connect automatically each time you open the app.
For the cloud activation, you must click on “Web Cloud” and enter e-mail address and password in the appropriate fields (those to access online web cloud) and put the check mark for “Usa Web Cloud”.
Applications can also run without the cloud option and thus these settings are optional.
The system has been extensively tested with smartphones such as Galaxy Nexus, Nexus 4 and Galaxy S2 with Android OS 4.0.

You can view the online cloud by accessing the http://www.lewe.tk website. To access the platform use the click on the “login” button and use email “prova@prova.it” and password “prova123” as credentials.
LEWE Download
Firmware, Libraries and PHP pages
Credits
A big Thanks to Alessandro Pasqualini and Mirco Segatello to developing this project

[…] The Lewe project aims to collect and use available technologies to make a low cost idea that is applicable to all sectors using sensors for data collection. This project goal is the development of a communication protocol, named Jack, able to transport data reliably making communication between multiple devices easier and real-time. All this could be found in a wristband that reads biometric to be sent via bluetooth to an Android smartphone and, through it, to an online cloud for data storage and organization. […]
[…] LEWE: the biometric wristbandPosted 2 days ago […]
[…] The Lewe project aims to collect and use available technologies to make a low cost idea that is applicable to all sectors using sensors for data collection. […]
[…] to Boris Landoni of OpenElectronics, the goal of Project LEWE is to leverage available tech and create a low cost platform using […]
[…] For full instructions on how to make your very own LEWE open source biometric wristband powered by Arduino jump over to the Open Electronics. […]
[…] The Lewe project aims to collect and use available technologies to make a low cost idea that is applicable to all sectors using sensors for data collection. This project goal is the development of a communication protocol, named Jack, able to transport data reliably making communication between multiple devices easier and real-time. All this could be found in a wristband that reads biometric to be sent via bluetooth to an Android smartphone and, through it, to an online cloud for data storage and organization. In this experimental version, this project has been carried out by an Arduino Mega board that has a bluetooth shield, a RTC shield and a Color LCD shield; clearly this version is quite hulking, but we want to explain you how to make the application, provided that everyone can make his own hardware with an Arduino Mega like architecture (the diagrams of the Arduino board are opensource) and integrate everything into a single board or two, in a more […] […]
hello… I like this work … and need to do more projects in this area..please contact at engit2020@yahoo.com
[…] 开源肯定要追上可穿戴这个时髦大船的,最近著名Open-Electronics组织就公开了利用Arduino构建的LEWE开源生物识别腕带,这是一款可以测试人体温度和出汗率的设备。它会直接将测试所获得的信息传送到用户的Android智能设备上,然后对这些数据进行分析。 […]
[…] 开源肯定要追上可穿戴这个时髦大船的,最近著名Open-Electronics组织就公开了利用Arduino构建的LEWE开源生物识别腕带,这是一款可以测试人体温度和出汗率的设备。它会直接将测试所获得的信息传送到用户的Android智能设备上,然后对这些数据进行分析。 […]
[…] to Boris Landoni of OpenElectronics, the goal of Project LEWE is to leverage available tech and create a low cost platform using […]