Here comes a new board for prototype creation of connected applications and in IoT: richly equipped with Wi-Fi, Bluetooth, NFC and a battery for autonomously operation.
It almost sounds like the last name of a noble or Royal family, instead, it identifies the latest board (the name is almost in antithesis with its order in sequence) from Arduino, now that the two souls of the Ivrea-born project are at peace once again. Although the last to be launched, this Arduino can surely be considered as the first because it is the first project designed specifically for prototyping of IoT applications, wearable electronics, connected sensors and home automation. After the analysis and the presentation last May 20 California, Primo board is coming to Italy this summer, so we thought we had to properly introduce it and highlight its main features.
The vocation of the new Arduino is shown by the rich onboard peripheral equipment, thanks to which Arduino passes from being a microcontroller with easily accessible pins from the outside, boot loader and USB interface for programming, to a complete development system for applications interaction with the external world, equipped with the most known wireless communication and interface links such as NFC and infrared port. With the Primo, Arduino makes its official debut in the professional world and the idea of educational support product or product oriented to beginner makers we had in the Arduino world takes another shape and is now more and more oriented towards the current technological trends and the business for the coming years: wearable electronics and smart objects.

Connectivity first
Let’s start by taking a more in-depth look inside our Primo board and we see that connectivity has been put first during the design phase: in fact, on the board we can find a Bluetooth Smart (BLE version 4.2 to be precise), Wi-Fi, IR optical interface, everything handled by a powerful nRF52382 SoC Nordic Semiconductor , which is a 32-bit ARM Cortex M4F with 64 MHz clock, 64 kb RAM and a 512 kB flash memory. SoC’s power absorption is reduced thanks to a very efficient power management section governing the entire chip.
Figure illustrates the board’s block diagram, where we can clearly see how the nRF52 acts as a coordinator relying on the STM32 for carrying out certain services.
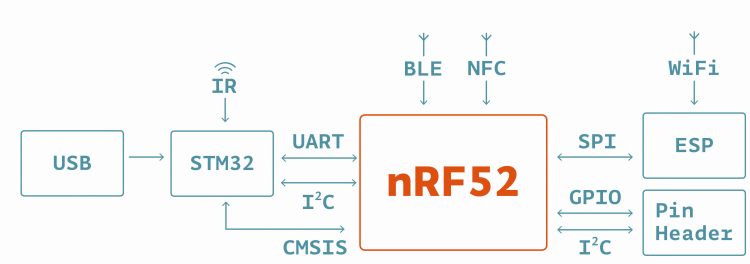
As you can see, the SoC by Nordic Semiconductor also directly manages the NFC interface (Near Field Communication), another communication link, although aimed to RF identification (RFID).
The onboard NFC functionality allows to emulate an NFC tag using the board; the technology implemented by the nRF52832 SoC allows safe authentication and “Touch-to-Pair” pairing for low-energy Bluetooth.
The Bluetooth radio section of Primo board is multiprotocol (i.e. retro-compatible with previous Bluetooth versions) and ensures -96 dB sensitivity in reception, thus sensibly lowering transmission absorption, as required by the Low-Energy requirements (in this case, we are talking 5.5 mA peak).
The Wi-Fi interface has been implemented using an ESP2866 by Espressif, which is now a reference standard for Wi-Fi connection in Arduino world, thanks to its low cost and great potential, with an integrated microcontroller capable of carrying out various operations and interacting through GPIOs and a UART serial data channel. Antenna both for Bluetooth and Wi-Fi is integrated into the Primo board.
The integration of wireless and NFC links lets us save on specific shields, thus allowing to minimize the dimensions of the prototype system (although at this point the system could be realized on the Primo board, given the price and the small dimensions…) without occupying the I/O pins of the headers.
A very rich hardware
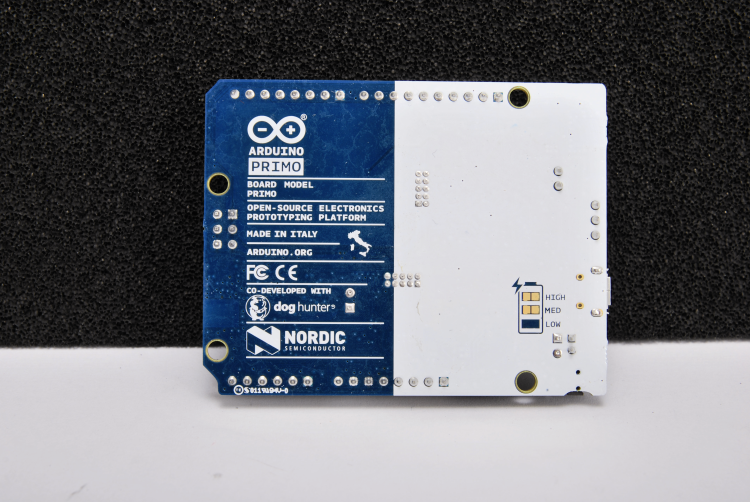
Continuing with the analysis of Arduino Primo’s equipment, we can see they have integrated a battery charger block (that can be used to charge an accumulator and have the board work independently), a buzzer and the three buttons, one being the classic reset and two reserved for user-defined applications. One button (ESP B/L button) also allows the ESP2866 to enter bootloader mode, if a firmware upgrade is needed.
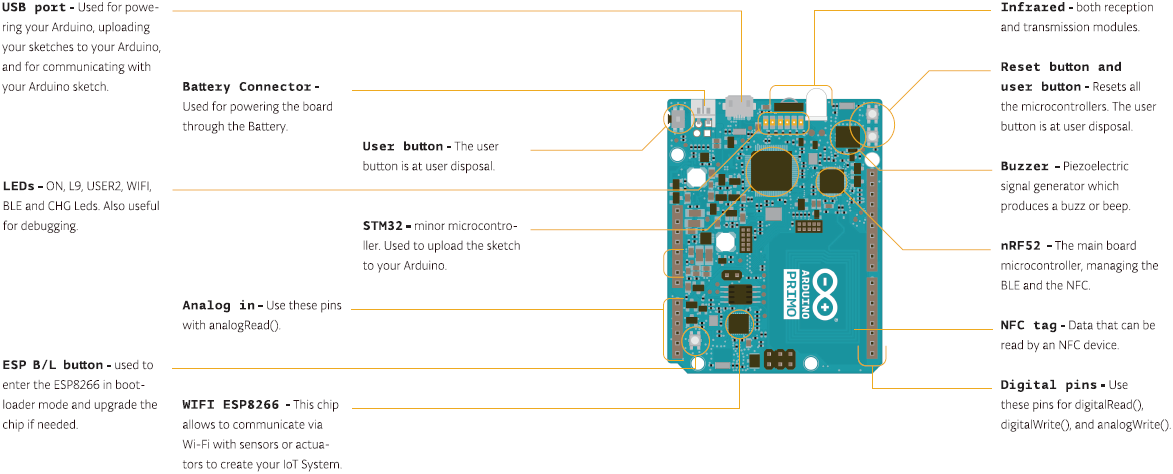
highlights the placement of the board’s main features.
Beside the main processor, we can find it 32-bit service processor: it’s a STM32F103R8T6, manufactured by ST Microelectronics, which the main function is to act as USB/UART interface for external communication; other functions are CMSIS-DAP, GPIO expander, power management, IrDA interface (infrared) composed by a transmitter LED and an amplified IR receiver.
The STM32 bit processor represents the subsystem tasked with USB interfacing, infrared interfacing and more. The same serial infrared interface is meant both for developing devices capable of communicating using such port, but also to wirelessly receive local commands, which is fitting for developing controllers for home automation, which interact on one side with the user through a simple remote control and on the other side are remotely interfaced on the web to publish information and receive settings.
The SoC’s computing power can simultaneously manage all of Arduino Primo’s subsystems and execute code for managing both remote and local data; in short, information acquisition by the sensors and the communication links do not use up all the power but there is more than enough room for executing local tasks and handling I/Os.
The headers for external connections and interfacing with the various sensors stay on Arduino Primo, and the headers are compatible with Arduino UNO rev. 3. The headers for the Arduino expansion pins still refer to the nRF52, while the SD microcontroller is a subsystem dedicated to wired and IR communication.
Now, let’s get ack for a second to the battery stage, because this version of Arduino distinguish itself because, being born for IoT and prototyping of wearable electronics or remote sensors, it provides autonomous power supply, besides the battery charge chip, there is an indicator for the charger status in the circuit which informs the STM32F103R8T6 microcontroller about the charge status.
On the bottom side of the board there are pads for possibly making two bridges (they are enclosed by the serigraphy displaying the battery symbol, as shown in figure), that is solder bridges for adjusting charging speed of the battery powering the board.
Since Arduino Primo needs 5 V to function, there are voltage regulators on board to provide the 3.3 V needed by Nordic Semiconductor SoC’s and the STM32 microcontroller, besides other components that do not work on 5 V.
The software
Although Primo’s main processor is not that powerful compared to the previous Arduinos we were used to, they kept the same programming ease that made project Arduino a huge success ; in fact, the IDE is still the same (in its latest versions) and the sketches still run.
The new Arduino Primo can therefore be programmed through Arduino Integrated Development Environment (a.k.a., IDE…) provided that the IDE 1.8.x is installed on the computer, because there might be some issues with previous versions for importing third-party drivers. In fact, Arduino Primo is available from third parties by downloading and installing the driver from the board manager (called Arduino NRF52).
But there’s more: Arduino Primo can also be programmed using more powerful and refinde tools then IDE, if the final application’s complexity requires it. To this purpose, Nordic Semiconductor makes available the specific SDK nRF5 for IoT, which allows more experts developers to develop Bluetooth Low Energy applications on nRF52832 SoC, allowing Arduino Primo to communicate with other objects (such as sensors with wireless connectivity) connected to the Internet without requiring the resources of a Wi-Fi router or a smartphone.
So, this board can interact with other “smart objects” without a direct web connection.
SoC Nordic Semiconductor, moreover, provides a TCP/IP client and server via Wi-Fi, in order to offer even more versatility; a functionality we can take full advantage of by using the SDK.
The board can still be programmed via a serial port or USB, however, as mentioned earlier, there is a OTA mode available for updating the main microcontroller’s program from the Bluetooth link that is on the board.
The board integrates the TCP/IP stack, supporting the IPv6 protocol, which is required by the strong increase of current and future Internet capable peripherals, especially with the arrival of IoT; in this regard, note that recently, Web-connected devices have been estimated to grow from 15 million today to around 200 billion in 2020. Moreover, in order to be able to connect to a wide range of Bluetooth Low Energy sensors, Arduino Primo can work as a complete TCP/IP Internet and server on Wi-Fi.
Web interface
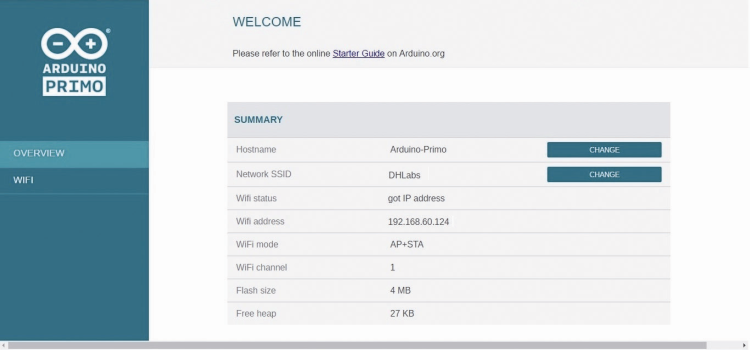
For managing the web connection, there is a web user interface.
The web interface of Arduino Primo allows to manage all the possible configurations and can be accessed via the web browser of a computer connected on the same Wi-Fi of the board, in two different ways:
- If the board hasn’t been configured yet, you can access by inputting this address in the URL bar: http://192.168.240.1/; in this case, please see the Getting Started guide.
- If the board has already been correctly configured for connecting to the Wi-Fi network, you can simply input the IP address you assigned to it in the URL bar, or the host name (hostname.local/).
The web interface (Web Panel) is a simple menu composed of two elements:
for managing the network connection, there is a web-based user interface OVERVIEW AND WIFI.
The Web Panel’s homepage is OVERVIEW and it contains all the information about the board, in particular hostname, SSID network, Wi-Fi address and Wi-Fi mode.
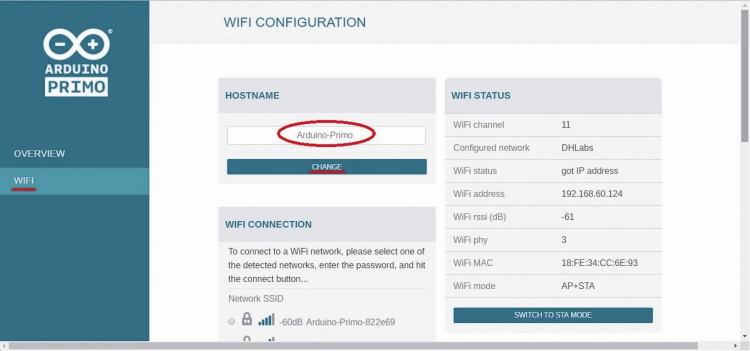
The Wi-Fi section contains a large array of pages from which you can set all the wireless network parameters, and also manage the networks found within the range of Arduino Primo.
For those of you who want to get more in-depth information about the subject and to support those who have to work with Arduino Primo, the reference website www.arduino.org offers all the relevant documentation and a starting guide, accessible at http://www.arduino.org/learning/getting-started/getting-started-with-arduino-primo.
Here, you can already find support for the board and the download link for IDE 1.8.x along with instructions for Windows and Linux and all of the board configurations, especially for the Wi-Fi connection.
Conclusions
Once again, Arduino keeps up with technology and the Primo aims to provide a developer with an instrument that is both professional and able to compete with other existent IoT solutions, by using winning aspects like the price and simplicity of approach that have been always a staple of this project.
From openstore
