This post follows a first one in which we presented some tips about how to tune printing (with 3Drag but also in general). Here you’ll find 5 more cool 3D prints to experiment with!
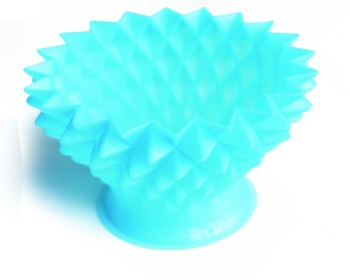
Porcupine Vase
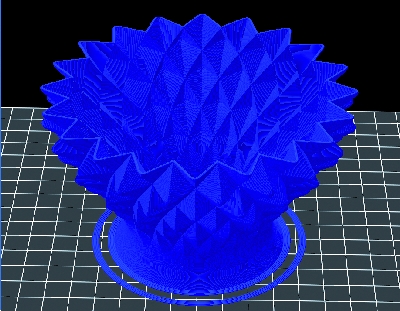
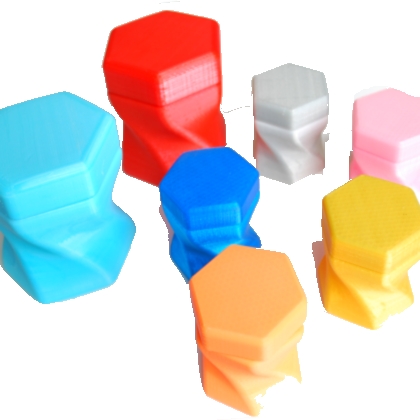
This is an easy print difficulties, with reduced printing times, but it’s. It belongs to the category of vessels and has the particularity to adapt to reworks through scaling on one axis with the tools provided by Repetier. The genesis of this model is very simple: we found a pair of vessels called “Double Twisted Vase Inside Out” and after printing the one that is more rounded, we decided to rework the whole cutting the vessel in half. The lower part has become the bowl, while the upper one has been rotated 180 degrees on the X axis, and havs then become an elongated glass. In all cases, to print pots like this (born as a full 3D models), you need to use a special settings with both “top solid layers” and “fill” set to 0. In this way the slicer produces only the “skin” of the object with the specified number of perimeters (two to give a little more robustness), the support base (bottom solid layer) and nothing else.
This series of three vessels, we gathered under one group (of which you have three STL and one G-Code), lends itself to great experimenting with parameters such as perimeters, print speed, thickness (z) of the layers and temperatures. As a practical note that the cup bottom is a bit critical in the first layers due high temperatures (turn on the fan at the end of the first layer) or high printing speeds. After the first 30 layers of the difficulty comes back into normal. The problem lies in the fact that in these first layers the diameter narrows very rapidly, coming to an angle of the walls that is critical with Z greater than 0.18mm, then if the material is too hot and soft, the layer collapses and the printing is compromised.
STL file from Thingiverse
layer_height = 0.2
perimeters = 2
top_solid_layers = 0
bottom_solid_layers = 4
fill_density = 0
perimeter_speed = 80
infill_speed = 80
travel_speed = 100
nozzle_diameter = 0.5
filament_diameter = 3
extrusion_multiplier = 1
perimeters extrusion width = 0.85mm
infill extrusion width = 1.02mm
solid infill extrusion width = 0.85mm
top infill extrusion width = 0.85mm
first layer extrusion width = 0.60mm
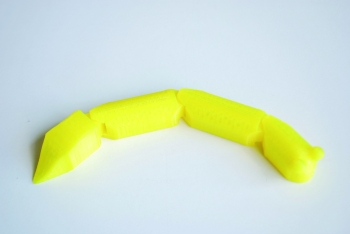
Articulated Worm

The first time we printed this model, we were bewitched by the “magic” by the self-assembling joints. In practice, a single piece became a worm with four jointed parts that are inextricably linked. The trick is in a system of pins and cavities that are created and close during the printing process, with each segment that is coupled to the previous one with a pin, but with slots that host the segments thanks to a separation layer. Once printed, all the pieces come off and you can unlock joints easily. A little rotation movement will let the PLA detach in the points where the layers are in contact and the joint will be free. With some repeated movement, the situation improves until you have a complete freedom of movement. The print file that we prepared has three worms (1.2 magnification ratio compared to the original one), with more detail in the printing thanks to setting 0.4 mm as the diameter for extrusion of perimeters and fill. When you trick the diameter of the extruded wire, the temperature must be set with precision and then, depending on the PLA used, you may need to raise or lower the temperature while printing. To familiarize with this print you can pt the “feedrate” to 60 to slow down the first layers, allowing you to find the optimal temperatures, and then increase in steps of 10 to return to 100% of the speed ( 90 mm / sec) which allows you to have perfect results only if the temperatures are right. This print required 4 hours to be printed while to print only one element, in the natural size, you need about 50 minutes.
STL file from Thingiverse
layer_height = 0.18
perimeters = 1
top_solid_layers = 4
bottom_solid_layers = 4
fill_density = 0.3
perimeter_speed = 90
infill_speed = 90
travel_speed = 140
nozzle_diameter = 0.5
filament_diameter = 3
extrusion_multiplier = 1
perimeters extrusion width = 0.40mm
infill extrusion width = 0.40mm
solid infill extrusion width = 0.40mm
top infill extrusion width = 0.40mm
first layer extrusion width = 0.80mm
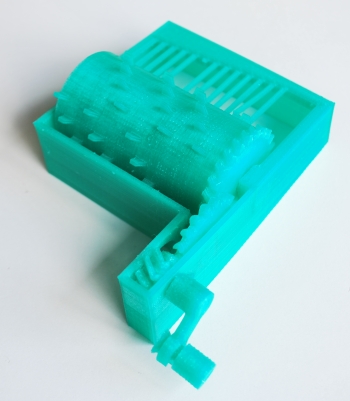
Music Box

This is a good test of your patience as the print of the entire set takes several hours to finish. The cylinder with the notches corresponding to the notes to be played is the most challenging piece (and time consuming) to be printed, while the structure with the slats is the most delicate and critical. The gears are relatively simple. To increase the strength we choose to print by setting the perimeters thickness to 0.35mm. As a result this leads to a greater detail in the design of gears teeth which, at the same time, are made with perimeters much closer between them and thus more robust. To understand what we mean by “greater detail”, just try to do the slicing setting values ranging from 0.5mm to 0.3mm in steps of 0.05 mm. Obviously you don’t need to print, just look at the individual layers from Repetier in the G-Code Editor window.
After printing the pieces, assemble them starting from the smallest wheel: stick it into the round hole and then to slide up and snap into the pin, then insert the larger wheel, with the larger gear to the outside and the smaller inside. The last piece to be put in position is the cylinder. Do this very carefully because if a tooth gets stuck on one blade it will break (we broke three ). The crank is to be turned clockwise. DO NOT leave the music box with one or more blades bent or in contact with a tooth because they tend to warp: move the roller in a place where there are no teeth in contact with the blades and your chime will work for long. On Thingiverse you can find the application to make other cylinders with music notes defined by you. Soooo nice.
STL file from Thingiverse
layer_height = 0.18
perimeters = 4
top_solid_layers = 4
bottom_solid_layers = 3
fill_density = 0.2
perimeter_speed = 90
infill_speed = 90
travel_speed = 140
scale = 1
nozzle_diameter = 0.5
filament_diameter = 3
extrusion_multiplier = 1
perimeters extrusion width = 0.35mm
infill extrusion width = 0.35mm
first layer extrusion width = 0.35mm
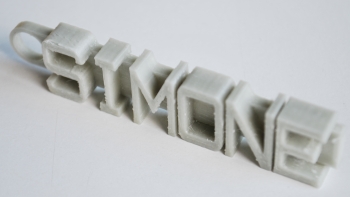
Key holder
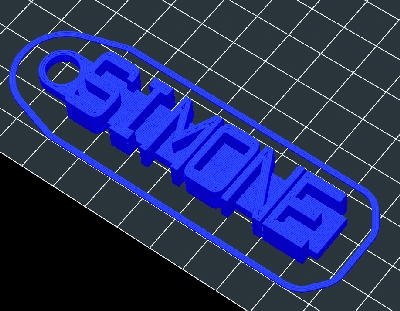
The key holders printed in 3D are highly effective gadgets, by the way, to realize a new CAD model every time to create the name of our friend or our friends can be boring. Thankfully a Thingiverse user developed an application in which one can enter the parameters and the STL model is generated accordingly, ready for printing. You have to start from the object and then choose “Open in Customizer.”
We advise you to choose the Flat Bottom parameter to have the support of the letters in contact with the floor printing, and if you have any i letter in the names, you have to decide what strategy to take to prevent the dot to be connected to a key ring (expan the basic strip or use the upper case i). At the end, with the “create thing” button, your key ring will be placed in your profile. Download and print recalling that the letters are in need of a certain definition, and therefore also in this case it is better to tune the diameter of the wire. In the file we give you, parameters are set for printing with phosphorescent PLA, which requires a lower temperature than normal. If you want to print it, change the temperature as explained above.
STL file from Thingiverse
layer_height = 0.18
perimeters = 4
top_solid_layers = 4
bottom_solid_layers = 3
fill_density = 0.2
perimeter_speed = 90
infill_speed = 90
travel_speed = 140
nozzle_diameter = 0.5
filament_diameter = 3
extrusion_multiplier = 1
perimeters extrusion width = 0.35mm
infill extrusion width = 0.35mm
solid infill extrusion width = 0.35mm
top infill extrusion width = 0.35mm
first layer extrusion width = 0.35mm
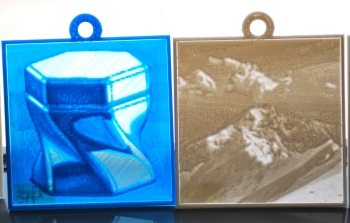
Photo layers – Lithopane
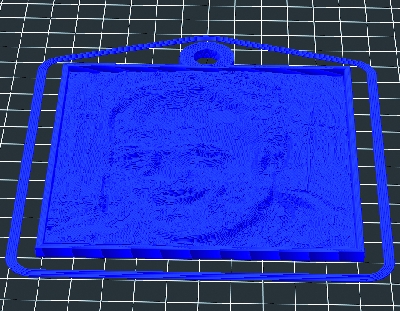
Last but not least, a print that is very special. Depending on the material used, it has a transmitted light attenuation that varies greatly. The PLA offers various degrees of attenuation, from neutral to transparent (yellow, red, green, silver, gold, blue) and ending with those opaque (nuclear green, orange, pink, gray, white and black), with the phosphorescent representing a category of its own. This introduction serves to understand how to print 3D images: stratifying the image with the number of layers that corresponds to the intensity of black at each point. The result is a 3D printing that when illuminated in transparency shows the photograph from which it was created. The effect is more easy to display with an image than it’s easy to explain, and the result is very interesting. To create your 3D photos (or lithopanes – widespread in the end of the 19th century to “hide” girls images of in tea cups bottoms in China), we will use additive synthesis with a solution made available on Thingiverse http://www.thingiverse.com/thing:74322). If you want a rundown of examples, just look up Lithopane on Google.
With the Thingiverse tool, the picture to be transformed into a 3D printing should be 100×100 pixel resolution: the procedure resizes the one you upload to this size (attention to proportions!). The generated file is a STL for printing of a 10.3 x 10.3 cm, 3.8 mm thick panel. To have a try now we have produced a file (an image of Massimo Banzi, shoot during the presentation of Maker Faire to be held in Rome next October). The best print was obtained using phosphorescent PLA: great homogeneity of extrusion – at about 192°C- and an opacity of the layers that allowed us to get good dynamics in the result. You can experimented with various PLAs to find what makes it better. A 0.18 thickness of printing is the one that gave the best result, while varying density of the fill and the number of perimeters offers different results. If you use our file in G-Code, amended by hand or in the file the temperatures that you will use for your PLA.
STL file from Thingiverse
layer_height = 0.18
perimeters = 2
top_solid_layers = 4
bottom_solid_layers = 4
fill_density = 0.4
perimeter_speed = 50
infill_speed = 50
travel_speed = 120
nozzle_diameter = 0.5
filament_diameter = 3
extrusion_multiplier = 1
perimeters extrusion width = 0.40mm
infill extrusion width = 0.40mm
solid infill extrusion width = 0.40mm
top infill extrusion width = 0.40mm
first layer extrusion width = 0.60mm

[…] Five More incredible Prints For Your 3D Printer […]