- Building a 3D Digital Clock with ArduinoPosted 4 months ago
- Creating a controller for Minecraft with realistic body movements using ArduinoPosted 5 months ago
- Snowflake with ArduinoPosted 5 months ago
- Holographic Christmas TreePosted 5 months ago
- Segstick: Build Your Own Self-Balancing Vehicle in Just 2 Days with ArduinoPosted 6 months ago
- ZSWatch: An Open-Source Smartwatch Project Based on the Zephyr Operating SystemPosted 7 months ago
- What is IoT and which devices to usePosted 7 months ago
- Maker Faire Rome Unveils Thrilling “Padel Smash Future” Pavilion for Sports EnthusiastsPosted 7 months ago
- Make your curtains smartPosted 8 months ago
- Configuring an ESP8266 for Battery PowerPosted 8 months ago
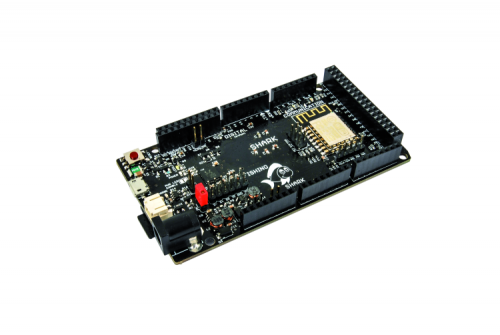
Fishino Shark: arduino like board with 32-bit, WiFi, audio codec, sd card, battery charger – The software
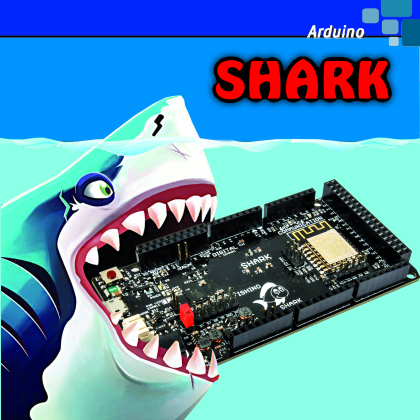
A new Arduino-like board ready to “devour” the competitors: not surprisingly, it was called Shark. Let’s see how to use it.
Second and last episode.
Read the first post about Fishino Shark
The sea of Fishino, our series of prototyping boards compatible with the Arduino family, has recently completed its population: as we have explained in the previous issue, the “fauna” of the little fish’s popular boards has been enriched with a “shark”, the Fishino Shark. This name wasn’t chosen randomly: the leading characteristic of all our Fishinos is that, in addition to being compatible with the corresponding Arduino, they’re named after fish (apart from UNO, called Fishino UNO). This one is called Shark because it’s the most aggressive of our prototyping units.
It has a Microchip 32-bit PIC32MX core and can be considered a cross between Fishino32, compatible at the header level with the Fishino UNO but equipped with an excellent audio codec, and Fishino Piranha, compatible with the Arduino MKR1000 but equipped with additional features and functionality. Fishino Shark, therefore, provides the performance and peripherals of a 32-bit board in the form factor of an Arduino / Fishino MEGA but with many more I/Os than its competitors.
So we can consider it an Arduino with the standard headers of the MEGA, but with a 32-bit processor and additional connectors to make available the additional I/O equipped.
In the last episode we met the Shark hardware and explained how to make it; now it’s time to use it, we’ll see first the preparation and then the configuration of both the board (the setting) and the IDE of Arduino necessary to manage the programming of Shark.
LET’S SEE HOW IT WORKS
As we announced at the beginning of the first episode of this article, the programming of Fishino Shark can be done easily through the IDE of Arduino (provided it’s a recent version or at least 1.6.5, which allow the import of third-party board drivers) having the foresight to install the package provided by us on the site, containing all the additional programs needed.
The installation of the package, thanks to the work of the Arduino team, is very simple: just open the IDE, select the Settings submenu from the File menu, and enter the www path in the line titled “Additional URL for the board Manager”. fishino.it/arduinoide/package_fishino_index.json, as shown in Fig. 1.
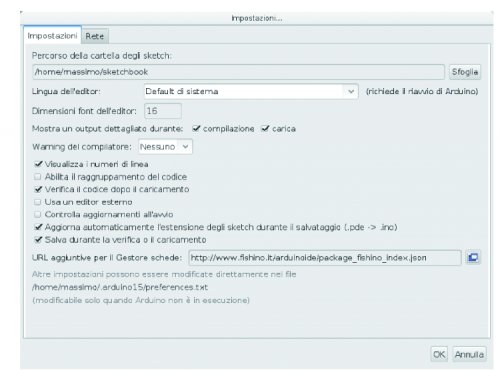
Fig. 1
Note that you can enter multiple paths by clicking on the button, which will open the window shown in Fig. 2 where we can add more URLs. Once you have entered the path relative to Fishino, simply enter the “Tools-board-board Manager …” menu, through which you will have access to the management panel for additional cards; towards the end you will find the package fishino_pic32 by Fishino (Fig. 3) corresponding to our Shark, which is a 32 bit.
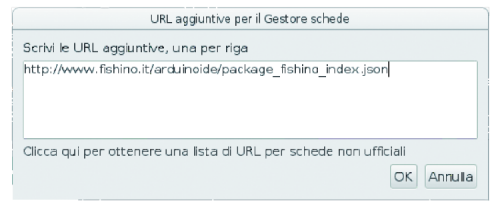
Fig. 2
You can see the Install button on the right, along with a box to select the version number; at the time of writing this article the version number is 1.0.1, but the package is constantly updated, so don’t be surprised if you find a more recent version.
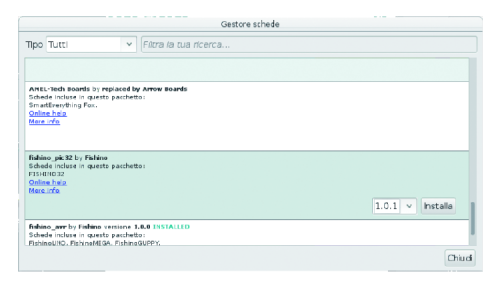
Fig. 3
Then click on the Install button and the package download will start. It can last several minutes; don’t worry, it’s an operation to be performed only once or only when you need to update the driver package, in which case only the modified elements will be downloaded.
Once the installation is finished, the screen will appear as shown in Fig. 4: as you can see, the Install button is now replaced with the Remove button and the list of available tabs appeared; don’t worry if it will be different from what appears in the image, because we are studying further boards! Therefore, once this operation is completed, the board Manager window appears as in Fig. 4; now you can close this window.
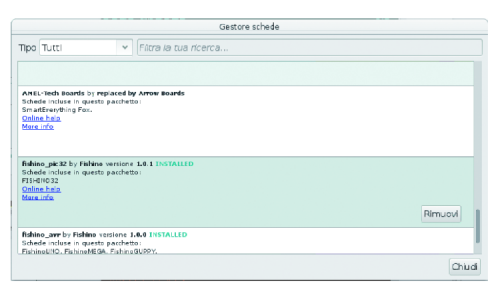
Fig. 4
In the IDE board selection menu (Tools> Tab) you will now find your Fishino Shark (Fig. 5).
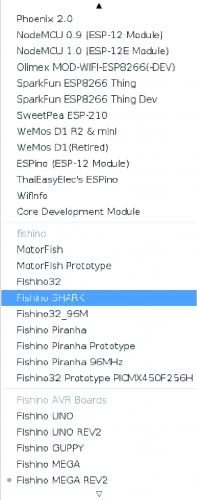
Fig. 5
Done! Your Fishino Shark is almost operational! Why almost? Simple, because to be able to manage it from the Personal Computer we still need USB drivers, which for some operating systems are to be installed; not Linux, in which they are included, nor even of MacOS X. We’re talking about Windows, the operating system for which it is necessary to proceed as explained below. The procedure can be ignored if you have Linux or MacOS-based computers.
LET’S INSTALL USB DRIVERS ON WINDOWS
The drivers are automatically downloaded together with the software package containing the descriptions of the new boards we have just installed in the IDE; unfortunately, these drivers have not installed automatically on Windows for technical reasons that depend on how Windows works. But don’t worry, to install them you just need to follow the instructions that will appear on the screen once you have connected Fishino Shark to the Personal Computer; when the operating system will make a pop-up appear indicating the detection of new hardware, click and proceed by searching for the drivers manually in the path where you have downloaded them. In the case of downloads on the hard disk “C” and the IDE Arduino installed there, the path will be something like this:
C: \ Arduino1.x \ packages \ fishino \ tools \ pic32-drivers-windows \ 1.0.0 \ chipKIT Drivers
where instead of Arduino1.x you will find the exact version of the IDE you are using.
Once the Stk500v2.inf file is selected, the driver will be installed, the operating system will assign and open the virtual COM port assigned to Fishino and at the bottom of the IDE window, once the board has been selected from the menu accessible from Tools / Tab. COM number assigned.
SELECTION OF THE USB PORT
Once the drivers have been installed (if necessary), the system is ready for use. It is therefore necessary to check or select the correct port in the IDE, associated with the Fishino Shark, which will be a COMxx on Windows (basically a virtual COM where xx stands for the port number created by the operating system) or a TTYACMxx on Linux (remember that no drivers need to be installed here). As for MacOS, we have not yet run enough tests and therefore we don’t have a recommended procedure for the Apple system, at least for now. However, we suggest you visit the website periodically, where updates and suggestions will be published as they arrive.
LET’S PERFORM THE FIRST SKETCH!
Now we are ready to test our board!
Here we can immediately find a small difference, which may look like a discomfort compared to Arduino or 8bit Fishino boards, but it could be translated in an advantage: at the moment, the board doesn’t have an auto-reset which sets the board automatically in a loading sketch mode; you need to press the reset button and hold it for something like 2 seconds until the orange programmable LED blinks, but not for more than 4 seconds, after that it sets a mode which allows updating the WiFi module’s firmware, highlighted by a blinking blue LED.
If we lose time, we can just release the release button and start over again!
But what’s the meaning of this choice? Simply because, since the Shark has a native USB, this is bound to the microcontroller’s functioning, as in the case of Leonardo’s boards of Arduino.
If the micro-controller gets stuck (it is needed a sketch in order to stick it for a bug), the USB port doesn’t respond anymore to the commands, including the reset ones.
This is why, for the moment, we opted for a manual system which avoids, for example, the famous “emergency manoeuvre” needed in some cases in the Arduino’s boards, which is the pressing of the reset button “a moment” after starting the program from the IDE.
However, we do not exclude to include, in a future bootloader’s version, an automatic reset system, even if the limits that we already said will remain.
So let’s go back to our sketch: let’s load the example BLINK from the IDE, the one that makes the led13 blink (which matches to the white led on the board), let’s hold the reset button for around 2 seconds and, when the orange LED starts to blink, let’s press the button that loads the IDE’s sketch.
After some seconds (it depends on the speed of the PC, on the complexity of the sketch, on the number of the libraries involved, …) the loading will be finished. This is highlighted from the switching off of the orange LED and from the contemporary blink of the white LED.
Done! We have our tested and working board! And now, what do we do with it?
We’ll explain it to you below.
LET’S UPDATE THE WIFI MODULE
If you followed the articles on the 8-bit Fishino boards, you will surely remember that the firmware update procedure required some flying connections between the board I / O and the ESPCONN port, as well as the preventive loading of a “neutral” sketch (for example blinking) and more.
None of this is necessary anymore on the 32-bit Fishino and the Fishino Shark, because the board is placed in firmware update mode using simply the reset button, intervening on the hardware.
The procedure is as follows:
- press and hold the reset button until the blue LED starts to flash; it takes 4 seconds because after the first 2 will start to flash the orange LED, to indicate the sketch loading mode and after a further 2 seconds, the blue LED will start to flash;
- at this point you need to launch the FishinoFlasher program, taking care to have a working Internet connection on your computer, as the firmware will be downloaded from the network.
The FishinoFlasher program will be presented with the typical screen shown inFig. 6, in which
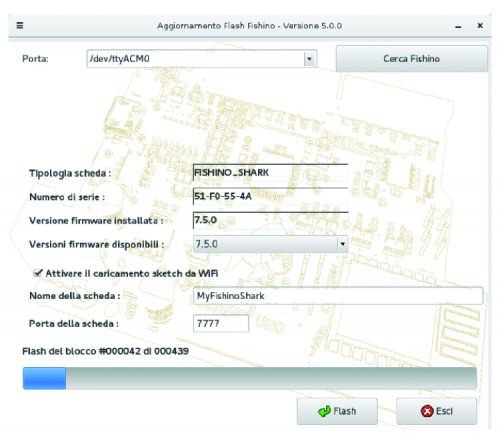
Fig. 6
you can see some elements, among which the type of board detected (Fishino Shark), the serial number of the WiFi module and the currently installed version of the firmware (7.5.0, in this specific case).
In the box below you can choose a new version to install; the latest version is available (7.5.0 in this case), but nothing prevents the installation of a previous version, even if it’s not normally recommended.
Pay attention to the fact that a “major” change of version number (the first digit on the left, 7 in this case) corresponds to a non-backwards compatibility with the previous libraries: a library installed and running with version 7.5.5 will also work with a firmware version 7.5.7 and 7.9.9, for example, even if you don’t take advantage of the additional improvements (the opposite isn’t true, i.e a library made for version 7.5.7 will require a version sign of AT LEAST of 7.5.7!); conversely, that library will never work with a firmware version 8.0.0, so be careful.
In summary: a library made for a firmware having a major version number X will work with all the subsequent firmware having the same major version number, but not with the previous ones or with the successive ones having a different major version number.
Just below you find the possibility to activate the loading of sketches via WiFi (OTA); simply enable the appropriate box, enter a name for the board (here MyFishinoShark) that will appear in the IDE and a door that we recommend to leave as indicated (7777) unless you have special needs.
That said, we choose our version and press the Flash button; after a few moments, the actual update will start: at the end of the procedure a notification window will appear confirming the update; you see it in Fig. 7.
At this point, simply click the OK button in the middle of the notification window, close the FishinoFlasher program and press the reset button on the Fishino Shark tab to exit the update mode.

Fig. 7
THE LIBRARY SOFTWARE
That said, we can spend a few paragraphs to describe software libraries implemented explicitly for Fishino Shark.
We can divide these libraries into two substantive categories:
- system libraries;
- user libraries.
This is a fairly fictitious division since good or bad all libraries could be considered partially in both sectors; the real difference lies in where they are placed on the hard disk and in the update mode.
System libraries are placed in the arduino15 folder, which has different locations depending on the operating system, and are managed and updated by the board manager integrated into the IDE.
This category includes, for example, the SD library, the AudioCodec, the I2S, and so on.
With each update available, the IDE will report its presence and will give the possibility to automatically download updates.
The Fishino library, on the other hand, together with the FishinoWebServer and others, belongs to the second category for our choice; this library, in fact, depends not on the board itself but on the firmware version of the WiFi module, and must, therefore, be updated according to this. Inserting it between the system libraries would have forced the user to update it, and then to update the firmware every time the system libraries are updated, which is not strictly necessary.
This library must then be downloaded directly from the site, download section, as for the previous boards; in that section, you will also find sample programs, among which the FishinoHomeAuto.
The download section libraries are provided as a zip file to be decompressed in the libraries folder inside the folder containing the sketches. Once you have performed this procedure you can try all the examples related to the use of the WiFi module as for the previous Fishino boards.
At this point it is necessary a note about the latter: their operation is identical, on the Fishino Shark, to that of the previous boards; you will notice only a noticeable increase in performance and, obviously, a memory occupation definitely far from the limits of the board!
A very important note: in Fishino Shark we have inverted the LiPo battery connector compared to the previous Mega REV1 and Guppy; this is to adapt to the “de facto” standard of batteries available on the network.
Therefore, pay close attention to the polarity indicated on the board when connecting the battery and, if it is the reverse of the LiPo you own, you need to invert the connector.
Be very careful, because for energy efficiency reasons we preferred for the input of battery power, a configuration that is not protected against polarity reversal (in practice the protection diodes are missing)!
CONCLUSIONS
We end this article dedicated to the most powerful board of the Fishino family here.
By putting it into operation and trying to use it, even though the example sketches that we provide you with support, you will immediately have the opportunity to “touch” the superior performance in terms of both hardware and computational speed.
Then you can shoot sketched sketches on other boards of the Fishino series (of course, provided they use the same devices supplied to the Shark), you can immediately see the difference, in terms of computing power, between the 32-bit core of our “shark” and those of the Fishino communes! Well, that said we just have to wish you good work and good development of your applications!
From openstore

Related Posts


One Comment
Leave a Reply
-
 Arduino ISP (In System Programming) and stand-alone circuits
We use an Arduino to program other ATmega without...
- Posted 12 years ago
-

-

-
 GSM GPS shield for Arduino
Shield for Arduino designed and based on the module...
- Posted 12 years ago
-
 Small Breakout for SIM900 GSM Module
Some post ago we presented a PCB to mount...
- Posted 13 years ago
-
 Join Maker Faire Rome 2024: Innovation Unleashed at Gazometro Ostiense | Calls Now Open!
All Calls Now Open for Maker Faire Rome 2024...
- Posted 2 weeks ago
-
 Building a 3D Digital Clock with Arduino
Project to create a digital clock consisting...
- Posted 4 months ago
-
 Acoustic amplifier – in DIY Kit
This kit creates a microphone amplifier with an output...
- Posted 5 months ago
-
 Creating a controller for Minecraft with realistic body movements using Arduino
Project of a controller that maps body movements...
- Posted 5 months ago
-

Pingback: Fishino Shark: arduino like board with 32-bit, WiFi, audio codec, sd card, battery charger … and more | Open Electronics