
It’s project time! Today, going to make a switch. This Internet-controlled switch uses few components, and it’s connected to EasyIoT Cloud. You can control your devices on a computer in the EasyIoT Cloud WEB interface or with a native Android application. The Internet-controlled switch is connected via Wi-Fi connection. Our switch can also be controlled locally with the push of a button.
This tutorial is an improved version of the ESP8266 Internet-connected switch. It works with the latest version of EasyIoT Cloud MQTT broker. Two main improvements are that this uses switch information to update the state of the UI interface. If the connection to switch is broken, then the state in UI will not update. The next improvement is that in this switch, you can configure the AP username and password with a mobile phone or computer. WARNING!! You will play with LIVE MAINS!! Deadly zone!!
No EasyIoT Cloud configuration is needed, just register to the EasyIoT Cloud service. You will need username and password to access your Internet switch via web application or Android application. The switch will be automatically added to EasyIoT Cloud and will be visible in the web interface or in the Android application after it is powered on.
The program is written in the Arduino ESP8266 IDE. Check out the Arduino ESP8266 IDE tutorial to see how to connect a ESP8266 module to a computer to upload a program. The program can be downloaded from our GitHub. You will also need the MQTT client library. Add this library to the library folder in the Arduino IDE. Our program uses the EasyIoT Cloud MQTT API.
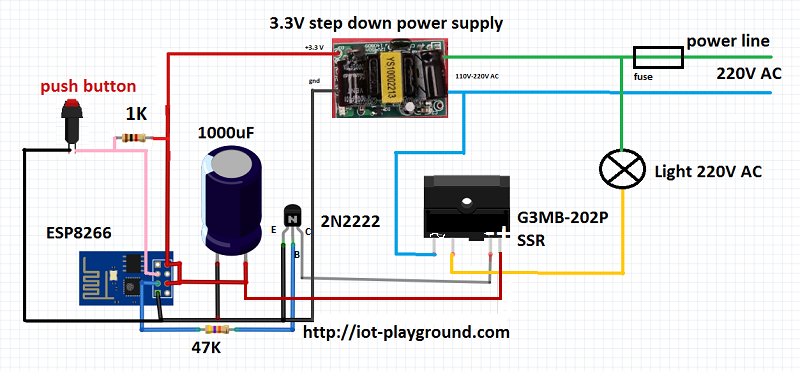
In our case, we use ESP8266 01, but you can use any other type of ESP8266. GPIO2 is connected to the NPN transistor to control SSR. The max current for our type of solid state relay is 2A — this is suitable for room light and not for applications that consume more power, like a heater.
For the power supply, we use a 3.3V step-down module. It’s very important to add a 1000uF capacitor to the 3.3V power line — when we tried it without the capacitor, the switch didn’t work.
GPIO0 is connected to the push button for local control of the Internet switch.
After power on, the switch will be automatically added to EasyIoT Cloud, and it will be visible in the web interface or the Android application.
more info and full detailed guide: DZone IoT
