- makeITcircular 2024 content launched – Part of Maker Faire Rome 2024Posted 2 weeks ago
- Application For Maker Faire Rome 2024: Deadline June 20thPosted 2 months ago
- Building a 3D Digital Clock with ArduinoPosted 7 months ago
- Creating a controller for Minecraft with realistic body movements using ArduinoPosted 7 months ago
- Snowflake with ArduinoPosted 8 months ago
- Holographic Christmas TreePosted 8 months ago
- Segstick: Build Your Own Self-Balancing Vehicle in Just 2 Days with ArduinoPosted 8 months ago
- ZSWatch: An Open-Source Smartwatch Project Based on the Zephyr Operating SystemPosted 9 months ago
- What is IoT and which devices to usePosted 9 months ago
- Maker Faire Rome Unveils Thrilling “Padel Smash Future” Pavilion for Sports EnthusiastsPosted 10 months ago
Create Your Amazing Mini Pinball Machine

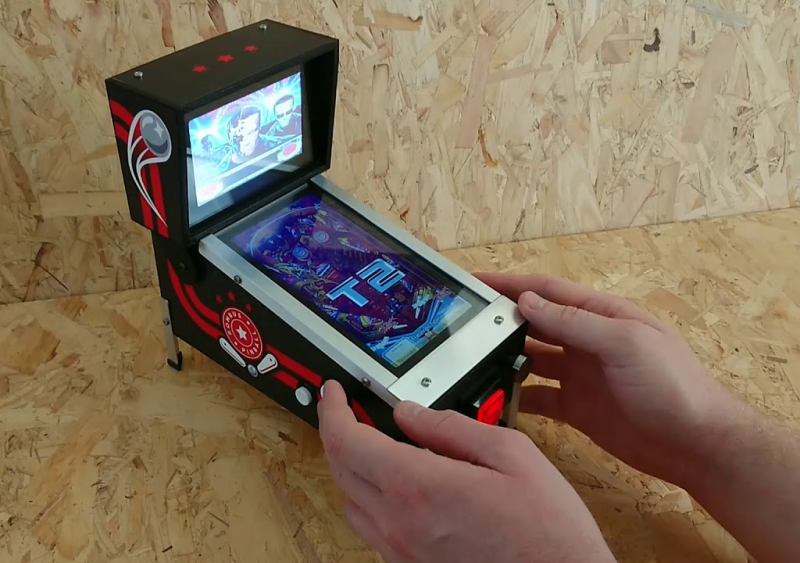
If you enjoy a game of pinball, you are sure to be interested in this awesome Rombus Pinball emulation station created by developer and maker Matt Brailsford aka Circuitbeard.
Finding the pinball emulation community lacking for Linux, the maker turned to the LattePanda, a tiny Windows 10 SBC with a built-in Arduino Leonardo. This was really the perfect board because he needed to support multiple displays with a minimum of fuss. That Leonardo comes in handy for converting button presses to key presses inside the Visual Pinball emulator.
Selecting the LattePanda did have a nice side benefit, in that the official 7″ screen that he used for the main play area plugs in via a ribbon cable. This leaves an HDMI socket free to extend the desktop onto the second screen mounted vertically for the back glass display.
Physically, the unit measures 26 x 14 x 25cm tall including the legs, so it won’t take up too much space when not being played. Buttons are available for the flippers, mag save (to avoid guttering — available in some games), along with other user interface controls. Due to size restrictions, the device doesn’t have a mechanical plunger, but instead works via capacitive touch.
For more details on the full build as well as full instructions and a list of all the components and development boards you will require jump over to the Circuit Beard website.


