
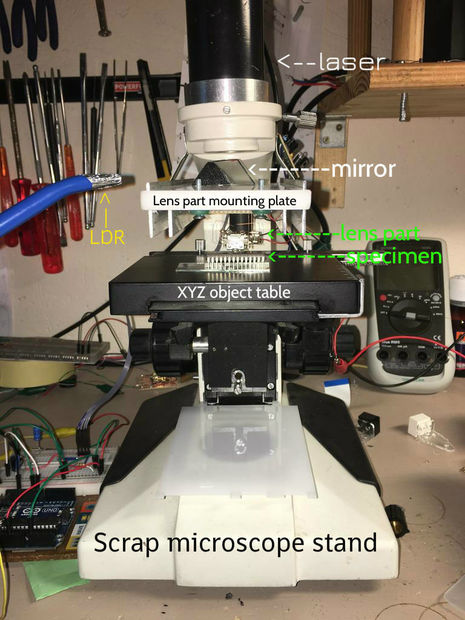
With a DVD laser pick-up, an Arduino Uno, a laser, and an LDR, Instructables user “Venkes” has managed to create a DIY Laser Scanning Microscope (LSM).
It’s capable of 1300x magnification and attaining a resolution of 65,536 pixels (256 x 256) in an area of .05 x .05mm.
A laser microscope works by shining a beam of light on a subject in an X-Y plane. The intensity of the reflected light is then detected by a photoresistor (or LDR) and recorded. When the various points of light are combined, you get an image.
Before to start this project, be sure to have:
for the lens part:
- two lens/coil parts of a laser pick-up (DVD and/or CD)
- a bit of PCB
- a piece if UTP cable (approx 15cm)
for the electronic part:
- An Arduino UNO
- An LDR
- 2 x 10uF capacitors
- 1 x 220 Ohm resistor
- 1 x 10k resistor
- 1 x 10k pot
- 1 x 200 Ohm trim pot
- 1 breadboard
- 1 switch
- 1 3,5 mm jack plug
- 1 audio amplifier, a cheap computer amp (like the little ones with build-in speaker) wil do.
for the laser part:
- 1 laser* with a good collimating lens
- 1 piece of glas, a quarter of a microscope object glas or so to act as a semipermeable mirror
- the under part of a ballpoint casing to put the LDR in
for the computer part:
- Four sketches, two of them for handeling the data stream coming from the microscope (“Arduino” and “Processing”), and two sketches to help focussing.
And to make live easier:
- Hot glue
- UV glue. This is a very handy glue to glue the thin wires on the lens part. Probably this is the only glue that can do this job because there is no mechanical stress when applying this glue!
