- makeITcircular 2024 content launched – Part of Maker Faire Rome 2024Posted 2 weeks ago
- Application For Maker Faire Rome 2024: Deadline June 20thPosted 2 months ago
- Building a 3D Digital Clock with ArduinoPosted 7 months ago
- Creating a controller for Minecraft with realistic body movements using ArduinoPosted 7 months ago
- Snowflake with ArduinoPosted 8 months ago
- Holographic Christmas TreePosted 8 months ago
- Segstick: Build Your Own Self-Balancing Vehicle in Just 2 Days with ArduinoPosted 8 months ago
- ZSWatch: An Open-Source Smartwatch Project Based on the Zephyr Operating SystemPosted 9 months ago
- What is IoT and which devices to usePosted 9 months ago
- Maker Faire Rome Unveils Thrilling “Padel Smash Future” Pavilion for Sports EnthusiastsPosted 10 months ago
An Open Source Filament Extruder for 3D Printer
Create filaments for FDM printing of your choice, by yourself, thanks to this self buildable machine that gives new life to PLA, ABS and PET leftovers.
Even if their price decisively fell in the last years, the precious filaments that we use in order to print 3D items via our 3Drag (and its evolutions, but it might as well be via other 3D printers) still are very expensive; not to mention that some colours – price aside – are hard finds.
In order to solve these two small problems, it would be nice to be able to manufacture our own filaments at home, which is not impossible because new home-made projects for PLA or ABS filament extruders have appeared on the Web, since some time. For these and other reasons we decided to undertake the project of a self-designed machine for the creation of filaments, that would “swallow” pieces of plastic materials, balls or pellets of composite material, that may be bought from dealers in plastic or technical materials. The possibility to use various plastic “shavings”, spheres or pellets allows to add additives to the white plastic, such as some specific dyes, so to obtain color nuances or “speckled” filaments.
The Filament Extruder (that’s how we named our machine) allows to create the filament in ABS or PLA, be it 1.75 mm or 3 mm, that may be used by the common 3D printers, starting from raw materials that are available as pellets or leftovers; in any case they must be small pieces, since otherwise, they would stop before the feeding mechanism. The cost of the filament we obtained is lower than the one of those that are available for sale, but the most interesting aspect is that, by means of specific dyes, it is possible to obtain different chromatic variations so to satisfy your taste. It is also possible to mix plastic pieces having a different color but similar melting temperatures, otherwise the filament extruded will have a variable form and consistency. The possibility to use leftovers (that must be grinded before being introduced in the machine) makes our Filament Extruder even more convenient from the economic point of view.
How it works
Our machine is essentially composed of a loading “funnel” (that is, the hopper) for the material, of a feeding system, of a heated extruder nozzle and of a mechanism for extracting, driving and guiding the extruded filament; to all of this a diameter measurement device must be added, as it allows to know if the diameter of the filament we are extruding is what we were expecting and, being the case, to correct it. The diameter of the filament obtained depends both on the melting point and on the filament’s traction speed; later we will return to this subject, by explaining how to obtain the one you desire.
In our prototype, the hopper has been created with a 1.5 mm thick aluminium sheet in four pieces, that are then assembled by means of 3 mm aluminium rivets; the “mouth” is 5.5 cm wide by 22 cm long, while the height from the top of the feeding system’s tube is 9.5 cm. The lower part, that lines up to the tube’s opening, measures 18×55 mm, that is to say, enough to make the material flow into the cavity that has been created in the tube, and that overlooks the endless screw. The measures that have been reported here are indicative ones since it is possible to change them, within certain limits.
The hopper must be fixed to the tube so that the bottom adheres to it: in our case we extended the short sides, folding them at the bottom so to have them adhere to the tube and to have them screwed to it, as with a collar. The pictures of a prototype give us an idea of what we actually did.
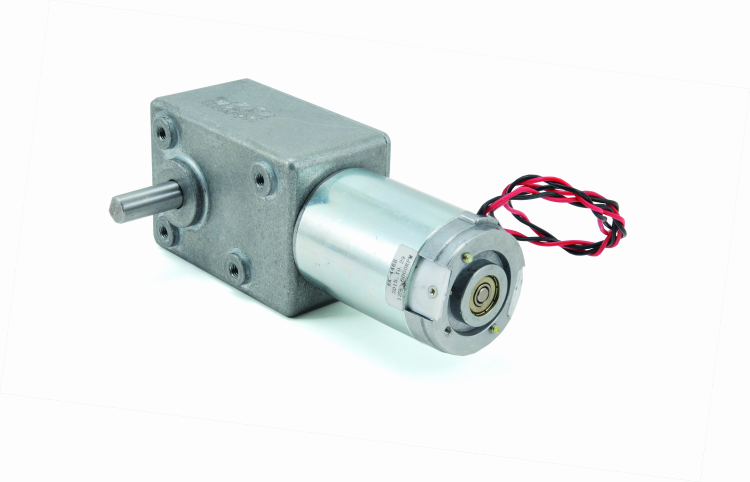
The material that is introduced into the hopper is then brought from the latter’s mould to a very narrow area (that is to say, 18×55 mm) that flows into the loading window of the feeding system; the latter consists of an endless screw that have been created with a big wood drill bit, that is started by a joint that is put in rotation by an electric motor by means of a reduction gear. More precisely, the feeding mechanism is composed of a 12 Vcc gear motor that has a speed of 9 RPM with no load, a nominal torque of 140 kg/cm and an output shaft (90°, Ø10 mm) that we coupled – by means of an Oldham (Ø30 mm – L 42 mm) that has 10 and 12 mm dowel holes – to a Ø16 mm helicoidal wood drill bit, that has been opportunely shortened in order to obtain a 60 mm long tang and a 220 mm helicoid.
The drill bit is then inserted in a common ½” galvanized iron pipe (commonly used for water plumbing) with a length of 200 mm, in which an opportune rectangular slot has been made, so to overlook the bottom of the aluminum hopper, that drives the pellet to be extruded there.
At the end of the pipe, a 40 mm brass F/M extension (commonly used for plumbings) has been applied; before the assembly, the smallest hole in the extension (on the side of the male fillet) has been internally lathed by means of a specific tool (the boring bar), for as much as needed in order to smooth the teeth and to sharpen the internal countersink. If you find an extension like those with the inside of the male part having a hexagonal cross section, you will have to do the same, in order to obtain the maximum internal diameter possible.
On the male fillet of the extension (previously coated with PTFE tape) a ½” cap – on which a central hole (3.5 mm in diameter) has been made – is tightened, it will extrude the plastics so to generate the filament. Inside the element, a small round metal net has been inserted, it has been recovered from a faucet aerator, and spaced 1.8 mm apart from the central hole by means of an M10 flat washer. The thick mesh allows to interrupt the rotating movement of the material coming from the nozzle and enhances the mixing of the fused material by means of possible additive dyes. We need to transform the motion into a rectilinear one, since the helicoidal bit pushes the material but it also rotates it, and we do not need it to rotate, also because that would modify the diameter since it would be an additional strain, in addition to the one that is determined by the traction downstream the extruder.
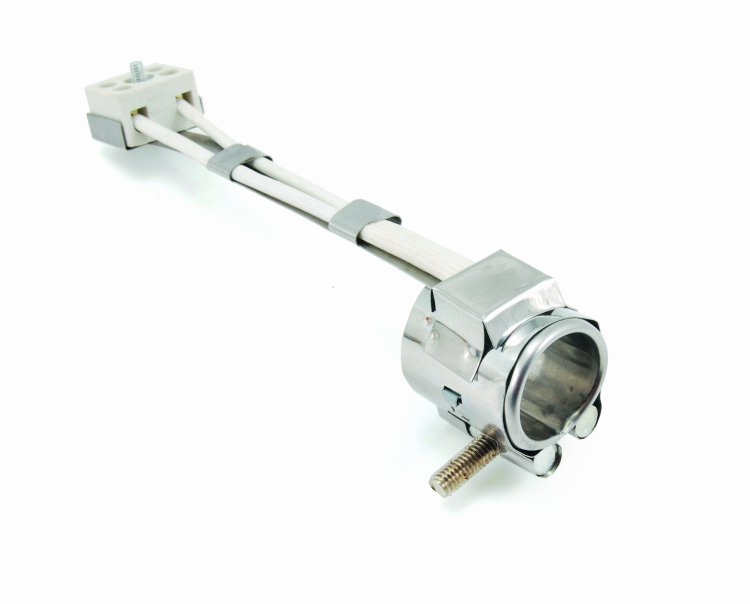
A collar heater has been fixed on the brass extension: it has a power of about 70 W, and works with the 230 Vca; while on the ½” cap, a type K thermocouple (Chromel Alumel) has been placed; the latter will allow the specific controller to detect the temperature that the nozzle has reached; the extension/heater group forms the veritable extruder and is wrapped with some fiberglass strips that provide thermal insulation, and kept in position by means of nylon strips.
Two 90° steel brackets, that have been fixed to an aluminum 4 mm plate, support the tube (that has been fixed by means of two ½” flange nuts) and the 15 mm thrust bearing. The latter prevents the helicoidal bit (that, as a reaction coming from the compressed material, is pushed back) to move backward, during the extrusion.
The gearmotor (that has been fixed to a 2.5 mm thick galvanized iron angular plate) and the above described machine elements have been fixed on a 19 mm MDF board, by means of self-drilling screws.
The management of the nozzle temperature (that is detected by the thermocouple) has been entrusted to a controller by SESTOS that accepts a 12-24V AC/DC power voltage, and that has a dedicated output for the control of a solid state relay (SSR), with which to manage the functioning of a 70 W heater, at grid voltage. As a relay, we used a 3A SSR. On the panel there are two 7-segments LED displays that allow reading the actual temperature, and the one that was set, and some buttons in order to set the unit. For now, be happy of this; later in this article, we will explain how to set the controller.
The gearmotor’s rotation speed is controlled by means of a specific brushed DC motor module (signed as SPEEDMOTDC in the wiring diagram that you will find in these pages), completed with a potentiometer so to regulate the rotation speed; it is the same circuit we described in this year’s May issue, page 25. The motor at the maximum speed draws about 900 mA. By means of an illuminated pushbutton switch, it is possible to take away the power from the circuit, so to prevent the gearmotor to operate when the nozzle has not reached a right temperature; this is because the helicoid’s rotation with the nozzle not being at a right temperature would damage the machine, because of the high gearmotor’s torque.
The motor cooling is guaranteed by a 40x40mm 12V fan, that has been fixed on a PLA chassis that has been specifically designed, and created by means of 3D printer (along with the other project files, you will find the related STL ones). In order to quickly lower the temperature of the extruded filament, so to prevent it from distorting, breaking or wearing too thin, two 80×80 mm 12Vcc fans are being used (both may be oriented at leisure); the first one (the one closer to the nozzle) always works at the maximum speed, while as for the second one it is possible to manage the speed at leisure (from 0 to 100%), by acting on the corresponding potentiometer, FAN 2. The power voltage of this fan is supplied by a DC/DC module with adjustable output whose circuit board trimmer has been substituted by a linear 10 Kohm potentiometer, so to allow a simple manual regulation, without having to resort to a micro screwdriver, that would be quite uncomfortable. The usage of a DC/DC adjustable module allows to modify the voltage on the fan with the maximum possible efficiency, given that the converter works in PWM.
Both fans may be switched off when they are not needed, by acting on the dedicated illuminated pushbutton switch.
The control electronics, powered by a 12V DC/4A switching power supply like the ones you use with notebooks, is housed in a PLA box that has been created by means of a 3D printer (even as for this one, the STL files for the printing are here). In order to power the various units (that is to say, the DC/DC module), the DC motor controllers and the temperature controller, please use a panel mount jack socket; the network cord must be connected in parallel to the PSSE48 power supply’s cable (from which you will have cut the plug) and to the wires that go to the solid state relay that supplies power to the extruder’s 230Vca heater.
The wiring of all these elements must be carried out by following the diagram shown in these pages, and by remembering to insulate the wire joints by means of the heat shrink tube, and especially those of the wires that are exposed to the grid voltage.
How to regulate the filament’s diameter
The diameter of the extruded filament varies as a function of the speed with which it is “pulled” after exiting the nozzle; in order to obtain a stable diameter it is needed that the extrusion and the pull speeds remain constants.
The traction of the filament is carried out by means of a “tractor” mechanism, composed of two Ø 25mm rubber rolls, one of them is directly mounted on the fulcrum of a 12 Vcc gearmotor (cod. RH15812630) with a no load speed that is equal to 10 rpm; the other one is mounted on a parallel fulcrum that is free to rotate and that is kept pressed against the first one by means of a pull spring. The driving speed may be regulated by acting on the potentiometer of the usual controller for DC motors, SPEEDMOTDC, that is connected to the gearmotor. Even the tractor’s structure is entirely in PLA and has been 3D printed (you will find the corresponding STL files on our website).
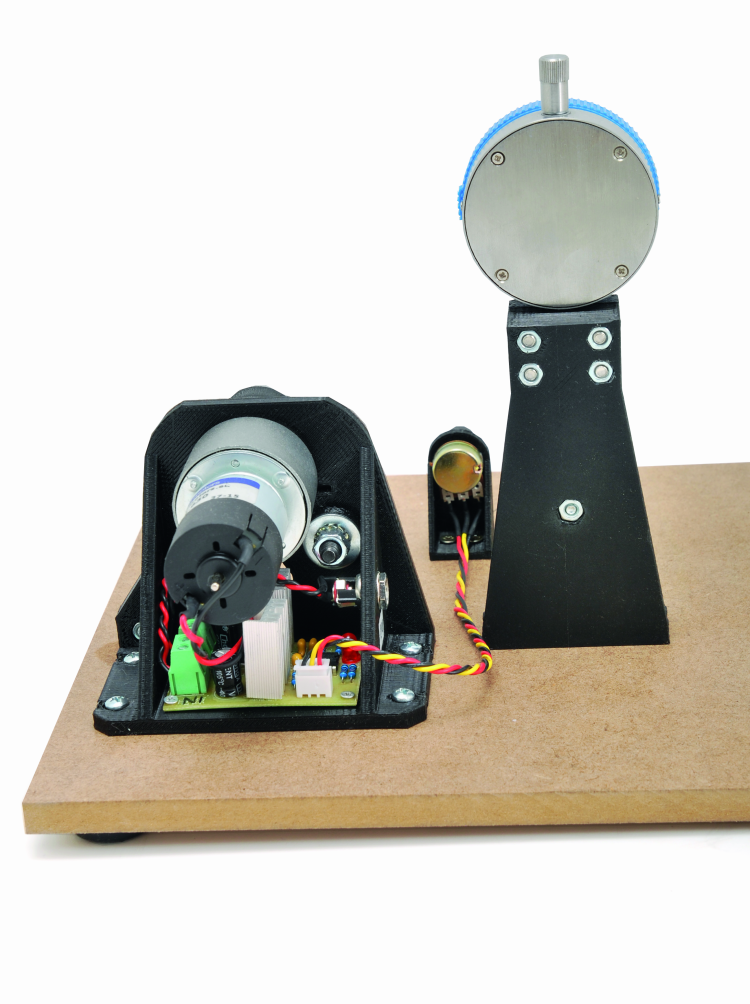
The control of the extruded filament’s diameter is carried via a comparator that has been opportunely modified and mounted on a specific PLA support that has been created by means of a 3D printer. The standard sphere, found on the tool’s stem, has been substituted by a 4x13x4mm bearing that will slide directly on the filament, allowing to measure its diameter.
By opportunely regulating the extrusion speed and the extraction one it is possible to obtain the desired diameter of the filament, which means that if you see the indication going below the desired diameter you will have to decrease the traction speed with respect to the advancement one of the feeding systems, while if the diameter increases you will have to pull more, and therefore increase the rotation speed of the traction system’s gearmotor.
The maximum deviation detected on the 1.75 mm filament’s diameter is 0.1 mm, and it’s 0.25 mm on the 3 mm one; in any case it is influenced by many factors, among which the fusion temperature, the quality, the shape and size uniformity of the pellet being used, the material (ABS/PLA), the environmental temperature leaps, the dye, the humidity and the extrusion speed.
The melting temperature must be chosen as a function of the material being used, keeping in mind that a wrong value may determine a remarkable reduction of the quality of the extruded filament. The production capability that has been detected during the tests with the ABS (having a diameter of 3 mm) is of 60 cm per minute, corresponding to an hourly production of 36 meters. Therefore the maximum advancement speed of the filament, when working with ABS, is 36 meters per hour.
The extruded filament is guided into the comparator’s block by means of three pulleys (made in any plastic material with the exception of the thermoplastic ones, it is possible to use the Delrin), each one of them is mounted, by means of 10×6 mm bearings on a triangular support that has a base to be fixed with equidistant screws (15 cm), whose purpose is the one to support the filament that is not yet completely solidified, and to bring it to the comparator; without them, the filament would bend and would be hindered when entering the hole of the structure hosting the comparator, in addition to the fact that the reading of the same would be modified. The minimal recommended distance between the extruder’s nozzle and the first pulley – when working at an environmental temperature of 20÷25 °C – is 20 cm, but you may find empirically the most suitable one for you. The three pulleys, the comparator’s block, and the driver’s one, must be fixed to a single plate, that in our prototype is a 1 cm thick MDF plate, provided with rubber pins.
Moreover, it is advisable to guide the filament for a certain distance, even after it has exited the comparator: the method is the same, that is to say, it is based on pulleys that are similar to the previous ones, and mounted on plastic supports that in our case have still been 3D printed (and whose STL files for the printing are provided) in PLA; such supports are supplied with rubber pins so to be placed on the ground.
how to use the machine
Once the mechanical parts have been assembled, and the electronic ones have been wired, accordingly to the wiring diagram shown in these pages, you are ready to work on your machine. Before connecting the grid power, please make sure that all the machine’s switches are set to OFF (the button ones must be in the most backward position) and that the potentiometer knobs of the gearmotor of the extruder’s feeding system and of fan 2 are in the MIN position (that is to say, fully rotated in counterclockwise direction).
Once the bases have been placed, please insert the jack plug of the power cord’s driver in the jack socket found on the support side for the driving’s gearmotor. Once this has been done, please insert the plug of the power cord into a socket of a 220 Vca electrical grid, and turn on the machine by acting on the GENERAL red light button: the controller’s red display will show the temperature read, expressed in °C (the actual one of the extruder) while the green one will display the set temperature. Now, please set a temperature that is suitable for the material to be extruded, that is to say:
- 188÷190 °C for the transparent Ø 3 mm PLA filament;
- 194÷195 °C for the white Ø 3 mm ABS filament;
- 197 °C for the transparent Ø 1.75 mm PLA filament;
- 203÷203,5 °C for the neutral Ø 3 mm ABS filament, with color pigments.
The said temperatures are indicative ones and are based on the experiments that have been carried out in the lab, with the available materials, but they may differ by a few degrees, depending on the features of the materials that you may find available for sale.
In order to set the extruder’s operating temperature:
- please press the UP or DOWN buttons briefly; the LED that is down and on the right will flash;
- please use the UP or DOWN buttons, respectively, in order to raise or decrease the temperature, and remember that in order to speed up the operation you may keep them pressed (you may use the << button in order to select units, tens, hundreds or decimals, in sequence);
- when the desired temperature is displayed, please press the SET button twice, so to make it the effective one for the new setting (the green display shows the chosen temperature); the controller will act consequently, so to bring the temperature to the requested value (if the nozzle is in the heating up stage, the OUT LED is turned on).
When the nozzle has reached the set temperature, please press the two pushbutton switches (they are lighted when they are set to ON); more specifically, please press EXTRUDER so to enable the extruder’s motor (the motor will not run since the related EXTRUDER knob is set to the minimum). By pressing the FAN 1-2 button you will fully (100%) activate the fan 1 (the one that is closer to the nozzle) and enable the fan 2, whose speed may be modified by acting on the corresponding potentiometer, FAN 2.
You will now have to increase the extrusion speed of the material, by rotating the EXTRUDER knob of about a quarter turn (in the clockwise direction). Please wait for the material to exit a bit from the nozzle, and that its temperature stabilizes (about 20 seconds). In the meantime, please turn on the comparator and zero it, by pressing the O red button. Please verify the correct functioning by raising the corresponding fulcrum that is found in the upper part of the box. Please place the driver’s SPEED knob to about half stroke. Please remove the material that has poured out from the nozzle, after that please seize the end of the one that will be subsequently extruded and make it quickly go on the 3 white pulleys, then, between the comparator’s bearings (please move the bearings away, by raising the comparator’s fulcrum) and, lastly, between the driver’s rubber wheels.
Please regulate the speed of fan 2, so that the extruded material reaches the comparator in a partially solidified state (it must not be rigid nor softened nor sticky).
Please regulate the extrusion speed (EXTRUDER) and the driving one (SPEED) so that the diameter of the extruded material, when measured by the comparator, is close to the desired one (the measured mean value must be taken into account).
If needed, please adjust the speed of the Fan 2. When needed, please space apart the pulleys that used as support and guide for the extruded filament.
In order to switch off the machine, please set the EXTRUDER and FAN 2 knobs to MIN, press the two pushbutton switches (the corresponding light signal is turned off) and, finally, act on the GENERAL illuminated switch.
Conclusions
Our machine for the filament extrusion is a very versatile product, and it may be created with parts that are easily found for sale. By following the instructions supplied in these pages, and by adapting yourself – with the help of experimentations – you will be able to achieve good results and make the filaments you prefer by yourself. You may also try some tests with materials that are different from ABS and PLA, by taking advantage of the fact that the structure of the extruder and of the corresponding heater allows to work even at temperatures that are higher than the advised ones, and the same goes for SESTOS controller, that is capable of regulating the temperature, up to 1,300 K, that is to say 1,026,85 °C: that’s much more than what we need!
From openstore
SPEED CONTROL FOR DC MOTOR TO 10-40V 5A
DC/DC Power Converter 1.5V ÷ 35V / 3A
GRAINS COLORANTS ABS IN NEUTRAL PELLETS
SWITCHING POWER SUPPLY – OUTPUT 9,5-20V
Gearmotor 12 Vdc – 10 rpm – 100 Ncm
VANDAL RESISTANT SWITCH BUTTON RED LED
VANDAL RESISTANT SWITCH BUTTON BLUE LED
Gearmotor 12 Vdc 9 RPM – 140 kg·cm
Sestos – Digital Temperature controller
Collar heater 70 watts – 220 Vac


2 Comments