
Let’s find out how to make a phone switchboard equipped with all the most advanced features, by using a Raspberry Pi as hardware and Asterisk as software. Part one.
The term VoIP, which means “Voice over Internet Protocol”, refers to a group of technologies used to transport voice using the Internet-based IP protocol as a vehicle. Actually, these technologies are not limited to just voice, but can also be used to transfer other media such as videos, text messages and faxes.
It is not a new technology, it was born with the Internet, however, while it was only limited to some sections and to the central part of the communication network in the beginning, over the years it has expanded to reach even the most remote locations of the network. Just think about the fact that nowadays, all phone carriers use VoIP for private user telephone calls and even in the 4G radiofrequency network, all communications are transported in form of data packets. The main advantage pushing towards this transition is the so-called “convergence”, which is the possibility to use just one packet network to transport any kind of information, be it data or other multimedia content.

Voice, converted into digital signals, is grouped in packets which are then transmitted using the IP protocol. Unlike the transfer of off-line content such as music and streaming videos, in case of real-time communication between two or more speakers, delays cannot be more than few tens of milliseconds, therefore packet dimension cannot be too big.
Protocols employed
Many protocols have been developed for VoIP communication, both open and proprietary. Here we will focus on SIP and RTP protocols, which are the most used because they have the advantage to be completely open. The two protocols work as a couple: SIP (Session Initiation Protocol) takes care of establishing a connection between the two speakers through a dialogue with the network elements, while RTP (Real-time Transport Protocol) takes care of transporting multimedia content between the two endpoints.
In SIP protocol two types of elements are defined: endpoints or User Agents, which are the terminals from which connections originate or to which they and, and SIP servers, which are the network elements through which the transit.
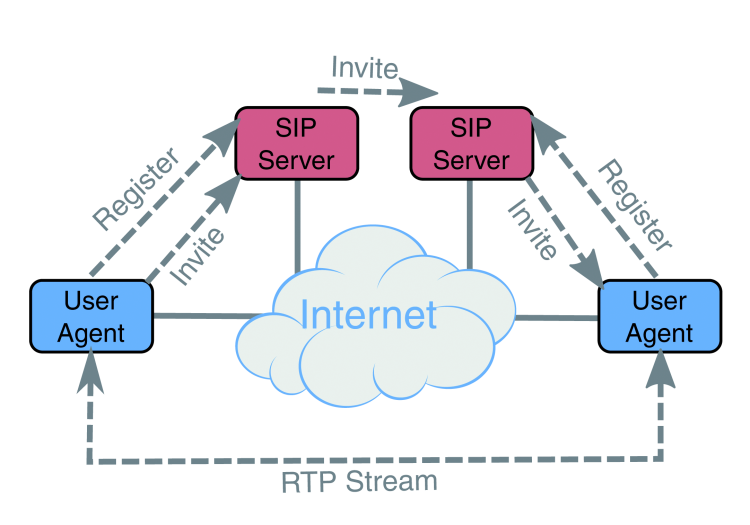
One of the functions of SIP server is a register allowing to localize User Agents. Each user agent registers periodically on its SIP server by communicating the address and the IP port that can be used to reach it, so that the server can contact it in case of incoming call. Another function of the SIP server is to act as a proxy allowing to transfer messages from one user agent to the other through one or more SIP servers. The RTP transfer can be done directly between user agents or through the SIP server that can act as “media gateway”, that is entering the transfer chain in order to, for instance, operates some format conversions.
Speech Coding
In order to be transmitted, the voice must be transformed in a bit flow using a coding process, then it will be recomposed by the complementary decoding process; these processes are carried out by CODing/DECoding devices which are called CODECs for simplicity.
There are many types of codecs, each one representing a compromise between quality signal and necessary bandwidth for transportation, and each one is more fitting for a specific use or environment.
In table 1, we can see the most common codecs employed for VoIP communications.

G.711 codec was the first one used and the one with the simplest algorithm, in fact, the voice is simply sampled at an 8 kHz frequency quantized on 8 bits through a nonlinear law (alaw in Europe and ulaw in North America and Japan) in order to get a 64 kbs stream.
For Internet transmission, in order to obtain the least bandwidth usage, compressed codecs are used allowing for a remarkably bit rate reduction without an excessive impact on the quality perceived by speakers. Among compressed codecs, the G.729 is without a doubt the most popular, although using it requires paying for a license because the algorithm is patented.
Four local communications, where bandwidth is not an issue, we can use high fidelity or HD codecs, such as the G.722 allowing to obtain high audio quality
Security of VoIP communications
Usually, communications using SIP and RTP protocols are transmitted not encoded; this means that you can “intercept” calls with any “sniffers” capable of capturing transmitted packets.
If privacy is your concern, you can encrypt the audio channel using the SRTP protocol which, as suggested by the S letter, is basically the secure version of the RTP protocol.
Similarly, in order to protect signaling, i.e. information regarding calling number and called number and the instant and duration of the conversation, we can encrypt messages using the TLS (Transport Layer Security) protocol. The protection degree obtained by using these precautions is really high, in fact it is the same offered by browsers when they use the HTTPS protocol, which makes use of the same algorithms.
Moreover, again regarding security topics, it is crucial to highlight the importance of using passwords that are complex enough to not allow password guessing, in order to avoid intrusions in our communication system by someone trying to make calls on your behalf. In every VoIP systems exposed on the public network there is numeral intrusion attempts every day, which principle is to try some hundreds of the most common user – password combos before giving up.
Architecture of a communication system
The communication system for a small office can be very simple: in fact, all you have to do is connect a mini server like Raspberry Pi to the local network serving also the phone devices used by the users.
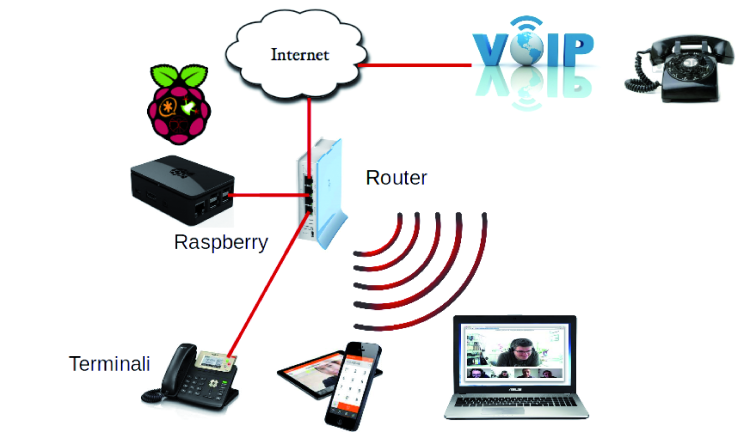
As phone terminals, you can use hardware phones dedicated to this purpose, or software telephones (softphones) to be installed on a PC or smartphone or tablet. For connecting to the phone network, the simplest solution is to make the connection using one of the many VoIP operators providing telephone numbers and traffic transportation to and from the public phone network.
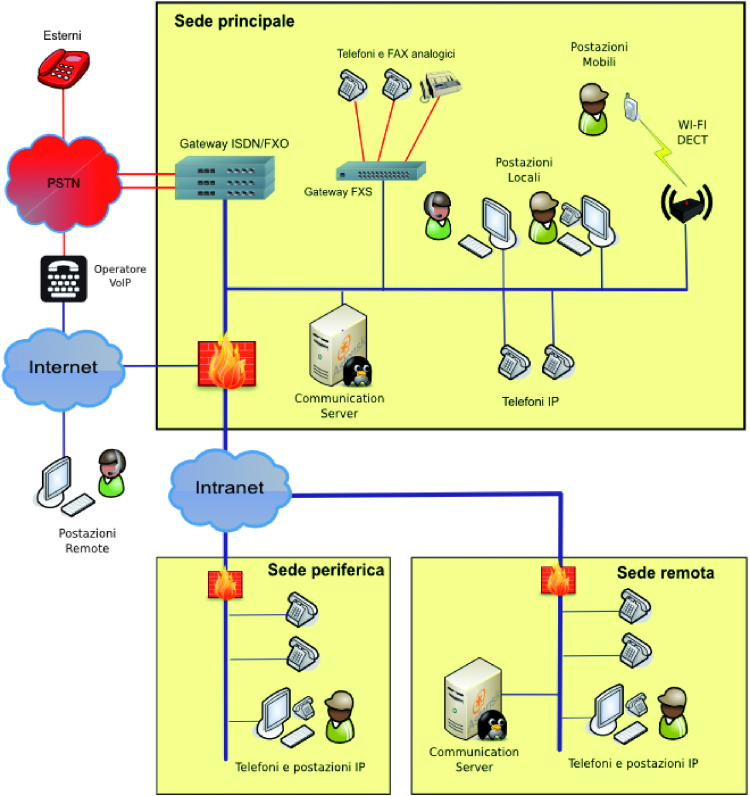
Of course, you can also build way more complex solutions capable of satisfying the needs of big organizations. In case those are distributed in multiple geographic locations, you can create an integrated system in which different service can be placed in many locations to share the load. On the other hand, smaller locations can be configured at satellites of another location and use the services remotely; you can also stretch this to the extreme “teleworkers” case, who can easily work from home or on the go.
Communication devices overview
The market offers a wide array of devices that can be used as components of a VoIP solution. Devices manufacturers certify communication platforms with which their devices are compatible, of course with a focus on open and most popular platforms.
IP phones are mini computers for all practical purposes, specialized as phone devices with a physical structure similar to those of traditional telephones. There are many models and price ranges, with veritable features in terms of dimensions and display, number of function keys, lines number, design and material quality.
For users who don’t sit behind a desk all the time, there are also cordless telephones that can make use of the Wi-Fi as radio section, or the DECT standard which is more performing in terms of range and battery life.
Besides hardware telephones, there are softphones for each operating system that can be installed on PC, smartphone or tablet and connected over the Wi-Fi network.
These terminals usually have more advanced features compared to physical phones like presence, instant messaging and video communication capabilities.
There are also special-purpose IP phones, such as door phones complete with actuators for opening gates, interfaces for intercom devices, chemical resistant phones and heavy-duty phones or phones to be used when wearing gloves.
A relevant part of the devices is represented by the gateways, used to convert VoIP communications to other traditional communication formats. Therefore, we have gateways for analog lines, ISDN lines and to interface with mobile GSM/UMTS/LTE networks. Over the last few years, several VoIP phone carriers are also emerging, which now provide access to public phone network directly over the SIP protocol.
Now, let’s get to practice!
Up to this point we have highlighted the basis of VoIP technology of our phone switchboard which would also give us the opportunity to apply and test out those concepts.
The phone switchboard we are proposing, will be equipment all the most advanced features and based on Raspberry Pi as hardware.
By now you know Raspberry Pi since you have seen it employed many times in Elettronica In; one of its most frequent applications is as Linux based server.
This is exactly how we are going to use it for this project, by installing the open source software Asterisk to create our target application, a small but functional VoIP phone box. The Asterisk project, which became the most used switchboard for professional applications over the years, provides all the telephone features you can imagine and it is also very “light” in terms of system requirements.
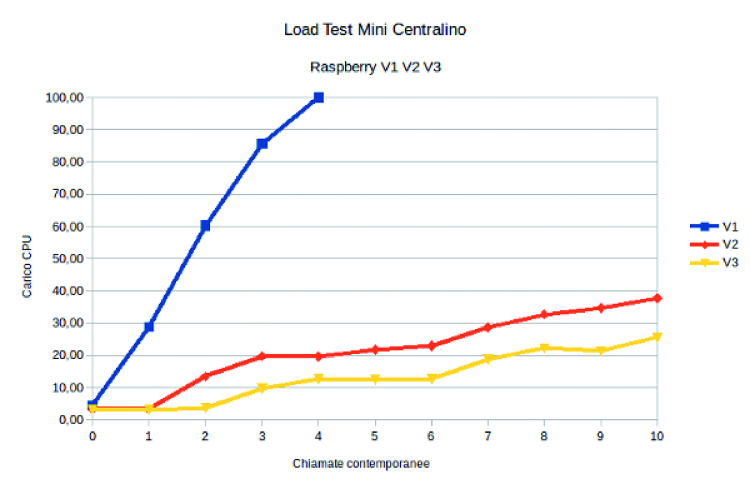
The software switchboard functions very well even with the first version of Raspberry Pi, although it supports a maximum of 2 – 3 simultaneous calls, which would make our switchboard fit and only for small offices. The performance increase introduced with versions 2 and 3, on the other hand, allows to easily go over 10 simultaneous phone calls, making the system able to satisfy the needs of small to medium-sized applications.
Inside the packet distributed for Raspberry Pi, besides the Raspbian operating system and the Asterisk communication engine, and also find the FreePBX graphic interface, which allows to easily configured to switchboard by browser, without the need to dive into complex config files.
Additional accessory packets have also been added, such as audio messages in Italian, the operator panel for the switchboard operator and a simple web telephone book.
Moving the First Steps
The software image for the mini switchboard can be freely downloaded on the reserved area of www.beppo.it; in order to make the download quicker, it’s been made lighter compared to the standard Raspian version by eliminating all the unnecessary packets, such as the graphics interface, that we are not going to use for server purposes. The result is a 1 GB, compressed zip image which can be unzipped and loaded on the SD memory card with a capacity of at least 8 GB. SD card speed is important for system performances, therefore we recommend to employ at least a class 10 model.
Once the image has been uploaded on the SD card, by using the usual procedure described many times in the magazine and also available on the community website of Raspberry Pi, you have to set the static IP address used two reach the switchboard.
The IP address can be set by editing the last lines in the file /etc/dhcpcd.conf and inserting the parameters of your network. In the examples for this article we are going to use the preset address 192.168.88.100, which will have to be replaced by the real address set your network.
Here you can see it last lines of file file /etc/dhcpcd.conf:
interface eth0
static ip_address=192.168.88.100/24
static routers=192.168.88.1
static domain_name_servers=192.168.88.1
The file can be directly edited on the SD card, if you have a computer able to mount the system ext4 file, or using the Raspberry Pi shell by connecting monitor and keyboard to the device.
Once connected to network and power, after the few seconds necessary for booting, Raspberry Pi can be reached through ssh shell with user root and password raspi as credentials. It goes without saying that one of the first things to do is replace and password with a personal, secure one.
For ssh connection, Windows users who do not have a native ssh client can use the free client PuTTY.
The operation sequence is:
Prompt $ ssh root@192.168.88.100
root@192.168.88.100’s password: *****
……..
root@raspberrypi:~# passwd
insert new UNIX password: ******
insert new UNIX password again: ******
passwd: password updated
correctly
root@raspberrypi:~#
Almost certainly, the SD card used will have a capacity over the 8 GB required by the image, therefore, in order to make use of all the available space, it is recommended to expand the partition using the raspi-config command, choosing the first option from the menu and reboot it when prompted. After these simple initial operations, the remainder of the switchboard configuration is done through the web interface that can be accessed by any web browser at the server address: http://192.168.88.100.
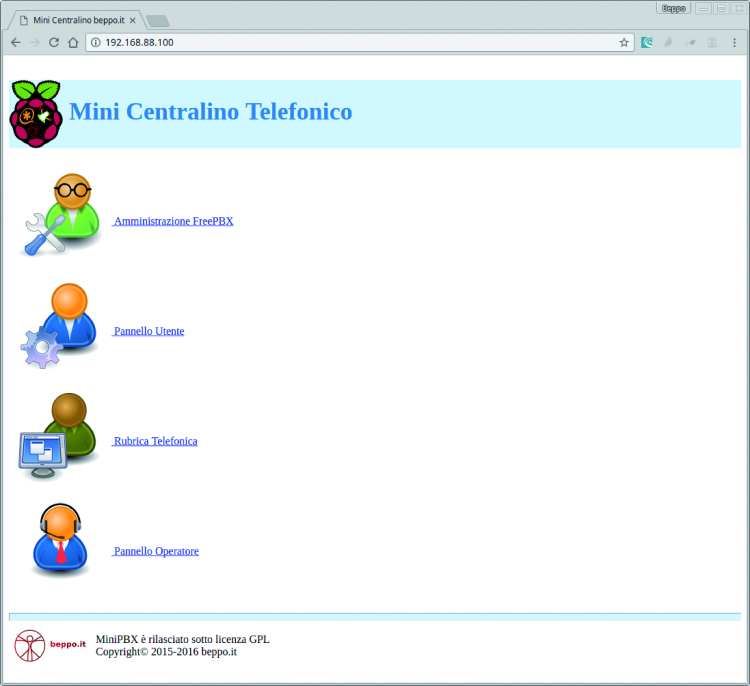
From the main page, you can access four applications covering several needs:
- FreePBX Administration; it is the configuration area of the switchboard from which you can edit all the settings; there are many configuration possibilities available, in this article we are just going to see the main one and the others can be accessed at the project FreePBX website and in the online help section of this interface;
- User Panel; it is the work area available to each single user for customizing the extensions assigned by the administrator;
- Telephone Book; it is the application allowing to save phone numbers that are contacted more frequently and call them with just one click;
- Operator Panel; this application allows to display available/busy extension status, useful for telephone operators who have to sort of phone calls to the various colleagues.
Access to the administration section is password-protected, and default credentials are username admin and password admin. Even for these credentials, it is recommended to replace the password with a personal one through the Administration > Administrators menu after the first access.

The Administrators module allows creating additional users with access profiles limited to the only administration functions you wish to enable.
Extensions Configuration
The many switchboards has already 10 configured extensions corresponding to 200 to 209. The configuration of these extensions can be displayed and edited from the Applications>Extensions.

Configuration parameters for each extension are various, here we are only going to describe the main ones. In the General section, you can find the most important info such as the Name displayed and the Secret used by the phone devices for authentication with the switchboard. As with the other passwords, we recommend to replace the default one (raspi) with a private and secure password, especially if the switchboard is accessible over the Internet.
In the VoiceMail you can enable an extension answering machine and set its parameters, such as password and the email address to which send messages.
Under the Find Me/Follow Me section, you can set a list of numbers to contact in case you don’t get an answer from the extension, such as a mobile number, an assistant or a colleague’s phone number.
Finally, under the Advanced section, you will find many parameters among which we are only going to mention “Nat Mode”, which must be set on No if the device is connected to the network with the switchboard or on Yes if it is maxed behind a NAT.
The first phone call
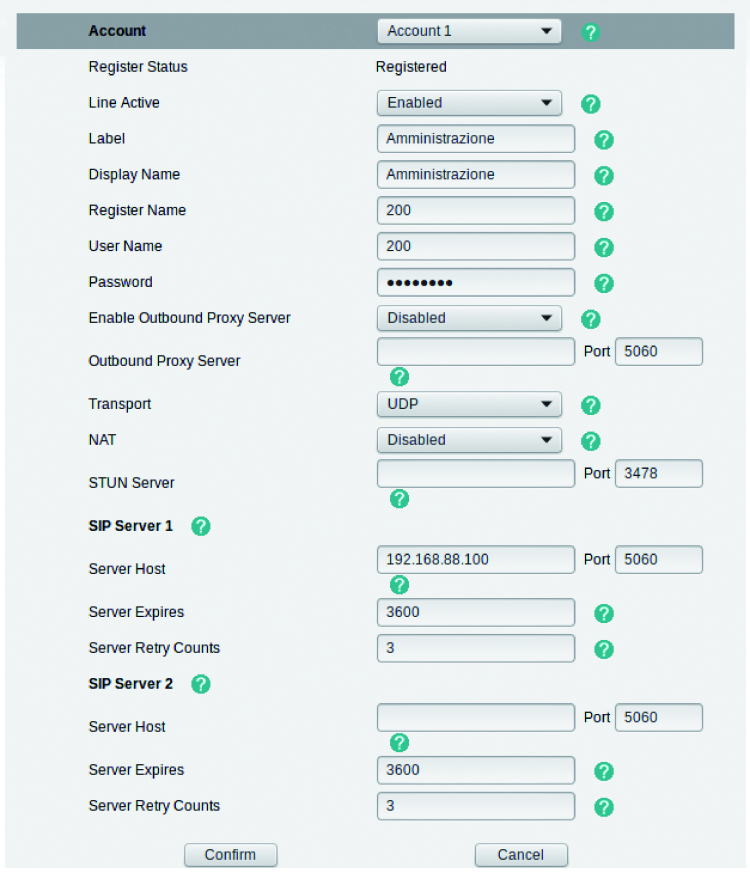
Once extensions are configured, you can connect the switchboard to the phone devices and start making the first internal phone calls. As devices, we can use hardware IP telephones or softphones to install on PC or smartphone, there are many modules available; the only important thing is that they support the IP protocol. A configuration of a SIP endpoint will, of course, depend on model and manufacturer, however the main configuration parameters will always going to be three:
- username, sometimes also referred to as “register name”, coinciding with the extension number (e.g. 200, 201, 202 ecc.);
- SIP server address coinciding with the IP address of the switchboard (default is 192.168.88.100);
- password, sometimes referred to as “secret” set in the Extensions section.
In this article we are going to describe how to configure the Jitsi softphone, an open source program coded in Java that can then be used on different operating systems; this softphone, besides the standard telephone features, also includes many advanced features such as chat, video communication and screen sharing.
The program can be freely downloaded from the project’s website https://jitsi.org/Main/Download where, besides the sources, you can also find the installation packets for major operating systems.
The first time it is launched after installation, the program requires access credentials to a communication device. In the SIP part, you have to insert the credentials set for the many switchboards:
- as username, insert the extension number followed by the @ symbol in the IP address of the minute switchboard;
- as password, insert the one set in the extensions configuration section.
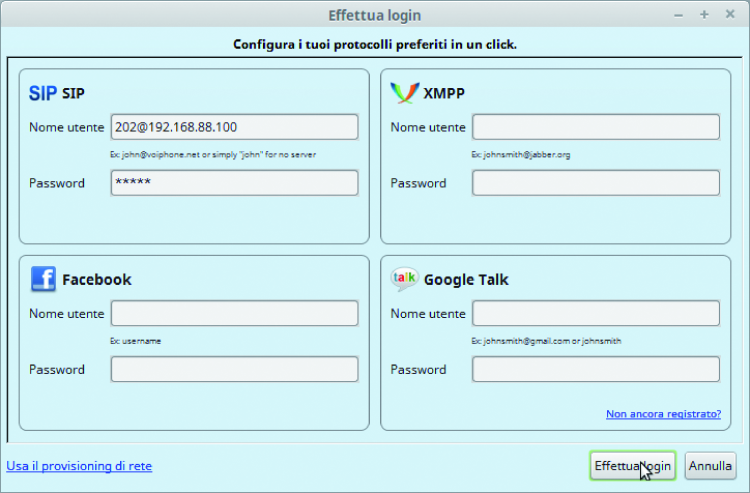
Right after the initial configuration, the softphone is ready to make the first internal phone call. By calling the extension *43 you can ask is the “echo test” internal service of the switchboard that delivers a structured message and then replies the receipt signal and output. This service is very useful in order to check the connection between phone and switchboard, therefore we suggest to always use it as first test phone call every time you install a new phone device. By installing more telephones, you will have the possibility to make phone calls between extensions and familiarize with phone call transfers, standbys and other phone call services.

External calls
After managing to make internal phone calls, here is the VoIP phone carriers stuff.
Each carrier has their peculiarities, but all of them, after signing the contract, will provide credentials for connection through the SIP protocol and assign at least one phone number to the connection. The connection between switchboard and operator is called “Trunk” because it allows the passage of a certain number of simultaneous phone calls.

Trunk configuration is done from the menu Connectivity>Ceck, where the most important part is configuration of the SIP protocol settings (sip Settings tab).
Normally, carriers provide detailed instructions on how to configure trunks on freePBX software, including possible peculiarities; in this article we are reporting a general configuration which is valid for most operators.
In the Outgoing section you are going to set the different parameters illustrated in the picture, the main ones being:
- username and secret, trunks authentication credentials;
- host, SIP server address of the VoIP provider;
- dtmfmode, specifying transportation mode of keyboard tones;
- disallow and allow, disabling and enabling, respectively, the use of specific codecs.
In the Incoming section, besides the parameters analog to those in the previous section, we must specify the registration string in the following format:
<username>:<secret>@<host>:<port>/<extension>
Where <username> and <secret> are the usual authentication credentials, <host> and <port> are the address and the port (5060 standard) of the SIP server and <extension> is the extension to send incoming calls, which is usually the same as username.

Once at least one trunk is configured, we can define an “exit route”, i.e. a rule commending the switchboard to send phone calls that satisfies certain prerequisite sites to the trunk.
In the corresponding tab (Route Settings,) go to the general section and name your route; in order to to do so, you must indicate the trunk list to use in sequence in case one phone call corresponds to the route conditions.

Trunks are used sequentially until one accepts the phone call, this mechanism allows to specify preferential trunks to use and spare trunks. In the Patterns section (Out route patterns,) we are going to specify conditions the called phone number must satisfy in order to enter the route. Condition [038]. which is normally employed for outgoing calls, indicates all number starting with 0 or 3 or 8 and followed by any amounts of numbers (the symbol . Is the wildcard).
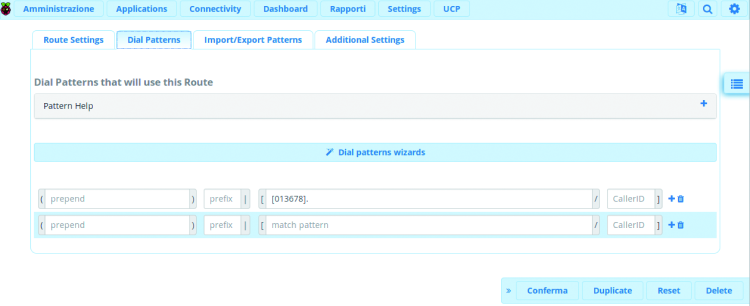
Under the conditions, we can also specify the sequences to put before the figures, prefixes to remove before transferring the phone call and rules regarding the extension making the call.
Now, we should be able to make outbound phone calls, however, in order to manage inbound phone calls we must add at least one in route.
In the example proposed in figure (In Route) we can see a really simple route that sends all direct calls addressed to a specific number to the extension 200.

Conclusions
In this article we have learned the basis of VoIP telephony and explained how, by using the popular Raspberry Pi board (on which you have to install a dedicated software) we can create a simple although useful and versatile VOP switchboard.
Once described the software installed, we took a look at the base configuration of the many switchboard, which however simple, allows to start using our VoIP switchboard in most of practical daily situations.
In the next and last article we are going to see how to extend configuration in order to create more advanced features.
From openstore
