
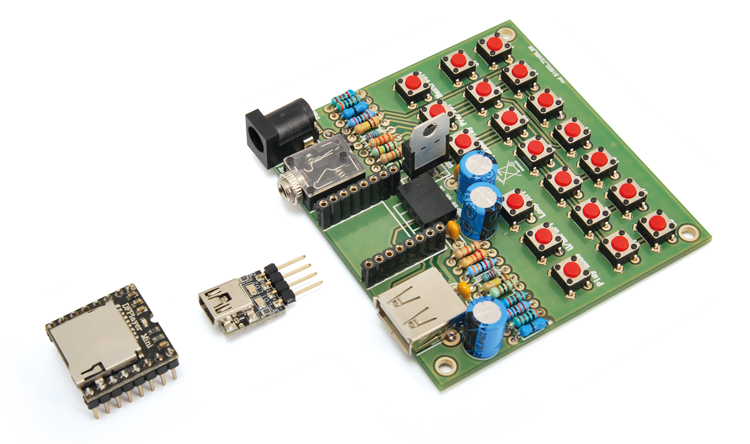
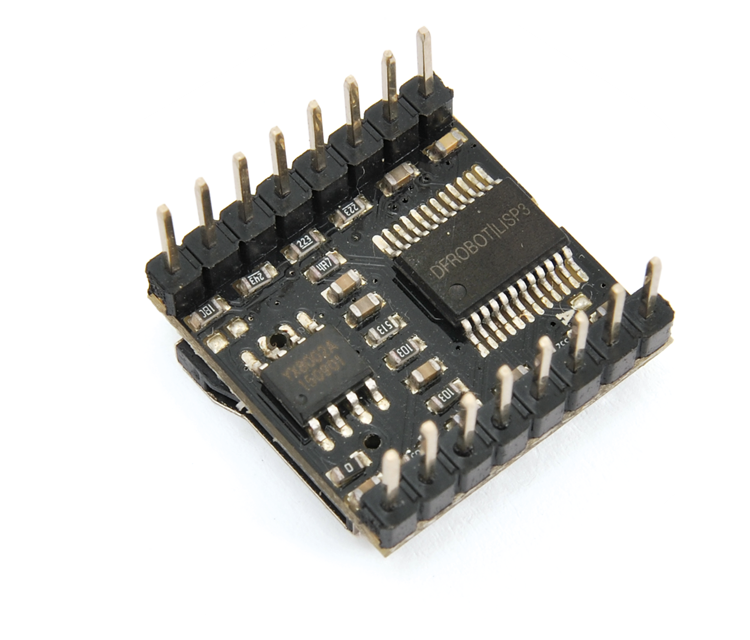
Let’s test out the capabilities of the DFR0299 audio player module, an ideal choice for Arduino but also for many stand-alone applications.
In this article, we decided to design and propose a demoboard for the DFR0299 module we already used in the ‘Presepino’ project; this module will function as a development platform for various application or just to program multiple circuits in the event of small productions.
The circuit
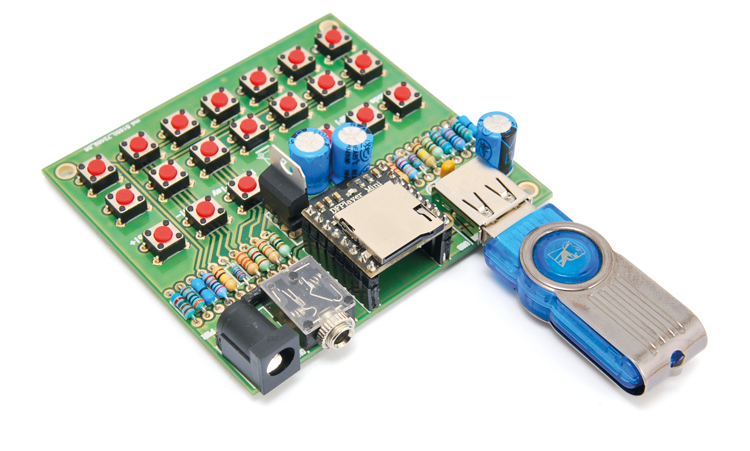
The module is able to directly play MP3 and WAV files saved on a FAT16 or FAT32-formatted SD-Card up to 32 GB; the card is to be inserted at the top of the PCB; however, the module also has an additional Device-type USB that we have brought on a USB A connector and that allows it to read data from a Pen Drive, again with a maximum capacity of 32 GB and with t same formatting of the SD-Card.
The peculiarity of this module is that it’s been developed and made for the Arduino environment and we have developed a dedicated library for its management which allows deciding which file to play, volume control etc. On the other hand, the device can also work autonomously and that is how we are going to use it, controlling via keys that allow us to manage very function. Since the module can be controlled through the serial interface at TTL-level, we are going to use a Serial/SB converter for our circuit in order to interface it with a Personal Computer. A serial port is still available and accessible in the diagram.
The module contains a decoder to decompress MP3 audio and a microcontroller capable of accessing, via SPI, to data contained on the SD-Card: the decoder transforms data stream in uncompressed audio as it reads it; the uncompressed audio is then amplified by a small integrated 3-watt bridged-output amp, which can easily be “heard” in the environment. If you need more power, you can still use audio output (SPK1, SPK2) in order to drive a proper BF amplifier to connect to a loudspeaker; alternatively, you can pick the audio from 4-pin and 5-pin, which are the channels low-level audio outputs, LEFT and RIGHT respectively. In this case you can have stereo audio.
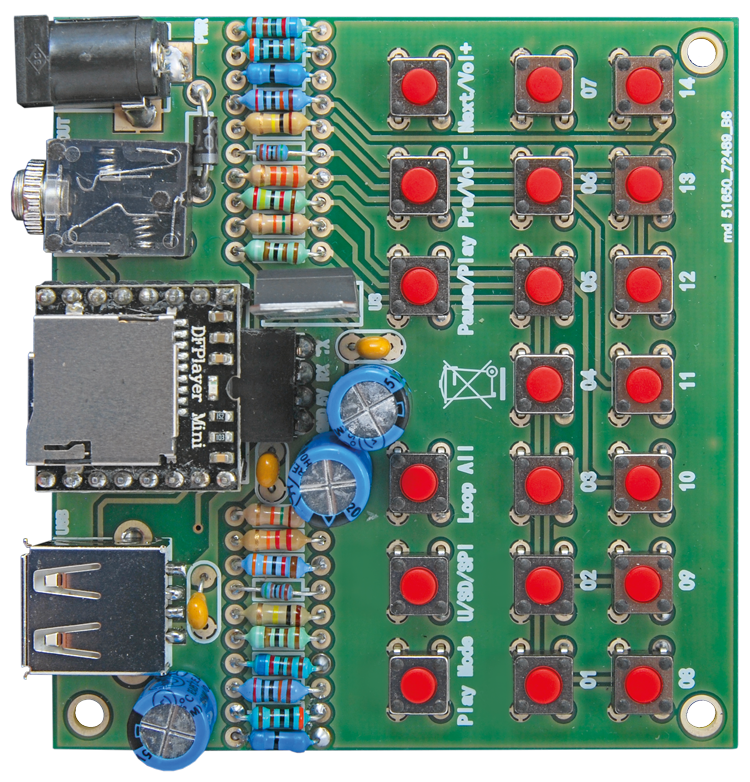
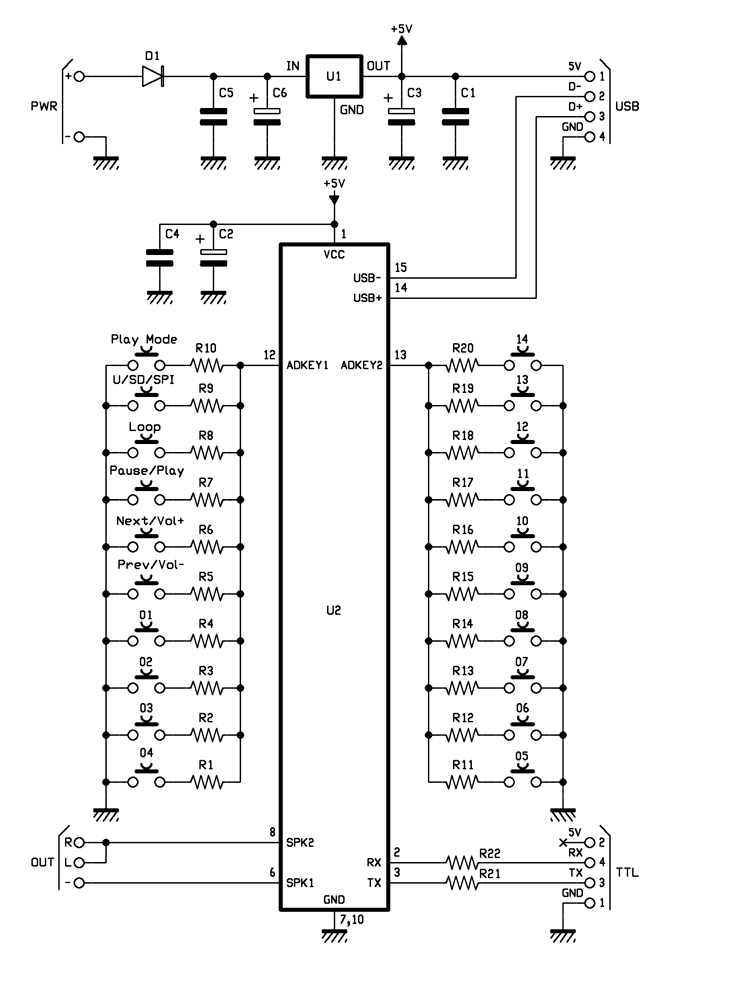
Each of the module’s functions is controlled by keys placed on the printed circuit, as shown in the diagram, that we can now analyze after this introduction. As you can see, since this is a demoboard, all pins have been extended out, including TX and RX of the UART inside the module, working at 9.600 bps by default (we remind you that this module is aimed for Arduino, so a higher serial speed is not needed). In order to allow multiple-keys reading, we took advantage of a trick using the A/D converter inside the microcontroller assigned to ADKEY1 and ADKEY2 lines. We have employed such solution since reading the 20 keys would otherwise require just as many pins, which are not available in the module, since it is mounted on a PCB lined with 8+8 pins with 2.54 mm distance from one another, made of two strips with 8 pins each that are to be used for power, audio output, USB connection and serial port, besides stereo audio and loudspeaker output.
Key reading takes place by detecting voltage determined by pressure and subsequent closure of each one of them at the related connected input; said tension is dependent on resistance in series with the key. Precisely, both ADKEY1 and ADKEY2 are complete with a pull-up resistor inside the module functioning as a partition with the resistor in series with each key, determining a certain pressure every time the key is pressed; the firmware contains a value table, each value corresponds to ADC -reading of corresponding values between ADC-reading for each pressed key, therefore, since the resistors for the 10 keys are all different, by closing Play Mode a different voltage on ADKEY1 will be determined than the voltage occurring by acting on 01, 02, Loop and so on. Same goes for ASKEY2.
Of course, keys on either side must be pressed only once, otherwise two resistors would be in parallel and the A/D converter would read an anomalous value, thus determining activation of an unrelated function.
Keys are divided into functional groups: those activating direct track playback (in this case, for the key-based control, we are considering playback of 14 audio files), and those controlling working mode; the first group includes keys 01 to 14 and by pressing one of them, tracks contained in used or predefined mass storage device in corresponding positions are played back automatically. Hence, first track will be directly reproduced by pressing key 01, while pressing key 02 will play back track n°2 and so on up to track 14.
It is worth noting that the fourteen keys related to the memory segments in which just as many tracks are saved have two activation modes: short press starts playback while long press determines the track looping from the beginning.
Play Mode determines playback mode, namely choosing whether to play current track till the end or skip immediately to selected track (interrupted/non interrupted mode); each key press inverts mode. U/SD/SPI key manually sets source selection from which reading files that are going to be played back (U/TF/SPI/Sleep): each press switches from USB to SD-Card to SPI, in that order, while third press goes back into Sleep Mode and the cycle starts over. Third function key, Loop, allows to switch from single playback to loop playback mode: in the first case, track selected via buttons 01 to 14 is played back once for each press, while in the second case (loop) the track starts over and over again after each playback, until circuit is powered off or Loop key is pressed or Pause/Play button is pressed. The last key is indeed used to pause current playback, or to resume it if paused; this is true both in case of one-time playback and loop playback and does not affect settings edited with previous keys.
Next/Vol+ key also has a dual function: it allows you to skip from one track to the following once short-pressed. It effectively works as a skip button.
When long-pressed, it constantly increases volume (that is the level of audio signal provided to the outputs and to the integrated amplifier of the module) until released.
Similarly, Prev/Vol- key, (fifth function key), skips to previous track from currently selected track (track selected with 01/14 keys) if short pressed (e.g. the player starts reproducing track 4 if it is reproducing track 5), while it progressively decreases volume when long-pressed until release.
Regarding playback volume, note that volume starts from highest possible volume, so it has to be controlled with the keys (to be precise, you will have to act on Prev/Vol-) to suit your needs.
Alright, now that we have analyzed keys, which constitute the board’s user interface, let’s talk about communication ports, which are basically serial port (TX, 3-pin, and RX, 2-pin) at 0 – 3 V range and USB, which refers to USB-A connector and, internally, to the Device type USB: note that we are effectively using a USB to interface with the Personal Computer, but not the module’s, since this is factory-configured to be used as an interface for the Pen Drive from which files to play back can be uploaded, but we are using the serial port connected to a USB/RS232 module, that is the Open electronic’s FT782M
Since this module, based on the popular FTDI’s FT232RL integrated circuit, works with the 5 V of the USB connection and therefore works with TTL levels on the serial side, according to the manufacturer’s instructions we have inserted some resistances in series with channels TC and RX of the MP3 module, which has been designed to work with 0- 3,3 V levels. The pins used to connect the loudspeaker (6 and 8) have been brought to a 3.5 mm jack with conjoined left and right channels, while the SD reader is embedded in the module’s PCB and therefore is not present on the demoboard’s diagram.
The whole circuit is powered by direct voltage ranging between 9 and 12 V and the U1 integrated regulator, preceded by the D1-diode for protection against polarity inversion (which voltage is negligible), is powered by the stabilized 5 V needed by the MP3 module. C5 and C6 capacitors filter input power (jack+ and – PWR) while the regulator-stabilized 5 V voltage is filtered by C1 and C3. Down the module’s power line we can find C2 and C4 capacitors locally filtering the 5 V and preventing interferences propagating along power line from affecting the microcontroller that controls the MP3 module.
Use
As we mentioned, the demoboard supports MP3 and WAV files and automatically reads from Pen Drive or microSD if either is inserted, while if both mass storage devices are inserted, you will have to press U/SD/SPI key I order to choose track source, otherwise the module won’t play anything back.
In order for the MP3 module to recognize and correctly playback audio files by correlating them with keys, you must save them on the chosen storage device according to this format “0001_TrackName.mp3” where the filename must begin with the numeric ID composed of 4 characters, that is the track number of 4 digits: 001, 002, 003 up to 0014. You can replace NameTrack with whatever you want, the only thing is that it must be preceded by the number you want to assign to it and the underscore.
This way you can, for instance, control the demoboard through the keys, by sort-circuiting them with CMOS switches or with the lines of a microcontroller initialized as open-drain output, establishing a correlation between reproduced track and line to be activated.
Remember that the USB/serial control interface allows to manage the demoboard (or better, the MP3 module it is based on) from PC, but no specific software is provided; in fact, you can manage it by a terminal emulator software (e.g. Hyperterminal for Windows, or Telnet etc.) by following syntax and commands specified by the module manufacturer (DFRobot) in the User Manual that can be downloaded at main site
Remember that audio file commands are searched for by the microcontroller regulating the MP3 module based on folders, starting from the root of the mass storage and continuing in alphabetic order; to this regard, we must mention that the module supports a maximum of 100 folders and each folder can contain a maximum of 1.000 tracks. It is understood that the first 14 can be reproduced through the keys, while playback of remaining files can be sorted only via the serial interface, using the proper commands. Supported file formats are those already mentioned and, more precisely, those corresponding to standard ISO 11172-3 and ISO13813-3 layer3 audio decoding, supported sampling rates are 8/11,025/12/16/22,05/24/32/44,1/48 kHz.
Volume control is divided into 30 steps (min to max); this is true both for the manual control via keys and for the control via the serial port. From the serial port, you can also choose one of the 10 sound equalization levels provided (e.g. Jazz, Classic, Pop, Rock etc.).
Still on the subject of communication via serial port, the PC-protocol requires this configuration:
– Data bits: 1
– No Checksum
– No streaming control
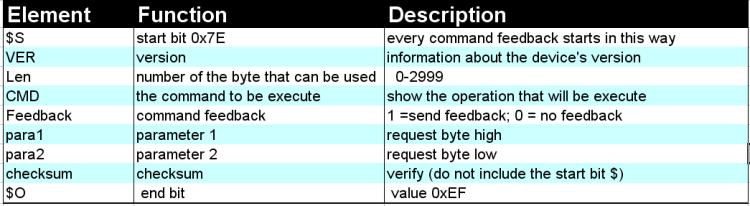
The required formatting, that is the command syntax to send through the serial port is $S VER Len CMD Feedback para1 para2 checksum $O, according to Table 1. As you can see, $S is the start bit and each string ends with end bit $O.
Table1
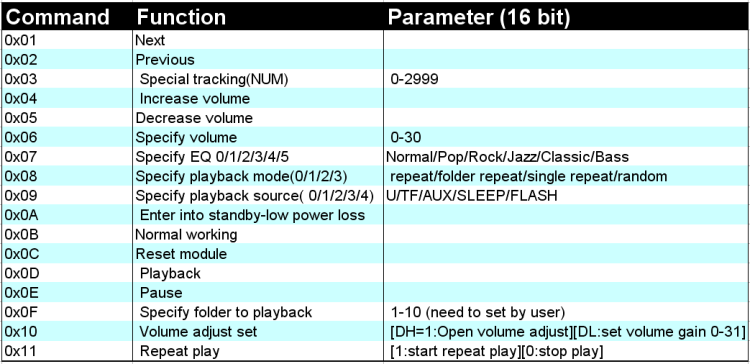
On the other hand, Table 2 shows main commands that can be given to the module, the working commands controlling track playback functionalities; note that parameters can be found only in commands that need them, such as those indicating the track to be reproduced, volume level to be set, etc.
Table2
From Openstore
Demoboard MP3 audio player DFR0299
Switching power supply 12 V-1,2 A
