- Building a 3D Digital Clock with ArduinoPosted 4 months ago
- Creating a controller for Minecraft with realistic body movements using ArduinoPosted 5 months ago
- Snowflake with ArduinoPosted 5 months ago
- Holographic Christmas TreePosted 6 months ago
- Segstick: Build Your Own Self-Balancing Vehicle in Just 2 Days with ArduinoPosted 6 months ago
- ZSWatch: An Open-Source Smartwatch Project Based on the Zephyr Operating SystemPosted 7 months ago
- What is IoT and which devices to usePosted 7 months ago
- Maker Faire Rome Unveils Thrilling “Padel Smash Future” Pavilion for Sports EnthusiastsPosted 7 months ago
- Make your curtains smartPosted 8 months ago
- Configuring an ESP8266 for Battery PowerPosted 8 months ago
Make Your Own Temperature Sensor and Email Alarm
The Internet of Things is becoming a more ever-present part of our lives. So, it should come as no surprise that something as crucial as temperature monitoring is a part of that. Follow along with this tutorial to learn how to create your own temperature sensor. More importantly, learn how to set up an email alert system for when things are getting warm.
The connection diagram is shown below. Instead of an ESP8266-01, you can use different type of ESP8266. You can also use a 3.3V power supply instead (AMS1117-3.3) of 2 AA batteries.
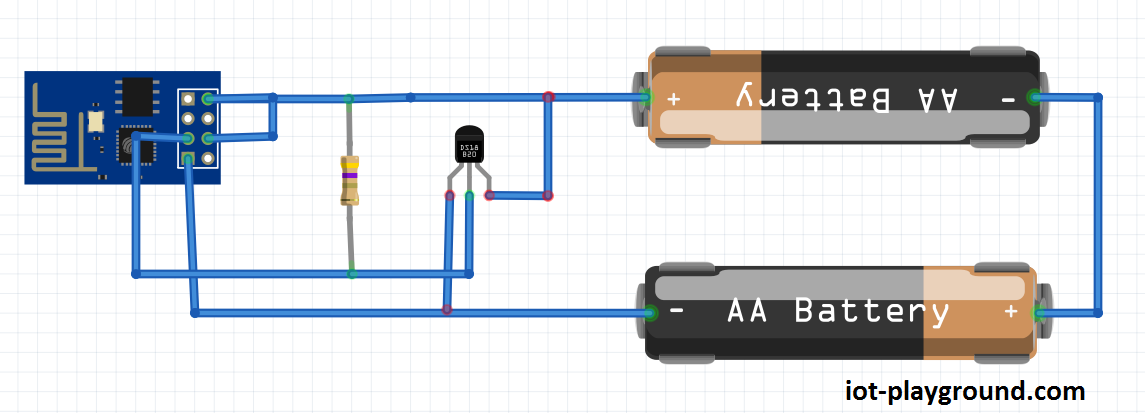
Our program is written in the Arduino ESP8266 IDE. See our Arduino ESP8266 IDE tutorial to see how to connect your ESP8266 module to a computer. If you are not experienced, it’s recommended to use an ESP8266 Node MCU board — just connect it to your computer’s USB port.
Download the program from our GitHub. Also download the EIoTCloudRestApiV1.0 library and add it to your library folder in the Arduino IDE. The DallasTemperature lib can be downloaded here.
In the program, you need to change only three lines: set access point name, access point password, and your instance ID. To get the instance ID, you need to register to the EasyIoT Cloud service. The instance ID can be found under Configure->User Info->Instance ID.
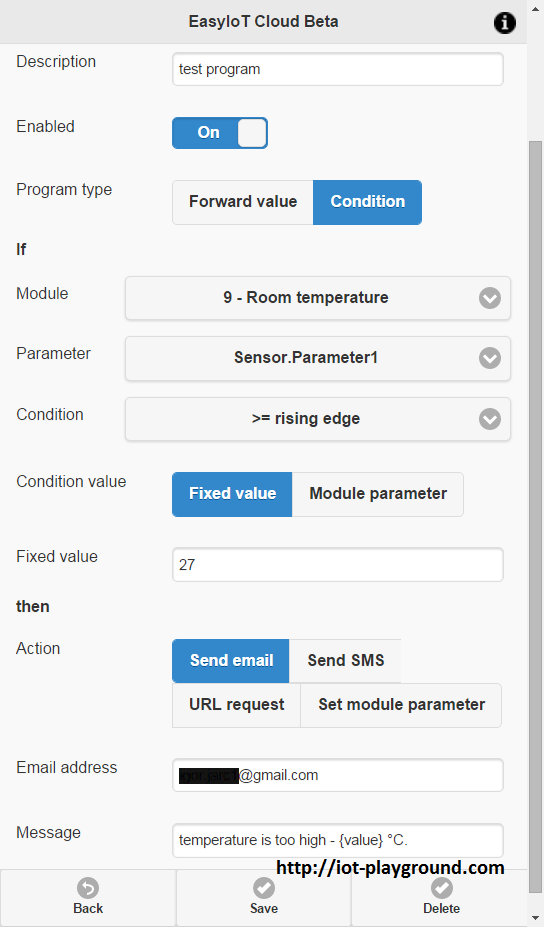
To use your temperature sensor you do not need to configure anything — the sensor is plug-and-play. If you want to set a temperature email alarm, configure the following automation program. Go to Configure->Automation and press the Add button.
Configure the following:
Enable the program, then select the program type “Condition.” In the “If” condition, select your newly added sensor module and Sensor.Parameter1. Then, set the condition to “>= rising edge.” Rising edge means that you will be notified only once when temperature raises to a certain value. For the Condition Value, select “Fixed value” and set whatever fixed value you want (in our case fixed value is 27). Then, set the Action “Send email” and set your email address and message. If you want to see the temperature in the message, use {value}. Finally, save the program.
Source: DZone IoT

Related Posts


-
 Arduino ISP (In System Programming) and stand-alone circuits
We use an Arduino to program other ATmega without...
- Posted 12 years ago
-

-

-
 GSM GPS shield for Arduino
Shield for Arduino designed and based on the module...
- Posted 12 years ago
-
 Small Breakout for SIM900 GSM Module
Some post ago we presented a PCB to mount...
- Posted 13 years ago
-
 Join Maker Faire Rome 2024: Innovation Unleashed at Gazometro Ostiense | Calls Now Open!
All Calls Now Open for Maker Faire Rome 2024...
- Posted 2 weeks ago
-
 Building a 3D Digital Clock with Arduino
Project to create a digital clock consisting...
- Posted 4 months ago
-
 Acoustic amplifier – in DIY Kit
This kit creates a microphone amplifier with an output...
- Posted 5 months ago
-
 Creating a controller for Minecraft with realistic body movements using Arduino
Project of a controller that maps body movements...
- Posted 5 months ago
-
