- Building a 3D Digital Clock with ArduinoPosted 4 months ago
- Creating a controller for Minecraft with realistic body movements using ArduinoPosted 5 months ago
- Snowflake with ArduinoPosted 5 months ago
- Holographic Christmas TreePosted 5 months ago
- Segstick: Build Your Own Self-Balancing Vehicle in Just 2 Days with ArduinoPosted 6 months ago
- ZSWatch: An Open-Source Smartwatch Project Based on the Zephyr Operating SystemPosted 7 months ago
- What is IoT and which devices to usePosted 7 months ago
- Maker Faire Rome Unveils Thrilling “Padel Smash Future” Pavilion for Sports EnthusiastsPosted 7 months ago
- Make your curtains smartPosted 8 months ago
- Configuring an ESP8266 for Battery PowerPosted 8 months ago
Add Linux, WiFi, Ethernet and USB to Arduino
Web site:
http://www.dragino.com/products/yunshield/item/86-yun-shield.htmlProject Summary:
The model of this shield named Yun Shield, the feature of this shield is as its name. User can add this shield into Arduino (Leonardo, UNO, MEGA2560 etc) and "turn" the Arduino into device which has similiar features as Arduino Yun: support remote upgrade and use the Bridge library.
With this shield, user can easy to set up communcation between Arduino and Internet (via ethernet , wifi or 3g etc) and add support for USB flash, video. The detail user guide/ manual can be found in the dragino website and most Arduino Yun Sketch / examples can reuse with this Shield. This shield is under production and will be ready within one months time.
Full Project:
Introduction:
Yun Shield is one of the most powerful shields for Arduino Board. Yun Shield is designed to solve the Internet connectivity and storage issue for Arduino Board.

Yun Shield runs Open Source OpenWrt system (Same system as runs in Arduino Yun) and it is fully compatible with Arduino IDE v1.5.4 or later. Yun Shield is the ideally choice for Arduino Projects which require various internet connections and more storage.

Basically, Yun Shield + Leonardo equally to the official Arduino Yun, but Yun Shield is more flexible because it can work with other Arduino board such as Uno, Duemilanove, Mega etc. And Yun Shield uses external wifi antenna which provides stability and possibility for various environments.
System Structure
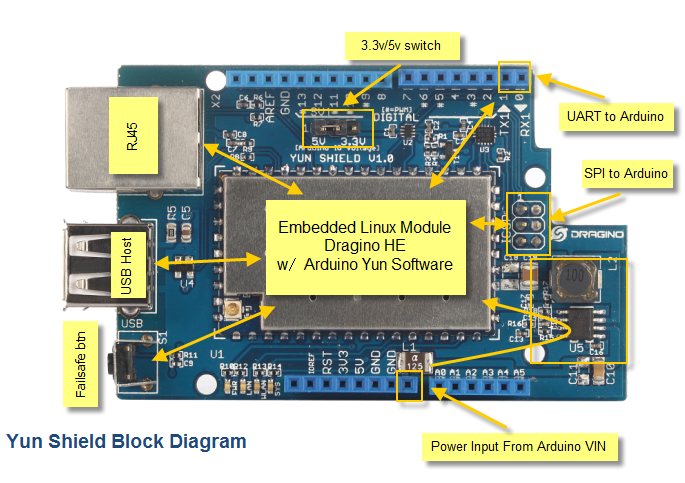
POWER:
The Dragino HE is the core module of Yun Shield. The HE module requires around 200ma current when in full load, so it is powered by the Arduino VIN pins to avoid overheated in the Arduino onboard 5v LDO. So when Yun shield is in used, the Arduino board should be powered by DC port instead of USB port. The DC input can be 7v ~ 15v.
The USB Host of Yun Shield gets power from the Arduino +5v pin, since the +5v from Arduino comes from the +5V LDO, to avoid overheated on the Arduino Board, when the USB host is in used, it is recommended to use +7v DC.
Interface:
The RJ45, WiFi, USB Host and Failsafe are connected to the Dragino HE module directly. And the
Dragino HE module use SPI and UART to communicate with Arduino Board. Yun Shield is compatible with 3.3v and 5v Arduino board. The on board jumper SV1 is used to set the SPI and UART to 3.3v or 5v level.
The SPI interface is used to upload the sketches comes from the Arduino IDE. SPI interface only connects to Dragino HE during uploading so the Arduino SPI can still be used to connect to other SPI slave devices.
The UART interface is used for the Bridge class in Arduino, there are lots of examples explain how to use the bridge class in the Arduino IDE. It is the core of Yun solution. We must make sure the serial Interface of Arduino is not used by other hardware.
Bridge Library
The Bridge Library simplifies the communication between the Arduino Board and Yun Shield.
Bridge commands from the AVR (Arduino Board) are interpreted by Python on the Yun Shield. Its role is to execute programs on the GNU/Linux side when asked by Arduino, provide a shared storage space for sharing data like sensor readings between the Arduino and the Internet, and receiving commands from the Internet and passing them directly to the Arduino.
There are detail explain and lots of example to show how to use Bridge in the Arduino Official Website. Reference link is: http://arduino.cc/en/Reference/YunBridgeLibrary
Features
- Open source Linux (OpenWrt) inside
- Low power consumption
- Compatible with Arduino IDE 1.5.4 or later, user can program, debug or upload sketch to Arduino board via Arduino IDE.
- Managed by Web GUI, SSH via LAN or WiFi
- Software upgradable via network
- Built-in web server
- Support internet connection via LAN port, WiFi or 3G dongle.
- Support USB flash to provide storage for Arduino projects.
- Failsafe design provides robustly system.
- Compatible with Arduino Leonardo, Uno , Duemilanove, Diecimila, Mega
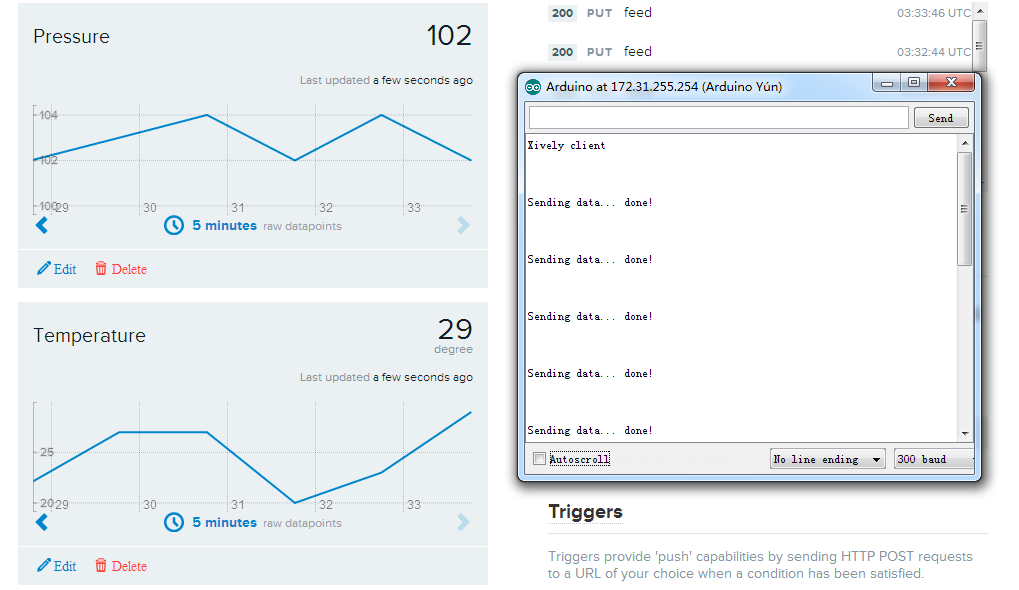
Example:
This example shows how to log data to the public IoT server “Xively”. The example is from Arduino IDE–> File –> Examples –> Bridge –> XivelyClient. Tutorial of this example can refer http://arduino.cc/en/Tutorial/YunXivelyClient
Step1: Connect to Leonardo and power
Simply put the Yun Shield on the top of Arduino Leonardo and Power the Leonardo via the DC Jack.
Step2: Use Computer to access to Yun Shield
At the first boot of Yun Shield, it will auto generate an unsecure WiFi network call Dragino2-xxxxxx

User can use their laptop to connect to this WiFi network. The laptop will get an IP 192.168.240.xxx and the Yun Shield has the default IP 192.168.240.1
Once user joins the network, they can use web browser (recommend Firefox and Chrome) and enter 192.168.240.1 to enter the Yun Shield setting page.
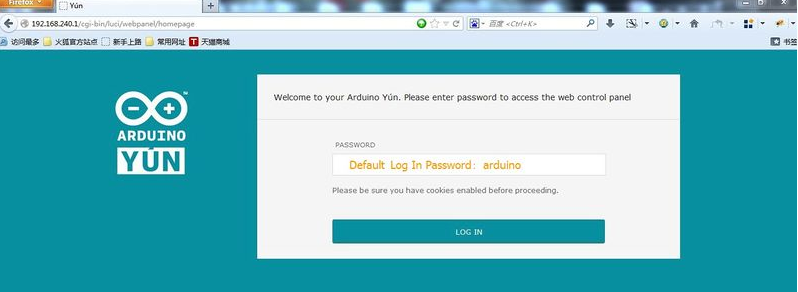
Default Password for Yun Shield is Arduino.
Step3: Set Up Yun Shield to access internet
After log in, the GUI will show the WIFI / ETH interface status. Click the Configure button and now user can configure Yun Shield to access internet via your WiFi router.

Step4: Detect Yun Shield
Assume your laptop and Yun Shield are in the same network. The Yun Shield will broadcast data in this network and Arduino IDE will receive this data and show the Yun Shield in Tools –> Port.

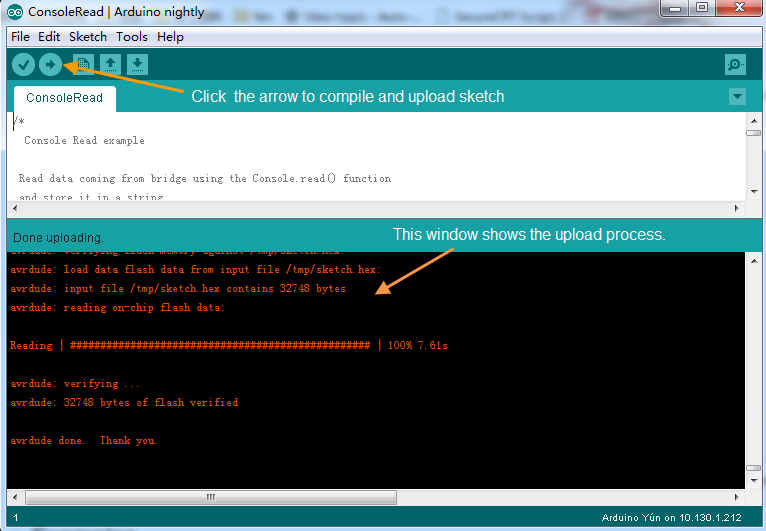
Step5 Upload Sketch
- In the Arduino IDE, choose the Arduino Yun board type for Leonardo.
- In Arduino IDE à port, choose the correct port. (should be Arduino Yun port with an ip address)
- In the Yun Shield GUI à Sensor page, choose the Board Type: Leonardo
- Compile the sketch and upload it to the Arduino Board. During upload, The Yun Shield will ask you to key in the password, by default, the password is arduino.
Code
// include all Libraries needed:
#include <Process.h> //Process lib use to call Linux Commands in Yun Shield
#include <Console.h> //Console lib, used to show debug info in Arduino IDE
#include "passwords.h" // contains my passwords, see below
/*
NOTE: passwords.h is not included with this repo because it contains my passwords.
You need to create it for your own version of this application. To do so, make
a new tab in Arduino, call it passwords.h, and include the following variables and constants:
#define APIKEY "foo" // replace your pachube api key here
#define FEEDID “0000” // replace your feed ID
#define USERAGENT "my-project" // user agent is the project name
*/
// set up net client info:
const unsigned long postingInterval = 60000; //delay between updates to xively.com
unsigned long lastRequest = 0; // when you last made a request
String dataString = "";
void setup() {
// start console:
Bridge.begin();
Console.begin();
while (!Console); // wait for Network Serial to open
Console.println("Xively client");
// Do a first update immediately
updateData();
sendData();
lastRequest = millis();
}
void loop() {
// get a timestamp so you can calculate reading and sending intervals:
long now = millis();
// if the sending interval has passed since your
// last connection, then connect again and send data:
if (now - lastRequest >= postingInterval) {
updateData();
sendData();
lastRequest = now;
}
}
void updateData() {
// convert the readings to a String to send it:
dataString = "Temperature,";
dataString += random(10) + 20;
// add pressure:
dataString += "nPressure,";
dataString += random(5) + 100;
}
// this method makes a HTTP connection to the server:
void sendData() {
// form the string for the API header parameter:
String apiString = "X-ApiKey: ";
apiString += APIKEY;
// form the string for the URL parameter:
String url = "https://api.xively.com/v2/feeds/";
url += FEEDID;
url += ".csv";
// Send the HTTP PUT request, form the linux command and use Process Class to send this command to Yun Shield
// Is better to declare the Process here, so when the
// sendData function finishes the resources are immediately
// released. Declaring it global works too, BTW.
Process xively;
Console.print("nnSending data... ");
xively.begin("curl");
xively.addParameter("-k");
xively.addParameter("--request");
xively.addParameter("PUT");
xively.addParameter("--data");
xively.addParameter(dataString);
xively.addParameter("--header");
xively.addParameter(apiString);
xively.addParameter(url);
xively.run();
Console.println("done!");
// If there's incoming data from the net connection,
// send it out the Console:
while (xively.available() > 0) {
char c = xively.read();
Console.write(c);
}
}
Screen Shot:
Some advantages for Yun Shield over Arduino Yun
Flexible:
The Yun shield can be used with different Arduino Boards and different type of avr.
Stable WiFi performance:
Yun Shield use external Antenna to ensure for the better wifi performance, the Arduino Yun use on board antenna, while place an Arduino Shield on top of Arduino Yun, the wifi performance will be strongly decreased because the antenna is under a PCB.
Flexible WiFi design: external antenna provides the feasibility to put the device into a metal enclosure. User can also change the antenna to different antenna type for their project wise. For example, the can set up several kilometers wifi connection with an outdoor directional antenna.
Duplicable and producible:
The design of Yun Shield is open and the most complicate and difficult parts are done in the Dragino HE module. User can use the Dragino HE module to make a customized Yun style product for their products in an easy/rapid/inexpensive way.
Documents
Circuit diagram:
YunShield.Schematic.v1.0 YunShield.Silkscreen.v1.0
Bill of Materials:

9 Comments
Leave a Reply
-
 Arduino ISP (In System Programming) and stand-alone circuits
We use an Arduino to program other ATmega without...
- Posted 12 years ago
-

-

-
 GSM GPS shield for Arduino
Shield for Arduino designed and based on the module...
- Posted 12 years ago
-
 Small Breakout for SIM900 GSM Module
Some post ago we presented a PCB to mount...
- Posted 13 years ago
-
 Join Maker Faire Rome 2024: Innovation Unleashed at Gazometro Ostiense | Calls Now Open!
All Calls Now Open for Maker Faire Rome 2024...
- Posted 2 weeks ago
-
 Building a 3D Digital Clock with Arduino
Project to create a digital clock consisting...
- Posted 4 months ago
-
 Acoustic amplifier – in DIY Kit
This kit creates a microphone amplifier with an output...
- Posted 5 months ago
-
 Creating a controller for Minecraft with realistic body movements using Arduino
Project of a controller that maps body movements...
- Posted 5 months ago
-

Pingback: The Arduino Yun Shield - RaspberryPiBoards
Pingback: Add Linux, WiFi, Ethernet and USB to Arduino | Arduino collector blog