- makeITcircular 2024 content launched – Part of Maker Faire Rome 2024Posted 2 weeks ago
- Application For Maker Faire Rome 2024: Deadline June 20thPosted 2 months ago
- Building a 3D Digital Clock with ArduinoPosted 7 months ago
- Creating a controller for Minecraft with realistic body movements using ArduinoPosted 7 months ago
- Snowflake with ArduinoPosted 8 months ago
- Holographic Christmas TreePosted 8 months ago
- Segstick: Build Your Own Self-Balancing Vehicle in Just 2 Days with ArduinoPosted 8 months ago
- ZSWatch: An Open-Source Smartwatch Project Based on the Zephyr Operating SystemPosted 9 months ago
- What is IoT and which devices to usePosted 9 months ago
- Maker Faire Rome Unveils Thrilling “Padel Smash Future” Pavilion for Sports EnthusiastsPosted 10 months ago
VOCAL CONTROL
In this guide, we will describe how the DM Board ICS outputs can be controlled by means of your own voice. Here you can view a demonstration video.
Hardware
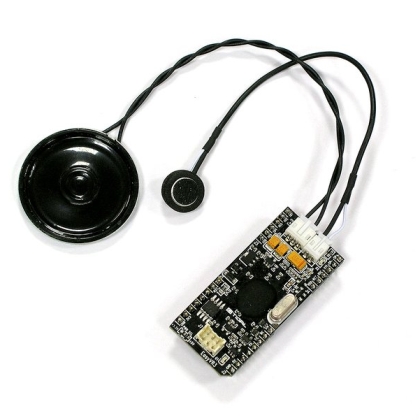
The module EasyVR 3 made by VeeaR is the speech recognition system chosen for this project.
The connection of this module to the DM Board ICS is very simple. There are only three steps to be made (see the image):
- Connect the microphone (provided with the module) to the EasyVR 3.
- Connect a loudspeaker (not included in the module) using the provided cable.
- Connect the module to the DM Board ICS using 4 wires: 2 for the power and 2 for the serial interface.
The EasyVR 3 module is pre-configured to work using 5V. As the DM Board ICS works at 3.3V, a resistor (that works as a jumper) have to be moved to make the module work at 3.3V as well:
A simple relay, connected to an output of the DM Board ICS, allows driving a 220Vac lamp.
Software
The first step is to program the DM Board ICS with the application software (Controllo Vocale) that can be downloaded from the DM Store. It allows to control the EasyVR 3 module.
Once the software is loaded into the DM Board ICS it is necessary to program the EasyVR 3 module with the required vocal commands.
The EasyVR 3 programming software can be downloaded here.
It is possible to program the speech recognition module by means of the USB port of the DM Board ICS by putting the board in USB-RS232 bridge mode (so that all the signals coming from the USB port are directly routed to the EasyVR 3 module).
The bridge mode can be enabled by pressing the SW1 button of the DM Board ICS after powering the board (just after the beep signal and within 3 seconds). The button must be kept pressed until the DM Board ICS emits a second beep signal (that confirms the bridge mode activation).
The first step, after launching the EasyVR 3 programming software, is to connect the software to the module by pressing the connection button:
On the left side of the programming software there are several command groups. The ones required are:
- Trigger:
Contains the words that wake up the VR module (In our case “Ciao DM Board”)
- Group 1:
Contains the command words we want to enable (In this example “Accendi” e “Spegni”)
- Sound Table:
Contains the phrases that the module has to play in response to the trigger and the commands (“Ciao, pronuncia il commando desiderato”, “Accensione in corso” and “Spegnimento in corso” in this application).
The module EasyVR 3 has two recognition modes:
- Speaker voice dependent:
The module only recognize the voice of a specific person. This mode requires to pre-record into the module the commands using a simple procedure.
- Speaker voice independent:
In this mode the module recognize the commands regardless of the speaker. However to enable this mode the QuickT2SI software is needed and this software is not free to use (it requires a license). We used of course the first approach.
Several .wav audio files (16bits 22050 Hz), one for each phrase that we want to be played by the VR module and one for each commands, are required. The open source software Audacity (http://audacity.sf.net) can be used to generate those files.
For more details on the EasyVR 3 module programming please refer to the manual.
When the module recognizes a command, it sends a code that correspond to the position of the audio file in the group. In this example, we loaded in the 1st position of the “Group 1” group the “Accensione” command audio file and in the 2nd position the “Spegnimento” command audio file.
The very same mechanism works also for the phrases that the module has to play in response to a command. We loaded in the 1st position of the “Sound Table” group the “Ciao, pronuncia il comando desiderato” audio file, in the 2nd position the “Accensione in corso” audio file and in the 3rd position the “Spegnimento in corso” audio file.


