- Building a 3D Digital Clock with ArduinoPosted 4 months ago
- Creating a controller for Minecraft with realistic body movements using ArduinoPosted 5 months ago
- Snowflake with ArduinoPosted 5 months ago
- Holographic Christmas TreePosted 6 months ago
- Segstick: Build Your Own Self-Balancing Vehicle in Just 2 Days with ArduinoPosted 6 months ago
- ZSWatch: An Open-Source Smartwatch Project Based on the Zephyr Operating SystemPosted 7 months ago
- What is IoT and which devices to usePosted 7 months ago
- Maker Faire Rome Unveils Thrilling “Padel Smash Future” Pavilion for Sports EnthusiastsPosted 8 months ago
- Make your curtains smartPosted 8 months ago
- Configuring an ESP8266 for Battery PowerPosted 8 months ago
Raspberry Pi 2 or, better, “Four”!
Tens of thousands of units sold in a few hours, a respectable performance, costs unchanged, here is where Raspberry Pi has decided to be in our future.
Here it is. On the desk, switched on, working, calmly, and cold it is processing our applications written for the previous Raspberry Pi model… with eye-rolling performances. We are talking about Raspberry Pi 2. Same aspect of version B + but a heart with four CPUs and one GB of memory. Those who live in the computing world were waiting for it so many years, despite the claims by the foundation, which indicated a certain “stability” of production on well-established models. Obviously, this position appeared as a sign of continuity for a product intended for the “education” market by vocation. On the contrary, some news heard here and there left us quite perplexed, and invited us to keep antennas high. For those of my age, the memory of the statements from Mr. Moore, cofounder of Intel, which in 1965 had found that from 1959 to then, every 18 months the number of transistors in a microcontroller doubled and consequently the computational performances while the processing costs were reduced in inverse proportion. As can be seen in figure this trend has been always respected until now, with little variance, so Moore’s observation has been promoted to the rank of law, known as the “first law of Moore.”

So, logically, also Raspberry Pi would have to follow it. A conviction also strengthened by the continuous appearance of Raspberry Pi clones with more powerful CPUs and with operating systems and applications poorly compatible with each other. And some suspects have been generated by Raspbian distributions by the Raspberry Pi foundation, released more frequently, with changes to the “root” partition found … suspicious, as the appearance of the .dtb hardware configuration file: we’ll talk more about it later. Finally, the historical moment we are living is classified as a deep crisis. But as always happens, crisis periods are those when revolutionary ideas and solutions mature, marking the way for the next growth and prosperity period. Clearly, times of crisis are also accompanied by disparities, from technologies that are losing their importance and economic viability to others who appear on the scene so disruptive. Some are ephemeral, others are destined to last for a long time and support the rebirth. Probably one of those to last is the Raspberry Pi foundation that, at least in our opinion, is managing in the best way the innovative thrust, while maintaining full compatibility with previous versions, behavior that in the past was the main reason for their survival till today.
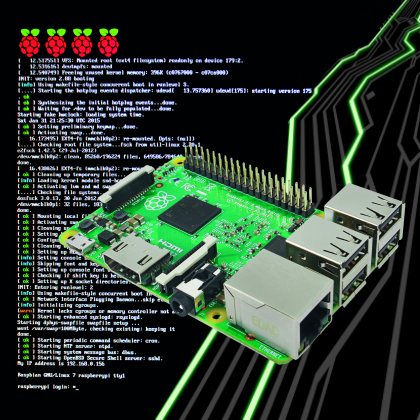
The way we test it was to take out the SD Card with our applications in development, to be honest too slow with the Raspberry Pi “1 gen” and insert it in the new … monster. It all run without hesitation with performances definitely not comparable.
First things first. Let’s see what has changed in the “body and under the hood” of the new Raspberry Pi 2. First, what didn’t change? The dimensions, mounting holes, the connectors and SD Card slot positions. So you can reuse boxes and housings. Clearly what has changed is the layout of the components on the PCB, given the increased size and number of the main chips. Oh, and the price has not changed since the previous version. Also for the “law” of Moore.
Let’ see, instead, what are the technical specifications: where the changes are!
Technical Features
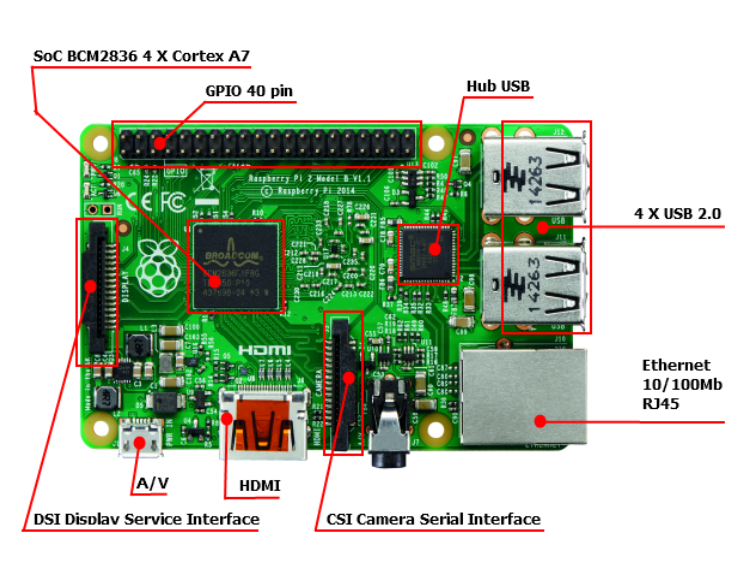
To recognize if what you have in hand is a Raspberry Pi 2 or an “old” Raspberry Pi B + you can analyze the following elements, which are visible in Fig. 2 and 3 along with indications of main components positioning. First, “Raspberry Pi 2 – Model B” is written on top of the printed circuit. Then the processor with the Broadcom logo, always on top of the printed circuit and the memory chip that is located in the lower part of the printed circuit board.

- Broadcom BCM2836 CPU ARM Cortex-A7 900MHz quad-core
- VideoCore IV GPU
- RAM: 1GB LPDDR2 SDRAM
Other features are the same as Raspberry Pi B+
- 4 USB standard ports on a dedicated bus
- Ethernet 10/100 Mb
- video HDMI and A/V output

- GPIO 40 pin with 26 pin for I/O, bus UART, I2C, SPI
- CSI (Camera serial Interface) connector
- DSI (Display Serial Interface) connector
- a micro USB for the power supply, at least by 2A since the board-only power consumption is close to 700 mA/5V; if you use a 1A power supply, a single USB device connected will overtake the capacity, causing instability.
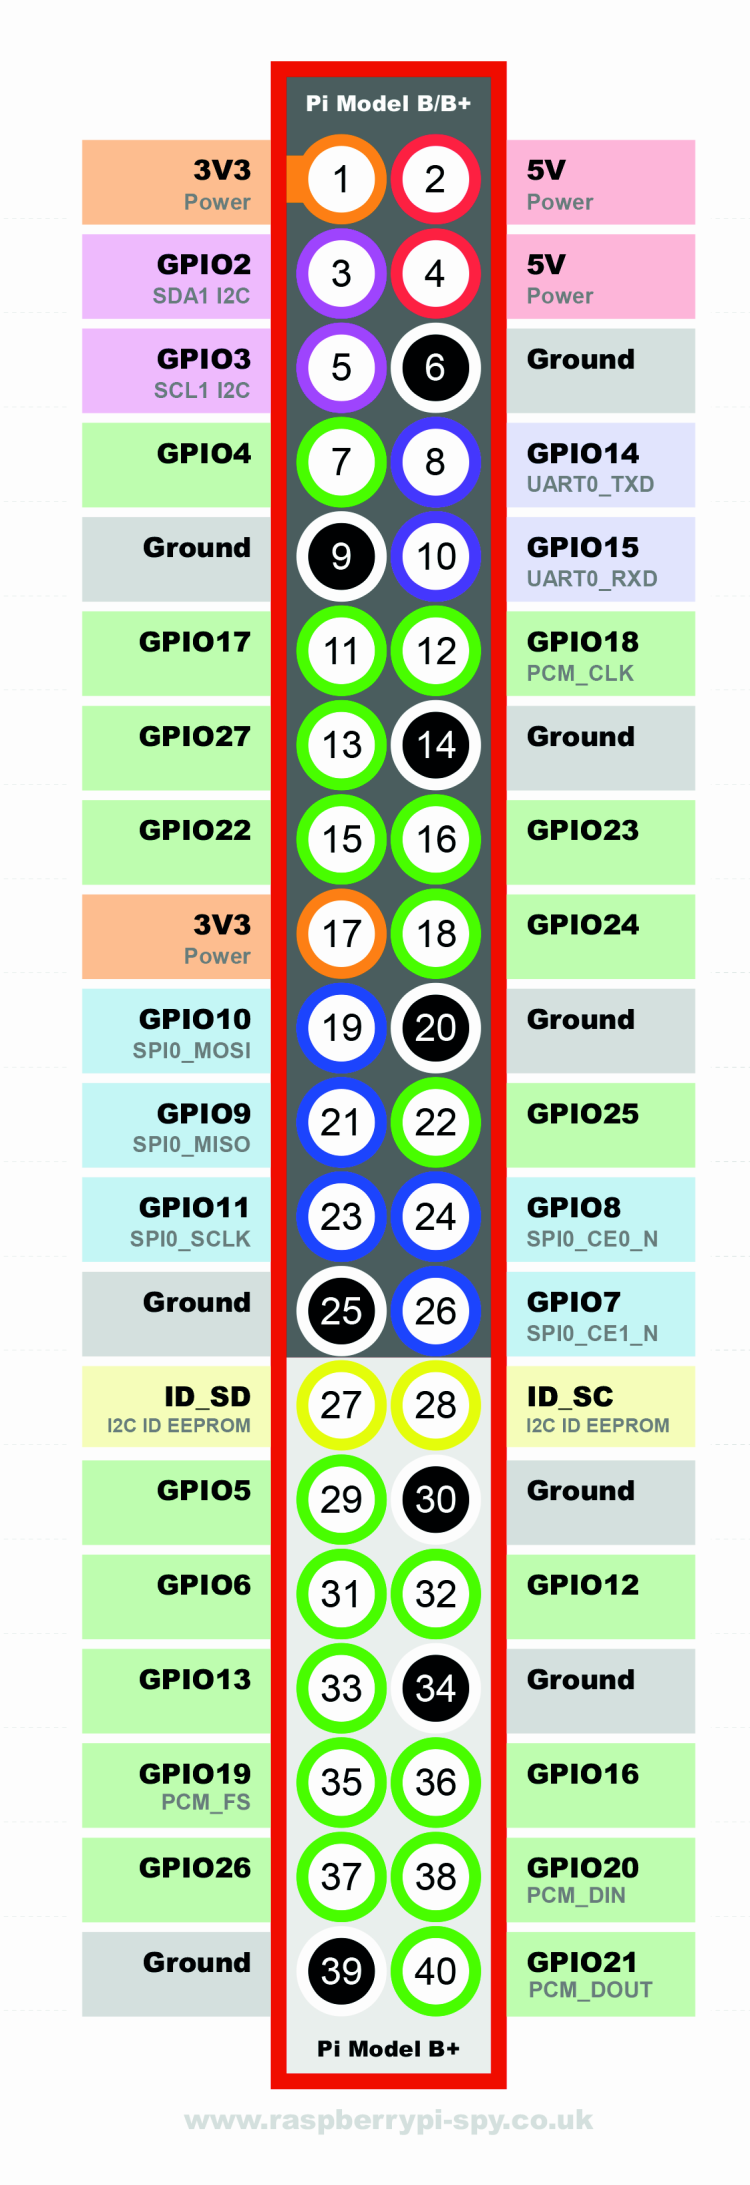
On figutre you can see the Raspberry Pi 2 GPIO pinout, unchanged respect to Raspberry Pi B+
On next figure it is visibile the 4 core CPU evidence, shown through command:
cat /proc/cpuinfo

while in this figure you can check the used and total memory

Big focus on compatibility
This feature list could suggest a simple upgrade of the world famous microcomputer, to adapt it to the possibilities offered by new technologies. Instead, in our opinion, there’s much more. In particular, the foundation choice to safeguard the investments dedicated to developing software, operating systems and user applications, adapted and made particularly efficient to run on Raspberry Pi “previous series”, with Broadcom BCM2835 processor. We are talking of thousands of hours invested, with associated costs spent “porting” the GNU / Linux Debian on ARMv6 hardware, including hardware support for floating point operations and to make the distribution itself more stable and performing. Just as much work and financial commitment has been spent optimizing for Raspberry Pi a large amount of libraries and open source applications such as WebKit, LibreOffice, Scratch, Pixman, XBMC / Kodi, libav and PyPy. Finally, the effort made in developing and optimizing tools that could make life easier for novice users (and not) as NOOBS tool that lets you manage different GNU / Linux on the same microcomputer, switching easily from one to another, or raspi-config configurator or rpi-update, the root partition update package. In addition, many independent developers have built applications, tutorials, books and documents based on Raspberry Pi. Switching to a new hardware often means invalidating all these investments, software and expertise to “start over” from scratch on new platforms with characteristics often not compatible with the previous ones.
Even very large organizations in hardware and software business, in the past as today, haven’t been immune to this issue. Developing the new Raspberry Pi 2, this has been safeguarded. Broadcom made available the new BCM2836 SoC where the “old” CPU ARMv6 was “cut out” and replaced with the new Cortex A7 quad-core.
The 1 Gb memory bank has been placed in the back of the PCB, advantaging the cooling capacity of the main processor. The VideoCore IV processor is the same as the BCM2835. The Raspbian kernel porting has been necessary to adhere to the hardware specifications of the new Soc. This step has proved successful because of the GNU / Linux operating system architecture, designed on purpose for this type of operation. GNU / Linux is an operating system belonging to the family of “monolithic kernel systems “, with a clear separation between “kernel space” and “user space”. The aim is to simplify the life of the system user, interfacing and “normalizing” the communication between applications and physical hardware devices on the computer. In extreme synthesis, the kernel (core) of the operating system, among other things, is responsible for interfacing the hardware (CPU, memory, bus, and physical devices) and provide a first level of standardized driver. The next layer, deals with further simplify the modalities of communication with peripherals, normalizing the whole set and making it “accessible” to the end user through the “virtual” file system that is the only “window” available to communicate with the physical system. In fact, the virtual file system is the line between what we have called “kernel space” and the “user space” where we write and / or we develop our applications. The architecture of GNU / Linux has already been described several times on magazines and in the book “Raspberry Pi – My first Linux embedded” (which, by the way, remains valid also for Raspberry Pi 2). The components “outside of the kernel” have not been optimized yet for the new CPU, in order to maintain compatibility with the previous board. This will happen time by time, according to the foundation, carefully selecting which library to upgrade to get the best combination of functionality, stability and performance of both worlds. Already now, among other innovations, it worth noting the availability of new operating system distributions aimed at the new version, including Snappy Ubuntu Core for Developers, already available for download in alpha version and … listen, listen: Windows 10 for Raspberry Pi, that shall be distributed free to developers.


Both these distributions are oriented to development of IoT (Internet of Thing) applications, a universe in turmoil that envisions a future a world increasingly interconnected but the contours of which are still being defined, at least that’s the my personal opinion. What is important is the presence of these two distributions on the official list, attracting attention and the consequent support, especially a financial one, that the two competitors on the market Microsoft for Windows 10 and Canonical for Ubuntu Snappy are reserving to Raspberry Pi foundation, although not exclusively. The major point is the acknowledgment by the big software houses that the information technology is moving towards “non-traditional” applications such as automotive, industrial automation, and home environment, mobile, that are growing in number and pervasiveness.
Turn Raspberry Pi 2 ON
To give life to our new Raspberry Pi we have several options, the first is to download the new Raspbian or NOOBS tool from the official Raspberry Pi site. Put the image file on a micro SD Card (attention, the SD Card in standard format is no longer needed, although now almost all the SD Card in the market are made up of a micro SD card and an adapter), insert it into the slot on the microcomputer and connect the power supply via the micro USB connector. For those approaching for the first time to Raspberry Pi, this is definitely the preferred method. Also, you can apply almost all the instructions in the book mentioned above.
Anyone who is a user of earlier Raspberry Pi versions can verify that the distributions released before 01.31.2015 cannot work, of course, on the new microcontroller. In this situation, one possibility is to do a backup of your files, install a “fresh” distribution and restore our files. In this way we will have to reinstall all the packages but also reconfigure them according to our needs. A considerable amount of work that conceals pitfalls and at least force us to re-test all the features. We preferred the third way, or perhaps the best way to be chosen if you use Debian GNU / Linux. Again, we wanted to have the new jewel compatibility tested in the rudest way possible. Some of the SD Card we use daily to work date back to the first Raspbian distributions appeared in 2012. Of course, they have always been updated with the commands we recommend in each article and in some cases they have been cloned by transferring the image from the original to a newest SD Card. Besides, we recommend a regular “maintenance” of the SD Card as their use on microcomputers shorten their life. The SD Cards have a maximum number of “writing on memory” operations allowed, a very big number indeed, which guarantees eternal life if being used in cameras, smartphones, tablets and similar. In microcomputer applications with high intensity of writing, in particular with the use of the database, the records are concentrated mainly on the same “cell area” of the SD Card, and sooner or later the maximum number of operations is achieved resulting in crashes and data loss. So if you develop applications as a “professional” with Raspberry Pi, which becomes absolutely possible with the new version, it is essential to take into account and carefully plan backups and data protection strategy. Having said so, we have taken two of our historical distributions and, using a previous version of Raspberry Pi, we connected to the same network and we performed a series of commands that allow you to fully update our distribution to run on the new Raspberry Pi, including the kernel. If you’re in our situation, we recommend this method. As a first step we recommend that you create a backup image of the SD Card, using WinDiskImager. Then, update the distribution in the usual way, the user logged in as “root” with the command:
apt-get update
apt-get upgrade
apt-get dist-upgrade
If the distribution is not updated for some time, the process will be quite long. From a certain version on, Raspbian adopts a new release of the graphical LXDE (Lightweight X11 Desktop Environment), which settle the taskbar at the top of the screen, a blank desktop to be populated with our preferred applications and the “Start” menu in top left. We can update the distribution to the new GUI with the command:
apt-get install raspberrypi-ui-mods
After, keep the distribution clean with the commad:
apt-get autoremove
which removes unused packages and:
apt-get purge
which removes unused config files.
Then update the root partition with command:
rpi-update
if you get an error such as “command not found” you can install the upgrade tool with the command:
apt-get install rpi-update
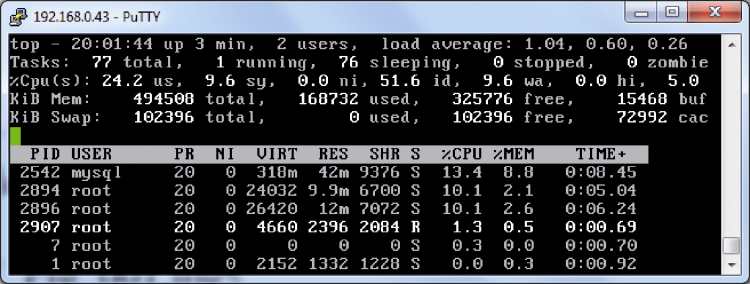
Everything done? You can turn off the “old” Raspberry Pi, transfer the SD Card on the new Raspberry Pi 2 and power up. Run your applications. Measure performances both visually and with the commands:
top
to monitor CPU load (exit pressing “q”) and:
free –m
for the memory usage.
Obviously the same SD Card is able to run on all Raspberry Pi versions . This is what we truly call “backward compatibility”. To better understand how Raspian has been configured to obtain this result we analyze the root partition, whose content is visible in figure. If we inspected the old root partition we find the presence of a number of well-known additional files: the image file of the Linux kernel, the file start.elf, config.txt and cmdline.txt. Basically we find the image of a second kernel named “kernel7.img”, a clear reference to the new CPU Cortex A7 and some files ending with .dtb (device tree blob).

The .dtb configuration files are increasingly adopted to communicate the hardware tree by the bootloader to the kernel, during the boot process. In fact the file .dtb is a database compiled in binary format that contains the “hardware structure description” directly readable by both the bootloader and the kernel. With this configuration, depending on the Raspberry Pi version where you install the SD Card, during the boot process the correct stage 1 bootloader is loaded, followed by the correct kernel with the respective configuration files. The old configuration file config.txt and cmdline.txt are still shared by both systems while maintaining once again the application compatibility between the two generations. In our case, for example, in one of our applications an external USB hard drive has been used for the root partition. After the update process that we have shown, the solution with external hard drive, which requires editing files cmdline.txt and / etc / fstab (see book) has worked well on both configurations, as shown infigure in the Raspberry Pi 2 boot messages section.

The configuration tool “raspi-config” has been enhanced with new features. Besides the usual functions to expand the root partition, launch the GUI at boot, run the overclocking of the CPU, enable the PI Camera and other, when choosing the “Advanced Options” menu you can access a second level that allows you to various configurations that previously had to be made by the command line.

In figuew in addition to the traditional functionalities as “overscan” that allows you to manage the “frame” around the screen, SSH which allows you to enable and disable the daemon for remote access, memory split to assign more or less memory to the GPU video and hostname to change name to the microcomputer, there are new functions to enable and disable the I2C bus and SPI, or to assign the serial bus to the system console and configure the audio output to HDMI connector or to the analog 3 , 5mm jack.

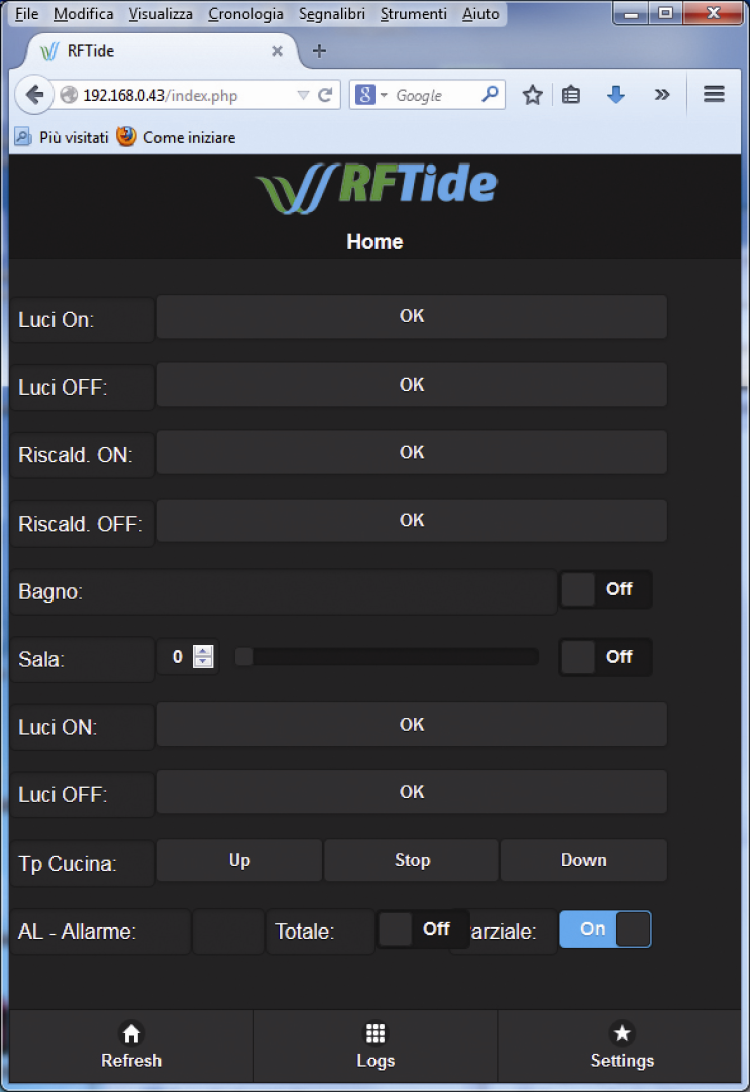
On the performance side there is not much to say, nothing comparable over previous versions, the benchmarks available on the web give a performance boost of about six times the current ones. Obviously it depends on applications and the way which they use resources. As for one of our projects, the main screen which is visible in the previous figure , which will be presented soon in the journal. The these figure, which give the consumption of CPU respectively on Raspberry Pi B+ and 2 speak for themselves.
In fact, at present, Raspberry Pi 2 can be compared to a low-end personal computer, where you can perform common office applications or teaching app in a more than acceptable. Examples are LibreOffice and Geogebra, the latter certainly not very efficient in the use of resources.


Finally, far from being confined to hobby applications or low performance applications, Raspberry Pi 2 arrives in the professional all-purpose world, as the most suitable solution today in most educational applications; it also solves organizational issues difficult to resolve so far. Let us think for example to a school laboratory, with a number of personal computers installed, shared among a number of classes, perhaps with different application requirements according to the level and subject of the course followed. Today this requires system administration, users and permissions, a quite complex architecture, if we want that everyone has the resources necessary to perform the assigned tasks without interfering with other students work. With the existing equipment based on Microsoft some types of exercises are quite complex to accomplish. We think to the necessary work for the design and implementation of communication networks, in particular TCP / IP, which is necessary to configure systems with multiple IP addresses assigned to the same network interface, configure routers, firewalls, access points, VPN and bridge and build applications based on TCP / IP. With a Raspberry Pi bundle and an investment of one or two traditional personal computers, you can set up an entire networked computer laboratory and in the most general sense, without any additional costs for purchasing software or development environment applications. In fact, the main purpose that Raspberry Pi foundation seeks is just providing educational open source tools, economic and competitive with emerging technology. Also from an organizational perspective, think of each student who enters the laboratory with its SD Card with the latest situation from the last time you’re in the lab, without interference with other students. The same SD card can then be used on Raspberry at home to continue the job started at school and deepen the topics covered. Various SD Card allows you to configure the lab with different architectures as needed, subnets, servers, clients, etc. Not to mention, also, that a 2012 law requires the adoption of open source software if these are available.

Finally, normally we keep on your desk the best solutions on the market to be used in our projects. This time the personal computers we use normally is looking at us so worried, very probably saw something that can … dismiss it. Or maybe we’ll wait until Raspberry Pi 3, then there will be no more doubts. Yeah, the “law” of Moore. By the way, as you noted in figure, we wrote this article with LibreOffice on the new Raspberry Pi 2, using the monitor, keyboard and mouse of the old PC. Now, I’ll power the old one on again, otherwise it could feel offended!
From the store
RASPKITV4
Rasberry Box

Related Posts


-
 Arduino ISP (In System Programming) and stand-alone circuits
We use an Arduino to program other ATmega without...
- Posted 12 years ago
-

-

-
 GSM GPS shield for Arduino
Shield for Arduino designed and based on the module...
- Posted 12 years ago
-
 Small Breakout for SIM900 GSM Module
Some post ago we presented a PCB to mount...
- Posted 13 years ago
-
 Join Maker Faire Rome 2024: Innovation Unleashed at Gazometro Ostiense | Calls Now Open!
All Calls Now Open for Maker Faire Rome 2024...
- Posted 2 weeks ago
-
 Building a 3D Digital Clock with Arduino
Project to create a digital clock consisting...
- Posted 4 months ago
-
 Acoustic amplifier – in DIY Kit
This kit creates a microphone amplifier with an output...
- Posted 5 months ago
-
 Creating a controller for Minecraft with realistic body movements using Arduino
Project of a controller that maps body movements...
- Posted 5 months ago
-
