RandA has been updated to be compatible with the 3rd version of Raspberry Pi: let’s going deep and explain all the new features.
As you probably know, if you are familiar with the evolution of the raspberry board, in February of this year the 3rd new version of Raspberry Pi has been launched on the market. It is a hardware update of the reference model Raspberry Pi 2 that brought major improvements and a development of hardware performances, in regards to:
- CPU, which is now a quad-core 64 bit ARMv8 clocked at 1.2 GHz;
- A Wi-Fi transceiver (801.11n) has been added, to support the already present wired Ethernet LAN;
- A Bluetooth 4.1 transceiver has been added.
Luckily, the mechanic layout of the board and the 40-pin expansion bus have not been modified, so nothing changes in terms of connections for the interface with RandA, our board which complements the Raspberry Pi’s potentials with the boundless world of Arduino.
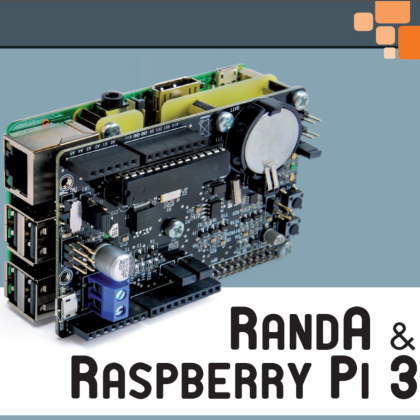
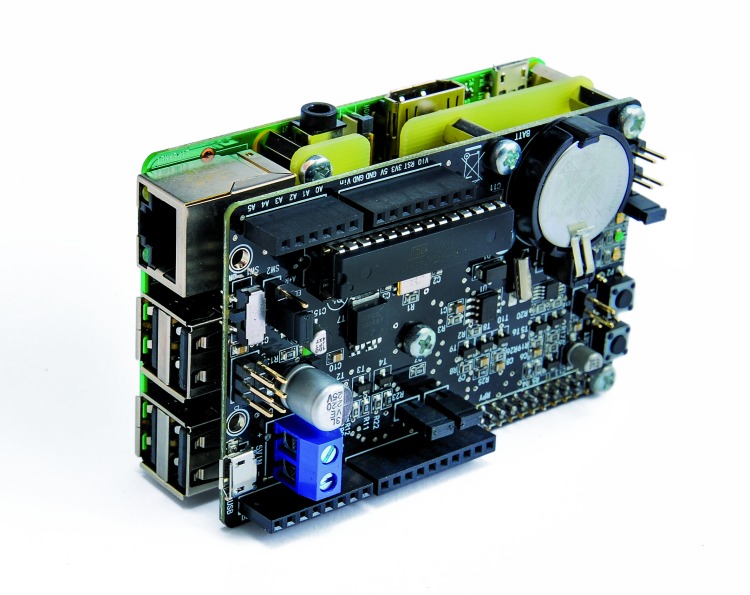
For those of you who still don’t know RandA (contraction of Raspberry and Arduino), let’s say it overlays to the Raspberry Pi board keeping the same size factor and encumbrance of Raspberry Pi (from model Raspberry Pi B+ onward). It is connected to Raspberry Pi through a 40-pin connector although just a few are used, to wit:
– GPIO2 and GPIO3 (3-pin and 5-pin) for connecting to the clock through the I²C-Bus;
– GPIO14 and GPIO15 (8-pin and 10-pin) for interfacing with Arduino through the serial TTL;
– GPIO22 (15-pin) for an additional connection to Arduino (it can be omitted);
– GPIO23 (16-pin) to control Arduino’s reset;
– GPIO24 (18-pin) to detect the status of the off button;
– Power pin, i.e. 5V, 3V, GND.
RandA contains the hardware of an Arduino Uno that is put into communication with Raspberry Pi (inserted through the above-mentioned 40 pin connector) via its serial port and has a series of standard connectors and connectors with Arduino layout to host possible shields.
It also contains an RTC module (clock) with backup battery and programmable alarm clock (switching on), a button-operated on/off the circuit (shutdown) and circuitry to control power for Arduino and Raspberry Pi.

RandA is an interesting board in and of itself thanks to its feature that allows interfacing the versatility and diffusion of Arduino with the potentials of the Linux operating system running on Raspberry Pi, but now, with the remarkable calculation power and the general performance level achieved by Raspberry Pi 3, it becomes even more interesting and stimulating for application developers whether at amateur, semi-professional and professional level.
In fact, let’s not forget that Raspberry Pi is essentially a computer with Linux operating system and complete with all the standard interfaces that allow it to go on the Internet. Besides, the calculating heart is, in the latest version, a 1.2 GHz quad-core CPU with 1 GB RAM.
Its mass memory is based on microSD cards, which as of today can have considerable speed and storage space, especially if we take into account their affordable prices.
RandA adds to this the possibility to implement, for instance, a practical and truly fully configurable interface for sensors and actuators. If you want to know more about RandA, we remind you that the board has been introduced in this post.
RandA, Raspberry Pi 3 and Raspbian Jessie
However, RandA is more than just a hardware expansion. In order to explicate its potentials, RandA needs an interface software with the Linux operating system running on Raspberry Pi. Special attention must be dedicated to the serial port management; unfortunately, Raspberry Pi 3 uses the standard UART0 serial port (so-called from the operating system ttyAMA0” or “serial0”) for connection via the Bluetooth interface equipping version 3. Therefore it is no longer available on GPIO14/15 (8/10-pins) as it was the case for the first and second version of Raspberry Pi. In fact, the secondary UART1 serial is configured on those pins. The problem is that this serial port (called “ttyS0” or “serial1” by the operating system) is not based on a preset UART hardware but on a simulated serial. In particular, its clock is connected to the frequency of the clock of the system which, as it is the case in a modern system like the Raspberry Pi, varies in function of the load in order to save energy.
We’d better not use this reduced and less-efficient software version of the serial port for an important connection like the Arduino connection. Therefore, our only option is to recover the UART0 on GPIO 14/15 pins. Luckily, it’s just a matter of software configuration, therefore we don’t have to modify the RandA layout.
However, this way we deactivate the Bluetooth peripheral. On the other hand, we must remember that Raspberry Pi 3 is equipped with Wi-Fi by default, therefore wireless connections are guaranteed by it. If you really feel the need for a Bluetooth connection, you can always buy a USB/Bluetooth dongle at a very low price.
In any case, the Bluetooth is now connected with the UART1 (ttyS0 or serial1), so it’s probably better to deactivate it, especially if you are going to install a USB/Bluetooth dongle.
Latest versions of Linux kernel and Raspberry Pi firmware are based on “device trees (dt)” management to configure hardware on Linux. In particular, we can launch preset routines in “/boot/config.txt” in order to modify configuration and management of the onboard hardware components. To be more specific, reconfiguration of UART0-UART1 can be obtained by giving the following command (still in “/boot/config.txt”):
dtoverlay=pi3-miniuart-bt
This way we bring UART0 back on GPIO14/15 while UART1 is connected to bt (Bluetooth).
Complete deactivation of Bluetooth can be obtained with the command:
dtoverlay=pi3-disable-bt
Actually, activation of I²C-Bus referral which is necessary to connect to the clock can be made in “/boot/config.txt” with the command:
dtparam=i2c_arm=on
All the preset routines are contained in directory “/boot/overlays”.
Meanwhile, the website dedicated to the customization of the Linux-Debian operating system on the Raspberry Pi hardware made a new major version of the operating system available, called “Jessie”. In this version of Linux-Debian, the official launch system becomes “systemd”, instead of the classic “sysvinit”. The activation/deactivation of services is now made via the “systemctl” command, through an informative structure allocated in the “/lib/systemd” directory. This is why we had to modify the activation of the “power off” executed at shutdown. While we first had the script “ups-monitor”, now the “PowerOff” program (which deactivates power through the clock circuit) is launched by the “RandApoweroff.service” script, conveniently inserted in the informative structure of “systemd”.
We didn’t have to furtherly modify the management software of RandA, however, with the Raspberry Pi update we took the chance to make a general revision of the firmware in order to check and enhance its functioning.
In particular, the software for remotely programming Arduino can now be downloaded only in its full version, in fact, the Arduino IDE V1.0.5 editing kit is no longer provided. It’s called IDE4RandA and it also includes a separated command “SearchRanda.jar” which simply lists the addresses of all the RandAs found in a local network.
IDE4RandA has also be verified on Windows 10. It also includes an important information page about how to activate Windows firewall in case it blocks communication. Informations are available in Italian and English.

Repository folders of compiled sketch storage
Both remote and local IDE, for the Linux environment, save the compiled sketches (executables) in the folder “/home/ArduinoUpload”. Another folder called “/home/ArduinoHex” is dedicated to executable sketches moved by the user in such position. From these two folders, we can select the sketches to be loaded on Arduino through the command (“ArduLoad”) or the web interface.
WEB Server
It is still based on the Tomcat software and it’s been revised for what concerns its interface pages with the serial port. Since Java does not include libraries to manage the serial line “RXTXcom.jar”, we can see a misalignment between Java, the library copied by the installation process or another version installed by other packages like Arduino IDE for Linux.
This is why they decided to turn the Java “servlet” used by these pages in a CGI script (or better, two scripts). Two things have been achieved this way, we don’t have any problems managing the serial and they have provided an additional example of how we can manage a sophisticated HTML page with AJAX, by interacting with a simple script bash that takes care of interface and Arduino.
In fact, while Tomcat is essentially an application server preconfigured for Java “servlet”, it’s been configured to also execute script bashes (or Python) with the advantage of an increased readability and debugging ABILITY.
Example sketches
They have reorganized and divided into the two following types.
- Examples related to the use of library “RAComm” for Arduino which allows the sketches to launch commands on Raspberry Pi. These have not been modified. They have been inserted as library examples, both in the remote IDE and in the local one; among them, we can find those that allow Arduino to send an email or make it read a webpage.
- General examples. These have been placed in the other standard examples in the remote IDE, while on the Raspberry Pi they have been placed in the “sketchbook” folder. They are:
– SerialIO = it allows to completely manage Arduino’s pins by commands sent on the serial line and it is used by the web interface via the page “RaspDuinoIO.html” or the command (script) ArduIO, but it can actually be used by any console or serial connection;
– SerialTest = it allows to run a simple check of the serial connection through blinking of the standard LED with adjustable time of the value sent;
– SerialStop = it does not execute a replay on the serial until a certain condition is met on a digital or analogic pin; it is used by the command “ArduInt”;
– SerialServos = it manages the servos through serial commands.
All the examples implement the itsMe() functions which return the sketch filename after the “?” The command is sent. This function is useful in order to determine on the fly which sketch is active on Arduino.
void itsMe()
{
char name[]=__FILE__;
char* c=strchr(name,’.’);
if (c != NULL) *c=’\0’;
Serial.println(name);
}
Documentation
There is a short English manual in the installation software, now updated to the new version. In around 20 pages the manual provides an overall description of connections, settings, hardware and software.
However, a bona fide Italian manual of around 100 pages should soon be released, where, besides a more in-depth illustration of hardware and software, a step-by-step approach to use RandA is provided in its multiple operational points of view with several examples.

Downloading the software (version 1.5)
The most recent software version 4 RandA is the 1.5, which is compatible with Raspberry Pi 3 and is based on the Linux-Raspbian-jessie version of the operating system. You can download the software here.
On this website you can find:
- a “.txt” file with release notes (both in Italian and English);
- the English booklet (pdf);
- the PC software contained in the IDE4RandA.zip file, which must be copied and unzipped on a Windows PC; it contains the Arduino IDE with remote control of RandA over LAN;
- the RandA-V1.5.zip file, which contains the software installation archive and the script that manages it and installs it on a Raspberry Pi board equipped with an operating system Raspbian-jessie;
- the image file of the SD memory card, complete with operating system and RandA software, to be inserted in Raspberry Pi in order to make it immediately operational; the image “RandA-V1.5-Debian.zip” (after unzipping) must be copied on a blank SD memory card with at least 8 GB memory using the famous PC utility Win32DiskImager (which can be downloaded here.
Beside the supplied software contained in the standard Raspbian installation, the system also contains the local Arduino IDE, the IDE for C++ Codeblocks and the very useful “xrdp” server which manages the “Remote Desktop” Windows protocol, in order to allow the full-screen connection between Raspberry Pi and its whole graphic interface through a local network. Very well, we think this wraps up everything you need to know in order to develop your projects using Raspberry Pi 3.
From the store

[…] Atmega328-based board for Raspberry Pi to deliver the advantages of both, Raspberry Pi and Arduino. Earlier this month, an updated version of RandA has been released to be compatible with Raspberry Pi […]
[…] placa basada en Atmega328 para Raspberry Pi para ofrecer los beneficios de Raspberry Pi y Arduino. A principios de este mes, se ha lanzado una versión actualizada de RandA para que sea compatible con Raspberry Pi […]