Take a picture, select a photo-effect and share it! Raspberry Pi 2 and RandA unite to create an interactive application we presented at San Mateo Maker Faire.
At the past Maker Faire, held last May in San Mateo (California – USA), we premiered a project born to show visitors the potential of RandA connected to Raspberry Pi, in a very charming and attractive way. More than five hundred photos taken by visitors through RandA PhotoSharing (this is the name of the project) most of those automatically shared on Open Electronics Twitter and Facebook accounts. This piece will explain systematically how to assemble the system and set it, focusing on Raspberry Pi configuration first and on installing and using the RandA PhotoSharing software later on.
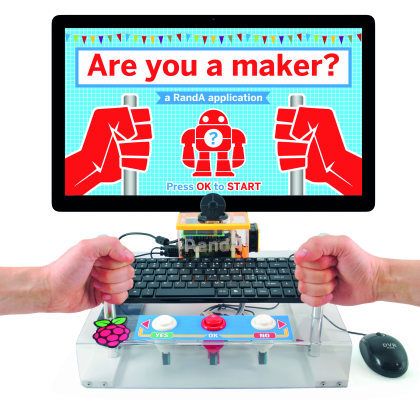
The goal we want to achieve will be a multi-purpose “empathy meter” we can use to measure different human feelings: love, friendship, smartness…
The user, through different software screens, can take a selfie (choosing a picture effect too) and measure his electrical conductivity (grabbing two conductors) which will be used to determine a score for the “feelings or theme” chosen. The result will be superimposed on the picture taken and then he can choose whether to share the photos on social networks, receive them via e-mail or simply watching them on the monitor.

This application can be useful for marketing campaigns, because user’s email addresses communicated to receive the images are stored in a database and could be exported to an excel file. Again, the social sharing pushed by those who prefer that communication channel helps increasing the visibility of both the user and the application host: for each photo you can specify a hashtag and a customizable logo.
The user will interact with our application through monitor, keyboard and three buttons that will be used to move to different screens: begin, select and apply a photo effect, snap photos and measure, sharing on social networks, send the captured image to your e-mail and close session.
Components and assembly
For this project, we will need the following components (available on www.futurashop.it):
- Raspberry Pi 2, to run the application, the GUI, edit photos and share/send them;
- Raspberry Pi Camera, to take selfies;
- SD-Card (8 GB or more) storing the Raspbian operating system and photos
- RandA;
- A dedicated shield, to connect buttons and conductors poles to RandA;
- HDMI Monitor;
- USB mouse and keyboard;
- Three buttons, for user interaction (Prev/Yes, OK, Next/No);
- Two conductive poles that “challenging” participants will hand duing measurement;
- An Internet connection with Ethernet cable or WiFi key.
We will also need a Gmail account and our social network accounts like Facebook and Twitter (optional) to share pictures from our application.
To share photos on social networks and save them in Google Drive we will use the site/service www.ifttt.com. IFTTT is a free and very useful service: it allows us to set automatic operations to be done every time we receive an e-mail with certain requirements. Those instruction sets are called “recipes”.
For example, after setting a “recipe” to extract and share on FB an email-attached photo, just simply send the email to trigger@recipe.ifttt.com assuring that the subject contains “#photofb”: IFTTT will automatically fetch the attachment from the e-mail and upload the photos to your Facebook profile (previously associated).
The Arduino shield
To interconnect Raspberry Pi to the three buttons through RandA, we made a simple shield that also interfaces the “Emotional sensors”. Referring to the specific circuit diagram, shown on these pages, we see that the three buttons are connected to IOD8, IOD9, IOD10 pins, connected respectively to D8, D9, D10 RandA lines. The two cylindrical electrodes that sense the “emotional level” are connected to SENS contacts, without a precise order: on the shield, one is connected to RandA 5V output while the other to a buffer made by the operational amplifier U1, the output of which terminates on RandA A0 line.
Note: user’s body becomes part of a voltage divider circuit which drives the buffer: via the R5 resistor, the 5V line powers one user’s hand through the special cylindrical electrode, then the weak and harmless current flowing through the body ends on the second cylindrical electrode and then to R2 trimmer, determining at the non-inverting operational amplifier input a potential voltage which is a function of both the R2 variable resistance (needed to calibrate system sensitivity) and user’s body electrical conductivity. Such conductivity varies, in the same subject, according to the sweating, to emotional status, etc.
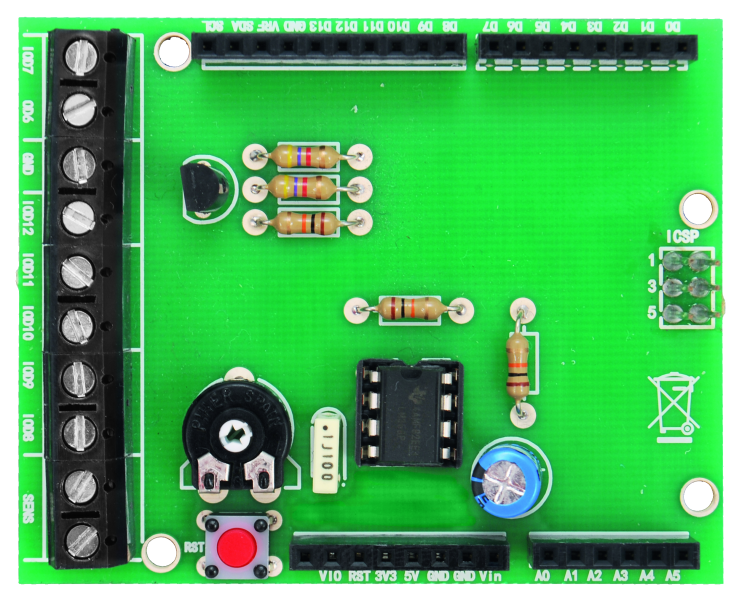
For this reason the voltage applied to the operational amplifier sent to RandA A0 line, well filtered by the low-pass cell R6 / C2 to block noise impulses and avoid peaks due to hands movements on the electrodes, reflects the connected user’s mood.
On the shield, we put also the RandA reset button and an open-collector common emitter transistor, base driven by RandA D6 line connected to OD6 connector; this NPN can be used to activate a custom LED, acoustic devices etc., but now is “spare”, therefore not used.
Configuration
We can download the Raspberry Pi OS image ready-to-use for this project from Elettronica-In website and skip directly to sketch loading procedure, or we can download from the official Raspberry Pi website the latest Raspbian iso and follow the entire setup procedure.
If we choose to go with the turn-key image, we will have to change the /etc/ssmtp/ssmtp.conf file as shown in the library configuration section for sending e-mail. We copy the Raspbian image to the SD Card using Win32DiskImager, a free software available at: sourceforge.net/projects/win32diskimager/.
Then, insert the SD card into Raspberry Pi and power RandA on. Next configuration steps can be performed either via Raspberry Pi GUI or remotely with a SSH client like PuTTY.
During the first switch on, Raspberry Pi configuration tool will start. We’ll take the chance to perform a few configurations:
- Expand Filesystem;
- Enable Boot to Desktop / Scratch: select the second entry “Desktop Log in …”:
- Internationalization Options:
- Change Locale: pressing the spacebar, uncheck en_GB.UTF-8 UTF-8 and select en_US ISO-8859-1 (setting it as Default locale for the system environment);
- Change Timezone: select Europe and then Rome (or wherever you’re living!);
- Change Keyboard Layout: choose the keyboard we are using (usually 105 keys (Intl) PC), then select Other->Italian as language, choose Italian keyboard layout;
- Enable Camera: Enable;
- Advanced Options:
- SSH: Enable;
- I²C: answer Yes to both questions.
Let’s move to <Finish> (browsing the menu by pressing TAB key) and confirm with Enter to restart the system. At this point we need an Internet connection: we can connect Raspberry with an Ethernet cable or follow the “Raspberry Pi WiFi key Installation and setup” section you’ll find in the following pages. After connecting Raspberry Pi to Internet, launch the following command to update the system and reboot it:
sudo apt-get update && sudo apt-get upgrade && sudo rpi-update && sudo reboot
The update process will take a long time and sometimes we have to confirm some packages installation by pressing S and ENTER.

Now we can download the latest RandA setup version. After downloading the package, follow the manual to install RandA (InstallationREADME.TXT). When done, we have to change the Tomcat listening port to avoid conflicts with the Apache service that we will install later. Tomcat is used to host RandA java control panel but we don’t need it now; instead, Apache will host the PhotoSharing control panel so that by entering the Raspberry Pi IP address we can access our application from anywhere.
Let’s move then in the directory where Tomcat configuration file is:
cd /home/apache-tomcat-7.0.47/conf
Open the file server.xml with the command:
nano server.xml
Edit the line “<Connector port =” 80 “…” replacing 80 with 8080. Now close and save the file with CTRL + X, Y and ENTER; then reboot Raspberry Pi:
sudo reboot
Now disable the Raspberry Pi power saving by editing this file:
sudo nano /etc/lightdm/lightdm.conf
We add the following line under the section [SetDefaults]:
xserver-command X = 0 -s dpms
Close and save file with CTRL + X, Y and ENTER: in this way Raspberry Pi will not turn off HDMI after inactivity.
Launch the following commands in sequence to install Apache, PHP and MySQL server needed to operate the RandA PhotoSharing web control panel:
sudo apt-get install apache2 apache2-doc apache2-utils
sudo apt-get install libapache2-mod-php5 php5 php-pear php5-xcache
sudo apt-get install php5-mysql
sudo apt-get install mysql-server mysql-client

During the installation of some packages you will be asked to confirm, press Y and Enter in this case. When you will be prompted for the database password insert it and write it to a safe place: we’ll need it again soon. Now install PHPMyAdmin, to manage the RandA PhotoSharing database:
sudo apt-get install phpmyadmin
When the installer will ask which Web Server to configure automatically, select “apache2” (flag it by pressing SPACE bar), then confirm by pressing TAB and ENTER. When prompted the following: “Configure the PHPMyAdmin database with dbconfig-common?”, answer “Yes”.
After installation is done, open the configuration file for apache2:
sudo nano /etc/apache2/apache2.conf
And append the following instruction to the end of file:
Include /etc/phpmyadmin/apache.conf
Close and save file (with CTRL + X, Y and ENTER); reboot apache2 for changes to take effect:
sudo /etc/init.d/apache2 restart
Run the command:
sudo visudo
and add at the end of the file the following string:
www-data ALL = (ALL) NOPASSWD: ALL
Close and save file with CTRL + X, Y and ENTER: this way we will give the PHP files all permissions needed to act on pictures (read, modify and delete).

Now install the libraries used by the Python script (the actual logic) to interact with the MySQL database and edit images. We launch the following commands in sequence:
sudo apt-get install python-dev
sudo apt-get install python-imaging-tk
sudo apt-get install python-mysqldb
sudo apt-get install imagemagick
We install the mail server and utilities that will help us to send email from Python, launching the following commands in succession:
sudo apt-get install ssmtp
sudo apt-get install mailutils
Now we modify the file ssmtp.conf with the command:
sudo nano /etc/ssmtp/ssmtp.conf
configuring it as follows:
root = postmaster
mailhub = smtp.gmail.com: 587
hostname = Raspberry Pi Pipi
AuthUser=UtenteGmail@gmail.com
AuthPass = PasswordGmail
UseSTARTTLS = YES
Remember to replace “UtenteGmail” and “PasswordGmail” with your real email account, close and save file with CTRL + X, Y and ENTER.
Edit the revaliases file:
sudo nano / etc / ssmtp / revaliases
adding the following line:
root: root @ gmail: smtp.gmail.com: 587
Close and save file with CTRL + X, Y and ENTER. We change the ssmtp.conf file permissions with the following command:
sudo chmod 774 /etc/ssmtp/ssmtp.conf
Reboot to save and enable all changes:
sudo reboot
We have completed the Raspberry Pi configuration with everything you need; now we have to download the PhotoSharing RandA package; let’s move to the right folder:
cd / var / www
and download the RandA Photosharing package running the following command:
sudo git clone https://github.com/open-electronics/randaps.git
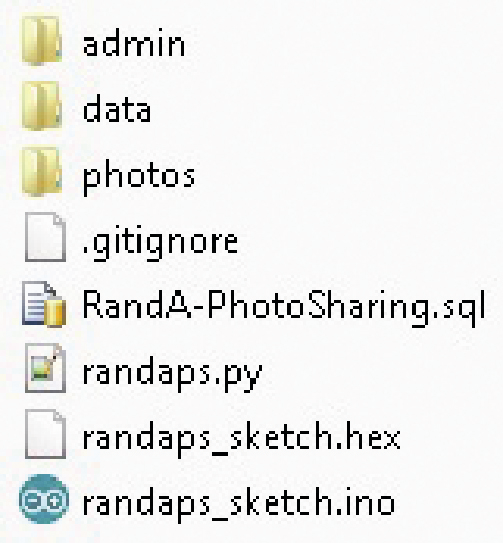
The new folder (refer in figure) will contain:
- admin /: folder containing the Web control panel files;
- data /: folder containing all the graphics (themes, overlay, logo, …);
- photos /: folder that will store all the photos taken;
- randaps.py: RandA PhotoSharing executable;
- randaps_sketch.hex: RandA compiled source code ready to be uploaded;
- randaps_sketch.ino: RandA PhotoSharing source code, in case we want to make changes;
- RandA-PhotoSharing.sql: MySQL database;
- README.pdf: Complete RandA PhotoSharing setup and user guide (this post!)
Browse to http: // IP_RASPBERRY_PI / phpmyadmin (replacing “IP_RASPBERRY_PI” with its actual IP address). Login as root (the password is the one we set during MySQL and phpMyAdmin installation).
Let’s move to Privileges tab, click on Add a new user and compile the fields as indicated below:
- User: [Use text field:] randaps;
- Host: [Local] localhost;
- Password: [Use text field:] randaps;
- Re: randaps;
- User Database: create a database with the same name and grant all privileges;
- Global privileges: select all.
Now click on Create User button: on the page left side frame you should see randaps database (if it does not, update the page); then click on the database you just created and select the tab Import. We have to import the SQL file included in the RandA PhotoSharing package; so, choose that file and click on Run.
Edit the RandA PhotoSharing executable file:
sudo nano /var/www/randaps/randaps.py
In the “CUSTOMIZABLE VARIABLES” section, insert the GMAIL account password (replacing “INSERT_YOUR_E-MAIL_PASSWORD”, but pay attention to keep the two initial and final quotes); save and close (always CTRL + X, Y and ENTER)
Now we can upload the sketch to RandA, with the following command:
ArduLoad /var/www/randaps/randaps_sketch.hex
At this point, let’s set up the social media accounts that RandA PhotoSharing will use to post the pictures taken:
- Gmail: RandA PhotoSharing will use this account to send photos both to IFTTT and user (if required);
- IFTTT: every time it receives an email (from your Gmail account set on Raspberry Pi) it will upload it to Google Drive (if set) or share it on Facebook or Twitter (if set).
We need to login to our Gmail account, visit the address.
and enable the “less secure app access”: in this way RandA PhotoSharing can send e-mails using this account.
Create an IFTTT account and record the following recipes:
- Save photos to Google Drive: https://ifttt.com/recipes/192360-send-gmail-attachments-to-google-drive;
- Upload photos to Twitter: https://ifttt.com/recipes/129743-twitter-subject-w-tw-body-tweet-attachment-photo;
- Upload photos to Facebook: https://ifttt.com/recipes/13714-upload-photo-to-facebook-from-e-mail.
Control panel
To access the control panel from any device (connected to the same RandA PhotoSharing network), just enter:
http: // IP_RASPBERRY_PI / randaps / admin
(user “admin” password “randaps”)
The page is divided into two sections: the first lists all the pictures (if we click on the date / time we can see the whole set), whether or not the user has given social sharing consent and preferred e-mail;
We can also create an Excel file with all the collected data, or delete all data (both the database and the pictures) via the two buttons at the table’s bottom.
The second section, as shown in figure, contains all the RandA PhotoSharing settings: after changing them, restart the program, or wait until the Start screen (home screen) has been refreshed.

All the settings are:
- Theme: measurement theme (how much are you a maker, love, understanding, friendship and so on.);
- Add new theme: Adds a new theme; we need to specify the theme name (i.e. “love”) and a detailed description (i.e. love meter). Then we will be noticed to put the main theme images under the proper folder.
- Standby: the first screen shows the theme main image or a whole pictures slideshow;
- Coordinate elements: X and Y pixel coordinates of overlaid elements (logo, lower third, measurement result); we can change those coordinates to move the elements over the picture, keeping in mind that the resolution is always 1280×720 (unless you don’t modify the default settings in randaps.py) and the origin (X = 0 and Y = 0) is the upper left corner;
- Save to SD card: if activated, stores pictures in the folder “photos”, otherwise deletes them;
- Save to cloud: if enabled, saves a picture copy to Google Drive;
- Send to social: if activated, asks the user the permission to share pictures on Facebook / Twitter (based on IFTTT configuration);
- Send by e-mail: if activated, asks if you want your photos by e-mail;
- Sender e-mail: Gmail account that will send pictures to you and IFTTT;
- e-mail subject: e-mail subject;
- IFTTT object: hear we can insert tags that will help IFTTT to upload photos on social networks;
- e-mail body: HTML editor that allows you to create the email body;
- text_start: text that will be shown in the Start screen;
- text_preview: text that will be shown during the photo effects selection;
- text_measurement: text that will be shown during the measurement
- text_photo: text that is displayed when the picture is taken;
- text_wait: text that invites to wait until picture is taken;
- text_social: text to invite the user to share on our social network
• text_email: text to ask the user if he wants to get the picture via email - text_yes: translation of the word “Yes”;
- test_no: translation of the word “No”;
- text_end: Photos will be shown on screen if social sharing and e-mail have not been accepted by the user; this text should invite him to press OK and finish the experience
Customization
The overlay images that could be applied to every selfie taken are stored in “data/” folder; every time we create a new “challenge theme” we must prepare the following images as well:
- [Theme] _screen.gif: GIF image (1920×1080) which will be scaled according to real screen resolution and loaded in the theme’s “Start screen” (for example love_screen.gif);
- [Theme] _overlay.png: PNG (free size) that will picture the stylized theme (eg love_end.gif);
- [Theme] _end.gif: GIF image (1920×1080) which will be scaled according to real screen resolution, shown in the final screen (eg love_overlay.png).
Logo.png is a PNG image (free size) that is attached to each photo and does not change when changing themes.
We can further customize the application by modifying the randaps.py file, under the “CUSTOMIZABLE VARIABLES” section.
To do this, open the file with the editor:
sudo nano /var/www/randaps/randaps.py
After changes are done, simply close and save it with CTRL + X, Y and ENTER.
To add or edit a web control user, we have to use PHPMyAdmin:
Browse to http: // IP_RASPBERRY_PI / phpmyadmin (replacing “IP_RASPBERRY_PI” with the actual IP address), select “randaps” database and then “users” table. We click on “Enter” tab, fill in the “user” and “password” fields: the “password” field accepts a text string encrypted with MD5 algorithm. To encrypt any text string, just use one of the many MD5 services available on the web.
Operation
To run RandA PhotoSharing, just open a terminal from the Raspberry Pi GUI (not SSH) and run the command:
sudo python /var/www/randaps/randaps.py
The first startup may take several seconds, because as first action the software resizes all the images stored to “data/” folder to match the real screen resolution; to close RandA PhotoSharing, just press F11 (enable / disable full-screen mode) and click the X on the upper right corner.
The screens displayed (in sequence) are:
- Start screen: displays the theme initial image or a slideshow (depending on settings) [waits for “OK” to go on];
- Preview: capture a Raspberry Pi Camera image: with Prev and Next buttons you can move through the different effects [waits for “OK” to go on];
- Measurement: invites you to catch the two electrodes (5V and A0) and meanwhile shows a countdown to wait for the shot; when done, shows a waiting message during the image processing;
- Social: If enabled, the screen shows the result and asks if you want to share on social networks (using IFTTT) [Waits for the user to click on Prev or Next, which in this case mean Yes and No];
- e-mail: if activated, the screen shows the picture taken asks if you want to receive the high definition version via e-mail, requesting it with a text box; [Waits for clicking one of three buttons to move on];
- Photo result: if social sharing and email sending have not been selected, this screen displays the picture taken [waits for OK to go on];
- End screen: thank you by displaying a customizable image (while in the background, it is sending the e-mail and sharing photos on social networks).
At this point, the program returns to the Start screen (step 1) by loading the default settings from the control panel.
For “final picture” we mean the photo took during the measurement session, applying the effects we have selected, a logo, and the theme image overlaid on the picture, over impressing the measurement result too.
For example, if the chosen theme was “love”, we could have a heart-shaped form containing the measured score, overlaid on the picture taken by the Raspberry Pi Camera. On the lower part, we can insert our company’s logo (put on every image: that’s marketing!).
We can see the software functional scheme in figure.

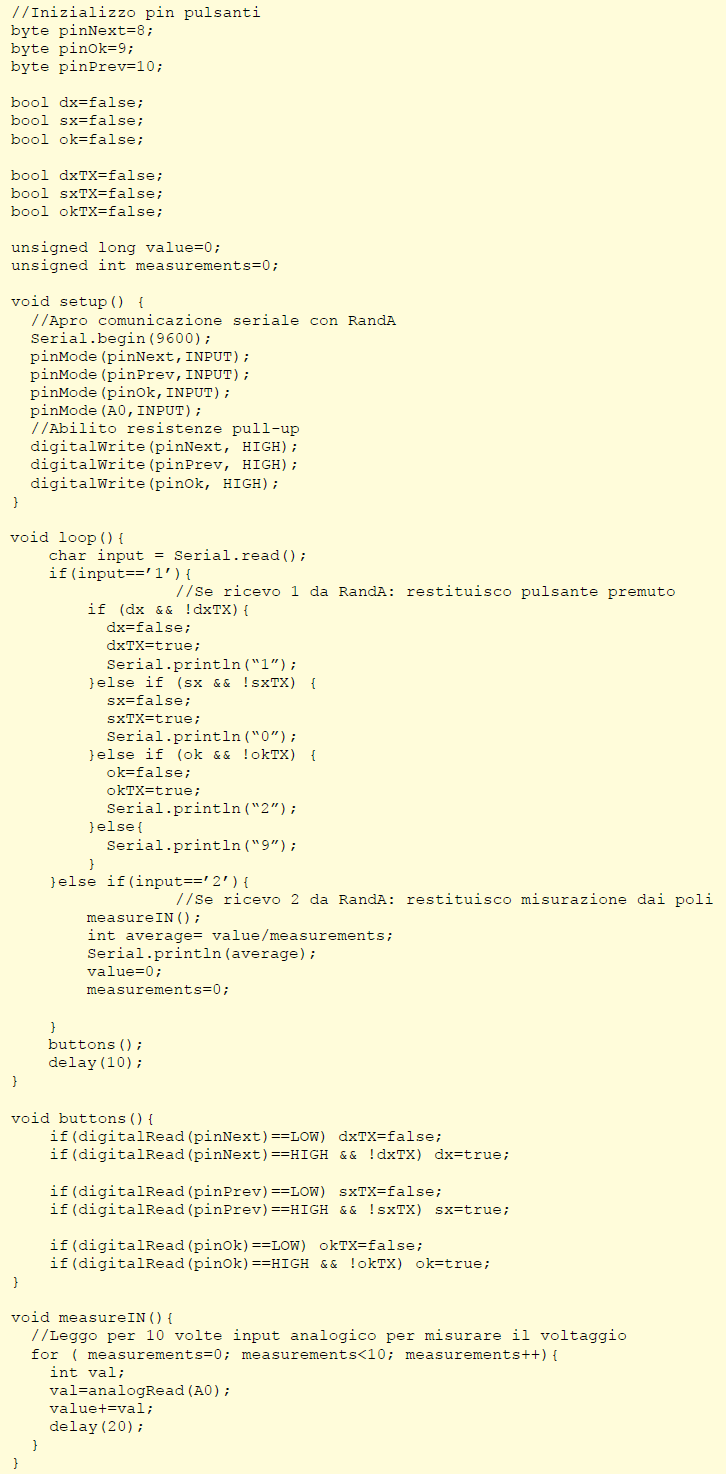
In Listing1 you can find the sketch we will upload to RandA, dedicated to managing the button signals and the measured value (tension) between electrodes sending them to Raspberry Pi.
Listing 1
Have Fun and share!
From open store
Starter kit for Raspberry PI 2 model B
RandA: the union from Raspberry and Arduino
