Let’s learn about the firmware management and versioning tool that is at the root of GitHub, and to be able to use it.
In order to become a good programmer, it is not enough to know the most popular programming languages, to know how to write the corresponding code, to create more or less complex functions or to know how to use, in the most appropriate way, the registers of a microcontroller or microprocessor. At least, that’s no longer enough nowadays. In fact, it is not enough to write your own program, as you will also need to learn the methods to enhance its management and usage.
We want to show you, and justify our claims, by letting you know about some specific software tools used for the purpose of enhancing the management of a firmware project. In particular, in these pages, we will introduce you to Git and will teach you how to use it.
Some of you might ask: “what’s Git?” Some other ones will ask: “yes, I heard about it, but I do not know if it suits me”. We may answer that we tested it and that it proved to be very useful, both for the amateur and for the professional usage.
What is git?
Let’s skip the premises, therefore, and see what it is about!
Git (the official logo is shown in Fig. 1) is a version control software, that is to say, it keeps track of all the modifications applied to a project, in time. The Git name was given by Linus Torvalds (the father of the LINUX kernel) and it doesn’t actually have a recognized meaning. There are those who claim it was chosen because its pronunciation is akin to the one of “get”, while other ones believe it is the acronym of “Global Information Tracker”.

Fig. 1
Many among you will have heard of GitHub, but please pay attention to the fact that Git and Github are two different things: Git is the actual program (we all know very well that a program has a set of commands composing it), while GitHub deals with saving the data and acting as an online server. GitHub is also a continuously expanding online community, with an infinite number of projects, and it is possible to clone them (that is to say, to copy the whole repository).
In this article we will show you the potentialities of using Git with your own PC and of archiving the data locally, so to satisfy all the users that do not wish to necessarily share their projects online.
In the next installment, we will discover the world of GitHub and will show you the potentialities offered by this system.
Git is part of the category of SCM (Software Configuration Management), that is to say, of the software tools that represent a pragmatic approach for the software configuration management and in particular for the version control, as an integral part of the development process. The SCM tool represents a key element in the software development tools and therefore it should always be taken into consideration, in the context of the architectures and the dynamics of a development team.
To make Git even more interesting there is the fact it is a free (that is to say, it’s completely free) and open source software, that has been designed and developed so to manage everything: from the small to the big (and to the very big…) firmware project; everything is executed quickly and in a particularly efficient way.
It is easy to learn to use Git and it requires only a few hardware resources from your computer while providing high performances in the field of the speed of execution.
In order to understand how useful Git is, you have to consider that before it came into being, in order to develop and modify a firmware project on a daily basis, one of the solutions was the one to create a copy of the project folder and to name it with the date; imagine the case in which the project lasted for a year or more and you had to work in a team!
We may claim, but you certainly understood that already, that managing the modifications proved to be very difficult and complex; moreover, if it was needed to carry out a firmware downgrade, you had to search within the folders, for the version of interest. Thanks to Git, it is possible to keep track of the modifications applied to the project and to have the possibility to recover the previous versions of a file or of the project itself.
There is plenty of programs for the versioning that are available for sale, but we chose Git since – differently from other programs used for the same purpose – it considers its own data as a series of snapshots of a mini file-system.
Git operates via command line, therefore, in order to simplify its usage, we will have to use a graphical environment that simplifies the command use, that is to say, a GUI (Graphic User Interface); in this article we will show and propose you to use TortoiseGit; anyway please notice that’s not the only solution, since other ones are available online.
Let’s work with git
Well, after this long introduction, we may start to work with Git. As a first thing, you will have to install the “engine”, that is to say, Git, that may be downloaded from the following link: (Fig. 2). At the moment this article has been written, the last available release for this software is 2.14.1, but Git is continuously evolving. We would like to remind you to install the version accordingly to your operating system and, if it is Windows, please pay attention to the installation, that is to say, if it is a 32 or 64bit one (you may see that from the system settings, to be accessed from the Control Panel).
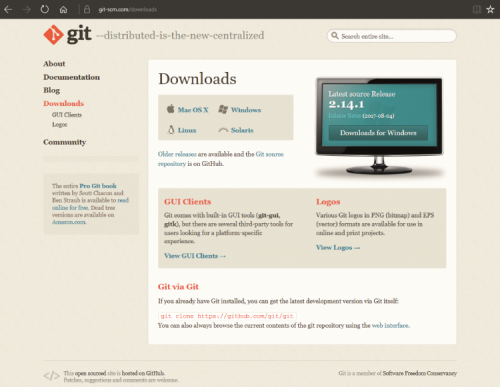
Fig. 2
Once the file has been downloaded, please start the setup by clicking on it (the file is an executable one) and install Git; you will notice that there are different customizations that may be applied; our advice is that, for the time being, you should keep the settings unchanged and click on Next until you reach the end of the installation, since our objective is the one to use Git from a graphical environment and not via command line, therefore it would be pointless to choose some custom options, since it will be TortoiseGit to “use” it.
Now, please install TortoiseGit, by downloading it from the following web page: (you will see it in Fig. 3).
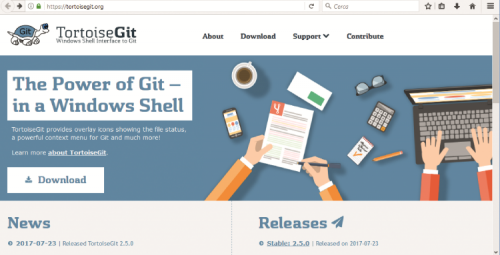
Fig. 3
After the installation, you may decide whether to keep the default installation language (English) or to download the add-on for the support in another language. In the case you wanted to change the language, while still in the same page from which you carried out the download, please scroll down to the bottom, until you find the Language Packs entry; after that please select the desired language pack, corresponding to the operating system on your Personal Computer, and download the setup file so to install it.
Well, the most boring part, the one concerning the files to be downloaded and installed, has been passed. We now have to verify that the downloaded language has been correctly set in TortoiseGit. How we do that? Nothing easier: let’s get to a clear space on the desktop and click with the right mouse button (Fig. 4).
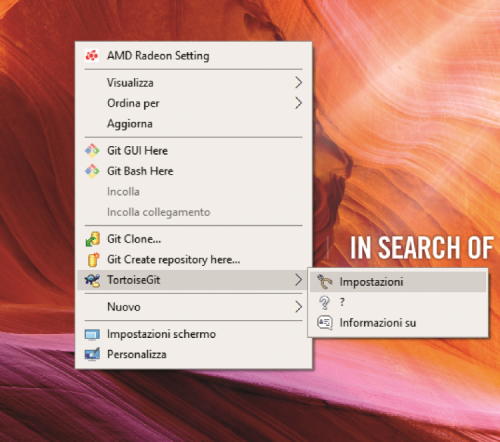
Fig. 4
Magically, some new options have appeared, let’s click now on TortoiseGit and select the Settings. Let’s go to the general option in which it will be possible to select the desired language in the language box (Fig. 5). If you want, you may insert the username you chose and your email address in Git: you will need them later, when we will be doing our first commit! But let’s proceed in order.
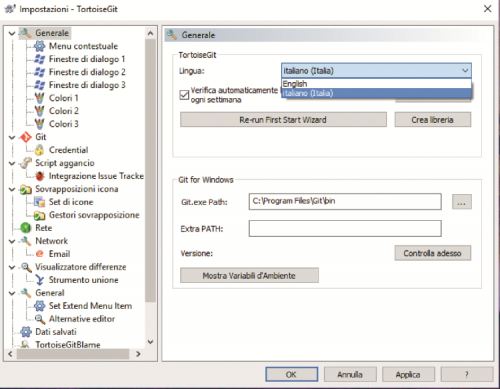
Fig. 5
As a first thing, please click on the OK button, so to save the configuration. At this stage, even the configuration part has been completed. In this guide we will show you how to locally use the repository, that is to say, that the versioning will be carried out on the Personal Computer and not on the remote server, which is what occurs on GitHub, for example.
At this stage, before proceeding further, a quick remark on GitHub is appropriate, given that there is often much confusion: GitHub was born to host, in its repositories, the firmware projects that were developed by means of Git; it also offers paid spaces for private projects and free spaces for the open source projects that are shared. It is possible to claim that it is the most used platform for the development of shared software; it is moreover possible to participate to the same project or to the drafting of documents from all over the world. If the project is a very important one and you do not want to risk losing data because of the hard disk, for example, then GitHub is the best solution.
Let’s see now a real example: we have a project in the Arduino environment and we wish to set an orderly operation, that keeps track of each modification and enables the saving, each time, of a snapshot of the work that has been carried out and finally that enables us to recover the archived versions without efforts.
Let’s build a repository!
The “repository” word indicates an orderly archive in which the files are collected. In the following paragraph, we will explain to you how to create one.
Let’s create therefore an Arduino demo project, and get at the base of the folder containing the project itself, and then click with the right mouse button so to give the “GitCreate repository here” command”. from the context menu opening (Fig. 6).
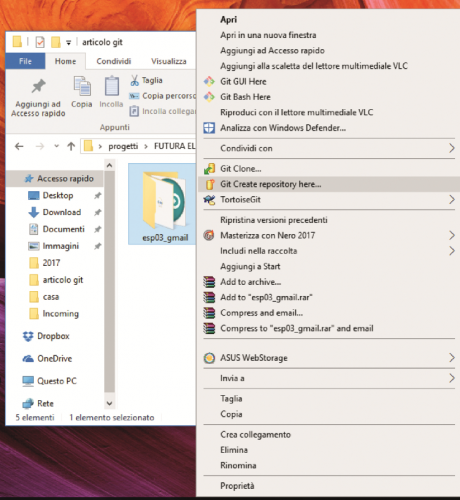
Fig. 6
A dialogue box containing a message will appear; while in it, please click on the OK button, without checking the “Make it Bare” box.
If it reached a successful conclusion, a warning window will appear, as shown in Fig. 7; you will have to click on OK.
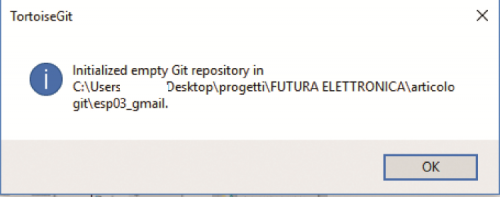
Fig. 7
By summarizing, we explained that the “project” folder is set as a repository and therefore it is as an orderly library, although an “empty” one! Since we created all the “shelves”, we have to fill them with all of our “books”, that is, the files/projects.
For the purpose, we have to carry out a commit! What is that? Well, the term indicates the saving of one or more files on the repository; in other words, after the container (repository) has been created, we have to tell it what must be placed there. This is carried out via the “commit” command.
Let’s see how to do it: by placing the mouse pointer on the project folder, please click it by means of the right mouse button and select Git committa “master” (Fig. 8); a new window will appear.
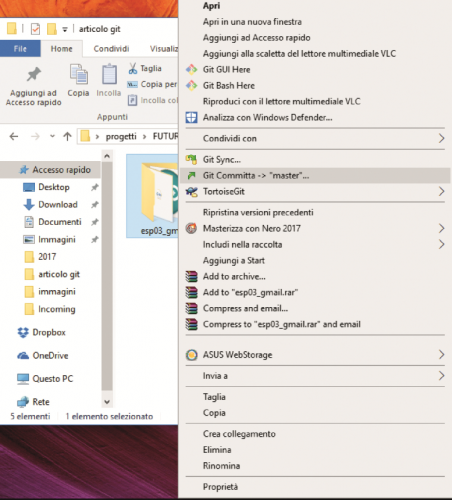
Fig. 8
What we have to do now is to make sure that we correctly set the data to be sent for the commit:
- in the message box please write “first commit” (you will then write the modifications you applied; for example “x function added”, “y registers changed” and so on);
- please check “set author-date”, so to save the date of the commit;
- please check “set author”, so to save the name of he who carried out the commit;
- please click on “All” or manually select all the boxes, until all the files have been checked (Fig. 9).
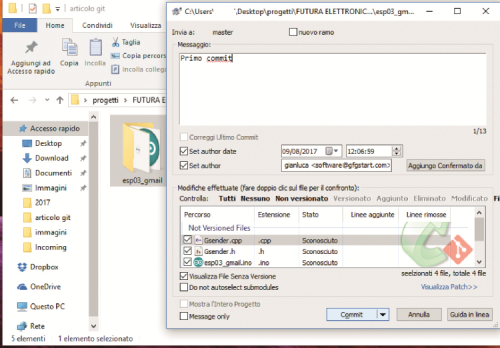
Fig. 9
Now click on the “commit” button, and then on Close (Fig. 10), in the window that will appear.

Fig. 10
By means of this procedure we saved all of our projects, and if for any reasons we delete a file, we may easily recover it (even after a month or more!).
Let’s try now to carry out a modification to a file of our Arduino project; let’s just add a comment in a file and save it (Fig. 11).
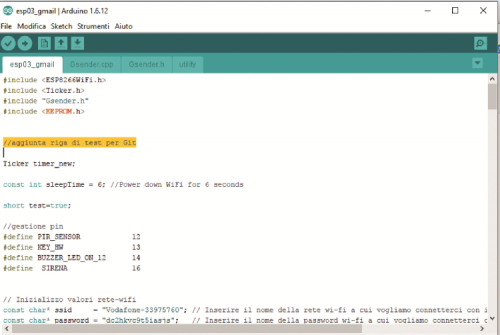
Fig. 11
Let’s return therefore to the project folder and click with the right mouse button on TortoiseGit, and select “view activity register” from the context menu opening (Fig. 12).
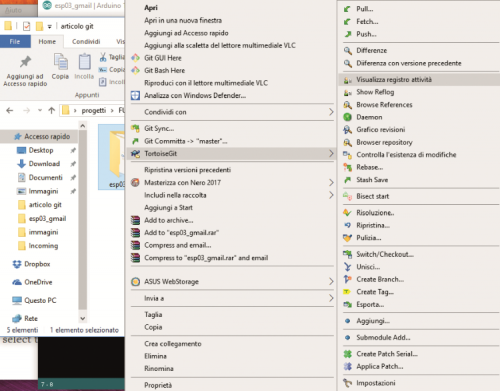
Fig. 12
Now for the fun part, since this window enables us to see the differences between the “committed” project and the one that we modified (in this case that’s just a file).
As you may notice, all the data is shown, since our the first committing; to return to our initial point, we have the advantage of not losing anything, not even a code line (unless it was the subject of the commit itself); as you may see from Fig. 13, an exclamation mark appears, but do not worry as this is correct since Git controls the changes applied and it points them out. Let’s see now which modifications have been carried out since we “committed” and up to now. Actually, we know that, since we only added a comment, but what if the modification was an important one?

Fig. 13
In this case, let’s bring the mouse pointer to the name of the modified file and let’s double-click on it; have you noticed what is now showing, highlighted in yellow? Well, as you may see from Fig. 14, the modification we carried out is appearing! Undoubtedly, this is really handy!
This method is known as “merging” that is to say, the comparison and the visual highlighting of the differences between the two files. In the above said Fig. 14 we may see, in fact, the modifications highlighted in the merge box.
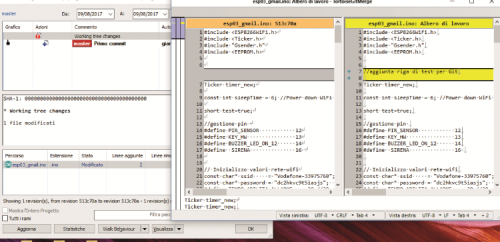
Fig. 14
Given that there are differences between the files and that we now want to carry out the second commit, in order to save our modification, we will have to close the merge box and to get with our mouse to the exclamation mark; let’s click with the right mouse button and, from the shortcut menu opening, let’s select the “Send” entry, as shown in Fig. 15.
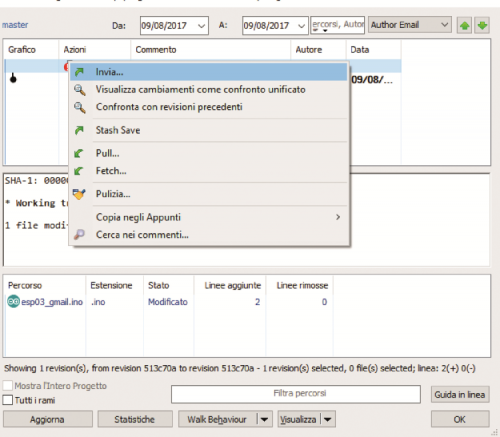
Fig. 15
At this stage, TortoiseGit will open the window again, so to carry out a new commit; while in it (Fig. 16):
- let’s type “second commit” in the “messages” section;
- let’s check the box at the “set author-date” entry;
- let’s check the box at the “set author” entry;
- let’s check the modified file and click on the commit button.

Fig. 16
As for the first commit, Git will save a second snapshot of the project.
At this stage, if you repeat the “tortoiseGit” command and select “view activity register”, you will notice that the diagram or “tree” moved up a point and that the “master” label is found now at the same line of the second commit, as shown in Fig. 17. The project started from the first commit (at any moment we may come back from that position), but the diagram advanced since the story of the project received another commit and therefore the tree moved up a position, in this case.
Try to think about what happens with 100 modifications or more, and how easy it is to find your bearings and organize yourself instead, when you have a diagram with the comments for each commit at your disposal, and the possibility to see the modifications and the comments for each one of them. Compare it to the example we made a few pages before, concerning the creation of a folder for each modification. It will be obvious how useful Git is! A complete overview of the commands may be found at the following web page: https://git-scm.com/docs.
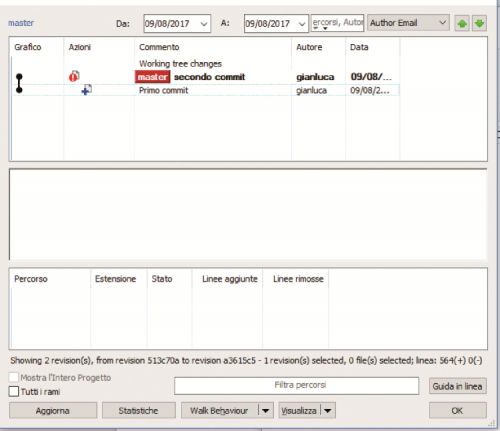
Fig. 17
Conclusions
In this guide, we wanted to introduce you to Git and to show you how it archives the files and keeps them in order, in a tree. We did it by highlighting how easy and intuitive is to see the differences of a file (or project) after it has been modified since the first “commit” save.
In the last years, Git has even been integrated by renowned companies, both of software and firmware creators, which shows that it is a valid product, and very useful in the versioning management.
We would like to point out that, in addition to Git (and in general to the SCM tools), in order to enhance and fine-tune a project, there are also some programs for the purpose of the comment management, of the modification planning and for the team working.
That’s up to you to discover them…
