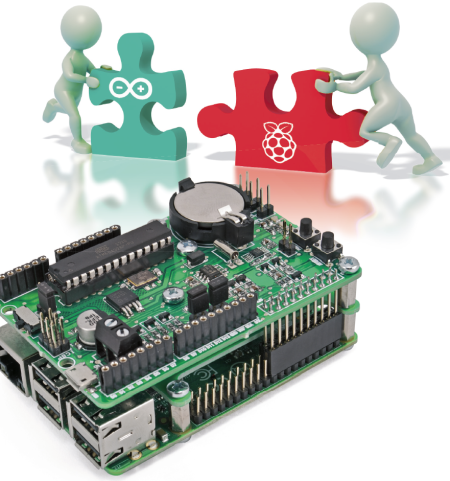
It is time to use the board that combines the capabilities of Raspberry Pi to Arduino ease of use.
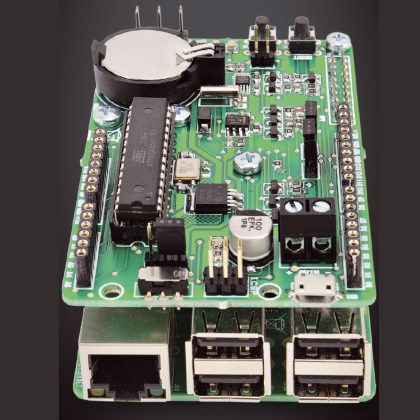
Raspberry Pi and Arduino worlds got close but they did not collide: indeed, they have resulted in a cooperation that has created a hybrid of enormous potential. We started talking about it in this post, where we presented the board RandA (the name means Raspberry and Arduino), a prototyping board whose core is Arduino and can be interfaced to the expansion connector of Raspberry Pi (also the last version) and hosts the classic female strip to connect Arduino shields.
In the previous post we saw the main features of this collaboration between Raspberry Pi and Arduino and now we will analyze some aspects with concrete examples. We will take for granted the successful installation of the software supplied with RandA, which includes the modified Arduino IDE to be used on your computer and all the software on Raspberry. For this installation, please refer to the previous article and especially the README files in the distribution.
As we have seen, the RandA system allows two approaches for its programming and usage: an Arduino-centric approach, where Arduino is to “lead the dance”, and a Raspberry-centric approach, where instead the reference environment is the Linux operating system.
Arduino-centric approach
We start with the Arduino-centric approach and begin to develop a sketch on our computer using the modified Arduino IDE. The IDE is perfectly compatible with the traditional use of Arduino connected locally to the USB port of your computer. So, for now, there is nothing to add for those who have already used this programming environment.
The surprise comes when we select the port where Arduino is connected, among those available. Along with any local ports (serial and USB simulated serial), there’s a new port described by a complex name that contains a network address. For example:
//192.168.10/Arduino
This, of course, if the RandA system is on and is networked via the Ethernet port, available on Raspberry, or by a WiFi dongle, also connected to Raspberry.
You may have several ports in the list, if there were more RandA networked. So we could load sketches on different systems.
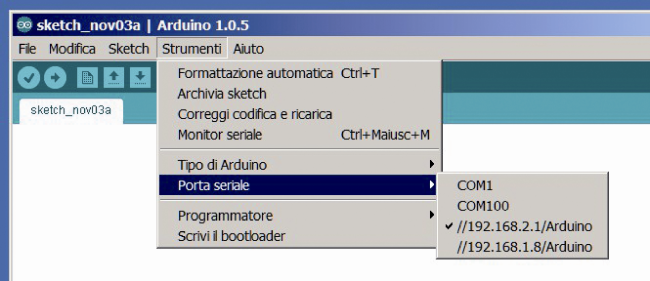
Also, if we had not permanently assigned from the router a static local network address for RandA, we could use this modified IDE to detect the addresses assigned by the router; then we connect with an SSH client as MobaXterm or via the browser to the web server installed on RandA.
For a first test we can run a sketch used on Arduino, or one of the examples listed in the IDE. Once you select the remote port and finish the upload, the sketch will work as usual. For example if we had used the sketch “for blinking”, we could see the flashing LED on RandA. Remember that RandA is fully compatible with Arduino Uno.
But what if we would upload a sketch that uses the serial port? No fear, activating the IDE console as usual, we will get the data stream as if we were locally connected to Arduino. In fact, in RandA, the serial port was completely remotized. So we can fully interact with Arduino.
So far we have found that, without having to use specific shield, Arduino is connected to the network relying on Raspberry networking. Also, you can upload sketches, that is not possible using network shields. Although this is already a good result, it is only a small part of RandA potential.
To RandA we can connect one of the many available shields for Arduino, to manage or expand I/O connections: I / O expanders, relay systems, opto-isolated systems, motor drivers etc.
But you can do much more and overcome, in part, the hardware limitations of Arduino. In fact, you can think of using Raspberry to perform some tasks. To do this it is necessary that Arduino can run commands on Raspberry and possibly read their response.
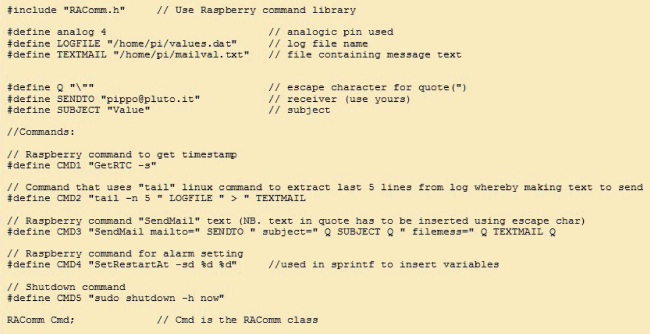
For this purpose, it has been prepared a library included on modified Arduino IDE. This library (RAComm) provides the ability to run commands on Raspberry and receive the response, but also allows you to open a file (read/write).
While talking with Raspberry, Arduino commits the serial port: this is not available for the dialogue with the IDE, so you cannot use the IDE console. For this reason it has been granted the possibility to open a console on Raspberry to write messages, to read input or simply for debugging. But this console, X terminal like, needs a connection with Raspberry (networking with SSH or directed by terminal) to be visible.
Let us show you an example of this synergy between Arduino and Raspberry: we use a useful Linux command that allows you to make a request (GET) of a resource on the network, the command “curl”.
Let’s use it to request to the site “openweathermap.org” atmospheric data relating to a location. Following the directions of the site, we know that the request must be made in the format shown in Figure, where there also appears the reply. In the example we used Rome but the request can be made for any location worldwide.

In basic mode, the data is provided in JSON format; but you may also have the XML.
The sketch, which is provided as an example in the library, it’s called “ReadWeb” and would be made up of a few lines of code unless for the part about the extraction of data from the wordy text returned from site. In fact, in addition to the code to manage the HTTP protocol, also the data replied are numerous. At this point we must keep in mind the memory limitation of Arduino. In fact, it is unthinkable to store the whole response in a buffer; furthermore the buffer of the serial is 64 bytes and it is not advisable to read more data to avoid data loss. So we have to get the response in small pieces and scan character by character to detect the beginning of the data that we want to extract.

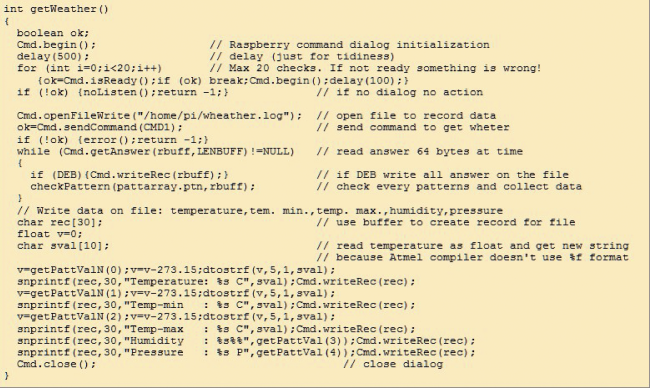
These figures show the essential parts of the sketch. As we see, the request is made “once”, and to repeat it you must reset Arduino. In fact, this sketch is demonstrative, while for a real use, probably, would be necessary to repeat the request at regular intervals. To do this, just add another command to set the alarm and then a “shutdown” command. That is, for example, to read the meteorological data every hour, just enter:
– RAComm.sendCommand(“SetRestartAt -sd 00”)
– RAComm.sendCommand(“sudo shutdown -h now”)
The first sets the alarm at next round hour, while the latter causes the system shutdown. (Remenber that in RandA “shutdown -h” commands the power off at the end of the closing process).
Also, the sketch writes to a file any response creating a sort of log. To do this you use library functions that allow you to open a file (only one at a time!), write or read it. The controls used in the example are:
- RAComm.openFileWrite(“home/pi/weather.log”)
- RAComm.writeRec(rbuff)
The file is automatically closed by the closing command of the communication with Raspberry (even if there is a specialized command).
The data extracted from the response are visible in figure. For the temperature, we convert it from the absolute temperature to Celsius degrees (T absolute-273,15).

The data is saved to the file. But for an effective use it could be used, for example, to activate or adjust a heating or cooling system by means of the Arduino digital or analog outputs.
As mentioned, the biggest part of the sketch is related to a problem that does not affect the interaction Arduino-Raspberry, but rather to overcome the RAM limitations of Arduino. The answer is split into records of up to 64 characters, but the pattern to be detected (for example ” temp ‘:’) could be split on two lines. Although the issue does not directly affect this article, we give a brief description of the algorithm adopted.
The issue has been generalized and then you can use it on other occasions to read a HTML text looking for particular patterns, in a logic: key-value.
First, we defined a structure “pattern” and an array of these. Each element of the array contains the pattern to be searched that works as a start of the data to be read and a character indicating the end. Also there are defined some variables used by the algorithm. The algorithm works by comparing in parallel all the defined patterns, by scanning the single characters. When it finds a pattern, begins to read the data independently from the other pattern. The data is stored (as strings) in a buffer of corresponding structure.
Before moving to another RAComm library example, it is the case to clarify which commands can be entered in RAComm.sendCommand (): all of them! The standard commands from Linux distributions (Raspbian), all the programs that we have provided for RandA and any script or executable that you can implement. We have already seen the use of a set command for RandA: SetRestartAt (is an executable in C), and now is the chance to briefly list them all; you can see them in Table 1, but they can also be listed from the Raspberry Pi console typing “commands”. Adding -h also displays all the help. Some of these, indeed, as ArduLoad, Arduio and ArduInterrupt, are designed for Raspberry-centric usage, as they provide access to features Arduino by Linux script.
| COMMAND MEANING | |
| ArduIO | Define, read and write Arduino pins |
| Arduload | Loads a compiled sketch .hex saved on Raspberry |
| ArduInterrupt | Waits until an interrupt on an Arduino pin |
| ResetRandA | Arduino Reset |
| GetRTC | Reads RandA clock |
| SetRTC | Sets RandA clock |
| SetRestartAt | Set the restart alarm |
| ResetAlarm | Resets alarm |
| SetSysClock | Sets the system clock from the RTC |
| SendMail | Sends an email |
The second example explains the delivery of an email. Suppose we want to detect the presence of an important signal and alert someone of the event accordingly. The detection of the condition is typically a task for Arduino. For example, we could detect the overpassing of an analog threshold or an ON / OFF condition. Sending an e-mail, however, is a daunting task for Arduino mainly because of the SMTP servers that are now using secure protocols, impossible to implement with Arduino. The command to use could be for example:
RAComm.sendCommand(“
SendMail mailto=\”pippo@pluto.it\”
subject=\”Rilevazione\”
filemess=\”/home/pi/messaggio.txt\” “)
The command has been split across multiple lines only for convenience of printing. While the pattern \” indicates the presence of double quotes within a string (the command to be passed as an argument to the function). “SendMail” taking it from the file where it was placed automatically formats the message text.
The command provides the possibility of also simply sending a short text, instead of the text stored on a file, in this way:
RAComm.sendCommand(“
SendMail mailto=\”pippo@pluto.it\”
subject=\”Rilevazione\”
message=\”Valore : 320\” “)
You can also add an attachment or more recipients. But for more details, please refer to the command help.
At this point it is the case, however, indicate that it is necessary to initialize the file
“/home/pi/bin/Mail.properties”
with its own data, so with the user name and password recognized by the SMTP server and the address of the server itself. Moreover, one must keep in mind that those not used to a mail client (like Outlook or Thunderbird) could have the Gmail server not set to receive external commands, so the proper configuration must be done on Gmail settings.
In the example included in the library, called “SendMail”, it is periodically detected an analog value and along with the timestamp taken from RTC it is stored on a file and then sent to an e-mail address.
It is not sent only the last value read but rather the last 5 records. To do this you use the Linux command “tail” that extracts the last n records from a file.
With these examples shown, the potential of the link library with Raspberry should be obvious. Keep in mind also that in case of logical error (for example a sketch that will shutdown the system at its very power on), you can disable the communication with Raspberry by opening jumper JP1 which is managed to report to Raspberry the intention to communicate.
The script that listens signal is launched at startup (in /etc/rc.local) and is called StartListenCmd. It can also be launched with a log file. But more simply, in case of serious problems of debugging, you can directly launch the C program that manages the communication, called ExecSCmd (after disabling StartListenCmd). ExecSCmd can be launched with the debug flag -s to echo on the console all that passes on the serial. The sourcecode ExecSCmd is located along with the other program sources for RandA in:
“/ Home / pi / workspace / cworkspace”
There is still a further opportunity to exploit Arduino-centric approach: you can always keep powered Arduino acting on the jumper switch SW2 separating Arduino from electronic switch management.
Arduino deprived of its linear power supply and USB needs very little power and it can also put itself in a very low power consumption state.
In this state Arduino can turn Raspberry on giving a pulse to its D4 pin (if the corresponding jumper JP2 is closed). A further example in this library shows this use, and turns Raspberry on if its analog input A0 reads a value greater than 300.
Raspberry-centric approach
Those familiar with the Linux operating system will definitely find it easier to use Raspberry as a programming base. For this purpose you can use a powerful C development environment like “codeblocks” that we installed on Raspberry, or the Python language for which we have installed the development environment “idle”. Because on Raspberry is installed Java you can also use this powerful language. In fact there are already Java programs used in RandA, as the SendMail command or servlets in the WEB server which will be discussed later. We have not installed a development environment for Java yet since we are not satisfied by the free IDEs available for a reduced hardware as Raspberry. Although installable from Debian package repository, Eclipse is not in a satisfactory version both for installation problems and for performance problems.
Java programs complete with source code are categorized into:
“/ Home / pi / workspace / jworkspace”
The programs (or scripts) can also be made in Arduino-centric approach as we have already seen.
You can use the serial port to communicate with sketches dedicated to manage the communication (ie outside the library RAComm). In this way Arduino becomes a powerful programmable for Raspberry.
The command “Arduload”, (accepting as argument the full executable file name (.hex) with the complete path), allows you to change from time to time the behavior of Arduino, because it “installs” on Arduino the sketches used by the application. These sketches, in executable file format, can be created with the remote IDE or with the IDE installed locally on Raspberry. In fact, both versions of the IDE, besides managing the upload of the sketch, save the executables on Raspberry in two separate directories:
✦ / home / ArduinoUpload: for sketches processed locally
✦ / home / RArduinoUploads: for sketches processed remotely
This is a further addition we have made to the modified IDE.
As an example of application that uses Arduino as a device, just refer to the command “ArduIO” already listed in Table 1. This C program can be found also in the “cworkspace”, along with its source code.
ArduIO wants to be the equivalent of the utility GPIO (wiringPi) of Raspberry. It lets you manage the Arduino pin from the command line. For example, to turn on the standard Arduino LED (pin 13) you must:
- Define as output pin 13: ArduIO -set 13 out
- Write 1 to pin 13: ArduIO -wrd 13 1
To turn it off, type: ArduIO -wrd 13 0.
You can use the usual approach used with Arduino: read analog and digital pin, enable / disable digital output and adjust the PWM pins. Typing “ArduIO -h” you get the detailed help. More precisely, in Table 2 we listed the various options.
| OPTION MEANING | |
| -set n x | Set pin “n” as x=inp,out,ipl (ipl:input-pullup) |
| -rda n | Read analog pin n |
| -rdd n | Read digital pin n |
| -wra n v | Set pin PWM |
| -wrd n v | Set pin digital (0/1)(NB: remove the jumper before setting pin 4, since it is connected to ON/OFF switch) |
| -pou n v | Pulse on pin n with frequency v (tone) |
| -poi n v | Read pulse duration on pin n(v=0/1 defines input high or low) |
The program uses a sketch (SerialRasp) to which it sends the corresponding commands, and it is the latter that activates the pins. So this sketch must have been previously uploaded to Arduino. But ArduIO overcomes this problem by loading it automatically if it is not present on the Arduino. To allow this it is necessary:
a) that can identify the sketches present on Arduino,
b) that can find the sketch in a predetermined position in case it was not the one established and needs to uploading
The first point is easily solved by preparing the sketches so that if polled they respond with their own name; while for the second item it has been prepared a directory “/ home / pi / bin / sketch4cmd” from where take it. Figure has highlighted the collaboration between the two environments with particular reference to the recognition of the sketch and to its automatic uploading.

It is not really necessary to use compiled languages like C, to build Raspberry applications that use Arduino for input / output. You can also use bash script (Linux) or Python script. Just use the commands prepared for RandA (Table 1) to simplify the task. The next example shows a small demo application that reads the value of the voltage present on pin A1 (for example, supplied by a photocell) and activates the standard Arduino LED when the read value is lower than a threshold.
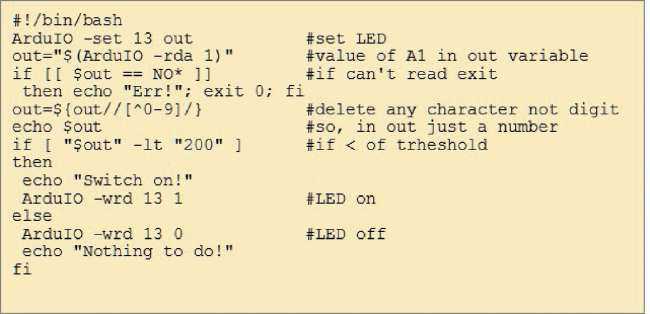

Of course, the script is mostly educational, but with small additions you can insert a periodic cycle or you can place a timer check or sending an e-mail alert.
These two files (ScriptExample4IO.sh and PyExample4IO.py) are present in the directory / home / pi / bin / examples.
There is an additional command that allows Raspberry to use the full potential of Arduino and that can be used in scripts: ArduInterrupt.
This program uses the sketch “SerialStop”, present in “/ home / pi / bin / sketch4cmd”, and essentially waits until a certain condition is met. The condition may be on a digital pin, when it becomes 1 or becomes 0, or on an analog pin when the measured value is greater or less than a certain threshold.
For example, “ArduInterrupt -ana 2 lt 200”, freezes until the analog pin 2 of the Arduino value drops below 200. It ‘clear that the use of this command is within a script where subsequent instructions trigger an action. Also the script will be probably launched in background.
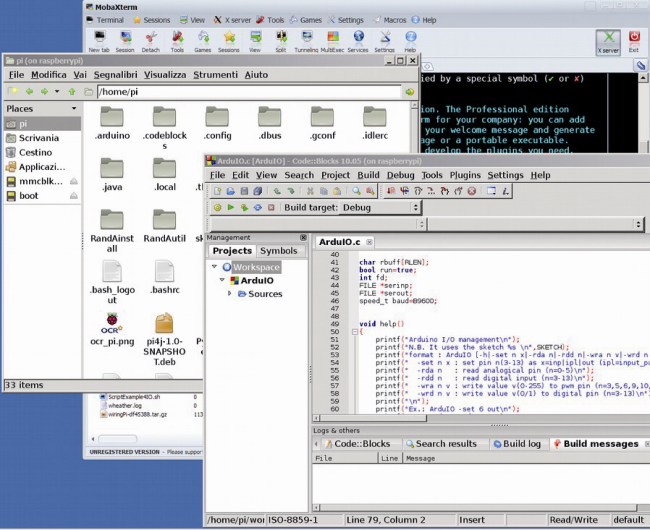
How to develop applications on Raspberry efficiently? With the Arduino-centric approach we used a remote location (any PC connected to a local network) to develop sketches that could also use the potential of Raspberry. Now changing the point of view it is still possible to use a remote desk (always our PC connected to a local network), this time using a remote console on Linux SSH protocol, but with the additional option of a graphical environment. For this you can use a software that allows you to act as X Window terminal (which is the graphical environment based on Linux). One of these is MobaXterm (free and downloadable from the website http://mobaxterm.mobatek.net/).
In Fig. 10 there is shown a typical situation in which along with the console MobaXterm, are superimposed a window on the file system and a codeblocks IDE window for C programming.
Who is more used to Linux or other modern operating systems, prefers this Raspberry-centric approach, because it allows a more flexible and efficient use of RandA. Those who are more accustomed to Arduino style, will prefer the former approach. In fact it is also useful to mix the two points of view depending on the application. But above all, we believe RandA is an ideal system for teaching and first approaching to programming and to digital systems, because you can cover, with it, an incredible amount of topics and operating environments.
Web Server
The supplied software is not limited to what we just described. In fact, we decided to add a Web server. This Web server allows a basic system management in a wide area network. In fact, until now we have limited the use of remote access exclusively to the local network both for the network software used and for safety reasons. With a Web server, it is possible to overcome this limitation simply configuring a proper port-forwarding rule on the router to have a network address visible outside.
The software server used is not just a Web server, but a “Web Application Server.” This mode uses an approach more “interaction-oriented”. The server is based on one of the most popular free software: Tomcat. Unfortunately, a software of this kind involves the use of Java Servlet (or JSP script) for interactive applications. But the complexity of the software is repaid by the remarkable efficiency of the applications; just think that all servers use these types of professional environment or its competitor “dot-net”.
But if you are new to Servlet or JSP, no fear, because the server was prepared to handle even CGI scripts; i.e. Linux or Python script. This way you can build your interactive applications and use them by a browser anywhere in the world.
Tomcat is installed (version 7) in: “/home/apache-tomcat-7.0.47”
In this directory there are two scripts: startWebS.sh and stopWebS.sh, to start and stop the web server. The first is called within the file system startup “/etc/rc.local”. If you want to disable the automatic web server start just comment this command in that system file.
The Tomcat is listening on port 80 (instead of 8080) by updating the file: “/home/apache-tomcat-7.0.47/conf/server.xml”.
Within the Tomcat directory you can find all the web server related files: from applications to static pages. In particular, the directory “… /webapps/ROOT” contains the starting page “index.html”. While the application for the management of Raspberry and Arduino is all contained in the directory “… /webapps/RandA”.
For those who want to load their own or third-party applications, the easiest thing to do is to use the archive file .war (as usually are deployed Java web applications) and install them through the easy Tomcat manager console. This console is accessed at “http: //…../manager” and is protected by user name (default Tomcat) and password (default Tomcat). The .war file can also reside on the computer connected to the web server. In fact, the console allows to automatically downloading and installing at once. So essentially the applications installation is remotized.
Those who wish to use simple HTML pages can place them in the directory where ROOT will be immediately available. Obviously can also create subdirectories of ROOT.
Instead when using the CGI mode, bash scripts should be placed in the directory:
| “/home/apache-tomcat-7.0.47/webapps/ROOT/WEB-INF/cgi” |
But, be careful, they must be referenced as: http: //…../bin-cgi/nomedellloscript
Example: http://192.168.1.8/bin-cgi/testcgi2.sh
The file “testcgi.sh” and “testcgi2.sh” in the directory “../ ROOT / WEB-INF / cgi”, are two sample files that show the use of simple bash script for Web dialog and launch Linux commands.
In case you want to use a different script interpreter, you have to edit the file “/home/apache-tomcat-7.0.47/conf/web.xml” (block <servlet> parameter “executable”).
The start page (to display it in the browser just enter the IP address of RandA), gives access to the management application and to a Web console (temporary) to access Linux also from wide area network (third-party application) .
The management application is currently not password protected, but you can easily change it by editing the file “/home/apache-tomcat-7.0.47/webapps/RandA/WEB-INF/web.xml”, and removing the comment to block authentication. While the Web console has the account “user-name, password”: “RandA, RandA”
The management application gives access to the following pages / applications:
✦ Loading sketches on Arduino.
✦ Arduino Console.
✦ Arduino I / O Management.
✦ Defining the alarm.
✦ Clock Adjustment.
✦ Deactivating RandA.
The applications listed above allow you to have remote access to RandA system also by geographical network, but the server has been installed by thinking especially as a basis for customization by users, presumably using a CGI script.
Conclusions
We have tried to provide a system up and running, available to be used in applications of various kinds, also with the addition of specialized hardware. But we wanted to keep an educational point of view, commenting as much as possible the software product, to facilitate customization and improvements.

Cool !!! But this solution force you the raspberry pi joined with
arduino at same place and the RandA replaces your arduino
board/solution. It could be enough for several solutions but this is not
very expansable. In a real sceneraio where you need for example a Mega Arduino board, or you buy / build your own simplified and cheap arduino solution (not 30€ arduino), or you need to comunicate with several Arduinos (distributed sensor network), or the sensor/actuator controller (arduino) is far or isolated from the Raspberry PI main system controller, this solution is not suitable. Then I prefer the USB / Serial pins (with electrical level conversor) communication between RPI / ARDUs. For example with an cheap RS 485 interface or
ENC28J60 ethernet interface for ARDUs you can deploy a distributed
sensor network. Yes this approach is not so easy and built-in solution,
but is not enough difficult. Only with an USB cable you can use SERIAL
PORT for communication an connect the ARDU type you already have or
need, and can be one or two meters between each other. Anyway, very cool
toy.