- makeITcircular 2024 content launched – Part of Maker Faire Rome 2024Posted 2 weeks ago
- Application For Maker Faire Rome 2024: Deadline June 20thPosted 2 months ago
- Building a 3D Digital Clock with ArduinoPosted 7 months ago
- Creating a controller for Minecraft with realistic body movements using ArduinoPosted 7 months ago
- Snowflake with ArduinoPosted 8 months ago
- Holographic Christmas TreePosted 8 months ago
- Segstick: Build Your Own Self-Balancing Vehicle in Just 2 Days with ArduinoPosted 8 months ago
- ZSWatch: An Open-Source Smartwatch Project Based on the Zephyr Operating SystemPosted 9 months ago
- What is IoT and which devices to usePosted 9 months ago
- Maker Faire Rome Unveils Thrilling “Padel Smash Future” Pavilion for Sports EnthusiastsPosted 10 months ago
Switcher – A WiFi Open Source Power Switch and Socket Based on ESP8266
Web site:
http://hristoborisov.com/index.php/projects/switcher-a-wifi-open-source-power-switch/Project Summary:
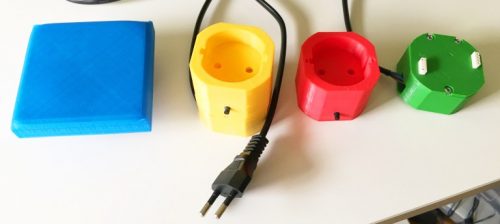
The Switcher is a Wifi, open source, power switch and socket.
Built with modularity in mind – It can be mounted as a wall lights switch or used as a standalone power socket. Switcher gives the ability to control your lights, or any other household appliance, wirelessly over the network and the Internet! There is a dedicated iOS App and web interface which can be used with any browser! You can build your own designs to make unique wall light switches for your house.
The switch uses the prominent ESP8266-01 module, an Arduino program, a 3D printed box and modules. It is free and open source, so you can build and modify it on your own!
Full Project:
Caution
This project can be dangerous! The circuit is attached directly to the mains electrical grid and is exposed to high voltages! Make sure you understand what you are doing and that, a mistake can be harmful or even lethal!!!
This is a very easy to build project. The idea is that you build the main module first, for which the circuit is provided below, and then build one of the modules. For now there are only two: a wall mounted light switch with touch button and RGB led indication and European type electric socket (Schuko type) which can be used to control any household appliance.
You can download 3d models for the base and the shields from here: https://github.com/hborisov/switcher_box
In the repository there are also gcode files which can be used to directly 3d print plastic enclosures.
Circuit diagram:
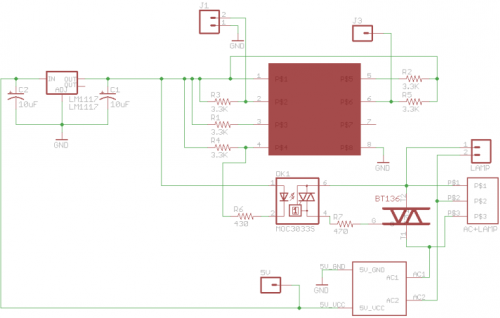
The circuit is very simple. The main goal was to make it small enough so that it can fit into the wall console where a standard light switch is put. The main obstacle was to find a small and powerful enough power supply, because the ESP can consume a lot of energy sometimes. So I came up with this module – Hi-Link 5v/3w which can be found easily on the Internet.
The other decision I made was to use a triac instead of a relay, because the triac is smaller, faster and also in the future I would like to add a dimming capabilities to the switch.
At the center of the circuit is the ESP8266 module. Pins 2 (Rx), 3 (RST), 4 (GPIO0), 5 (CH_PD), 6 (GPIO2) are pulled high to prevent booting the ESP into programming mode. This requires “inverting” the GPIO pins programmatically. Also in this case the Rx pin is used for button input and its UART function is disabled in the program.
The power supply module steps down the voltage to 5V, but the ESP requires 3.3V, that’s why I use LM1117 voltage regulator. I could have used 3.3V power supply but I’ve decided to have both: 5V and 3.3V which later paid off because in the shields (modules) I am using RGB leds which operate on 5V.
GPIO0 of the ESP8266 is used to switch on/off the controlled appliance. This is done through an optocoupler and a triac. The optocoupler isolates the low voltage circuit from the high-voltage one and the triac (BT136) is doing the switching.
Bill of Materials:
- ESP8266-01
- LM1117
- MOC3023
- BT136
- 3.3K SMD resistors (0603), 5 pieces
- 430 SMD resistor
- 470 SMD resistor
- 10uF SMD tantalum capacitor (P package), 2 pieces
- 3pin terminal block 3.5mm (DEGSON)
For the modules:
- CVILUX CU3
- CVILUX CW3S
- RGB led – WS2812B
- A button
Firmware:
The firmware is implemented in Arduino (C++).
You can find the source code here: https://github.com/hborisov/switcher_cpp
PCB:
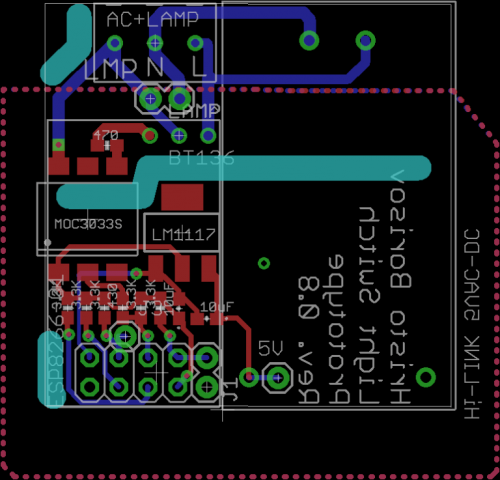
Eagle project can be downloaded from here: https://github.com/hborisov/switcher_pcb
A board can be ordered directly from OSH Park: https://oshpark.com/shared_projects/eMwHjMz0

-
 Arduino ISP (In System Programming) and stand-alone circuits
We use an Arduino to program other ATmega without...
- Posted 12 years ago
-

-

-
 GSM GPS shield for Arduino
Shield for Arduino designed and based on the module...
- Posted 12 years ago
-
 Small Breakout for SIM900 GSM Module
Some post ago we presented a PCB to mount...
- Posted 13 years ago
-
 makeITcircular 2024 content launched – Part of Maker Faire Rome 2024
Applications to MakeITcircular must be in by October 3,...
- Posted 2 weeks ago
-
 SONY color camera module, 700 TV Lines
Color camera module equipped with a 1/3″ CCD sensor...
- Posted 3 weeks ago
-
 ESP32 Low Power Module
ESP32 Low Power Module, based on Espressif’s SoC capable...
- Posted 2 months ago
-

-
 Application For Maker Faire Rome 2024: Deadline June 20th
Learn More About the Ideas, Makers + Projects at...
- Posted 2 months ago
One Comment