- makeITcircular 2024 content launched – Part of Maker Faire Rome 2024Posted 2 weeks ago
- Application For Maker Faire Rome 2024: Deadline June 20thPosted 2 months ago
- Building a 3D Digital Clock with ArduinoPosted 7 months ago
- Creating a controller for Minecraft with realistic body movements using ArduinoPosted 7 months ago
- Snowflake with ArduinoPosted 8 months ago
- Holographic Christmas TreePosted 8 months ago
- Segstick: Build Your Own Self-Balancing Vehicle in Just 2 Days with ArduinoPosted 8 months ago
- ZSWatch: An Open-Source Smartwatch Project Based on the Zephyr Operating SystemPosted 9 months ago
- What is IoT and which devices to usePosted 9 months ago
- Maker Faire Rome Unveils Thrilling “Padel Smash Future” Pavilion for Sports EnthusiastsPosted 10 months ago
Insect Robot
Web site:
http://hacklabterni.org/projects/insettorobot/wikiProject Summary:
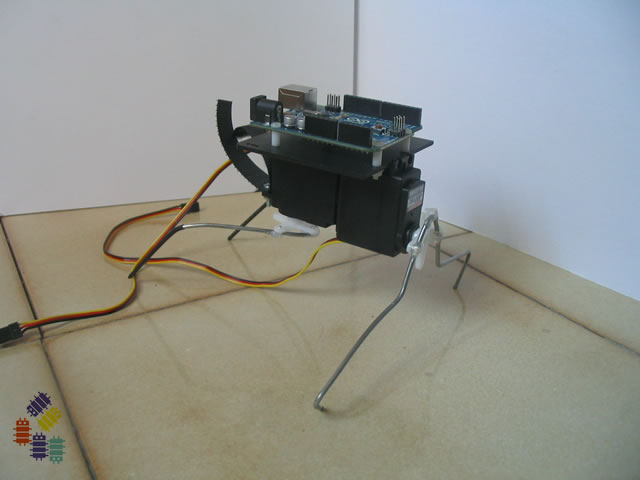
Insect Robot is a little walking robot on four legs moved by two standard servos which are controlled by Arduino. The robot uses an Ultra-Sonic Ranger to detect objects in front of it and, in case of obstacles, it walks backwards and turns.
A 9V battery powers the motors, the sensor and Arduino.
This project is based upon the work by Kimmo Karvinen and Tero Karvinen published in "Make: Arduino Bots and Gadgets".
Full Project:
The body of the insect is made by gluing two servos together and attaching the legs to the motors.
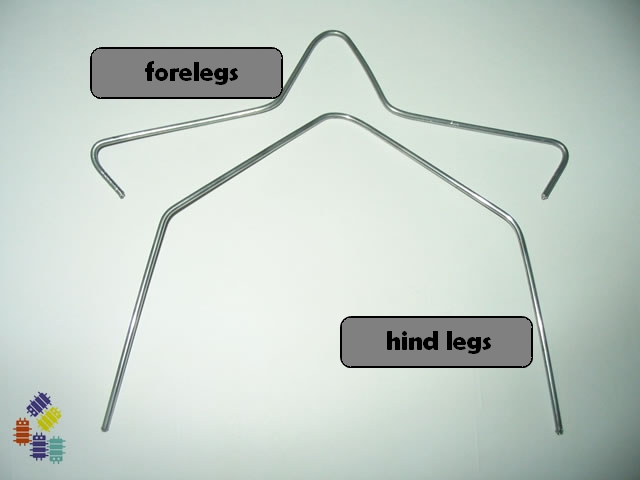
Cut two pieces from the wire clothes hanger, 28cm and 25cm long. Bend the wires with the pliers as shown below: the 25cm piece as the shape above (front legs), the 28cm piece as the shape below (rear legs).
For a better grip you can cover the tips of the legs with heat-shrinking tubing.
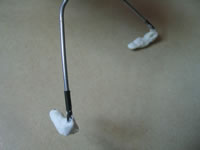
For the front legs you can use a silicone clay such as Sugru.[/colored_box]
Fix the legs to the cross-shaped horns with thin wire, then cover the joints with hot glue.

Stick the motors together with glue to make the body of the robot after removing the extension next to the servo arm from the front motor (on the left in the picture below) and the opposite one from the rear motor.
Use a piece of Velcro tape to hold the battery: cut a strip and attach it with screws to the extension on the back of the rear motor.

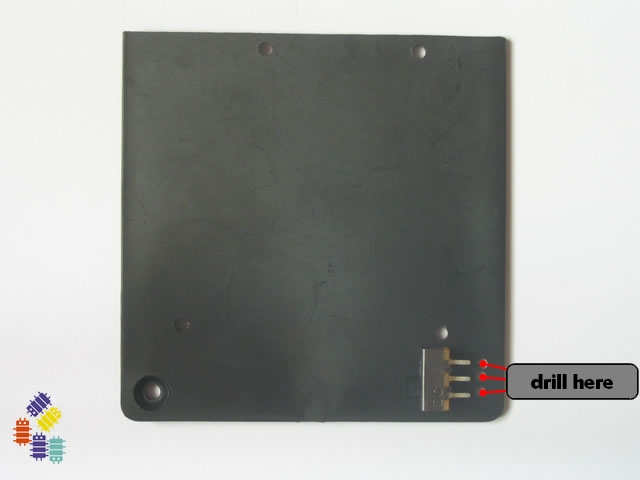
Make holes on the plastic board to attach the Arduino board…

… and the swich.
Attach Arduino to the plastic board with plastic nuts, bolts, washers and spacers. Solder the red wire from the battery clip to the center pin of the switch and a wire to an external pin, then attach the switch to the plastic board with glue.

Attach the legs to the motors and the board to the servos.
Connect the servos and the switch to Arduino with the help of jumper wires as shown in the drawing below.
Load the sketch twoServosCenter.pde to Arduino for centering the servos, then fix the legs with the screws. Attach the battery and shape the legs so that the insect be well balanced.
Attach the 90° five-pin header to the ultrasonic sensor and connect the five-wire cable. Attach the sensor to the front motor with hot glue and connect it to Arduino as shown in the drawing below:

Load the sketch theWalk2.ino: the robot will be able to walk, to detect obstacles and to change its direction.
Circuit diagram:

Bill of Materials:
Parts: pieces from a wire clothes hanger, heat-shrink tubing, two large servo motors (we used Hitec HS-325HB 40mm × 20mm × 37mm), thin metal wire, hook-and-loop fastener tape (Velcro), two nuts and bolts (2 x 10), 70mm x 70mm plastic board, Arduino UNO, four plastic nuts and bolts (2 x 25), four plastic washers and spacers, mechancal switch (11mm x 5mm), sticky tacs, two black jumper wires, three red jumper wires, two yellow jumper wires, break-away pin strip header, 9V battery clip, 9V battery, 90° five-pin header and five-wire cable with five-pin connector, ultrasonic sensor (we used Devantech SRF05), glue, plastic cable ties.
Tools: two pairs of pliers, cigarette lighter, hot-glue gun, mini drill, screwdriver, electric screwdriver, soldering iron.
Firmware:

-
 Arduino ISP (In System Programming) and stand-alone circuits
We use an Arduino to program other ATmega without...
- Posted 12 years ago
-

-

-
 GSM GPS shield for Arduino
Shield for Arduino designed and based on the module...
- Posted 12 years ago
-
 Small Breakout for SIM900 GSM Module
Some post ago we presented a PCB to mount...
- Posted 13 years ago
-
 makeITcircular 2024 content launched – Part of Maker Faire Rome 2024
Applications to MakeITcircular must be in by October 3,...
- Posted 2 weeks ago
-
 SONY color camera module, 700 TV Lines
Color camera module equipped with a 1/3″ CCD sensor...
- Posted 3 weeks ago
-
 ESP32 Low Power Module
ESP32 Low Power Module, based on Espressif’s SoC capable...
- Posted 2 months ago
-

-
 Application For Maker Faire Rome 2024: Deadline June 20th
Learn More About the Ideas, Makers + Projects at...
- Posted 2 months ago
3 Comments