- makeITcircular 2024 content launched – Part of Maker Faire Rome 2024Posted 2 weeks ago
- Application For Maker Faire Rome 2024: Deadline June 20thPosted 2 months ago
- Building a 3D Digital Clock with ArduinoPosted 7 months ago
- Creating a controller for Minecraft with realistic body movements using ArduinoPosted 7 months ago
- Snowflake with ArduinoPosted 8 months ago
- Holographic Christmas TreePosted 8 months ago
- Segstick: Build Your Own Self-Balancing Vehicle in Just 2 Days with ArduinoPosted 8 months ago
- ZSWatch: An Open-Source Smartwatch Project Based on the Zephyr Operating SystemPosted 9 months ago
- What is IoT and which devices to usePosted 9 months ago
- Maker Faire Rome Unveils Thrilling “Padel Smash Future” Pavilion for Sports EnthusiastsPosted 10 months ago
DIY $0 Water Touchpad
Web site:
https://www.instructables.com/id/DIY-Water-Touchpad/Project Summary:
A ridiculously low cost sensor to compute the x-coordinate of right index fingertip on a water surface.
This is a fun Arduino project that everyone must try sometime in their life! Here's why -
1. COST = $0 (excluding Arduino Uno)
2. BUILD TIME = 5 minutes
3. PRECISION = 10 microns (1/100000th of a meter)
4. DIFFICULTY = none
Full Project:

Description
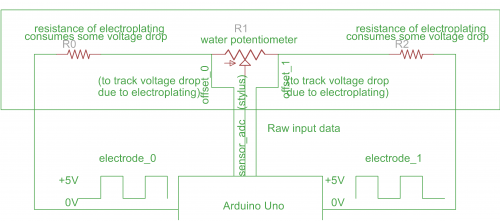
The basic idea behind this sensor is the use of a cuboidal water container as a water potentiometer device. It is similar to a 3-pin slide pot used in electronic circuits, with the 2 aluminum electrodes equivalent to the 2 end pins of a slide pot, and the right index fingertip is equivalent to the middle pin (voltage output) of a slide potentiometer. The output voltage is read by Arduino Uno’s ADC and the displacement is computed. This data is serially printed by Arduino Uno to my laptop and plotted by the software SerialPortPlotter.exe.
External Links
Explanation of Tracking Algorithm
Since water is an electrolyte, its composition, hence, conductivity does not remain uniform on passing current through it. Thus, to retain uniform composition, electrolysis must be minimized. In order to minimize electrolysis, the following adaptations have been made –
- The microcontroller C++ code constantly keeps swapping over the polarity of voltage drop across the water, to cancel out the disturbance in its composition.
- The microcontroller C++ code has been optimized for minimum cycle time period, to maximize the frequency of swapping of the voltage drop polarity.
Owing to the above adaptations, the water always has uniform composition and hence, uniform conductivity at all points inside water. Thus, the voltage drops linearly with respect to the displacement from one electrode.
A parallel pair of aluminum sheet electrodes are attached to the water container at two opposite faces. These two apply a voltage drop of 5 volt across the water. A bare copper wire, connected to Arduino Uno’s ADC input, is tied to the left wrist. This pin tracks the voltage at the right index fingertip, i.e., output voltage of the water potentiometer, when dipped into the water.
Due to electroplating on the aluminum electrodes, some voltage drop is consumed at the 2 electrodes, so this offset in voltage at the ends of the potentiometer needs to be corrected, or else voltage would not be linear, i.e., directly proportional to the horizontal displacement. Thus, 2 offset pins are attached to the water container and connected to Arduino Uno’s ADC input. In other words, the voltage drops linearly between the 2 offset pins (and NOT between the 2 electrodes, due to electroplating on the 2 electrodes).
Build Instructions
-
Construct the Sensor
Cut 2 square pieces from the aluminum foil having breadth of the plastic cuboid container box and height a little greater than that of the container. Stick each square lamina on a plastic base of exactly equal dimensions as the lamina. Fix these 2 plates to the plastic cuboidal container box at an angle of 90 degrees or PI/2 radians to the horizontal base.
- Hook Up the Sensor Wires


Connect a wire from from one of those electrode plates to digital pin 2 of the Arduino Uno. Now this electrode plate becomes ELECTRODE_0. Connect another wire from from the other of those electrode plates to digital pin 3 of the Arduino Uno. Now this electrode plate becomes ELECTRODE_1.
Now, fix one wire to the inner side of the plastic cuboidal container box at some distance from ELECTRODE_0. Connect this wire to analog pin A1 of the Arduino Uno. Now, this pin becomes OFFSET_0. Now, fix another wire to the inner side of the plastic cuboidal container box at some distance from ELECTRODE_1. Connect this wire to analog pin A2 of the Arduino Uno. Now, this pin becomes OFFSET_1.
- Tie Bare Copper Wire
Tie bare (non-insulated) copper wire to your left wrist (or right wrist, if you are left-handed). The bare copper wire must be wrapped VERY tightly multiple times to make good contact with the skin. Connect the other end to analog pin A0 of the Arduino Uno.
- You’re All Set!
Fig #1 – Arduino IDE serial monitor when fingertip is dipped in water

Fig #2 – Arduino IDE serial monitor when fingertip is outside water
Wipe the 2 aluminum electrodes and the interior of the plastic water container with a wet cloth to clean it of dust and impurities. Fill the water container with water from your home water purifier The water must be at room temperature. Salt or any other substances/impurities must NOT be added to it. Disconnect your laptop charger (this sensor won’t work with a desktop PC), to eliminate noise due to AC-mains hum. At last, power the Arduino Uno with a 9V heavy-duty battery and connect it to your laptop via a USB cable.
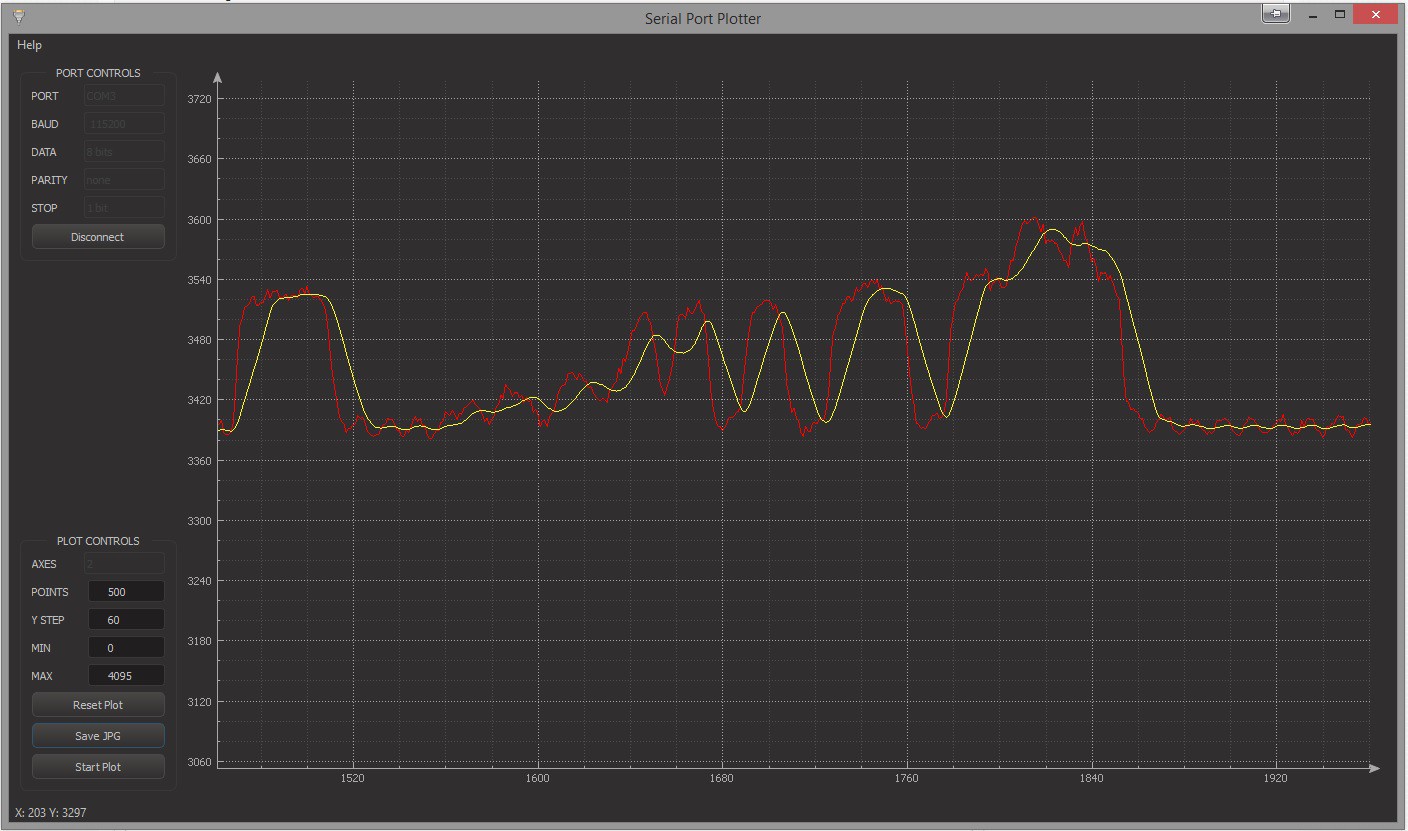
The x-coordinate of the fingertip can be used for any fun application like controlling the laptop screen brightness, controlling the laptop’s speaker volume, among others. In the YouTube demo video, I’ve used a software called SerialPortPlotter.exe to plot a graph of the fingertip’s x-coordinate versus time.
Circuit diagram:
Bill of Materials:
- Arduino Uno Rev3
- 9V heavy-duty battery
- aluminum foil (kitchen foil)
- 1 bare copper wire
- plastic container (rectangle-base or square-base)
- 5 wires (2 for electrodes, 2 for offset, 1 for left wrist)


Firmware:
Here’s the link to the Arduino C++ code for DIY Water Touchpad
FORMAT of serial output from Arduino Uno –
$34675;n
RANGE of serial output is 0 to 50000.
When stylus is outside water, only then serial output is 51000.
BAUDRATE : 2000000 bits per sec
Fig #2 – Arduino IDE serial monitor when fingertip is outside water
Software & Code Snippets:
I’ve used a software called SerialPortPlotter.exe to plot a graph of the fingertip’s x-coordinate versus time. You can download SerialPortPlotter.exe from here – https://os.mbed.com/media/uploads/borislav/serialportplotter.zip, or you can visit SerialPortPlotter’s main page here – https://os.mbed.com/users/borislav/notebook/serial-port-plotter/
In SerialPortPlotter.exe, make the following modifications –
- BAUD = 2000000 bits per second
- DATA = 8 bits
- PARITY = 0 bits
- STOP = 1 bit
- POINTS = 1000 Y
- STEP = 1500
- MIN = 0
- MAX = 51000

-
 Arduino ISP (In System Programming) and stand-alone circuits
We use an Arduino to program other ATmega without...
- Posted 12 years ago
-

-

-
 GSM GPS shield for Arduino
Shield for Arduino designed and based on the module...
- Posted 12 years ago
-
 Small Breakout for SIM900 GSM Module
Some post ago we presented a PCB to mount...
- Posted 13 years ago
-
 makeITcircular 2024 content launched – Part of Maker Faire Rome 2024
Applications to MakeITcircular must be in by October 3,...
- Posted 2 weeks ago
-
 SONY color camera module, 700 TV Lines
Color camera module equipped with a 1/3″ CCD sensor...
- Posted 3 weeks ago
-
 ESP32 Low Power Module
ESP32 Low Power Module, based on Espressif’s SoC capable...
- Posted 2 months ago
-

-
 Application For Maker Faire Rome 2024: Deadline June 20th
Learn More About the Ideas, Makers + Projects at...
- Posted 2 months ago
2 Comments