- makeITcircular 2024 content launched – Part of Maker Faire Rome 2024Posted 2 weeks ago
- Application For Maker Faire Rome 2024: Deadline June 20thPosted 2 months ago
- Building a 3D Digital Clock with ArduinoPosted 7 months ago
- Creating a controller for Minecraft with realistic body movements using ArduinoPosted 7 months ago
- Snowflake with ArduinoPosted 8 months ago
- Holographic Christmas TreePosted 8 months ago
- Segstick: Build Your Own Self-Balancing Vehicle in Just 2 Days with ArduinoPosted 8 months ago
- ZSWatch: An Open-Source Smartwatch Project Based on the Zephyr Operating SystemPosted 9 months ago
- What is IoT and which devices to usePosted 9 months ago
- Maker Faire Rome Unveils Thrilling “Padel Smash Future” Pavilion for Sports EnthusiastsPosted 10 months ago
Cosino, the platform that makes your ideas
Project Summary:
In the embedded world exists boards like Arduino Yun, Arduino 3, Udoo and much more, which have the peculiarity to meet both the world of Arduino and Linux. Well, what we are describing here is not simply a new board that aims to integrate these two worlds again, but it is a new project that was created with a quite different inspiration and approach. Let's see what it is.
Full Project:

The project
First of all Cosino is an acronym for “Computer Oriented to Simplify Innovation of New Objects” and basically gives its the name to the Linux board around which is based the whole project that we are going to describe below. The project is Italian from the Tuscany team of HCE Engineering.
But in what consists, exactly, the project? It is essentially based on the concept of simplify the work of embedded developers and designers for the industrial world by providing a platform and the right tools that allow, in short time, to start prototyping an industrial board until its mass production. This is done by means of three main “ingredients”: the Linux board, the add-on boards called “extensions” and components called “peripherals”.
We start from the Cosino board, whose main appellation is to be a “board for rapid prototyping”. The main characteristics of the board are described below, but what we want to emphasize here is that it is a Linux board suitable for industrial environments, already certified and therefore useful to realize finished products just right now, so not only usable for hobby projects, even if the board can be useful also for makers due to its integration with Arduino, as we shall see.
![]()
Next to the board, which is the heart of the project, there are also the so-called “extensions” or boards that consists primarily of sensors and actuators, thus leaving the control logic to the Linux board: this set therefore represent our embedded system, but with the advantage that we have to design only our particular “extension”. A great saving of time!
The idea then goes further, because in addition there are also the “peripherals”, a series of components always oriented to the industrial world, already tested and supported by the Cosino project and therefore usable since right away.
In addition to the tools mentioned, the site http://www.cosino.io provides to engineers a set of useful services for running their embedded designs. In fact, on the site you can find documentation, guides, tools, projects and technical support necessary to reduce the development time of a prototype. Not only, the Cosino team is able to offer support also in the subsequent phases of the prototype development or in the area of board engineering and to the start of production till the finished product. As is known, these aspects should not be certain neglected and indeed represent a non-trivial part in the realization of a marketable product.
Cosino board
The core board is based on the Atmel ARM9 microcontroller SAM9G35, has a 128Mb SDRAM memory and a 256Mb Flash. The board has the expected I/O to manage Ethernet, USB, UART, SPI, I2C, LCD and GPIO (more technical details can be found at the reference site). These I/O are accessed through two headers that allow, in fact, to reuse the board for different purposes, depending on the specific application that the user will have to develop. Therefore any connector, whether it RJ45 jack, USB or SD-Card, should be provided on our external board: on one side this might seems like a limitation, but actually offers the advantage that we are able to include on the board only the connectors and the I/O that matters us.

Regarding the software side, Cosino is ready to use the Linux kernel 3.10 and the Debian 7.0 (Wheezy) as well as the embedded distribution OpenWRT (Barrier Breaker version). This translates to the user in the fact that with Cosino is possible from the outset to have tons of open source softwares for the most disparate fields of application.
Again, on the reference site http://www.cosino.io we can find useful information about kernel Linux compilation, Linux distribution installation and so on, even if these steps that can be skipped by those who are beginners or not want to waste theis time, thanks to the availability of ready preloaded Sd-Card.
The Arduino extension
The fact of having a core board represents in itself an advantage, but in reality, as we have already mentioned, there are also, however, external connectors and I/O that should be provided (ie mounted) on a new board. But at first, making a new board to be connected to the Cosino could be a waste of time, for those who are making just a prototype.
For this reason, the Cosino team has decided to create a generic “extension” that allow us, since the beginning, to devote early time of the project on the software development. The board is called Mega2560 and has RJ45 connectors, USB, RS485, JTAG and much more. In addition there is a micro USB that can be used both to power the board and to have a serial debug console.

But the most intriguing feature of this “extension” is that it presents a section with an ATmega2560 microcontroller (and related circuitry) that allows us to have a real Arduino Mega 2560 compatible board (that’s the reason of the name for this extension). Therefore, given the presence of the typical Arduino connectors, you can use all the shields (and related software) available for the Arduino Mega, as well as those for the Arduino UNO (which Arduino Mega compatible of course).
Communication between Linux and Arduino is available through direct serial interface.
Let’s get start to prototype
We show here a practical example, just to see what advantage can result from base out project on a Cosino board and a Mega2560 extension. Suppose we need to build a prototype for a board that, when an object move on a conveyor belt, will have to count the number of these objects and provide us the detected temperature near the same object: think for example of a bakery product just out of the oven. If the temperature is above or below certain threshold values, the system will report it as it will mean that the cooking of the product has not been optimal. Of course the time of arrival of the pieces, as well as the temperature value detected, will constitute useful collecting data for the production system.
Since we initially start with a prototype, we can make simplifications about the system: for example we can use IR diodes as a sensor of counting objects, use the popular Dallas DS18B20 to detect the temperature, while for communication we can use the serial interface instead of the RS485 (this is actually a simplification of the circuit only). Switching to a more complex sensor means, as we shall see, have to modify slightly our project.
A simple schematic is therefore the following:
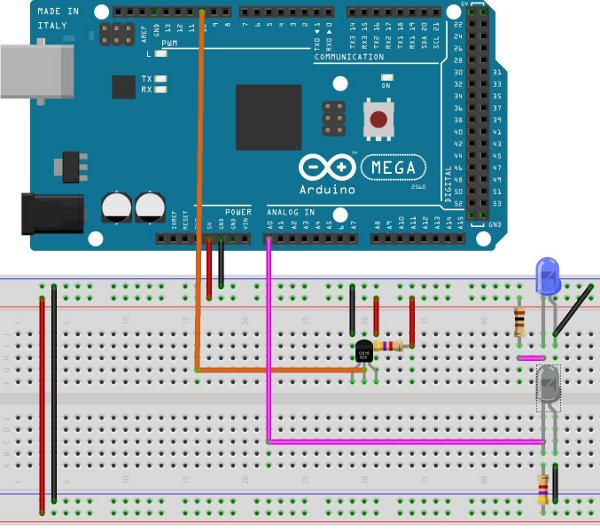
Then we create a new project with the Arduino IDE. The sketch will have to read the temperature of the DS18B20 sensor and detect the interruption of the infrared barrier.
On the Arduino website (http://playground.arduino.cc/Learning/OneWire) is already present the driver to handle the 1-Wire DS18B20 sensor, while for the IR diodes we will simply read the level of an analog signal via the function analogRead(). These data will be accessible from the outside using the industrial Modbus protocol, so we’ll add to our Arduino project also this support by downloading the related library from site
https://code.google.com/p/simple-modbus.
So the Arduino main task is to read the information from the sensors and send them out via Modbus. This is a code example:
#include <OneWire.h>

#include <SimpleModbusSlave.h>

#define IR_PIN 0

OneWire ds(10);


// Dallas address

addr[8] ={0x28, 0xA3, 0x10, 0x05, 0x04, 0x00, 0x00, 0x78 };

int16_t temp;

enum { ADC_VAL, TEMP_VAL, HOLDING_REGS_SIZE };

unsigned int holdingRegs[HOLDING_REGS_SIZE];


void setup() {

    modbus_configure(&Serial, 9600, SERIAL_8N2, 2, 2, HOLDING_REGS_SIZE, holdingRegs);

}


void loop() {

    modbus_update();

    // readTemp() read Dallas temperature and return a raw int value

    temp = readTemp();

    holdingRegs[ADC_VAL] = analogRead(IR_PIN);

    holdingRegs[TEMP_VAL] = 0xFFFF & temp;

}

Let us now turn to the project on Linux. Here the software will read the data received via the Modbus from Arduino and perform additional processing: when it detects the presence of an object will have to read the temperature value supplied by the DS18B20 sensor and, based on this information, activate or not an alarm or block the advancement of the conveyor belt. This data should then be written to a log file or to a database. A minimal example of code (in C language, although we can use the language we are most comfortable) may be the following:
#include <modbus.h>

#include <stdio.h>

#include <stdlib.h>

#define MB_ADDR 2

#define REG_START 0

#define REG_END 1

#define TEMP_L 45.0

#define TEMP_H 80.0


int main(void) {

    uint16_t tab_reg[3];

    modbus_t *mb;

    float temp;

    int ir;

    mb = modbus_new_rtu("/dev/ttyS3", 9600, 'N', 8, 2);

    modbus_connect(mb);

    modbus_set_slave(mb, ADDR);

    while (1) {

        modbus_read_registers(mb, REG_START,(REG_END - REG_START + 1), tab_reg);

        ir = tab_reg[0];

        temp = (float)tab_reg[1]/16.0;

        if (ir > 100) {

            // write data to file or database ...

            if (temp < TEMP_L || temp > TEMP_H)

                // alarm!! ...

        }

    }

    modbus_close(mb);

    modbus_free(mb);

    return 0;

}
As you can guess, make a first prototype of such a system really means to spend half a day with most of the time devoted specifically to the development of software.
Of course, if you want, you can go further with this example and activate on Cosino an Apache web server, purging data on a database server and make some HTML pages, so as to have a system which allow us to accessing data from everywhere.
At this point, if our prototype satisfies us, it can be refined. For example the sensors and the Arduino board may be replaced with industrial sensors driven by a PLC. In this case, since we are working with the Modbus protocol, the only Linux side change that we essentially have to do is to modify the address of the slave PLC and sensors, while the rest of the application will remain the same. That is we need to modify only these three lines of code:
If instead the purpose of the project is to develop our own board using the components of the prototype, the path will be to design and engineer a new “extension” for the Cosino with, of course, the sensors and with the header to accommodate the Cosino board itself.

Conclusions
As described, the Cosino project was born to allow designers to cut their time development process for a new prototype, this is possible thanks to the use of industrial devices already tested and supported, without neglecting the advantage of having available all the Arduino world thanks to the Mega2560 extension. This last option on the other hand can come in handy even to skilled makers which want to build Arduino and Linux integrated systems.
Once completed the development of the prototype, Cosino also offers the tools and services to switch the project instantly into the production stage or to engineer the board to be mass produced, perhaps selling it on the Cosino store.

-
 Arduino ISP (In System Programming) and stand-alone circuits
We use an Arduino to program other ATmega without...
- Posted 12 years ago
-

-

-
 GSM GPS shield for Arduino
Shield for Arduino designed and based on the module...
- Posted 12 years ago
-
 Small Breakout for SIM900 GSM Module
Some post ago we presented a PCB to mount...
- Posted 13 years ago
-
 makeITcircular 2024 content launched – Part of Maker Faire Rome 2024
Applications to MakeITcircular must be in by October 3,...
- Posted 2 weeks ago
-
 SONY color camera module, 700 TV Lines
Color camera module equipped with a 1/3″ CCD sensor...
- Posted 3 weeks ago
-
 ESP32 Low Power Module
ESP32 Low Power Module, based on Espressif’s SoC capable...
- Posted 2 months ago
-

-
 Application For Maker Faire Rome 2024: Deadline June 20th
Learn More About the Ideas, Makers + Projects at...
- Posted 2 months ago