- makeITcircular 2024 content launched – Part of Maker Faire Rome 2024Posted 2 weeks ago
- Application For Maker Faire Rome 2024: Deadline June 20thPosted 2 months ago
- Building a 3D Digital Clock with ArduinoPosted 7 months ago
- Creating a controller for Minecraft with realistic body movements using ArduinoPosted 7 months ago
- Snowflake with ArduinoPosted 8 months ago
- Holographic Christmas TreePosted 8 months ago
- Segstick: Build Your Own Self-Balancing Vehicle in Just 2 Days with ArduinoPosted 8 months ago
- ZSWatch: An Open-Source Smartwatch Project Based on the Zephyr Operating SystemPosted 9 months ago
- What is IoT and which devices to usePosted 9 months ago
- Maker Faire Rome Unveils Thrilling “Padel Smash Future” Pavilion for Sports EnthusiastsPosted 10 months ago
Facebook counter – How many Likes to your facebook fanpage?
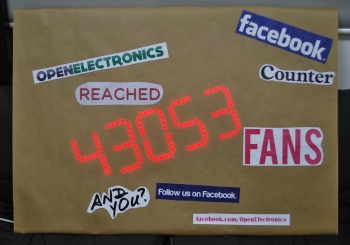
Whether it’s a personal, store or product page, popularity at today is measured in Likes: the number of users who liked your page, photo or any other content you posted on
Facebook is a key metric of customer engagement and potential success for your venture.
That’s why we decided to put together some clever ideas (and few circuits) to create a giant sized display, based on Arduino, that is able to display the number Like collected for a specific page, without being connected on a computer.
Just try a little search
When it comes to applications with Arduino, the chance that someone already created something similar (at least related) to what you want to create is quite high.
After few simple web searches we discovered an interesting piece of work, posted on SkoltiLab blog dubbed “Facebook Like Box” (http://www.skolti.com/lab/exp8/).
The program – written by David Alcubierre – uses Facebook APIs. Among many other features, these APIs allow developers to send queries and get XML responses – one of the calls actually returns the information about the number of likes related to a specified page.
David’s project outputs on an LCD display with two lines of 20 characters: the classic LCD screen mounted on display shield available from various suppliers; unfortunately, we wanted something more impressive and visible and this was far too small and discreet.
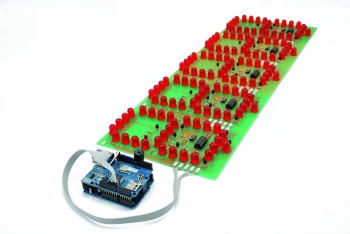
With this in mind, we created a display in which each single digit has its own printed circuit board and is connected to the others in a series. This setup communicates with Arduino using the I2C protocol: the chip used in the display is a PCF8574, an I/O expander that is controllable via I2C and addressable thanks to three bits. This setup is ideal for connecting to an Arduino board.
Furthermore, we decided to add a beep playing a short tune at any time the like number increases.

The hardware ingredients
While you probably don’t need information about Arduino and the ethernet board, few words are worth spending on the I/O expander and the I2C communication protocol used to manage a significant number of lines of two-way communication.
The internal block diagram of PCF8574 taken from its datasheet shows a very straightforward and easy to understand structure, where the serial input data on the SDA are converted in parallel data by a shift register and vice versa.
The I/O ports have some special features and, when on high level don’t support more than one milliampere, while at low level they can support up to 25 mA. The operating range of the chip ranges from 2.5 to 6 V.
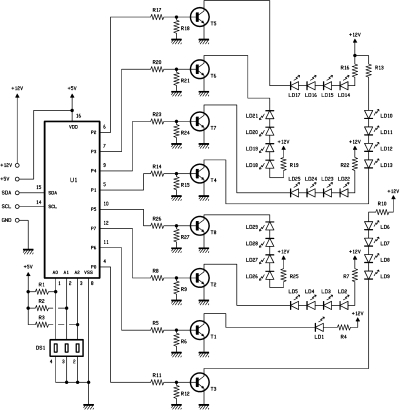
With these characteristics, the use of this integrated circuit for our display inevitably requires a transistor for each of the seven segments we want to create with the 4 red LEDs. Moreover, using a single integrated for each digit is only an ingenious solution that transforms the eight bits available in seven segments plus a dot. Through the definition of a bitmap for each specific integer number we have the transformation of a byte sent to the circuit into a displayed digit with the ignition of the relevant segments.

The definition of each chip address is made via the appropriate three-way dip switch available in each display base: simply check the appropriate address in the sketch to correctly identify each digit.
The entire circuit is 12 volts powered: Arduino supplies the power to the PCF8574 through its own regulator which converts the 12V input to the 5V required; the Ethernet shield is powered through the Arduino board as well.
Refer to the wiring diagram for all the information on the various links between the boards.

The sketch
/*
 Facebook Like Box

 This sketch connects to Facebook using an Ethernet shield.

 created in 8 Aug 2012
 by David Alcubierre

modified by Boris Landoni

 This code is in the public domain.

 */
#include <SPI.h>
#include <Ethernet.h>

#include <Wire.h>

#define EXPANDER_4 0B00111000  //PCF8574A
#define EXPANDER_3 0B00111001  //PCF8574A
#define EXPANDER_2 0B00111010  //PCF8574A
#define EXPANDER_1 0B00111011  //PCF8574A
#define EXPANDER_0 0B00111100  //PCF8574A

int length = 15; // the number of notes
char notes[] = "ccggaagffeeddc "; // a space represents a rest
int beats[] = { 1, 1, 1, 1, 1, 1, 2, 1, 1, 1, 1, 1, 1, 2, 4 };
int tempo = 100;

int num[10];

int speakerPin = 5;

//LiquidCrystal lcd( 8, 9, 4, 5, 6, 7 );

// Enter a MAC address and IP address for your controller below.
// The IP address will be dependent on your local network:
byte mac[] = {  0xDE, 0xAD, 0xBE, 0xEF, 0xFE, 0xED };
IPAddress ip(192,168,0,99);

// initialize the library instance:
EthernetClient client;

const unsigned long requestInterval = 20000;  // delay between requests

char serverName[] = "api-read.facebook.com";  // facebook URL

boolean requested;                   // whether you've made a request since connecting
unsigned long lastAttemptTime = 0;            // last time you connected to the server, in milliseconds

String currentLine = "";            // string to hold the text from server
String fbcount = "";                  // string to hold the tweet
long  fbcountlold;                  // string to hold the tweet
long  fbcountl;
char fbcountA[6];
boolean readingFbcount = false;       // if you're currently reading the tweet

void setup() {
  num[0]= B10101111;
  num[1]= B00000011;
  num[2]= B10110110;
  num[3]= B10010111;
  num[4]= B00011011;
  num[5]= B10011101;
  num[6]= B10111101;
  num[7]= B00000111;
  num[8]= B10111111;
  num[9]= B10011111;
  pinMode(speakerPin, OUTPUT);
  // reserve space for the strings:
  currentLine.reserve(256);
  fbcount.reserve(100);

  // Open serial communications and wait for port to open:
  Serial.begin(9600);
  Wire.begin();

  PCFwrite(EXPANDER_0, 255);
  PCFwrite(EXPANDER_1, 255);
  PCFwrite(EXPANDER_2, 255);
  PCFwrite(EXPANDER_3, 255);
  PCFwrite(EXPANDER_4, 255);
  delay(2000);

  // attempt a DHCP connection:
//  Serial.println("Attempting to get an IP address using DHCP:");
  if (!Ethernet.begin(mac)) {
    // if DHCP fails, start with a hard-coded address:
    Serial.println("failed to get an IP address using DHCP, trying manually");
    Ethernet.begin(mac, ip);
  }
  Serial.print("My address:");
  Serial.println(Ethernet.localIP());
  // connect to Twitter:
  connectToServer();
  //delay(2000);

  for (int i=0;i<10;i++){
    PCFwrite(EXPANDER_0, num[i]);
    PCFwrite(EXPANDER_1, num[i]);
    PCFwrite(EXPANDER_2, num[i]);
    PCFwrite(EXPANDER_3, num[i]);
    PCFwrite(EXPANDER_4, num[i]);
    delay(500);
  }

  PCFwrite(EXPANDER_0, 0);
  PCFwrite(EXPANDER_1, 0);
  PCFwrite(EXPANDER_2, 0);
  PCFwrite(EXPANDER_3, 0);
  PCFwrite(EXPANDER_4, 0);

}

void loop()
{

  if (client.connected()) {
    if (client.available()) {
      //Serial.println("read incoming bytes");
      char inChar = client.read();
      //Serial.print(inChar);
      // add incoming byte to end of line:
      currentLine += inChar;

      // if you get a newline, clear the line:
      if (inChar == '\n') {
        currentLine = "";
      }
      // the current line ends with <fan_count>
      if ( currentLine.endsWith("<fan_count>")) {
        readingFbcount = true;
        fbcount = "";
      }

      if (readingFbcount) {
        if (inChar != '<')  {
          if (inChar != '>'){
            fbcount += inChar;
          }
        }
        else {
          // if you got a "<" character,
          // you've reached the end of the facebook:
          readingFbcount = false;
          fbcountl = StrToFloat(fbcount);
          Serial.print("Open Electronics has reached ");
          Serial.print(fbcountl);
          Serial.println(" Fans");
          if (fbcountlold<fbcountl){
            play();
            Serial.print("Open Electronics has ");
            Serial.print(fbcountl-fbcountlold);
            Serial.println(" more Fan");
          }
          fbcountlold=fbcountl;

          //fbcount.toCharArray(fbcountA, 6);

          int i = fbcount[0];
          i=i-48;
          PCFwrite(EXPANDER_0, num[i]);
          if (fbcountl>9){
            i = fbcount[1];
            i=i-48;
            PCFwrite(EXPANDER_1, num[i]);
          }

          if (fbcountl>99){
            i = fbcount[2];
            i=i-48;
            PCFwrite(EXPANDER_2, num[i]);
          }

          if (fbcountl>999){
            i = fbcount[3];
            i=i-48;
            PCFwrite(EXPANDER_3, num[i]);
          }

          if (fbcountl>9999){
            i = fbcount[4];
            i=i-48;
            PCFwrite(EXPANDER_4, num[i]);
          }

          // close the connection to the server:
          client.stop();
        }
      }
    }
  }
  else if (millis() - lastAttemptTime > requestInterval) {
    // if you're not connected, and two minutes have passed since
    // your last connection, then attempt to connect again:
    connectToServer();
  }
}

void connectToServer() {
  // attempt to connect, and wait a millisecond:
  //Serial.println("connecting to server...");
  String content = "";
  if (client.connect(serverName, 80)) {
//    Serial.println("making HTTP request...");
    // make HTTP GET request to Facebook:
    client.println("GET /restserver.php?format=xml&method=fql.multiquery&pretty=0&queries={%22page_info%22%3A%22select%20name%2Cfan_count%20from%20page%20where%20page_id%20IN%20(169319619774700)%22}&sdk=joey HTTP/1.1");
    // declare correct server
    client.println("HOST: api-read.facebook.com" );// + content.concat(serverName));
    client.println();
  }
  // note the time of this connect attempt:
  lastAttemptTime = millis();
  //Serial.println("OUT making HTTP request...");
//  Serial.println(lastAttemptTime);
}

float StrToFloat(String str){
  char carray[str.length() + 1]; //determine size of the array
  str.toCharArray(carray, sizeof(carray)); //put str into an array
  return atof(carray);
}

void PCFwrite(int addr, int data) {
/*  Serial.print("addr ");
  Serial.println(addr);
  Serial.print("data ");
  Serial.println(data);
*/
  Wire.beginTransmission(addr);
  Wire.write(data);
  Wire.endTransmission();

}

void playTone(int tone, int duration) {
  for (long i = 0; i < duration * 1000L; i += tone * 2) {
    digitalWrite(speakerPin, HIGH);
    delayMicroseconds(tone);
    digitalWrite(speakerPin, LOW);
    delayMicroseconds(tone);
  }
}

void playNote(char note, int duration) {
  char names[] = { 'c', 'd', 'e', 'f', 'g', 'a', 'b', 'C' };
  int tones[] = { 1915, 1700, 1519, 1432, 1275, 1136, 1014, 956 };

  // play the tone corresponding to the note name
  for (int i = 0; i < 8; i++) {
    if (names[i] == note) {
      playTone(tones[i], duration);
    }
  }
}

void play(){
  for (int i = 0; i < length; i++) {
    if (notes[i] == ' ') {
      delay(beats[i] * tempo); // rest
    } else {
      playNote(notes[i], beats[i] * tempo);
    }

    // pause between notes
    delay(tempo / 2);
  }
}
Given that all starts from Tom Igoe’s Twitter Client plus the Facebook query API tweak made by David, we still need to code to add the display replacement and the counter increase jingle tone.
With regards to the library, the Ethernet functions and facebook APIs query code, plu XML parsing, you can refer to the “Twitter Client with Strings” example provided with the core installation of Arduino1.0.x.
But, let’s see he parts we added to existing material.
First we must necessarily include the SPI and Ethernet libraries, plus the Wire library for I2C communication.
At the beginning of the sketch we find the defines that combine the five panels with the relative addresses through the “EXPANDER_n” constants with “n” ranging from 0 to 4; use of integrated PCF8574A is assumed in the sketch, then the bit mask is “0B0011xxx”. In case of PCF8574 type integrated circuits we should have used “0B0000xxx”.
The chosen jingle is “Twinkle Twinkle Little Star” with a usual “PlayNote” procedure found towards the end the sketch. In this first part we define the vectors with the notes and their duration, along with the time and length. The pin to connect the audio circuitry is D5.
For networking we chosen the fixed IP configuration through IPAddress ip (192,168,0,99), but you can also use a method based on DHCP.
Following lines instantiate the Ethernet client and create the variables that we will use during execution.
The setup () part is used it to place numbers the bitmap array – the one containing the segments to be lighted to represent each digit – the appropriate values: let’s remember that the “0” bits holds the segment off and that when the PCF8574 is reset this activates all their outputs with the high level.
Before finishing setup() we turn on all segments for two seconds, then we display simultaneously on each display the digits from 0 to 9. At the end of this cycle, we turn all digits off by sending to all 5 displays a 0 value.
The main loop checks that the client is connected to the server declared as a string at the beginning of the sketch with
char serverName[] = “api-read.facebook.com”;
and begins to parse the xml received, searching for the Like value with this simple routine
if ( currentLine.endsWith(“<fan_count>”)) {
readingFbcount = true;
fbcount = “”;
}
if (readingFbcount) {
if (inChar != ‘<‘) {
if (inChar != ‘>’){
fbcount += inChar;
}
}
The data is loaded character by character into the fbcount variable is used by subsequent statements that, for five times, read a character and transfer it on the corresponding display with the function defined at the end of PCFwrite scketch.
Before displaying the fbcount value a comparison is also made with the numerical value that was previously read, so that, in case of increase the jingle is played. This routine makes reference to the two additional routines playTone and playNote allowing for the generation of the frequency corresponding to the letter representing the note in the array, for the period specified in the vector beats.
The server connection is performed by the code that is outside the main loop containing the call to the server as defined in the initial part of the sketch. The call sends a http GET with the query string.
To ensure the data are those related to the right page you need to insert the correct ID (check our XML and see our site and our ID). The string is very long so we abbreviated it in order to highlight the place where you enter the ID.
client.println(“GET /restserver .… %20IN%20(169319619774700)%22}&sdk=joey HTTP/1.1”);
The ID is in brackets and is located near the end of the string.
To recover your ID can be done by accessing your page and then editing the URL replacing “www” with “graph”. For clarity:
http://www.facebook.com/OpenElectronics -> displays the Facebook page
http://graph.facebook.com/OpenElectronics -> Show the card with various information including the ID, as shown:
{
   "id": "169319619774700",
   "about": "Open-electronics.org is the brainchild of a world leader in hobby electronics Futura Elettronica. http://www.open-electronics.org",
   "app_id": "0",
   "can_post": false,
   "category": "Computers/internet website",
   "checkins": 0,
   "cover": {
      "cover_id": 570038313036160,
      "source": "http://sphotos-a.ak.fbcdn.net/hphotos-ak-prn1/524790_570038313036160_1715750447_n.jpg",
      "offset_y": 62,
      "offset_x": 0
   },
   "general_info": "Open Electronics is the brainchild of a world leader in hobby electronics Futura Elettronica.\nOur technicians will support you in designing circuits, writing firmware, making prototypes, choosing components, so as to help you project your idea.",
   "has_added_app": false,
   "is_community_page": false,
   "is_published": true,
   "likes": 49454,
   "link": "https://www.facebook.com/OpenElectronics",
   "mission": "Open Electronics wants to become the reference open source site with ideas and feedback aimed to enrich the community. Beginners can find all the aid needed to improve their skills in electronics.",
   "name": "Open Electronics",
   "products": "Open source electronic projects",
   "release_date": "12/11/2010",
   "talking_about_count": 1660,
   "username": "OpenElectronics",
   "website": "http://www.open-electronics.org",
   "were_here_count": 0
}
http://api-read.facebook.com/restserver.php?format=xml&method=fql.multiquery&pretty=0&queries={%22page_info%22%3A%22select%20name%2Cfan_count%20from%20page%20where%20page_id%20IN%20(>>ID<<)%22}&sdk=joey
You must use the ID that before the “name” field while ignoring other ids that may be found within the data displayed. You can test the data that you retrieved by putting in your browser the string that we reported, replacing >>ID<< with the number you just retrieved.
For open-electronics.org:
Here the answer is a little shorter, since we simplified the query string.

The other routines contained in the sketch are used for displaying and for converting from strings to numbers, followed by the parts that are related to the jingle, already described.
Compiling the sketch
Before compiling and loading the code on the board, you need to change the IP according to the one assigned to your Arduino on your LAN and set the addresses of the display according to their actual configuration. The ID is inserted into the sketch before compiling and after having “tested” it through the browser. If you do not take care of all this, before loading the firmware on your Arduino, you’ll have a good chance of having a non-working system or simply a system displaying Likes from someone else’s page.
Once the firmware is compiled and loaded you can do a first test: the debug strings print instructions on the serial port allow you to check the software without connecting the LED display, but only by mounting the Ethernet shield and making the connection to your LAN. For each server query you’ll have the current Likes output on the IDE console – which of course you must activate -if there is an increase, you will also see the new Likes number.
Final testing
Even in the absence of a network connection, the firmware has a display initialization routine that first turns on all segments in sequence and then composes numbers from 0 to 9 simultaneously on the digits. During this step keeping the IDE console open can be useful (check that the once the network cable is connected, after resetting the Arduino, you receive the message My address: <IP of address of the board> that should be followed by the Like count)
If you have a particularly successful website and five digits for Likes are not enough, this is not a problem: just physically add one or more digits to the series and proportionally adapt the defines and the code blocks writing one digit after another for each display.

Related Posts


6 Comments
Leave a Reply
-
 Arduino ISP (In System Programming) and stand-alone circuits
We use an Arduino to program other ATmega without...
- Posted 12 years ago
-

-

-
 GSM GPS shield for Arduino
Shield for Arduino designed and based on the module...
- Posted 12 years ago
-
 Small Breakout for SIM900 GSM Module
Some post ago we presented a PCB to mount...
- Posted 13 years ago
-
 makeITcircular 2024 content launched – Part of Maker Faire Rome 2024
Applications to MakeITcircular must be in by October 3,...
- Posted 2 weeks ago
-
 SONY color camera module, 700 TV Lines
Color camera module equipped with a 1/3″ CCD sensor...
- Posted 3 weeks ago
-
 ESP32 Low Power Module
ESP32 Low Power Module, based on Espressif’s SoC capable...
- Posted 2 months ago
-

-
 Application For Maker Faire Rome 2024: Deadline June 20th
Learn More About the Ideas, Makers + Projects at...
- Posted 2 months ago
Pingback: Facebook counter – How many Likes to your...
Pingback: Facebook counter – How many Likes to your...