
Building our centralized web-controlled home video surveillance system. Last episode
In the previous posts, dedicated to the creation of a video surveillance system based on Raspberry Pi and the MotionEye application, we saw how to install the software necessary for our architecture and how to configure a first video camera connected via USB and a second Pi Camera that can be managed remotely, using a second Raspberry Pi, reachable from the local network, with MotionEye installed. We have seen how to configure the management of alarm notifications against the detection of a “suspicious” movement in the area controlled by the video camera. In the face of an event, we have described the possibility of sending a message via email and / or executing a command or program. Still with reference to the architecture that we propose in Fig. 1, in this episode we see how to expand our architecture with a commercial IP camera, all always controlled by our Raspberry Pi “concentrator”. We state that the information contained in this article is of an “orientation” type to deal with a project of this type. Those who want to reproduce what is described should have a good knowledge of the GNU / Linux world, of the TCP / IP protocol and of the SOAP technology (Simple Object Access Protocol – it is the technology adopted for the development of Web Services, category to which ONVIF belongs). Obviously, the knowledge of a little programming in the Python language does not hurt.
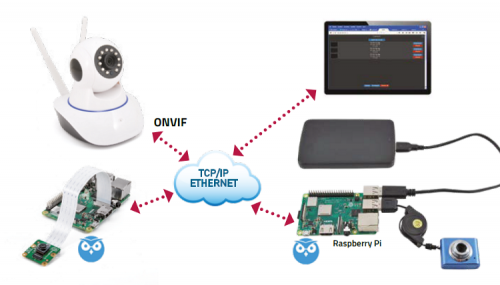
Fig. 1
The challenge, if we can call it that, was to be able to control a commercial IP camera from the MotionEye application. A wide range of this type of video cameras is available, of good quality, with prices continuously falling and equipped with TCP / IP connectivity, PTZ zoom and pan (Pan, Tilt, Zoom). Generally, for the use of these cameras, proprietary software is offered, albeit free of charge, usually provided as “apps” for smartphones or PC applications. Fortunately, an increasingly widespread trend is the adoption by manufacturers of the GNU / Linux operating system and the ONVIF (Open Network Video Interface Forum) communication protocol and the RTSP (Real-Time Streaming Protocol) video streaming protocol.
Too many acronyms? Let’s proceed with the order.
The IP camera we have chosen is the IPC-Z06H model with the code CP728. The main problem we encountered is the lack of documentation intended for a “maker” user, so we approached the project with a “reverse” engineering approach.
Looking at the IP camera, below we have identified a label with the access credentials to the IP camera management system, as visible in Fig. 2. A first indication, better than nothing.
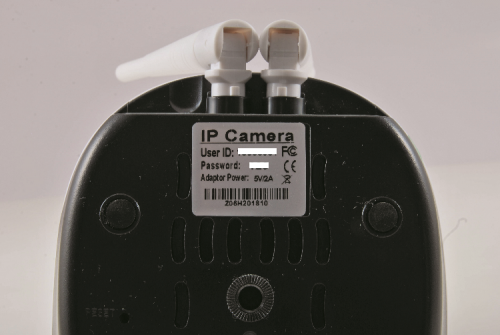
Fig. 2
We connected the IP camera to the local network via Ethernet cable. Clearly our local network has a DHCP server, therefore our IP camera will automatically be assigned an IP address belonging to our local subnet. Yeah but which address? To find out, you have two possibilities: either open the graphic interface of your router and go to find out which devices are currently connected and their respective IP addresses, or use the Nmap command from the GNU / Linux shell, for example, Raspberry Pi. Nmap is a network mapping tool with numerous features, in our case we use it to find out the IP address of the IP camera and on which ports network services are available. If Nmap is not installed, install it with the commands:
sudo apt update
sudo apt install nmap
Then type the command:
nmap -p 1-10000 <indirizzo-IP-vostra-rete>/<CIDR>
Nmap is able to probe the open TCP ports on each device to identify the type of service offered.
The parameter -p allows to indicate the range of ports to be scanned. In our case from 1 to 10000. Normally there should be no services on the doors above 10000.
For <IP-address-your-net> enter the “network” IP address of your local subnet, for example 192.168.178.0, for <CIDR> (Classless Inter-Domain Routing) enter the bit length of your subnet mask, for example 24 for the commonly used mask “255.255.255.0”.
Among the numerous output lines we have identified the following, visible in Fig. 3:
Nmap scan report for 192.168.178.135
Host is up (0.0017s latency).
Not shown: 9998 closed ports
PORT STATE SERVICE VERSION
554/tcp open rtsp?
5000/tcp open upnp?
Our attention on this device was drawn by the presence, on port 554 of a service with RTSP protocol, the video streaming protocol of our IP camera. At this point, suppose that the ONVIF protocol is present on port 5000. In addition, we also have the IP address of our IP room. Our goal is to be able to intercept the streaming video to be able to view it via MotionEYE and, why not, always from MotionEye to be able to manage the pan and tilt of the IP camera. Having no documentation in this regard, we decided to request “enlighten” from the “ONVIF” protocol itself. ONVIF is structured according to the Web service standard, or “web service”, whatever you want. A web service consists of a set of messages that a device makes available to be able to provide and receive information and commands from a third-party user, usually another device on the network that acts as a user. ONVIF messages are encoded on the basis of SOAP (Simple Object Access Protocol) specifications which is an object-oriented protocol for exchanging messages between devices based on the XML format and which, in turn, generally relies on the HTTP protocol for network transmission.

Fig. 3
For our “investigation” we used the SoapUI (Soap User Interface) tool, an application that allows you to “manage” the SOAP protocol with a graphical interface that can be used by a “human” user. The specifications of the ONVIF protocol and of the different message classes are documented in the “ONVIF Core Specification” manual, which can be downloaded at: https://www.onvif.org/specs/core/ONVIF-Core-Specification-v250.pdf
We will not dwell on the configuration and preparation of SoapUI to interrogate the PI chamber. This would require far more than the space of an article. We merely illustrate the main steps we have taken.
A few more notes. There are currently two versions of the ONVIF protocol, 1.0 (10) and 2.0 (20). ONVIF message classes are developed with the Web Services Description Language (WSDL) and are available on the ONVIF website.
The first class of messages that we are going to use is the “Device Management” class. The specifications are available at the address: https://www.onvif.org/ver10/device/wsdl/devicemgmt.wsdl
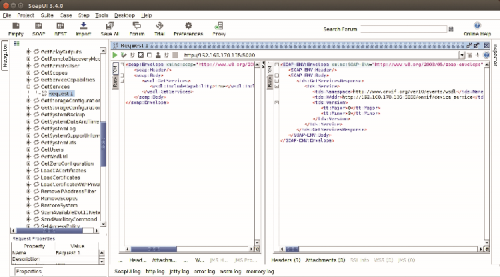
Fig. 4
Once imported into SoapUI we find it as “Device Bindings”.
In the “Device Bindings” class we select the “GetServices” message (method). In the top window you can see the destination URL of the message:
http://192.168.178.135:5000
As you can see, it is an HTTP request to the IP address of the IP camera on port 5000, which we identified with the “nmap” command.
We modify the text of the request by inserting “true” in the IncludeCapability tag.
<soap:Envelope xmlns:soap=”http://www.w3.org/2003/05/soap-envelope” xmlns:wsdl=”http://www.onvif.org/ver10/device/wsdl”>

   <soap:Header/>

   <soap:Body>

      <wsdl:GetServices>

         <wsdl:IncludeCapability>true</wsdl:IncludeCapability>

      </wsdl:GetServices>

   </soap:Body>

</soap:Envelope>

After pressing the "Submit" button (green triangle at the top left) we get the answer:


   <SOAP-ENV:Header/>

   <SOAP-ENV:Body>

      <tds:GetServicesResponse>

         <tds:Service>

            <tds:Namespace>http://www.onvif.org/ver10/events/wsdl</tds:Namespace>

            <tds:XAddr>http://192.168.178.135:5000/onvif/device_service</tds:XAddr>

            <tds:Version>

               <tt:Major>0</tt:Major>

               <tt:Minor>3</tt:Minor>

            </tds:Version>

         </tds:Service>

      </tds:GetServicesResponse>

   </SOAP-ENV:Body>

</SOAP-ENV:Envelope>
Unfortunately, the answer only partially helps us. In fact, it confirms that there is an ONVIF service on port 5000 corresponding to the address of our IP room, but it does not tell us much about the other supported classes. We would have liked to find the pointer to the “middle” class among the Namespaces. Or rather to its version. From the specifications of the IP camera we know that it supports the 2.0 version of ONVIF and therefore we create our pointer to the “middle” class independently:
https://www.onvif.org/ver20/media/wsdl/media.wsdl
We are interested in the messages of the “middle” class because we have to identify the name of the configuration “Profile” defined by the manufacturers of the IP camera to personalize the ONVIF messages. We will need to correctly fill in the messages for the pan / tilt management of the IP camera. We import the “middle” class into SoapUI and configure the “GetProfiles” message. We execute the request and obtain the partially visible response in Fig. 5.
  <trt:GetProfilesResponse>

         <trt:Profiles token=”IPCProfilesToken0”>

            <tt:Name>MainStream</tt:Name>


            <tt:VideoEncoderConfiguration token=”VideoEncoderConfigToken0”>

               <tt:Name>VideoEncoderConfig0</tt:Name>

               <tt:UseCount>1</tt:UseCount>

               <tt:Encoding>H264</tt:Encoding>

               <tt:Resolution>

                  <tt:Width>1280</tt:Width>

                  <tt:Height>720</tt:Height>

               </tt:Resolution>

               <tt:Quality>10</tt:Quality>

               <tt:RateControl>

                  <tt:FrameRateLimit>30</tt:FrameRateLimit>

                  <tt:EncodingInterval>1</tt:EncodingInterval>

                  <tt:BitrateLimit>1200</tt:BitrateLimit>

               </tt:RateControl>
We have reported in the text the most important sections contained in the reply message. The first is the name of the famous “configuration profile so sought after, in our case” IPCProfilesToken0 “.

Fig. 5
In the second section we can see the information of camera configuration, resolution, quality, frame rate, etc.
In the same class the message “GetStreamURI” is also available. The response to this message tells us which URIs to use to intercept the IP camera’s video streaming stream. It will be useful to configure the IP camera inside MotionEye. So, let’s go and browse. In Fig. 6 we can see the reply of the message “GetStreamURI”.

Fig. 6
We only report the URI address that interests us:
rtsp://192.168.178.135:554/onvif1
Let’s make a final check on the message that allows you to manage the pan and tilt of the IP camera. For simplicity we will use the message “ContinuosMove” that we find in the PTZ class of ONVIF. We import it into SoapUI from the address: https://www.onvif.org/ver20/ptz/wsdl/ptz.wsdl
Let’s see the message in Fig. 7.
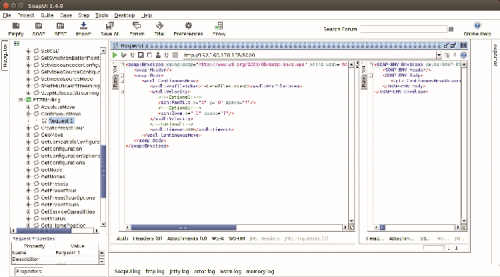
Fig. 7
To address it correctly we must communicate the Profile, which we have found previously.
<wsdl:ContinuousMove>

         <wsdl:ProfileToken>IPCProfilesToken0</wsdl:ProfileToken>

         <wsdl:Velocity>

            <!--Optional:-->

            <sch:PanTilt x=”0” y=”0” space=”?”/>

            <!--Optional:-->

            <sch:Zoom x=”-1” space=”?”/>

         </wsdl:Velocity>

         <!--Optional:-->

         <wsdl:Timeout>1</wsdl:Timeout>

      </wsdl:ContinuousMove>
The parameters that interest us are the “ProfileToken” that we found previously, the “PanTilt” parameter and the Timeout parameter.
The PanTilt parameter, in the “Velocity” section, is a vector that allows you to set the speed and direction of movement of the pan and tilt. The “x” parameter sets the horizontal pan and tilt. The values range from “-1”, maximum speed to the left to “+1”, maximum speed to the right. The value “0” means no movement. Similarly, the parameter “y” sets the vertical pan and tilt. The values also in this case range from “-1”, maximum speed upwards, to “+1”, maximum speed downwards. The value “0” means no movement. The “Timeout” parameter allows you to configure the duration of the movement. With these parameters, we will be able to configure a client program written in Python that will allow us to “swing” the IP camera from the MotionEye interface.
MotionEYE configuration for IP camera
As we have already described in the previous articles, the MotionEye web server responds to the IP address of Raspberry Pi on port 8765. Therefore, to access your MotionEye you must open a browser, for example, Firefox, and type in the URL: http://<indirizzo-IP>:8765
where the IP address is that of your Raspberry Pi “concentrator”.
You will see the usual login page visible in Fig. 8. Recall that the default MotionEye administrator is “admin”, without password, so leave the password field empty.
You will see the main page of MotionEye, (Fig. 9). As known, the buttons at the top left allow you to configure the cameras connected to MotionEye and to change the user. The button at the top right is used to exit the application.
To add the IP camera, click with the right mouse button on the field at the top left (see red arrow) and select “Add Camera”.

Fig. 8
You will be presented with a pop-up window with the characteristics of the camera you want to configure.

Fig. 9
Several possibilities are available. For each, a specialized configuration mode opens, where you can specify paths and credentials to access the camera itself. In our case, since it is an IP Camera connected via a network, select “Network Camera” and as the URL, enter the one found by the message “GetStreamURI”. As Username and Password, enter those indicated on the label applied to the IP camera or that indicated by the manufacturer. If everything went in the right direction, the camera will be recognized as RTSP / TCP Camera (Fig. 10). In our case, in the “Camera” field we had to select the “RTSP / UDP Camera” option.
Confirm and you will be presented with the menu with all the available configuration sections. In the meantime, you can see the images taken by the IP camera, together with the other configured cameras, on the main page of MotionEye.
In the “Video Device” section, give a name to the IP camera, in our case we have called it “CameraIP”. Take note of the number that appears in the “Camera ID” field. We will need it later to configure the pan and tilt functionality. Leave the other configuration sections disabled, except for the “Text Overlay” section. It does not make much sense to set the interception of movement for a room that is itself to move. How about?
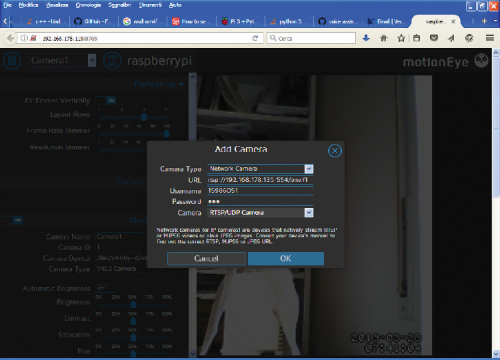
Fig. 10
Python-onvif installation
It is time to deal with the pan and tilt of the PI chamber. MotionEye provides a series of “actions” that can be used to perform additional operations. Each action, if activated, materializes with the presence of a button in the window relating to the video camera to which you want to associate the specific action.
- lock
- unlock
- light_on
- light_off
- alarm_on
- alarm_off
- up
- right
- down
- left
- zoom_in
- zoom_out
- preset1 to preset9
To activate an action it is necessary to insert a file in the configuration folder of MotionEye (/ etc / motioneye), the name of which is composed of the name of the action followed by the underscore character and the “Camera ID” of the camera to which you wants to associate the action itself.
The shell (bash) commands relating to the functions to be associated with the action must be inserted within the file. For the pan and tilt of the IP camera we will use the actions:
- up
- right
- down
- left
For this we will insert the Bash scripting files in the / etc / motioneye folder: up_3, right_3, down_3 and left_3. At the startup MotionEye, given the presence of these files in its configuration folder, it will insert the relative activation buttons, at the bottom right, in the IP camera window. In order to manage the pan and tilt of the IP camera it is necessary to create a client that allows you to talk with the web services of the IP camera itself. The “python-onvif” project is available in the GitHub repository, which is an implementation in Python of an ONVIF client. The project is made available, with MIT license, by Quatanium Technology Co. Ltd., which we mention and thank for the work done. To install python-onvif type the commands:
sudo apt update
sudo apt dist-upgrade
Install “suds”, a python client to manage SOAP messaging:
pip install ‘suds>=0.4’
pip install suds-passworddigest
Install python-onvif
pip install onvif
At the beginning, we experienced the direct call to the “ContinuousMove” class, each time a button was clicked the response times were decidedly too long, largely due to the creation of the ONVIFCamera object (see Listing 1).
Listing 1
#!/usr/bin/python
from onvif import ONVIFCamera
import sys
from socket import *
myHost = ‘192.168.178.119’ # IP RPI
myPort = 5555
# Camera object with connection parameters
mycam = ONVIFCamera(‘192.168.178.135’, 5000, ‘15986051’, ‘123’)
# Direction and speed of movements
XMAX = 1 # right
XMIN = -1 # left
YMAX = 1 # hight
YMIN = -1 # low
tmov = 0 # default movement duration
# Create ptz servic objecte
ptz = mycam.create_ptz_service()
request = ptz.create_type(‘ContinuousMove’) # instanza messaggio ONVIF
request.ProfileToken = “IPCProfilesToken0” # Profile camera IP
s = socket(AF_INET, SOCK_STREAM) # creates a TCP socket
s.bind((myHost, myPort)) # bind IP and port
s.listen(5) # accepts 5 simultaneous connections
while 1:
# wait for next client to connect
connection, address = s.accept() # accept connection from client
while 1:
comando = connection.recv(1) # receives a character
if (comando == ‘d’): # destra
print ‘move right...’
request.Velocity.PanTilt._x = XMAX
request.Velocity.PanTilt._y = 0
request.Timeout = tmov
if (comando == ‘s’): #left
print ‘move left...’
request.Velocity.PanTilt._x = XMIN
request.Velocity.PanTilt._y = 0
request.Timeout = tmov
if (comando == ‘g’): # low
print ‘move down...’
request.Velocity.PanTilt._x = 0
request.Velocity.PanTilt._y = YMAX
request.Timeout = tmov
if (comando == ‘u’): # hight
print ‘move up...’
request.Velocity.PanTilt._x = 0
request.Velocity.PanTilt._y = YMIN
request.Timeout = tmov
# Send a messagge ContinuousMove at camera IP
ptz.ContinuousMove(request)
comando = ‘’
break
connection.close() # close socket
Consequently, we decided to create a “server” program that initializes the ONVIFCamera class only once and waits for requests from an intermediate program on TCP / IP socket, port 5555, which is in turn called by the activated scripts. from the buttons. Fig. 12 shows the architecture of the software objects used to manage the pan and tilt of the IP Camera. When a pan and tilt button is pressed in the IP Camera screen, the “Bash” script corresponding to the required action is executed. For example, in case of movement to the right, the “right_3” script will be activated, which in turn calls the “onvif_cli.py” program by passing it the “right” parameter. Same for the other movements. In Listings 3, 4, 5 and 6 you can see the very simple content of each script or the invocation of the onvif_cli.py program with the parameter that requires the execution of the respective movement of the IP camera.
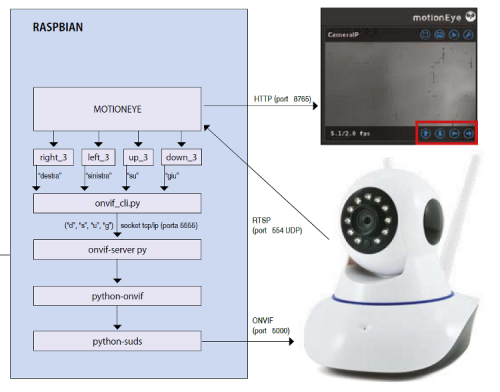
Fig. 12
The “onvif_cli.py” program is visible in Listing 2. When called by one of the scripts associated with the buttons, it analyzes the content of the parameter passed by each script, packages a request for the server “onvif_server.py”, creates a client session via socket, always towards the server and sends the relative swivel request. At this point, the “onvif_server.py” server composes the ONVIF message corresponding to the requested action and delivers it to the “python-onvif” and “python-suds” component chain which provide the effective transmission to the IP Camera. The result is the movement of the Camera in or in the required directions and the consequent change of angle of the displayed image.
Listing 2
#!/usr/bin/python
import sys
from socket import *
serverHost = ‘192.168.178.119’ # IP address server
serverPort = 5555 # port server
comando = sys.argv[1]
print comando # only for debug
muovi = ‘x’
if (comando == ‘destra’):
print ‘move right...’
muovi = ‘d’
if (comando == ‘sinistra’):
print ‘move left...’
muovi = ‘s’
if (comando == ‘giu’):
muovi = ‘g’
if (comando == ‘su’):
print ‘move up...’
muovi = ‘u’
s = socket(AF_INET, SOCK_STREAM) # create a TCP socket
s.connect((serverHost, serverPort)) # connect to server on the port
s.send(muovi) # send request to server
The request message is of a single character, the meaning of which is easy to understand by analyzing Listing 2.
In Fig. 13 you can see what the contents of the / etc / motioneye folder should look like.

Fig. 13
To launch the onvif_server.py program automatically at the start of Raspbian, insert the server execution directive in the configuration file of the Cron scheduler.
Open the Cron scheduler configuration file with the command:
crontab -e
At the end of the text insert the declaration:
@reboot nohup python /home/pi/onvif_server.py > /dev/null &
Close with <CTRL-x> and confirm. Reboot and reopen the MotionEye page. In our case, it is possible to see the images taken by the three cameras.
Listings 3, 4, 5 and 6
Listing 3 - right_3
#!/bin/bash
nohup python /home/pi/onvif_cli.py destra > /dev/null &
Listing 4 - up_3
#!/bin/bash
nohup python /home/pi/onvif_cli.py su > /dev/null &
Listing 5- left_3
#!/bin/bash
nohup python /home/pi/onvif_cli.py sinistra > /dev/null &
Listing 6- down_3
#!/bin/bash
nohup python /home/pi/onvif_cli.py giu > /dev/null &
To arrange them as in Fig. 14, use the “Layout Rows” cursor in the “Preferences” configuration section. By clicking on any image, you can see all the buttons associated with each room. The ones to be used for the pan and tilt are the four at the bottom right of the CameraIP image.

Fig. 14
Deepening the available features even more and using a hard disk as mass memory for Raspberry Pi and, why not, a UPS to guarantee continuity of power, we can create an integrated video surveillance system with practically professional features.
From openstore
Camera module 8 Megapixel for Raspberry Pi
Raspberry Pi NoIR Infrared Camera Board v2.1 (8MP, 1080p)

Hello.
I have read your article CCTV with Raspberry PI and MotionEYE. It has helped me a lot.
I have an interesting question regarding showing the video from DVR on my own Flask webserver.
1. I have a DVR and I want to display the video from it on one of the pages on my own Flas web server.
Is it possible to do something like that?