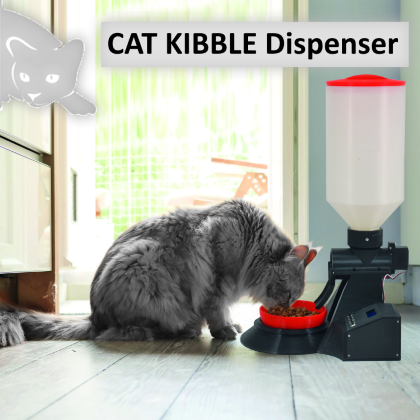
It automatically supplies meals to your pet at preset times, by providing the daily dose of cat kibble.
Having a pet involves big responsibilities, first of all granting them food; unfortunately, a hectic lifestyle and imposed workhours do not go hand-in-hand with the needs of our four-legged friends, and surely anyone living on their own will have a hard time providing the pets meals on schedule. In order to solve a problem that is surely dear to any pet owner, and especially cat and dog owners, we have designed a device we called FelixMatic: it is a practical automatic dispenser of dry food for cats (or small dogs) equipped with a high-capacity container that can easily be opened from the top and a bowl to collect the kibble when it is supplied. We know we can already find automatic dispensers on the market, however, our example is unique because it can be programmed with 9 meals a day in order to supply very precise quantities of dry food.
The project
The way the dispenser works is more complex and complete than the average available product on the market, in fact, it does not only supply food but it also gives exact doses as decided by us; basically, at a preset time, a cochlea at the base of the container will turn, and drop a certain amount of kibble in the bowl, regulated by a dedicated weight sensor.
In order to have this kind of functioning, our dispenser is composed of a mechanical and an electronic section; the former has been assembled with PLA, 3-D printed parts, while the electronic section is composed of an Arduino UNO board to which we have applied an RTC Shield, a specific shield with an LCD display, a model-making continuous rotation servo and a load cell; the latter is used to weigh the amount of dry food, and once we reach the desired quantity, the servo operating the cochlea stops. The LCD monitor is managed through pins 8, 3, 5, 6, 7 of the Arduino board; instead, the load cell is read through the A0 pin and it provides an analogue signal itself. For simplicity of design, we decided to use a shield dedicated to measurements and weight display, interfacing with Arduino UNO rev.3 as indicated and connected to the load cell. The shield, called Weight Shield, mounts an eight-character, 2-line LCD display, which is used, in our project, for setting up the machine. Besides the display, we have the INA125 integrated, a high precision amplifier developed specifically for measurement instruments such as scales. We are going to solder the keys connection on this shield, which will follow the wiring diagram proposed on these pages (Fig. 1), showing the connections to the load cell (we have included a terminal block for those).
As you can see, the five keys, which are normally open, must be connected to the common ground, to a scale of resistors, since we are going to read them using the A/D converter in order to save Arduino’s lines; basically the multiple dividers, powered by Arduino’s 5 V, outputs 8 V on the A2 analogue line which depends on the key pressed, to wit:
- 0V for P1;
- 1,7V for P2;
- 2,53V for P3;
- 2,92 for P4;
- 3,26V for P5.

Fig. 1
The load cell can weigh up to 1.000 g and its body is composed of aluminium alloy; the output sensitivity is 1 mV/V (±0,15mV) and nonlinearity (at full scale) is 0,05%; hysteresis is 0,05% at full scale. The error due to thermal derive is 0,05 % at full scale at 10°C. The cell’s input resistance is 1 kohm (±10 ohm) and it’s the same as the output resistance. Isolation resistance is 2.000 mohm, while working temperature ranges from -10°C to +55°C. In order to connect the load cell there are four wires:
- rad is positive (5V);
- black is negative (GND);
- green is OUT +;
- White is OUT –.
The four wires must be extended up to the terminal block on the right of the Weight Shield.
The firmware
The program, which will run or Arduino, includes several libraries in order to work such as:
- #include <LiquidCrystal.h> to manage the LCD 8×2 monitor
- #include <EEPROM.h> to write some values in the EEPROM
- #include <Wire.h> to interface with RTC
- #include <DS1307RTC.h> to manage RTC
- #include <TimeLib.h> to easily manage elapsed time
Let’s take a look at the main variables and functions found in the code, so you can easily customize the project for other purposes also.
In order to manage values detected by the load cell we have included 5 variables, four of which are used to calibrate the cell itself:
- loadA weight without load (tare, in grams);
- AnalogvalA weight read by the load cell corresponding to grams related to loadA;
- loadB weight of any load (in grams);
- AnalogvalB weight read by the load cell corresponding to grams and relate to loadB;
The fifth variable is analogValueAverage and it’s going to contain the result of the effective weight measured using the load cell, i.e. the net weight, corresponding to the grams of kibble issued. Note that loadA is used to calculate the tare, which enables the dispenser to drop the set weight of kibble in the bowl, minus the tare.
In the firmware, there are also two data arrays:
- MealHour[10]
- MealMinute[10]
These arrays contain, as you can easily see, the dispensing times of the meals, and will be calculated each time when the dispenser is turned on. In this phase, the sketch initializes the serial port (through which you will be able to monitor the program debug using a PC) and the LCD. Afterwards, it will call functions ResetMeals() and Initialize().
The resetmeals() function reset the memory cells related to meals dispensing: in the EEPROM (which structure is shown in Table 1) the effective meal distribution is set by setting a flag which is brought back to zero every day at 00.00, again by the function ResetMeals(), therefore allowing to start over with the meal cycle for the day.
The function Initialize() recalls other functions within itself:
- reset()
- load()
- sort()
Function reset() allows to reset the arrays MealHour[] and MealMinute[] to make sure there are no wrong values for these variables.
The load() routine takes care of taking values from the EEPROM and copying them on the array passed as a parameter.
Finally, the sort() function takes care of sorting the arrays using an algorithm (bubble sort) and it is useful when we want to make sure that mealtimes will be automatically managed by the dispenser, even if they are memorized randomly and not in an increasing manner, therefore guaranteeing your pet will have their meal at the right time.
The last function at the core of the dispenser working is called supply(): it is a function which, when recalled, takes care of managing the servo based on the weight detected by the load cell; in other words, the routine commands the servo rotation up until the load cell provides Arduino with a reading equal to the weight corresponding to the dose to be supplied, then it stops the servo. Thereafter, the servo spins the output spiral and stops it, so that it behaves like a divider blocking the kibble when the supply must stop.
In this routine there is also the function unjam() used to unjam the supply mechanism, in the event some kibble becomes stuck in the orifice and prevent it from spinning; the unlocking is attempted by making the orifice spin five times in one direction and five times in the opposite. If, after the manoeuvre, the food is still stock, the system will display an error message on the LCD; same things happen if we run out of food, and another error message will be displayed on the LCD. Both missed supply due to running out of kibble or the supply mechanism getting stuck are detected in the same way: the absence of net weight a few moments after sending the distribution command.
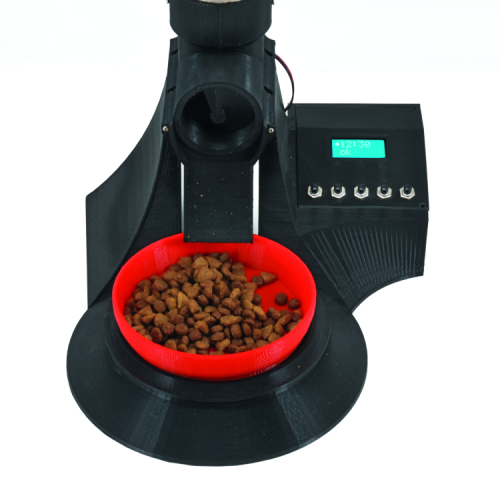
User interface
Now, let’s take a look at the user interface, composed of five keys and the display mounted on the Weight Shield; the keys functions are the following:
- P1 (down button): used to scroll the menu down;
- P2 (okay button): use to confirm options;
- P3 (decrease button): use to decrease number of meals;
- P4 (decrease button) use to increase number of meals;
- P5 (dispense button); can be used only in the initial screen (Fig. 2), this key is used to manually distribute kibble whenever we want to add food beyond the preset dose, or to supply food anytime.
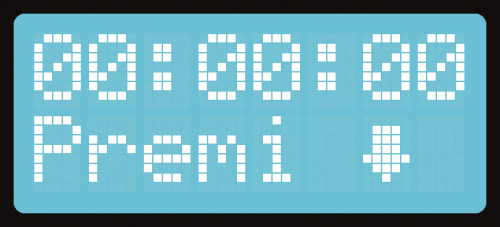
Fig. 2
After starting the system, you will see the main screen (Fig. 2), with current time displayed on the first line (if it shows 00:00:00, time must be configured; we will see how to do it below); on the second line you will see the word Push with an arrow facing downward: it means we will proceed to configure the dispenser in its functional characteristics. When we see this screen, we can press P5 to manually distribute kibble, and decide the dose.

Fig. 3
Now you will see the menu with two options: Meals and Grams (Fig. 3). If you push the key two times, the Back command (Fig. 4) will take you back to the main screen.

Fig. 4
Use the keys to select the option Meals and a menu will open up (Fig. 5) where you can choose the number of meals you want to supply to your cat up to a maximum of 9 a day.

Fig. 5
In order to select the number of meals, stay on the first line with the pointer and push the decrease key (P3) to decrease the number of meals. You can instead press the increase key (before) which will increase the number of meals a day. Press OK to confirm (P2). To go back to the main screen, click on Back to keep previous settings. Once you press OK (P2) you will go back in the last submenu; this is used to set mealtimes (Fig. 6). After selecting the number of meals, we can proceed and indicate hours and minutes to distribute kibble. For instance, if we select three meals a day, the screen in Fig. 6 will be shown three times, one for each meal set; for each screen we will have to indicate the desired time to distribute the food.

Fig. 6
In conclusion, as mentioned above, in order to set the display clock on the dispenser, placed over the keys, you have to place the pointer on the first line, then you can press the “increase or decrease” key to increase or decrease the number corresponding to the time up until the hour you desire. In order to modify minutes, press ok and then once again push decrease or increase to select minutes using the same procedure. After selecting hour and minutes, move the pointer on the second line by pressing down, then confirm and save the exact time by pressing OK. After you are done setting the times, you can go back to the main screen shown in Fig. 2. In order to set the number of grams per meal, press the down key; this way you will access the main menu. Press down one more time and move the pointer on the second line on grams (Fig. 7), then press OK. Once you open the submenu (Fig. 8) to set the number of grams per meal, you can press increase or decrease to adjust the weight.
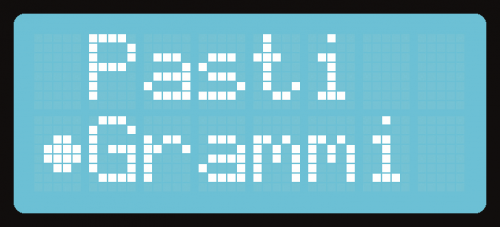
Fig. 7

Fig. 8
Once you decide the weight (i.e. the grams) of the food to provide your pet with at each meal, move the pointer on the second line as shown in Fig. 9, press OK to save settings. In case you don’t want to confirm new settings, scroll down with the pointer until you get to Back and press OK to go back to the previous menu (Fig. 9).

Fig. 9
Mechanical structure
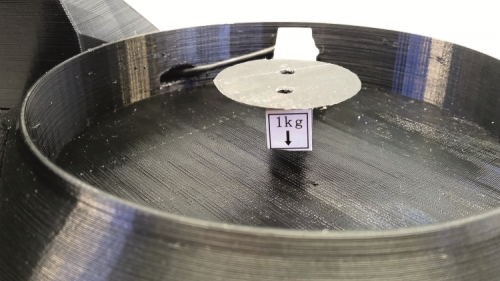
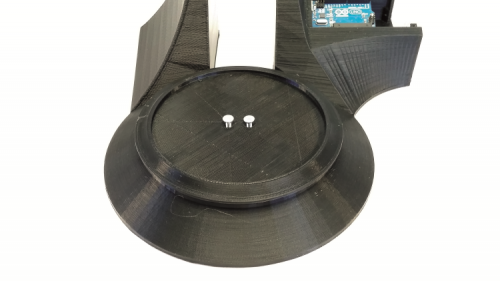
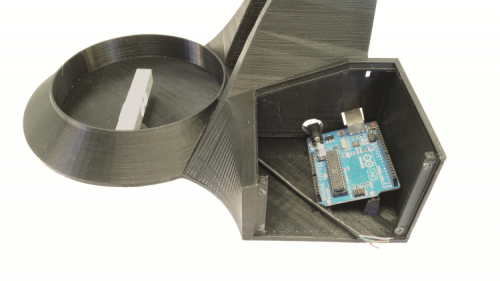
Now that we have explained how the system works, we can move to the assembly phase: the electronics section is placed in the base, 3-D printed as the rest of the mechanical structure. In the base we have placed the Arduino, the shields and the keys, on the right in the dedicated compartment, to be connected as shown in Fig. 1 and to be mounted on the cover which you will secure using small self-threading, 2,5×10 mm metal screws; the cover has been printed with the holes for the five keys and the window for the display. Still inside of the base, in the section below the actual dispenser, you will fasten the marble plate to the load cell using two screws, which cell must be then applied to the base; on the moving plate, you will place the bowl that will collect the kibble.
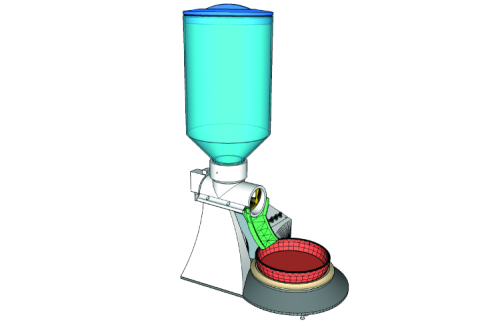
Fig. 10
The latter is to be 3-D printed, however you can also use one of your own, provided that its base is smaller (in diameter) than the moving plate placed on the load cell and it is short enough to avoid touching the rest of the structure. The weight is not important in fact, as explained at the beginning of the article, the firmware calculates the tare, which is then subtracted to the detected weight when the kibble is dropped in the bowl. Fig. 10 shows the block while Fig. 11 proposes an exploded view of the structure and Fig. 12 shows an internal view of the mechanics, especially for what concerns the kibble dispensing mechanism, based on a spiral element actioned by the servo.

Fig. 11
Note that the moving plate holding the bowl is applied to the load cell’s arms using two screws, through an 3d-printed circle adapter. List 1 shows the firmware section allowing to set the supply time. On that hand, List 2 shows the firmware section managing the kibble dispensing: it is the function used to supply the food.
List1
void SetOra(int i)
{
char bottone[8];
int posCursor=0, opcMenu=-2;
int Ore=0,Minuti=0;
int flag=0;
int NO=1,NM=10;
lcd.clear();
lcd.setCursor(2,0);
stampa(Ore);
lcd.setCursor(4,0);
lcd.print(“:”);
lcd.setCursor(5,0);
stampa(Minuti);
lcd.setCursor(2,1);
lcd.print(“ok”);
do{
strcpy(bottone,”null”);
LeggiBottone( bottone, A2, 200);
lcd.setCursor(0, posCursor); lcd.write(byte(0));
if(!strcmp(bottone,”giu”))
MuoviCursore(&posCursor, 1, ‘m’);
else if(!strcmp(bottone,”ok”)||!strcmp(bottone,”incr”)||!strcmp(bottone,”decr”))

opcMenu = posCursor;
switch( opcMenu )
{
case 0:
if(!strcmp(bottone,”incr”))
{
if(flag==0){
Ore=Ore+1;
if(Ore>= 25)
Ore--;
lcd.setCursor(2, 0); stampa(Ore);
}
else{
Minuti=Minuti+1;
if(Minuti >= 60)
Minuti--;
lcd.setCursor(5, 0); stampa(Minuti);
}
}
else if( !strcmp(bottone,”decr”) )
{
if(flag==0){
Ore=Ore-1;
if (Ore <= 0)
Ore++;
lcd.setCursor(2, 0); stampa(Ore);
}
else{
Minuti=Minuti-1;
if(Minuti <= 0 )
Minuti++;
lcd.setCursor(5, 0); stampa(Minuti);
}
}
else if(!strcmp(bottone,”ok”))
{
if(flag==0)
flag=1;
else
flag=0;
}
opcMenu = -2;
break;
case 1:
if(!strcmp(bottone,”ok”)){
EEPROM.update(NO+i,Ore);
EEPROM.update(NM+i,Minuti);
opcMenu = -1;
}
break;
};
}while(opcMenu != -1);
mem=1;
}
As you can see, the counter variable checks how many times it tried to drop the food; if it reaches 5, it provides an error message, because it means the mechanisms is faulty or the container is empty.
List2
void eroga(){
float load;
int analogValue;
float flag=0;
contatore=0;
int val = word(EEPROM.read(19), EEPROM.read(30));
do
{
analogValue = analogRead(A1);
analogValueAverage = 0.99*analogValueAverage + 0.01*analogValue;
unsigned long currentMillis = millis();
if(currentMillis - previousMillis2 > interval2){
previousMillis2 = currentMillis;
load = analogToLoad(analogValueAverage);
if(currentMillis - previousMillis5 > interval5){
previousMillis5 = currentMillis;
Serial.println(“copio flag”);
flag=load;
}
if(currentMillis - previousMillis4 > interval4){
previousMillis4 = currentMillis;
Serial.println(“controllo se blocca”);
if(load<=flag+1 && load>=flag-1)
sblocca();
if(contatore>=5){
servo.detach();
lcd.clear();
lcd.setCursor(1,0);
lcd.print(“ERRORE”);
lcd.setCursor(0,1);
lcd.print(“!!!!!!!!”);
while(1){}
}
}
servo.attach(9);
servo.write(0);
}
}while(load <= val);
servo.detach();
}
In both cases, you will need to take care of it because the machine doesn’t supply food and… your pet’s belly will rumble!!
Conclusions
Our dispenser is surely a useful and nice idea for any pet owner; especially as the whole system is based on the ever-present Arduino, which makes everything simpler. The mechanics we propose are not binding, because anyone with a 3-D printer can adopt commercial dispensers based on their needs.
However, the system can be adapted to other uses, not strictly referring to feeding pets: it can be used to supply various substances and also to… Keep some bad habits at bay, such as excessive consumption of sweets and cigarettes, by supplying them sparely…
All in all, it is a timed dispenser that can be easily customized, seen here used to supply food, but also capable of managing many other things.
From openstore

[…] Electronics’ 3D-printed device, called “FelixMatic,” claims to be more complex and complete than average off-the-shelf solutions. Not only can […]
[…] Electronics’ 3D-printed device, called “FelixMatic,” claims to be more complex and complete than average off-the-shelf solutions. Not only can it be […]
[…] projektu tvrdí, že FelixMatic je ucelenější a vybavenější, než komerční řešení. V základním programu je možné […]