- makeITcircular 2024 content launched – Part of Maker Faire Rome 2024Posted 2 weeks ago
- Application For Maker Faire Rome 2024: Deadline June 20thPosted 2 months ago
- Building a 3D Digital Clock with ArduinoPosted 7 months ago
- Creating a controller for Minecraft with realistic body movements using ArduinoPosted 7 months ago
- Snowflake with ArduinoPosted 8 months ago
- Holographic Christmas TreePosted 8 months ago
- Segstick: Build Your Own Self-Balancing Vehicle in Just 2 Days with ArduinoPosted 8 months ago
- ZSWatch: An Open-Source Smartwatch Project Based on the Zephyr Operating SystemPosted 9 months ago
- What is IoT and which devices to usePosted 9 months ago
- Maker Faire Rome Unveils Thrilling “Padel Smash Future” Pavilion for Sports EnthusiastsPosted 10 months ago
Arduino Full Memory: how to upgrade to the last ATMEL Toolchain version
This short report is aimed to the most “advanced” users of Arduino boards, especially to the users of the “Mega” flavors of the family, but also users of standard versions of the board, like Arduino UNO and Arduino Duemilanove, can take advantage of the following notes.
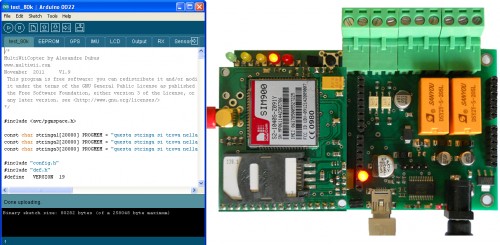
The story starts with the TiDiGino, one of the recent projects based on the ATmega2560, a very well performing mcu with 256kByte of flash memory on board, that is also the core of of the Arduino Mega 2560 board.
The TiDiGino project software has been developed under a contest.
Some out of the participants have been developed high level solutions that took advantage of almost all of the many hardware features of the TiDiGino board.
During development tests they had to notice crashes and malfunctioning that appeared mysterious and very tricky to debug and fix.
After a series of further deep tests and investigation on the support site of ATMEL we have discovered that the main source of our problems was the compiler included in the versions 0022/0023 of the IDE as like as in the current version 1.0.
The compiler program, named “avr-gcc-4.3.2.exe” is not able to compile correctly sketches that require data areas larger than 64kWord, i.e. 128kByte of flash memory.
In simple words the reason is related in the wrong translation of jump instructions beyond 64k.
The compiler we are talking on is the one (version 4.3.2) included in WinAVR package dated from 2008, when the ATMEL microcontroller had on board less than 64kB of memory.
The WinAVR project has been updated on January 2010 with the version “WinAVR-20100110” containing a new version of the compiler, named “avr-gcc-4.3.3.exe”; we tried out this new version too, without success.
The major negative outcome of this issue is that it affects also the Arduino Mega boards both 1280 and 2560 versions, with the effect of limiting the use of data areas larger than 64kWord in sketches. In order to get access to data beyond that limit it is necessary to use the functions of the PROGMEM library, that allow the use of 24bit pointers.
The issue affects only the dimension of data areas, one program that occupies 60kB of data end 60kB of program would run without problem also in the current situation.
After many investigations and tries we find out the solution to this issue, that is to integrate the last version of the ATMEL Toolchain into the Arduino IDE package.
The ATMEL Toolchain is a set of software programs and libraries (tools) that transforms a source code into an executable by a sort of “virtual assembly line”; the output processed by one tool is the input for the following tool in the chain, an so on.
Of course the most important tool in the Toolchain is the compiler, whose last version is currently the “avr-gcc-4.5.1.exe”.
This version is an important enhancement in respect of the one included in the Arduino IDE and offers many advantages:
- – supports all the 8bit ATMEL microcontrollers families;
- – overcame the 128kB limit and compiles correctly sketches up to 256kB;
- – includes best and newest libraries;
- – outputs a most compact and efficient compiled object code.
As a completion of this preliminary notes we would focus on the avrdude.exe and avrdude.conf files.
Avrdude.exe is a service program included in the IDE and it is located in the “MyPath\arduino-0022\hardware\tools\avr\bin” folder. The Avrdude.exe version in the Arduino IDE has been modified, respect the AVR original version, in order to support the Arduino bootloaders.
Avrdude.conf is the configuration file that contains the configuration data and settings for each ATMEL microcontroller managed by the IDE, the most advanced users could have been modified this file with the additions of new models of microcontrollers.
Avrdude.conf is located in the “MyPath\arduino-0022\hardware\tools\avr\etc”.
The reason we have mentioned these two files is that they are not involved in the operation of upgrading the Arduino IDE with the compiler in the Toolchain, and have to be carefully saved in a safe place before beginning the upgrading, especially in the step where we will proceed to delete all the contents in the “MyPath\arduino-0022\hardware\tools\avr” folder.
At this point it is possible to describe all the actions needed to execute the upgrading of the IDE.
Our suggestion is to follow the instructions described below, step by step in the provided order and without modification.
The process has been tested many times in order to guarantee the achievement of the result.
Upgrading Arduino IDE process
The process described below is applicable to the Arduino IDE versions 0022, 0023, 1.0, 1.0.1-rc1; the last one listed is the candidate release of IDE 1.0, that is a sort of beta release, still under test; we have processed it too with good results.
Below are the steps to follow:
-
Copy the whole original IDE folder in a new folder as a backup, in order to maintain the original installation and save the possibility to downgrade the process in case of problem.
- Rename the new folder i.e. arduino-0022-tcnew:

The original folder of the IDE and its copy
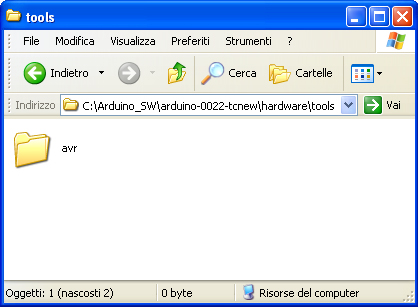
- In the new folder delete the sub-directory “avr” in “MyPath\arduino-0022-tcnew\hardware\tools”:
The “avr” directory that has to be deleted
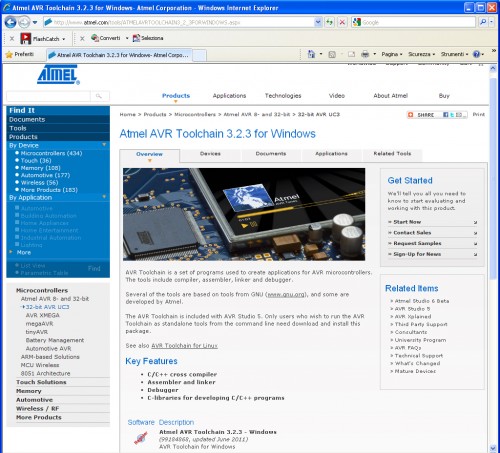
- Download the last version of the ATMEL Toolchain for Windows, from the link http://www.atmel.com/tools/ATMELAVRTOOLCHAIN3_2_3FORWINDOWS.aspx; to get access to the download section you must fill an on-line registration form; you will receive an e-mail containing the link to the actual download address:
Download section inside the ATMEL site
- Install on your PC in the usual way the downloaded file “avr-toolchain-installer-3.2.3.579-win32.win32.x86.exe”. Take a note of the installation path, in order to easily retrieve the folder in a subsequent moment. If you have a copy of the AVR Studio already installed on your PC, the installation wizard will prompt you with the existing path, in order to get your application upgraded;
- Copy from the new installation the directory “AVR Toolchain” and paste it into the folder “MyPath\arduino-0022-tcnew\hardware\tools”; at the end rename the “AVR Toolchain” directory as “avr”. In this way you will get again the original path: “MyPath\arduino-0022-tcnew\hardware\tools\avr”;
- Enter the new folder “avr” and delete the sub-directory “avr32”:
The sub-directory “avr32” to be deleted
- Copy the file avrdude.exe from the original directory “MyPath\arduino-0022\hardware\tools\avr\bin” and paste it into the folder “MyPath\arduino-0022-tcnew\hardware\tools\avr\bin”. Say “YES” at the warning prompt to overwrite the file;
- Copy the whole original directory tree “MyPath\arduino-0022\hardware\tools\avr\etc” and paste it in the folder “MyPath\arduino-0022-tcnew\hardware\tools\avr\;
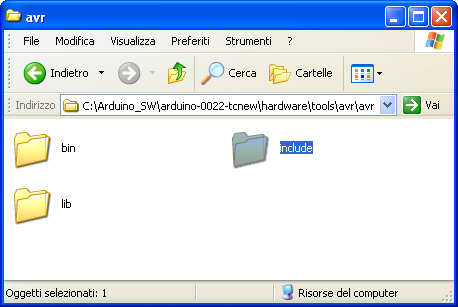
- Delete the sub-directory “include” in ” MyPath\arduino-0022-tcnew\hardware\tools\avr\avr“. Pay attention at the double “avr” directory; there is actually an “avr” subdirectory inside an other “avr” sub-directory as shown in this figure. In place of the deleted sub-directory paste the directory that you can download from our site.
The “include” sub-directory that has to be deleted and substituted with the one downloaded from our site
- Now enter the directory “MyPath\arduino-0022-tcnew\examples\”, delete the sub-directory ArduinoISP and the sketch contained in it and add the folder “ArduinoISP101”, that is the new version of that sketch, included in the IDE 1.0.1-rc1. You can download this folder too from here. At the beginning of the process we suggested to you to make a copy of the whole folder of the Arduino IDE; subsequently we drove you in the process of upgrading the copy of the IDE itself. That in order to hold one original version of the IDE that is anyhow useful in case you would get in trouble with the new version. Anyway the original version will always be good to compile applications having a data area smaller than 64kB. Please note that the sketch “ArduinoISP101” has the extension .pde that is correct for the IDE versions 0022 e 0023; in case you are using the version 1.0 you must rename the sketch extension in “.ino” (the new standard adopted by IDE 1.0);
One more warning about the last step: the sketch, that is of interest for all the users running Arduino as an ISP Programmer, works correctly at a BAUD rate of 19200 with the IDE version 0022, 0023; at 9600 BAUD with the version 1.0.1-rc1, and doesn’t work at all with the version 1.0.
According to IDE version that you are using could be needed to change the line “Serial.begin(19200);” in “Serial.begin(9600);”.
For the users of version 1.0 of the IDE we have posted in the download section a further version of ArduinoISP, named “ArduinoISP101LM” that is a version of the 1.0.1 patched by two experienced programmers whose names are in the credits list of the sketch.
Be aware that this last version is not an official version and will work with the IDE 1.0 too, at a BAUDRATE of 19200.
In IDE 1.0.1-rc1 environment won’t be mandatory to set the BAUDRATE at 9600 BAUD because the sketch automatically detects the IDE version and sets the port speed accordingly.
As previously described the sketch folder should be placed in the “MyPath\arduino-0022-tcnew\examples\” folder.
Although the sketch is not an official release we can assure that it works quite better than the 101 original, especially in the case you should program MCUs with large memories.
For a better explanation give a glance at the contents of the Table:
Comparison table of the two version of ArduinoISP
As a final note we would warn all the users of the ATtiny family of microcontrollers with the IDE versions 1.0 or 1.0.1 that in same conditions our upgrade could fault the compiling task.
The solution, quite simple, is to add the line “#include <math.h>” as the first instruction in the wiring.h file of the tiny “core”
This solve the problem of the correct priority in the loading of the library chain because math.h has to be loaded as the first library of the chain and not as a dependence of other libraries.
It is time to test this upgrade; if you don’t have at hand one sketch bigger enough to overcame the memory limits described in this article, ever in the download section of our site you could download the sketch “test_80k” that will provide to you the opportunity to proof that the Arduino Mega is now able to run correctly sketches with data areas bigger than 64kB.
The story ends with the test of the software on our TiDiGino project than now run happily.
We will keep you up to date with further news about our tests and investigations on the topic.
Download
[Thanks to Prof. Michele Menniti & Ing. Marco d’Ambrosio]


5 Comments