
Here we take advantage of Telegram bots for the development of a thermostat that may be controlled from a smartphone, by means of simple instant messages.
Even though social networks and instant messaging services established themselves and spread rapidly, in the last years, many people do not go any further from Whatsapp and ignore the existence of valuable messaging services, such as Telegram. Yet, Telegram has been the first messaging app to implement message encryption, which is something that Whatsapp only recently did. The peculiarity that makes Telegram a “superior” service is the fact that it supports bots: they are virtual users – or, if you so prefer, software robots – capable of interacting as if they were real users, and to create different functions in an automatic way; they are peculiar users since they do not need be associated with a telephone number.
The last time we dealt with Telegram and used its bots has been when we showed the Notes Machine project, that has been published in this post. There, we already analyzed the potentialities of the Fishgram library, that was created in order to fully take advantage of our bot. Therefore, without having to dwell too much on its implementation, we shall see another interesting application of the same, in this article.
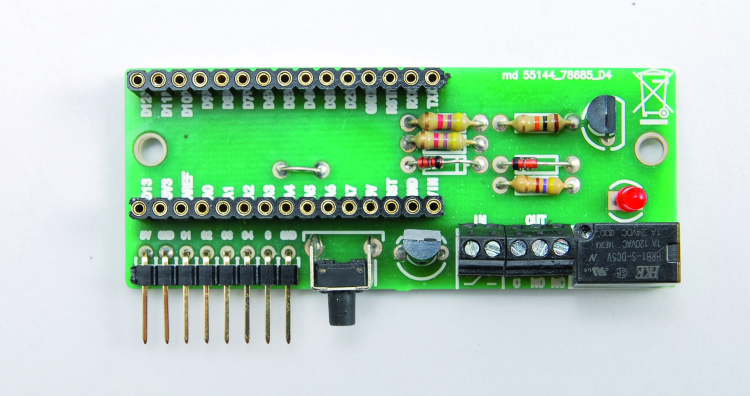
We will also use an IoT platform – ThingSpeak – that enables us to freely send data from Fishino, in order to arrange it on a diagram, that may be largely customized as well. For this project we used a Fishino Guppy (very handy, thanks to its limited size), along with a simple PCB that we developed for this occasion. The ad-hoc PCB sports:
- a button, and the possibility to connect the second one by means of a handy clamp;
- an S.I.L. male connector, for the purpose of using four I/Os, Vcc and external ground (they might prove useful for further expansions);
- a DS18B20 digital temperature sensor;
- a relay with the corresponding clamp, its functioning is signaled by a LED.

For practical reasons, we will only manage the temperature sensor and the relay via our code, but nothing prevents you to connect more relays, thus transforming the analog inputs into digital outputs, via software.
THE THERMOSTAT
First of all, we would like to say a word or two, so to explain what our thermostat is, and how it works. The operating principles will be repeated in the sketch.
It is a thermostat that is composed of an element that is sensitive to changes in temperature, and that activates a switch or a diverter, when above or under a set threshold. The temperature control is directly carried out via smartphone, thanks to the Telegram app. Our system, moreover, will publish the temperature variation online, on a platform that may be checked from any device, and in case the alarm temperature threshold is exceeded, it will immediately warn us by means of a message that may be customized from the sketch.
Usually, thermostats are characterized by hysteresis, that is to say that the opening or closing of the switch is carried out at two temperature thresholds: an upper and a lower one. In our system this possibility has been provided as well.
In the program we will create, it will be possible to set a hysteresis at a minimum of 1° C; that means that the difference between the upper and the lower temperature threshold we want to keep will be 2° C (by modifying the software you will be able to make the hysteresis smaller).
In order to clarify this concept, let’s imagine we are in summer and we want to keep a steady temperature, at 20°C; as a default setting, the upper threshold will be set at 21°C, and the lower one at 19°C. As soon as the environmental temperature exceeds 21°C, the thermostat will activate the air-conditioning, so to lower the temperature. When will the air-conditioning stop operate? That’s what the lower threshold is for: as soon as the temperature goes under 19°C, the air-conditioning will be stopped. It will work again only if the temperature exceeds 21°C again.
Even these thresholds (in addition to the alarm ones, that are needed in order to warn us in case of malfunctions) and the temperature to be kept will be set by means of Telegram.
THE DS18B20 TEMPERATURE SENSOR
The DS18B20 is a digital temperature sensor. That means that it transmits the observed values to Fishino by means of a digital signal, and not via a voltage to be read on an analog pin (such as for the well-known LM35). In order to carry out a correct interpretation of the signal, we, therefore, need two libraries.
The first one is OneWire, that enables the communication with any sensor that sends data by means of a single digital pin.
The second one is DallasTemperature, that was written for this family of sensors, and that relies on the OneWire library, in order to communicate with our DS18B20 sensor, as the following code lines show:
#define TEMP 5
OneWire oneWire(TEMP);
DallasTemperature sensors(&oneWire);
The PCB has been structured so that the sensor’s communication pin is connected to Guppy’s pin 5.
Therefore, let’s “feed” the OneWire library with this pin, by creating an instance; after that, we will activate the DallasTemperature library as well, by sending the reference to the previously created instance to it. These instructions are to be added to the void setup(). While in it, on the other hand, it is enough to start the communication between the sensor and the microcontroller, via the following command:
sensors.begin()
The configuration that is necessary for the sensor ends here. In the void loop() (we would like to remind you that it must last as little as possible, in order to avoid calls to FishGram.loop() that are too temporally distant between them), we take advantage of the well known millis() in order to read the temperature value from the sensor, every X seconds.
The sensor is not among the fastest ones, in the sense that it slowly adjusts itself to the temperature changes; this is not a problem since it is unlikely to have sudden temperature changes in a place like a room.
In fact, we set about 30 seconds between a sensor’s query and the next one.
The main instructions we find in the code block are the following ones:
sensors.requestTemperatures();
temp = sensors.getTempCByIndex(0);
relay();
The first two are needed in order to request and receive the temperature from the only sensor found, that is also the first one and therefore connected to the 0 value. The temperature is then memorized in the temp variable.
It is easy to imagine that the void relay() deals with the management of the relay found on the PCB, and we will analyze it later.

THINGSPEAK
We perfectly know that the IoT world is not limited to sophisticated and expensive devices, and today we shall see such an example: we shall create a basic IoT system, composed of Fishino (that will deal with gathering the data concerning the temperature, so to send it to the Internet), and of an IoT web platform (whose task is that of analysing and displaying the said data). We are talking about ThingSpeak, that represents an excellent union between the simplicity of use and reliability, in addition to having the native support in the Arduino world and a free basic solution that is more than enough for our purposes.
Once an account has been created on this web platform (it may be accessed at https://thingspeak.com), and after having confirmed our identity by means of a confirmation e-mail that we will receive, we will find ourselves before a screen such as the one shown in the figure.

We will then have to create a new channel, by clicking on the New Channel button: we may consider the channel as the virtual “place” where our data will be stored and displayed. This will open the page shown in figure, where we will find the settings to select, as for our channel: we may choose a name, a description, we may decide if to make the channel a public one or not, and choose how many different fields our channel will have (up to a maximum of eight), they may be renamed at will. In other words, in the case in which we’d like to display a temperature, humidity and brightness of a room, there’s no need to create three different channels. It will be enough to create a single channel and to assign three fields to it: one for each physical quantity that will be measured.

This figure shows one of the possible configurations for the channel used in this project

Once the channel has been created and configured, we will have to click on the Save Channel button, so to save our channel’s settings; the button clearly stands out in the final part of the web page, shown in the figure.

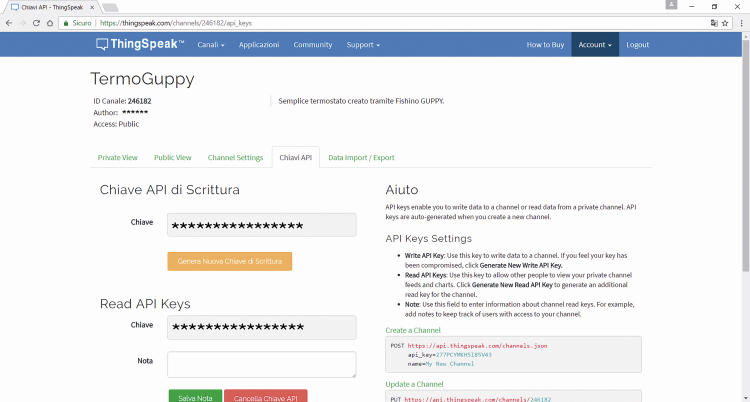
Once this has been done, all that is left is to send our data; in order to do so, we need the key for reading (that will not be used in our project) and writing our channel, in addition to its ID. In the window that will open – after having clicked on the Save Channel button – we will have to click on Chiavi API and to take note of the two keys, and of the channel ID that appears above as well.
Finally, we may analyze the code in our sketch.
As a first thing, we include the ThingSpeak library: without it, we would have had to manually deal with the different HTTP requests. Before the void setup() we also find:
The communication, as already hinted, is carried out by means of the HTTP protocol, that’s why it’s needed to create another instance of the FishinoClient class. After that, we input the ID channel and the two keys we acquired from the corresponding variables.
As for the void setup(), we find there a single instruction that starts the library, thanks to client object we previously created:
ThingSpeak.begin(client);
Finally, as for the void loop() and still taking advantage of the millis() function, we will send the temperature value to our ThingSpeak channel, by means of the following two instructions:
ThingSpeak.setField(1, temp);
ThingSpeak.writeFields(myChannelNumber, myWriteAPIKey);
In the first instruction we select in which one of the eight fields to display the temperature; in our case, we activated only the first one for the purpose: therefore let’s type the number 1, and choose which value to send. Given that the temperature is stored in the temp variable, it is the latter that we have to type as a second parameter.
In the second instruction, we enable Fishino Guppy to write data on the channel, by means of its ID and the write key. That’s it!
In the case in which we set our channel as a public one, it is enough to type the following URL, so to be able to display the results from any device; Obviously, please substitute the ‘idcanale’ with our channel’s ID:
https://thingspeak.com/channels/idcanale

A clarification is due, here: ThingSpeak’s basic version has a minimum of 15 seconds for the interval between two updates of the value of the physical quantity being observed, in addition to 20 seconds for the analysis of the received data.
To send the temperature value every 60 seconds is, therefore, a good compromise.
FISHGRAM
We will use a simple procedure, in order to memorize the various commands; there we used the templates, while here we will limit ourselves to compare a few lines. Obviously this will be a less elegant and performing code, with respect to the previous one, but it will be immediately understood.
Before analysing FishgramHandler() in detail, we would like to focus our attention on the following instructions found in the setup:
bool b = true;
FishGram.restrict(b);
FishGram.allow(myId);
By means of the first two instructions, we will go activate the whitelist provided by Fishgram. Only the IDs found in this list will be authorized to communicate with Fishino by means of the bot. In order to add an ID to this list, you will have to use the third instruction, to be repeated in the case of various IDs.
Among the examples provided by this library, there is one that enables the possibility to quickly know both our ID and the one of anyone writing to the Fishino-controlled bot, simply by opening the serial monitor.
Let’s take FishgramHandler() into consideration, now. After four if constructs that we will soon analyze (they control some boolean variables), we will find a second series of five if constructs, that have a slightly peculiar condition.
The strcmp() function found in every one of them compares the message that has just been received with a string we decide.
In the case in which the latter is exactly the same as the one of the message, the strcmp() returns 0, therefore we need to put a negation exclamation mark before it:
if (!strcmp(message, “/temp”))
Once the equivalence has been found, these five if constructs will limit themselves to create and send a reply message, and then to end the FishgramHandler() function:
String ans = F(“La temperatura vale: “);

ans += temp;

ans += “°C”;

FishGram.sendMessage(id, ans.c_str());

return true;
They will allow us to know the last temperature value that has been measured, the two alert thresholds in case of malfunctions, the temperature we decided to keep and the differential value (that is to say the difference between the upper threshold and the lower one, in the temperature’s hysteresis cycle). The third series of six if constructs, on the other hand, enables to set some of these values, by relying on some boolean variables. The first two ones are specular ones, as they set either the warm season or the cold season by modifying the hot variable.
Let’s give an example: in summer, once the 22°C is exceeded, it will be needed to activate the air-conditioning, while in winter, once the same threshold has been exceeded, it will be needed to deactivate the heating system. The void relay() (we will discuss it later) takes advantage of this variable.
Each one of the last four if constructs of the third series “activates” its own boolean variable, and deactivates one of the other three ones, and then they send a short message as well and end the FishgramHandler():
if (!strcmp(message, “/set_up”))

 {

   set_up = true;

   set_temp = false;

   set_diff = false;

   set_down = false;

   String ans = F(“Imposta la soglia superiore:”);

   FishGram.sendMessage(id, ans.c_str());

   return true;

 }
The message will request to send a numeric value, so to set – for example – the upper alert threshold. That means that at the following FishgramHandler() call, the message will not have to be analyzed by the different strcmp(); on the other hand, it will go modify the value of the variable corresponding to the option to be set.
For this reason, the four if constructs have been placed first. Given that set_up = true, the following code block will be executed:
if (set_up)

 {

   if ((atoi(message) > (setTemp + diff / 2)))

   {

     sup = atoi(message);

     String ans = F(“Soglia superiore impostata a “);

     ans += sup;

     ans += “°C”;

     FishGram.sendMessage(id, ans.c_str());

     set_up = false;

   } else {

     String ans = F(“Soglia superiore non valida, riprova”);

     FishGram.sendMessage(id, ans.c_str());

   }

   return true;

 }
The message containing the numeric value will be analyzed by the atoi() function, that converts a string into a whole number. If this value is greater or equal to the temperature to be kept, added up to half of the differential (that is to say, if it is greater or equal to the upper threshold of the hysteresis cycle), then the corresponding variable will be set, and after a confirmation message the boolean support variable will be “deactivated”. If on the other hand, the value is not a correct one, the user will be informed and the set_up variable will remain “true”so that another try will be possible.
Now, let’s consider the conditions to be verified before memorizing a new value for the variable containing the upper alert threshold (inside the code you will find all the comments explaining all the tests that are carried out as for the values, before memorizing them, in detail).

As hinted before, the upper alert threshold must be greater or equal to the upper threshold of the hysteresis cycle. We will give an example to clarify: if we want to keep 20°C, with a differential set to 2°C, the upper threshold of the hysteresis cycle will automatically be equal to 21°C, that is to say, half of the differential is added to the temperature to be kept. For such a reason an upper alert threshold set below 21°C would be inadequate.
The same reasoning is applied to the lower alert threshold.
As a default setting, these variables are set to:
- 20°C as for the temperature to be kept;
- 100°C as for the upper threshold;
- 0°C as for the lower threshold;
- 2°C as for the hysteresis.
From the point of view of the Telegram user, it might prove difficult to remember all the available commands. But here the app comes to the aid since it is, in fact, possible to create a small menu (in just a few passages), with the command list and the corresponding descriptions;
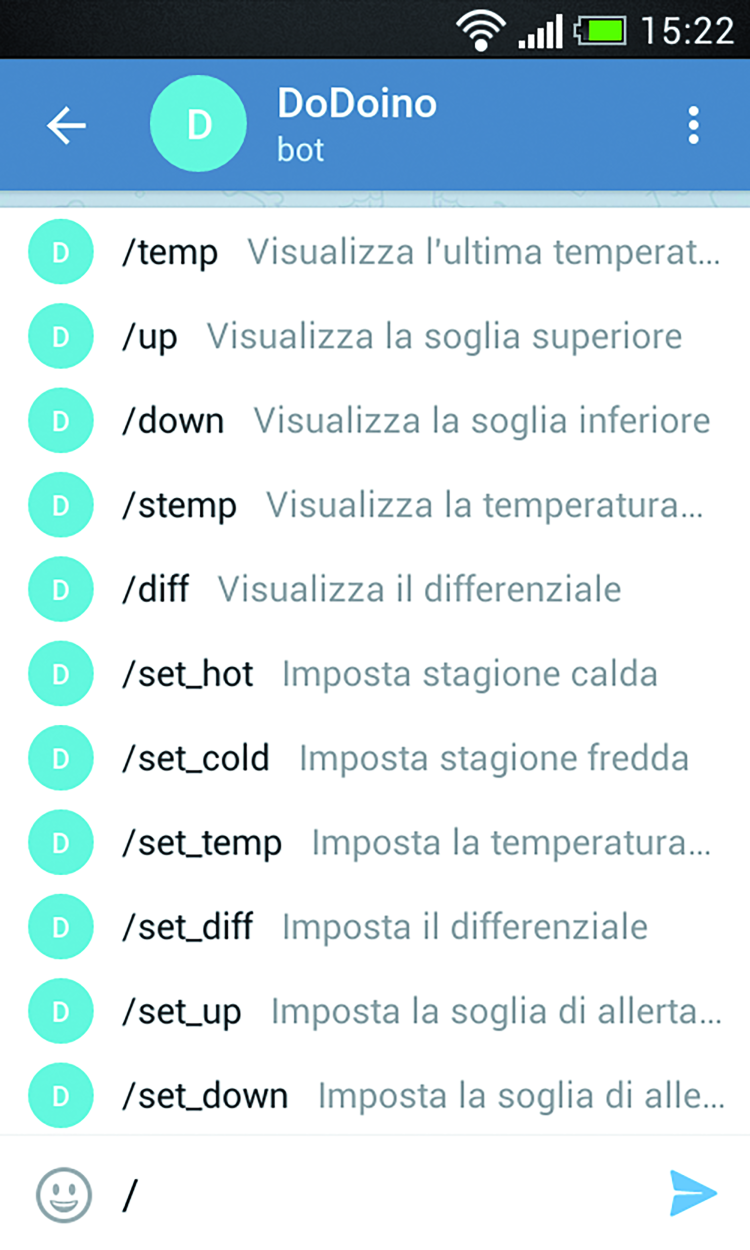
it will be displayed after pressing the icon corresponding to a slash.

In fact, commands on Telegram start with a slash, “/”, such as in the case of “/start” that is used in order to start a bot for the first time. That’s why all the commands we chose and added in the different strcmp() functions start with “/”.
Actually, that’s not mandatory, but if we didn’t add a start slash we would sacrifice the opportunity to create a command list.
Let’s connect to the “father of all bots”, that is to say BotFather, as we did when we created a bot in the article dated February 2017.
Therefore, let’s add the “/setcommands” command and select the related bot: in our case that’s Doinobot.

At this stage BotFather asks us to insert the different commands in a message, and to do it by following a specific outline, but without adding the initial slash.

As for our project, we will, therefore, reply with the following message :
temp – it displays the last detected temperature
up – it displays the upper threshold
down – it displays the lower threshold
stemp – it displays the temperature to be kept
diff – it displays the differential
set_hot – it sets the hot season
set_cold – it sets the cold season
set_temp – it sets the temperature to be kept
set_diff – it sets the differential
set_up – it sets the upper threshold
set_down – it sets the lower threshold

If we reach a successful ending, we will receive a confirmation message, as the one shown in figure. At this stage, we will have to return to the personal chat with the bot and press on the icon containing a slash, as shown in previous figures, shows the result we reached.
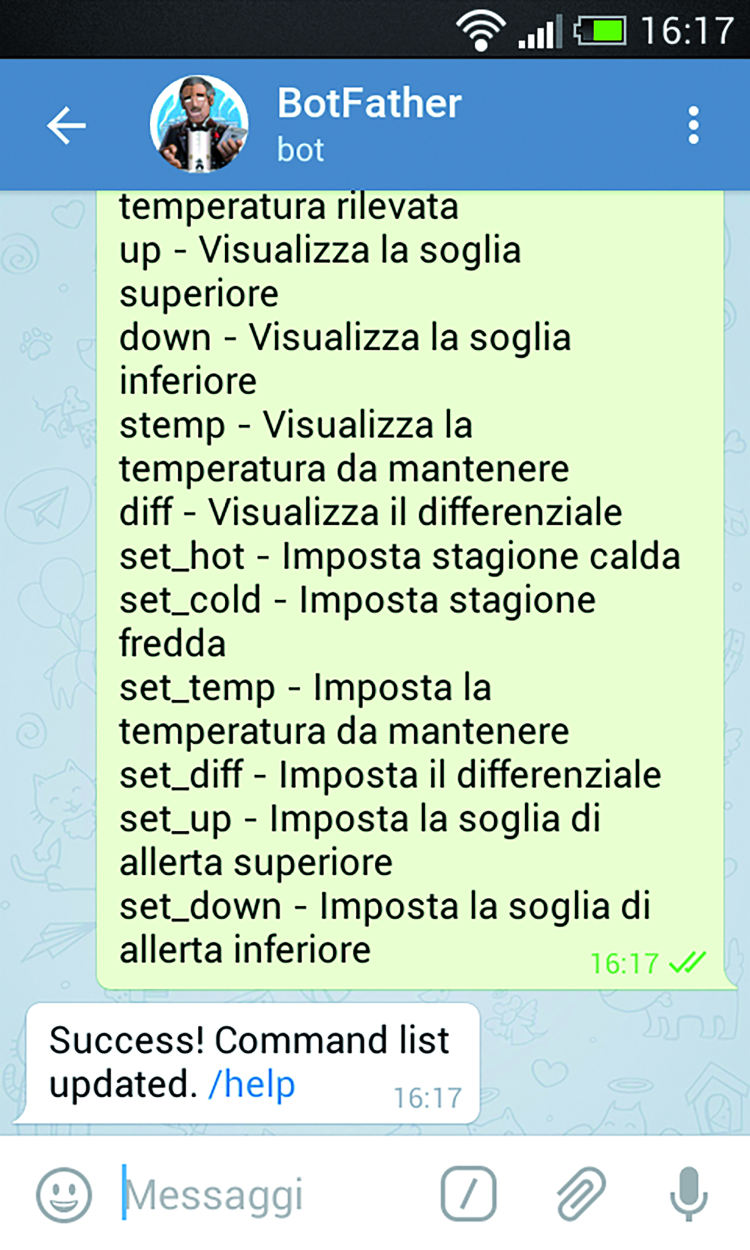
Figure shows the reply we will receive if we invoke the “/temp” command.

Finally, please do not forget to add the FishGram.loop() instruction, inside the void loop(). We would like to remind you that it must last as little as possible, in order to guarantee a properly operating Fishgram library.
VOID RELAY()
Finally, let’s deal with the explanation of this procedure, that is recalled some instants after a new temperature measuring has been carried out.
if (hot)

 {

   if (temp > (setTemp + diff / 2))

   {

     digitalWrite(RELAY, HIGH);

   }

   if (temp < (setTemp - diff / 2))

   {

     digitalWrite(RELAY, LOW);

   }

 } else {

   if (temp > (setTemp + diff / 2))

   {

     digitalWrite(RELAY, LOW);

   }

   if (temp < (setTemp - diff / 2))

   {

     digitalWrite(RELAY, HIGH);

   }

 }
The code block shown above controls – as a first thing – which season has been set; after that, in the case in which the temperature exceeds the hysteresis’ upper threshold (temperature to be kept + differential / 2) or if it goes below the lower one (temperature to be kept – differential / 2), it will respectively activate or deactivate the relay.
The RELAY macro has been defined before the void setup(), by assigning the value 2 to it, given that by using the circuit (that is to say, the shield we propose here) we previously described, the relay activation pin will be connected to Fishino Guppy’s pin 2.
if ((temp > sup) && (!supExceededMessage))

 {

   String ans = F(“Attenzione!

   La temperatura e’ …”);

   FishGram.sendMessage(myId, ans.c_str());

   supExceededMessage = true;

 }

 if ((temp < inf) && (!infExceededMessage))

 {

   String ans = F(“Attenzione!

   La temperatura e’ …”);

   FishGram.sendMessage(myId, ans.c_str());

   infExceededMessage = true;

 }
The second code block (the one above) warns of a possible malfunction and does it by taking advantage of the values of the two alert thresholds. The first time the temperature exceeds the upper alert threshold or goes below the lower one, given that the supExceededMessage and infExceededMessage variables are set to “false” (as a default setting), a message will be sent to the user. Both the if constructs (before ending) set the corresponding boolean variable to “true”so that the message is not sent again at the following void relay() call.
if ((supExceededMessage) && (temp < sup))

 {

   String ans = F(“Anormalita’ risolta…”);

   FishGram.sendMessage(myId, ans.c_str());

   supExceededMessage = false;

 }


 if ((infExceededMessage) && (temp > inf))

 {

   String ans = F(“Anormalita’ risolta…”);

   FishGram.sendMessage(myId, ans.c_str());

   infExceededMessage = false;

 }
This last code block has been used in order to reset the alarm condition: as soon as the temperature is back to normal again, given that supExceededMessage or infExceededMessage are set to “true”, a corresponding construct is executed and – still by means of a message – it will inform the user that the problem has been solved. The two boolean variables are then set to “false” again, and the task of the void relay() procedure ends here.
Obviously, both the alarm condition and its reset condition may be enhanced at leisure, for example, via LEDs lighting up or via warning sounds.
Conclusion
A thermostat is an ideal example for showing both the capabilities of the Fishgram library and the versatility of the Fishino boards, and particularly in the IoT setting. The WiFi connectivity, combined with the capability of supporting the data exchange via HTTPS protocol, is an integral part of these boards, and still it keeps the simplicity of use that is intrinsic to the Arduino world.
We hope we showed you that, once again, thanks to the above described application.
From Openstore
