Today we will introduce you to a board that replicates the approach of the Raspberry Pi but with increased functionalities, capable of running GNU / Linux and Android. We are talking about Banana Pi microcomputer, based on the SoC Allwinner A20 produced by Lemaker, a Chinese company based in Shenzhen. The first point of interest is the name of the card itself. Just open the box and you immediately understand the reason for the naming. At first glance, it looks very much like a Raspberry Pi. In fact, Pi, at least in the initial intentions of the project Raspberry Pi, stood for the “vocation” of the board for those who want to learn Python programming.
Eventually, the story of the teaching microcomputer has gone well beyond the initial forecast, both in terms of functionality provided and in the volume of production and sales (currently over three million units sold) while the word “Pi” started identifying the product and became part of the name of almost all the accessories for the card itself. Giving a fruit name to companies and products is rather an old tradition in the world of computing, Acorn, Apricot and Apple are examples. In all probability, therefore, the intention of the makers of Banana Pi is the desire to offer an alternative to Raspberry Pi, with performances increased significantly.
In fact, Banana Pi is equipped with a SoC Allwinner A20 processor, a very powerful processor (dual core, 1GHz each) with a “internal” management much more complex than the Raspberry Pi one, and therefore dedicated to applications much more demanding in terms of resources than those achievable with Raspberry Pi.
The main problem of the “porting” of GNU / Linux on ARM RISC systems is the adaptation of the kernel (the core of the operating system) to the hardware features of the target system. This is true in particular for the GPIO and video processors. The problem of the GPIO is given by the fact that several families of processors have different number, type and management mode of inputs / outputs. Who is writing drivers for the GPIO of a given card faces difficulties in reproducing exactly the same functionality on a different card. In order to write video processors drivers, besides, you must have the information about the internal features of the processor itself, which often are not open source but are proprietary and subject to licensing. In this case, often, the graphic processors are just not “enabled”. The computations are all made through software interpolation, going to load only the main CPU. Even the boot mode and initial configurations are different from a SoC to another and even from a GNU / Linux family to another. In summary, Banana Pi looks like a product that wants to be in same range of Raspberry Pi but with higher performances and several additional features, maintaining indeed a full compatibility with existing hardware and software implementations, keeping the Raspberry Pi ease of use that characterizes them.
For us it is also an opportunity to make an overview on the SoC micro-computes present on the market, both for “teaching” and commercial use, based on the ARM RISC processor and hosting GNU / Linux.
As usual, we start with the specifications of the card.

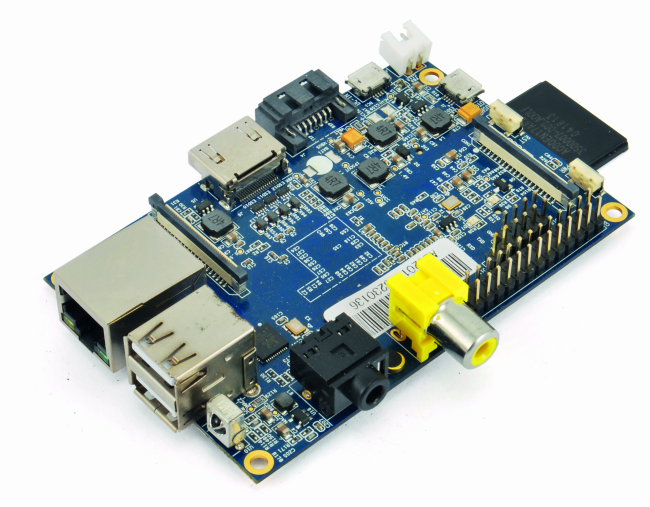
While “resembling” a lot to Raspberry Pi looking at the shape and layout of the main external connectors, you immediately notice that the size (length and width) of Banana Pi is greater than that of Raspberry Pi. The internal connectors and the fixing holes are positioned differently than those of Rasperry Pi. On Banana Pi there is a higher number of connectors and devices, such as a SATA connector for connecting hard disks, an infrared sensor (remote control), two micro USB socket and three additional buttons. About micro-USB sockets, the one in the same position of the corresponding on Raspberry Pi is an OTG plug, while to power up the board you have to use the micro-USB connector between the SATA and hdd power source ports.
- Soc Allwinner A20:
CPU A20 ARM Cortex-A7 Dual-Core 1 GHz clock
GPU ARM Mali400MP2, supporting OpenGL ES 2.0/1.1
The SoC is manufactured by Alwinner Technology, a Chinese company of 500 people located in the Guangdong region, specialized in the production of SoC chips for smartphones, tablets, smart TVs that find increasing use also in microcomputers. In 2014 Allwinner became an official member of the “Linaro” team, the no-profit organization owning the same name GNU / Linux distribution dedicated to RISC processors. This ensures special attention in making available an operating system that allows a better use of these microcomputers, both in terms of supported devices and by maintaining and updating the distribution repository.
- SDRAM: 1GB DDR3 shared with GPU
- Storage: SD Card Max.64GB; Slot SATA for hdd up to 2TB
- Network 10/100/1000 Ethernet RJ45 (USB WIFI Dongle optional)
- Slot CSI for camera module (camera module optional)
- Microphone input onboard
- Video: HDMI CVBS LVDS/RGB
- Audio: Jack 3.5 mm and HDMI
- Power Source 5 volt via MicroUSB (recommended, 5V 2A)
- 2x USB 2.0 connected directly to chip Allwinner A20; 1 OTG micro-usb
- Buttons: Reset (near to MicroUSB connector), Power, Uboot
- GPIO, 2X13 pin
- IR receiver

We have mentioned the position of Allwinner regarding the operating systems for their SoC. At the same time, Lemaker is proving to be very active in releasing different OS distributions, kept continuously updated. The operating systems can be downloaded from the Lemaker website. The site also contains a blog section and a very active forum section, where you can find a variety of information for specific board applications.
Operating systems currently available are:
- Lubuntu_For_BananaPi currently in version 3.0 – The distribution derives from Lubuntu, which is a lightweight version of Ubuntu. This version, besides having fixed some bugs, puts particular care to make the GPIO connector management as closer as possible to that of Raspberry Pi. In our opinion, this is a particularly suitable distribution for those who want to use the board as a micro desktop computer, with monitor, keyboard and mouse, without going too far into the administration of the operating system. The management of additional packages and the main system configuration can be performed through a graphical user interface like your “home PC”;
- Raspbian_For_BananaPi,version 3.0 – This distribution confirms the desire of producers to offer an alternative to micro-computer Raspberry Pi as much compatible as possible but with increased performance and features;
- ArchLinux_For_BananaPi – Arch Linux ARM carries forward the Arch Linux philosophy of simplicity and user-centrism, targeting and accommodating competent Linux users by giving them complete control and responsibility over the system. Instructions are provided to assist in navigating the nuances of installation on the various ARM platforms; however, the system itself will offer little assistance to the user;
- OpenSuse_For_BananaPi – OpenSuse is the open version of the German Slackware distribution, and SUSE is the acronym for “Software und System-Entwicklung” (“Software Development and System”). “Open” emphasizes its adherence to the philosophy of free software. Over the years the distribution has incorporated many features of “professional” distribution Red Hat, the commercial version of GNU/Linux;
- Android_For_BananaPi – this is the default OS for Allwinners chip;
- Scratch_For_BananaPi – distribution dedicated to teach programming, by using a language created on purpose by the MIT
We have tested two versions of the above OS: Lubuntu and Raspbian.
Lubuntu for Banana Pi
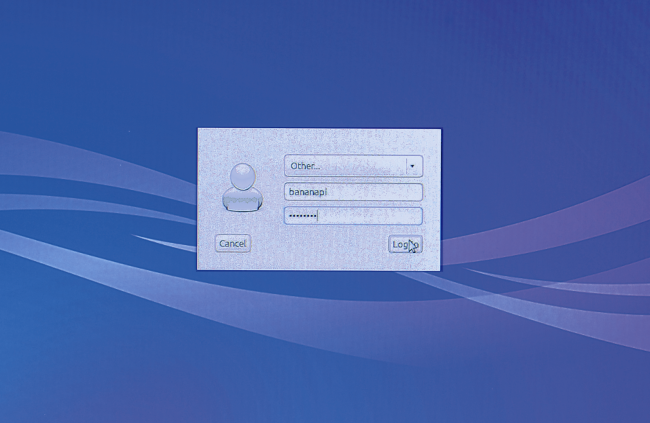
Once installed the operating system Lubuntu_For_BananaPi_v3.0 on the SD card, we insert it into the appropriate slot on the board. Then we connect a monitor to the HDMI connector on Banana Pi. We connect the keyboard and mouse to the USB connectors. We connect the board to the home network by an Ethernet cable. Finally, we connect the power supply. After the operating system is loaded, you’ll see the login page of Lubuntu as shown in Fig. 3. You can login as “normal” user, with id: “bananapi” and pwd: “bananapi” or you can be user “root” with pwd: “bananapi”. Once authenticated you go directly to the “desktop” with a taskbar and the “Start” menu. From the menu, you can select and start all the preloaded applications or install new ones with the typical package manager of Ubuntu-like distro (Fig. 4). This could complete the guide for whom will use BananaPi as “office automation” pc. We, as usual, are more interested in the management of interfaces, such as I / O and communication buses.

The operating system kernel is responsible exclusively to address the device hardware resources and present them to user programs as virtual devices represented by files under the /dev directory. In the SoC Allwinner the association between physical I / O device, the input / output pinout and the virtual device to have it addressable by the end user is contained in a configuration file which is read by the kernel during boot procedure. The file, named script.bin, is stored in the boot partition of the operating system, which in our case is “mounted” in /boot folder of the file system. We can “catch up” this file by opening the application “File System” from the “start” menu of the desktop. Let us go to / boot / bananapi, identify the file script.bin (Fig. 5) and try to open it by double click.

Unfortunately, the file is a binary unreadable by humans since it is the result of a building process. In our aid, there is a process of “reverse engineering” that allows you to get the text file back with .fex extension, which is the GXF file format (Generic eXchange Format) an ascii file structured in a particular way. To compile and, if necessary, recompile the configuration file to script.bin we use a tool provided by the SunXi community (http://linux-sunxi.org) that is developing software for devices based on SoC Allwinner. The tools we need are included in the package “SunXi-tools” available in the Git-Hub repository. For the moment, we stop here. Installing this tool in the distribution Lubuntu_For_BananaPi is rather laborious, as it is necessary to install the add-on packages and their dependencies one by one. We will resume the subject later, speaking of the same functionality provided by Raspbian operating system. For now, we just need to know that in Lubuntu the GPIO pins on the connector have the same names we use for the Raspberry Pi.
Raspbian for Banana Pi
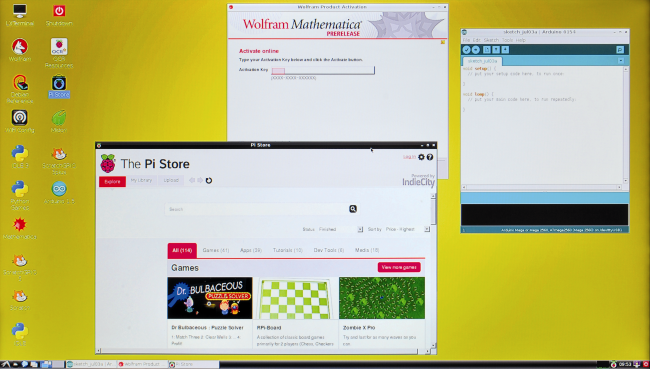
As its name suggests, the main peculiarity of this distribution is that it is almost completely compatible with Raspbian for Raspberry Pi. According to the forum, an SD card designed to run on the Raspberry Pi should work on Banana Pi by modifying only the “boot” partition replacing the kernel and configuration files to initialize the boot process. We started from the “Official” Raspbian_For_BananaPi_v3.0 downloaded at http://www.lemaker.org/content-9-38-1.html. After downloading and unpacking the image file, load it onto an SD card with the program Win32DiskImager and use it to boot the board. We shall see directly the desktop, as it automatically logs in as user “pi” with password “bananapi” (Fig. 6). This distribution includes the Arduino IDE and classic Raspian applications, such as Pi Store and the software Mathematica (Fig. 7).

One of the main differences compared to Raspbian for Raspberry Pi is the mapping of I / O pins between Soc A20, the connector pins, and their interfacing with kernel driver modules. As we have already anticipated, the pin description for the operating system and the global environment is kept in the file script.bin that we find in boot partition, along with the image of the kernel and the configuration file uEnv.txt, the equivalent of the file cmdline.txt in Raspberry Pi. The “boot” partition is automatically mounted in the filesystem. Open a terminal window from the desktop or connect with SSH to Banana Pi. We prefer the second option, using PuTTY and WinSCP. It is better, in this case, to assign a static IP to our board avoiding the dynamic address assigned by router.

To do this we must modify the file / etc / network / interfaces with a valid configuration for our home network (Fig. 8):
auto lo
iface lo inet loopback
#iface eth0 inet dhcp
auto eth0
iface eth0 inet static
address 192.168.0.43
netmask 255.255.255
network 192.168.0.0
broadcast 192.168.0.255
gateway 192.168.0.254
#allow-hotplug wlan0
#iface wlan0 inet manual
#wpa-roam /etc/wpa_supplicant/wpa_supplicant.conf
#iface default inet dhcp
We login as user “pi” with password “bananapi”. Once logged in, we enable the root user by assigning it a password with the command:
sudo passwd
Confirm the password twice, and then we can login as “root” with command:
su
Let us go in /boot; if it is not present, we can mount with:
mount /dev/mmcblk0p2 /boot

In folder /boot/bananapi by using WinSCP we shall move the file script.bin to a folder on our PC.
Now we can install sunxi-tools package to compile/decompile the file script.bin; first we install git package to handle the repository, not before of having updated all the repositories with the commands:
apt-get update
apt-get upgrade
apt-get install git
On /home folder, we can download the sunxi-tools package:
git clone git://github.com/linux-sunxi/sunxi-tools.git

Before compiling we need to install a dependency, the libusb-1.0 library:
apt-get install libusb-1.0-0-dev
After the installation is complete, we go to /sunxi-tools folder:
cd sunxi-tools

and we compile the package with command:
make

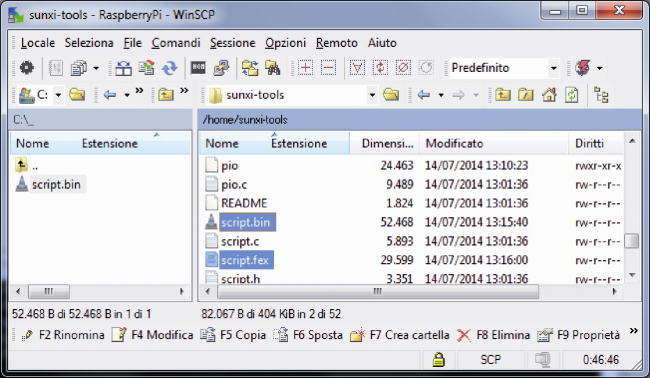
Now we can copy the file script.bin from /boot to /home/sunxi-tools:
cp /boot/bananapi/script.bin /home/sunxi-tools
and we are ready to decompile the file script.bin (pay attention to initial “./”):
./bin2fex script.bin script.fex
Opening the file script.fex we will see the different sections that bind the Soc Allwinner A20 pins to the virtual devices we could use in our programs. In section [gpio_para], that you can see on “Listato 1” we have verified the pinout respect to the GPIO connector (CON3 on Banana Pi).

Listato 1
[gpio_para]

gpio_used = 1

gpio_num = 88

gpio_pin_1 = port:PB20<1><default><default><default>

gpio_pin_2 = port:PB21<1><default><default><default>

gpio_pin_3 = port:PB20<1><default><default><default>

gpio_pin_4 = port:PI03<1><default><default><default>

gpio_pin_5 = port:PB22<1><default><default><default>

gpio_pin_6 = port:PB23<1><default><default><default>

gpio_pin_7 = port:PI14<1><default><default><default>

gpio_pin_8 = port:PI10<1><default><default><default>

gpio_pin_9 = port:PI13<1><default><default><default>

gpio_pin_10 = port:PI12<1><default><default><default>

gpio_pin_11 = port:PI11<1><default><default><default>

gpio_pin_12 = port:PH05<1><default><default><default>

gpio_pin_13 = port:PH03<1><default><default><default>

gpio_pin_14 = port:PH00<1><default><default><default>

gpio_pin_15 = port:PH01<1><default><default><default>

gpio_pin_16 = port:PH01<1><default><default><default>

gpio_pin_17 = port:PI19<1><default><default><default>

gpio_pin_18 = port:PH02<1><default><default><default>

gpio_pin_19 = port:PH02<1><default><default><default>

gpio_pin_20 = port:PI20<1><default><default><default>

gpio_pin_21 = port:PI21<1><default><default><default>

gpio_pin_22 = port:PI17<1><default><default><default>

gpio_pin_23 = port:PH20<1><default><default><default>

gpio_pin_24 = port:PH21<1><default><default><default>

gpio_pin_25 = port:PI16<1><default><default><default>

gpio_pin_26 = port:PI16<1><default><default><default>

gpio_pin_27 = port:PI18<1><default><default><default>

gpio_pin_28 = port:PH05<1><default><default><default>

gpio_pin_29 = port:PI21<1><default><default><default>

......

......
| Pin on Board | Pin Definition | IO on A20 |
| CON3-P01 | VCC-3.3V | |
| CON3-P02 | VCC-5V | |
| CON3-P03 | TWI2-SDA | PB21 |
| CON3-P04 | VCC-5V | |
| CON3-P05 | TWI2-SCK | PB20 |
| CON3-P06 | GND | |
| CON3-P07 | GPCLK | PI3 |
| CON3-P08 | UART3-TX | PH0 |
| CON3-P09 | GND | |
| CON3-P10 | UART3-RX | PH1 |
| CON3-P11 | IO-0(UART2-RX) | PI19 |
| CON3-P12 | IO-1 | PH2 |
| CON3-P13 | IO-2(UART2-TX) | PI18 |
| CON3-P14 | GND | |
| CON3-P15 | IO-3(UART2-CTS) | PI17 |
| CON3-P16 | IO-4(CAN_TX) | PH20 |
| CON3-P17 | VCC-3.3V | |
| CON3-P18 | IO-5(CAN_RX) | PH21 |
| CON3-P19 | SPI0_MOSI | PI12 |
| CON3-P20 | GND | |
| CON3-P21 | SPI0-MISO | PI13 |
| CON3-P22 | IO-6(UART2_RTS) | PI16 |
| CON3-P23 | SPI0_CLK | PI11 |
| CON3-P24 | SPI0_CS0 | PI10 |
| CON3-P25 | GND | |
| CON3-P26 | SPI0_CS1 | PI14 |

Comparing these two references with Raspberry Pi GPIO map we can verify the correspondence between Soc A20 pinout and its virtual assignment. Take for example the physical pin 13 on the GPIO connector that is associated to pin PI18 of Soc A20. In Listing 1, towards the end, we see that it is assigned to virtual pin gpio_pin_27. Exactly the same number assigned in Raspberry Pi. Have fun comparing the other pins and you will discover that all match. This also applies to the bus management, for example in the file script.fex you can go to the I2C port assignment section that we see in Listing 2 below.
Listato 2
[twi0_para]

twi0_used = 0

twi0_scl = port:PB00<2><default><default><default>

twi0_sda = port:PB01<2><default><default><default>


[twi1_para]

twi1_used = 0

twi1_scl = port:PB20<2><default><default><default>

twi1_sda = port:PB21<2><default><default><default>


[twi2_para]

twi2_used = 1

twi2_scl = port:PB18<2><default><default><default>

twi2_sda = port:PB19<2><default><default><default>
In Listing 2, we see that the twi1 port is assigned to pins PB20 and PB21, that in Listing 1 correspond to the GPIO 2 and 3 (physical pins 3 and 5) of Raspberry Pi connector, the exact positions where the I2C bus is attached.
We wanted to try this correspondence by using the shield FT1060M. We installed it on the Banana Pi GPIO connector and we lunched two software, GPIOInt_FF.py and TempLux.py. The feature of the first program is to use the “polling” function that can be used thanks to the particular implementation of the GPIO management driver built for the operating system Raspbian. As shown in Fig. 16, the function can also be used for Banana Pi, so we have demonstrated that it is possible to “port” this type of programs from Banana to Raspberry Pi without adaptations.
Instead, we couldn’t enjoy this feature when porting the same software to PcDuino, as described in number 182 of the magazine, since that required a partial rewrite of the programs.
Another point in favor of Banana Pi!
We also wanted to test the correspondence in the I2C bus operation, using the program TempLux.py.
To test the I2C bus we must install the i2c-tools package with the command:
apt-get install i2c-tools
Now we can verify if the PCF8591 chip is correctly recognized on I2C bus. To use this bus we need to load its drivers with:
modprobe i2c-sunxi
modprobe i2c-dev
Let us verify the right configuration with command i2cdetect. The chip is recognized on bus 2 instead of bus 1 (like is common in Raspberry: this is a little difference) with command:
i2cdetect –y 2
that shows the output you can see on figure.


For this reason, we must slightly modify the code, line 34, as follows:
bus = SMBus(1)
with:
bus = SMBus(2)

We need to install “smbus” package before executing the program:
apt-get install python smbus
Now, we execute:
python /home/TempLux.py
and we get the result.

You may notice the considerable difference in execution speed compared to the same program run on the Raspberry Pi. Apart from the small change, it’s a plus. As a last “gem”, we tried to exploit the SATA connector for connecting a hard disk. We used a spare disc connected to a SATA adapter and then to the card connector. Here you have to be very careful. For some unknown reason the hdd power connector has the poles reversed if compared to those on the power cable from the disk. This, at least in our case. Before connecting the hard drive, check the polarity with a tester. We have reversed the connector poles coming from the hard disk with the help of a tweezers and reinserting them in the required manner, as shown in figure.
We turn off the card with the command:
shutdown –h now
To physically turn off the board we must press the PWR button (near the GPIO connector) for at least 4 seconds. This cuts off the power supply. Another plus, there’s no more need to unplug cables. Now we can connect the SATA connector to the board, then the power connector.

Check again the power polarity.
Turn on BananaPi by pressing the PWR button. Open WinSCP and in /dev folder we shall find our hdd mapped in
/dev/sda1

Most probably, the hdd is FAT or NTFS formatted. We need to format it to EXT4, to host the /root partition of our distribution. We can do it in two ways, either using GPARTED (with GUI interface) or FDISK from command line.
EXT4 is the latest filesystem released by GNU/Linux, capable of addressing files up to a size of 16TiB and mass storages up to 1EiB (1.152.921.504.606.846.976 di byte); That’s pretty enough for a RaspberryPi software!
If you have chosen GPARTED, here is the command to install it:
apt-get install gparted
The second method, preferred by sys admins, uses the command mkfs (make file system).

Be careful: once executed, this command formats the disk erasing all the content on it, without any warning!
mkfs.ext4 /dev/sda1
Whatever you have done, we can check it with cfdisk that is a program to manage hdd partitions. Be careful while using this program as well, move with arrows and exit using “Quit”:
cfdisk /dev/sda
Let’s create a mount point for the new empty root partition, to see it on the filesystem:
mkdir /mnt/temp
mount /dev/sda1 /mnt/temp
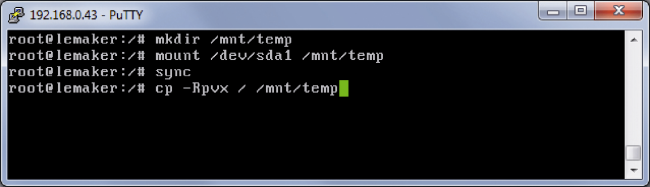
Now we can copy all the root partition from SD Card to the hdd root partition we have just created. Let BananaPi works in peace, since this operation is time consuming .
cp -Rpvx / /mnt/temp
cp is the copy command, and its parameters are:
- R = copy all folders recursive;
- p = keep file properties;
- v = verbose;
- x = stay in the specified filesystem.
All the content of root (/) is copied to the mountpoint /mnt/temp on the target device, that is the hdd SDA1. Thanks to the “x” parameter, the boot filesystem is not copied.
Now we must configure the boot files to address correctly the new root partition on the hdd. To check if everything is fine, we have created a dummy file “pippo.txt” in /home. This file is present on the SD Card but not on the HDD, so we can understand that we are using the latter partition. Then we need to tell the boot process which is the root partition to be used.
The boot setting is contained in uEnv.txt file in the boot partition. Copy it to a backup file with command:
cp /boot/uEnv.txt /boot/uEnv.bak
Therefore, we can modify the last line in the .txt file as follows:
bootargs=console=ttyS0,115200 console=tty0 disp.screen0_output_mode=EDID:1280x720p50 hdmi.audio=EDID:0 console=tty1 root=/dev/sda1 rootfstype=ext4 elevator=deadline boot_delay=32 rootdelay=10rootwait
In this way, we are stating that root partition is on device SDA1 and the boot delay is 32ms before booting and 10 seconds before accessing to the root device, so that the kernel can find and mount the external drive (it needs about 5 seconds). Save all the changes and finally let’s change the /mnt/temp/etc/fstab file:

After completing all the operations, we must reboot the board. If everything is fine we shall verify that in /home folder there isn’t the “pippo.txt” dummy file.
In case of failure, freezing or any other problem, it’s enough to switch off the BananaPi, put the SD card in a PC and replace the uEnv.txt file with the original one.
Else, we have now a real mini-PC with very good performances.
Try to install a web server like apache2, mysql, phpmyadmin and compare the performances with a RaspberryPi. The BananaPi is suitable to host applications requesting a not minimal DB management, a concurrent access from many users to our web service. The good advantage is that we can migrate the applications directly from Raspberry that need to be speeded up. Keep in mind also the possibility to use a SATA SSD.
All these features at a cost of few modifications of the O.S., but capitalizing all the skills we have done with RaspberryPi. Another plus is the continuous evolution of software thanks to the development community.
On our concerns, BananaPi won a stable settlement on our desk!

[…] Discover Banana Pi, another Linux board for you to experiment with! Today we will introduce you to a board that replicates the approach of the Raspberry Pi but with increased functionalities, capable of running GNU / Linux and Android. […]
[…] Si la carte de la fondation Raspberry n’a pas de prétention commerciale, cela ne l’empêche pas de subir les assauts de la concurrence et cette nouvelle venue qu’est la Banana Pi est une drôle de surprise qui traduit bien le succès de la petite carte mère open-source. Il faut dire que les millions d’exemplaires vendus ont du attiser les appétits de nombreux fabricants.. On pourrait croire que l’arrivée d’un clone aurait pu faire baisser le prix déjà très bas de la carte Raspberry Pi. Il n’en est rien et la Banana Pi est finalement vendue plus chère que l’original. A 57$ en Asie soit un peu plus de 41€ contre 36€ pour la carte Raspberry sur Amazon. On passe d’un processeur Broadcom BCM2835 ARM11 cadencé à 700 MHz sur un seul coeur à un Allwinner A20 double coeur cadencé à 1 GHz. Cet avantage de performance est t-il un bon pari ? Source : CNX software. Discover Banana Pi, another Linux board for you to experiment with! […]
[…] you may recall, we described BananaPi lately in this post, and today we give you a brief overview on the latest software updates released […]