
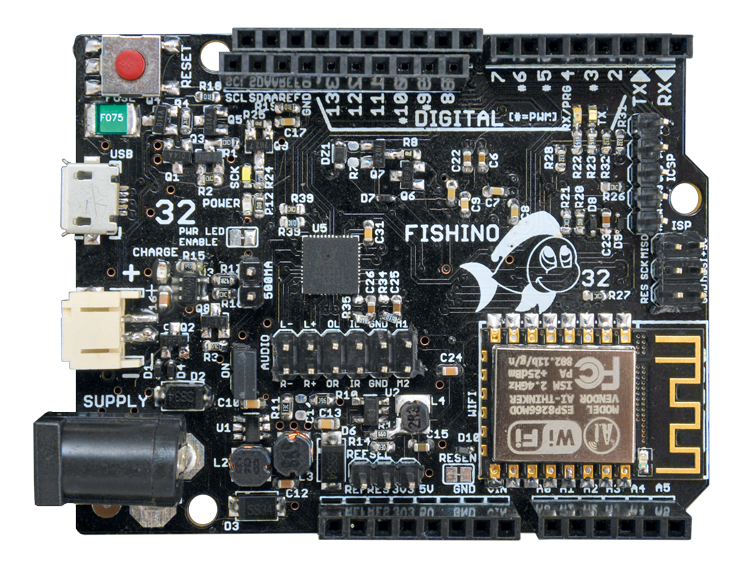
Our prototyping board acquires a 32-bit processor and sets the bar high, towards demanding applications that may take full advantage of the WiFi support, of the RTC and of the SD-Card, that make Fishino stand out from the common Arduino UNO. Second installment.
In a previous post you met our new and powerful Arduino-like board, that shines for having WiFi and RTC transceivers available on board. Now it stands out even more from the Arduino boards, because of the processor it uses; in fact it has been provided with a 32-bit MCU by Microchip.
We described the circuit diagram, and pointed out the features and the advantages (with respect to our Fishino boards that are based on an ATmega microcontroller); it is now the time to move on, to its implementation and activation.
Activation
Once you get hold of your Fishino 32, you will proceed to its programming that – as we could see in the first installment – may be carried out by means of the Arduino IDE. You will have, however, to install the package we supplied on the website: it contains all the additional programs needed (third-party software).
The package installation, thanks to the Arduino team’s work, is certainly a simple one: it is enough to start the IDE, to select the Setting submenu from the File menu and, while in the row named Additional URLs for the Board Manager. As shown in figure, it is possible to insert more than one path, by clicking on the button: a window will open, and by means of it, it is possible to confirm or search for new paths.

Once the Fishino path has been typed, it is enough to enter the Tolls menu and to give the Board>Board Manager…” command: you will access the management panel for the additional boards; you will find the fishino_pic32 by Fishino package towards the end.
On the right, you may notice the Install button, along with a box, which is used for the version number selection. In the moment we write this article, the version number is 1.0.1, but the package is being continuously updated.
Please click on the button and the packages will start downloading, the process may even last for quite some minutes; do not worry, as this is an operation to be executed only once, at the start (or when updating the board, but in that case only the modified elements will be downloaded).
Once the installation has been completed, the screen will appear as in figure. You will notice that the Install button has now been replaced by the Uninstall button and that the list of the available boards has appeared: do not worry if it’ll be different from the one in the pictures: we’ve been studying to add more boards!

Once this operation has been completed, in the board selection menu you will find our Fishino32.
Now your Fishino 32 is almost operational; only the USB drivers are missing, and for some operating systems they must be installed (that’s not the case of Linux, as they will be included, and the same goes for MacOS X).
With regards to Windows, the drivers will be automatically downloaded, along with the software package containing the description of the new boards that we just installed; unfortunately, they are not automatically installed in the operating system; for technical reasons that it would be too long to explain here.
As for the installation it is enough – once Fishino has been connected to the PC – to follow the on-screen instructions, by manually searching for the drivers in the following path:
C:\Users\username\AppData\Local\Arduino15\packages\fishino\tools\pic32-driver-windows\1.0.0\chipKIT Drivers, please take into account that the name of the user for which you are installing the drivers must be typed in the place of username.
Once the Stk500v2.inf file has been selected, the driver will be installed and the corresponding virtual COM port will appear in the IDE. Once the drivers are installed (if needed), the system is ready for use.
You will now need to select the correct port in the IDE, it will be a COMxx on Windows or a TTYACMxx you are working on a Linux operating system.
Executing the first Sketch
And here we are, ready to test our board! You will immediately find out a small difference, with respect to Arduino and the 8-bit Fishino boards. At first, it may look as inconvenient, but actually it often turns out to be an advantage: the board does not have an autoreset, that automatically sets it to the sketch loading mode. Therefore, you will need to press the reset button, and to keep it pressed for about 2 seconds, until the programming orange LED flashes (but not for more than 4 seconds, or the update mode for the WiFi module firmware will be set: a condition that will be highlighted by the blue LED flashing).
If we missed the timing, that’s no big deal: let’s release the reset button and restart.
You might be wondering about the reason behind this functioning mode; well, it is because the board has a native USB, which is connected to the functioning of the controller itself, as in the case of the Arduino Leonardo boards. If the controller is halted(as in the case of a broken sketch) the USB port won’t respond to the commands, and not even to the reset ones. We, therefore, preferred a manual system that would prevent, as an example, the notorious ‘emergency maneuver’ that is sometimes needed on the Arduino boards (that consists of pressing the reset button “a moment” after having launched the programming from the IDE).
However, we do not rule out the possibility – in one of the next versions of the bootloader – of an automatic reset system, even though the abovementioned limits still remain.
Let’s return to our sketch; we will load the BLINK sample from the IDE: that’s the sample that makes the led13 (the one corresponding to the white LED on the board) flash. Let’s keep the reset button pressed for about 2 seconds and, when the orange LED starts to flash, we will press the IDE sketch loading button.
After a few seconds (it depends on the PC speed, on the sketch complexity, on the number of libraries we used, etc.) the loading will be complete: the fact will be highlighted by the orange LED switching off and by the white LED flashing at the same time.
That’s it: the board has been tested and is operational! And now?

Updating the WiFi module
If you read the articles concerning the 8-bit Fishino boards, you will surely remember that the firmware update procedure required some loose connections between the boards’ I/Os and the ESPCONN port, the preloading of a “neuter” sketch, such as for example the blink one, etc.
None of this is needed on Fishino32: the board is set to the firmware update mode, simply by using the reset button!
The procedure is as follows:
- please press and keep the reset button pressed, until the blue LED starts to flash; you will notice that 4 seconds are needed: after the first 2 seconds the orange LED will start to flash, so to indicate the sketch loading mode, and after 2 more seconds the blue LED will start to flash;
- please launch the FishinoFlasher program (downloadable from http://fishino.com), after having verified that your computer has a working Internet connection, given that the firmware will be downloaded from the wireless network, and thus from the Web.
Once started, the FishinoFlasher program will show a screen as the one in the figure; it is possible to notice some elements there, such as the type of the detected board (Fishino32), the WiFi module’s series number, and the currently installed firmware version (in this case, that’s 2.1.3).
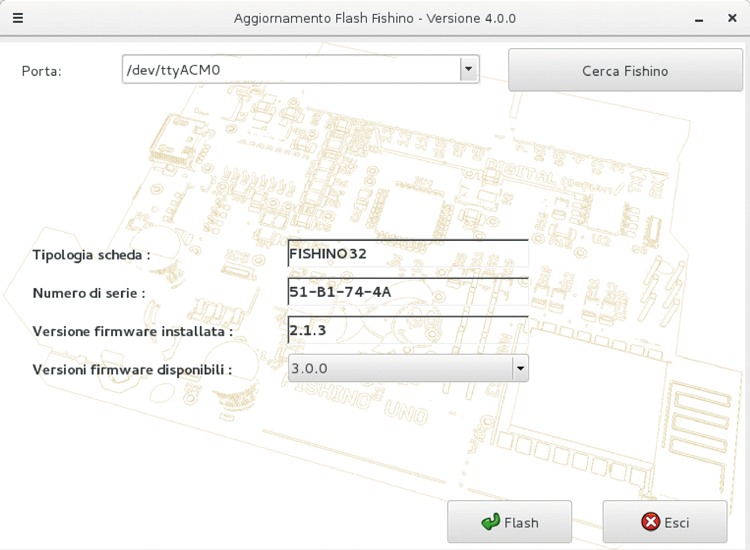
It is possible to choose a new version to be installed, in the box below; the last available version is proposed (3.0.0, in this case), but nothing prevents the installation of a previous version, even though it is not normally advised.
Please pay attention to the fact that when changing to a “major” version number (that regards the first number on the left, that’s 3 in this case), a backward compatibility with the previous libraries will not occur. In practice, a library that has been installed and that works with the 2.5.5 version will work – as an example – with a firmware of the versions 2.5.7 and 2.9.9, even though it will not take advantage of the improvements, but the contrary is not true, that is to say that a library made for the 2.5.7 version will require a firmware having a version at least equal to 2.5.7.
On the other hand, that library will not work with a 3.0.0 firmware.
In brief, a library that was created for a firmware having a certain version number will work with all following firmware, having the same major version number, but not with the previous or following releases that have a different major version number.
This being said, let’s choose our version and click on the Flash button; after a few moments the actual update will start figure. At the end of the procedure, a notification window will appear, so to inform us about the fact that the update took place.

At this stage, it is enough to click on Ok, to close the FishinoFlasher program and to press the reset button on the board, in order to exit the update mode.
Available software-Libraries
We may subdivide the libraries into two logical categories:
- system libraries;
- user libraries.
That’s quite an artificial subdivision, given that – more or less – all the libraries could be considered as partially pertaining to both sectors; the true difference lies in their placement in the hard disk, and in the update modes.
The system libraries are placed in the arduino15 folder (depending on the operating system, it may be found under different paths) and they are managed and updated by the integrated board manager, while in the IDE. For example, the SD, the AudioCodec, the I²S libraries, etc. belong to this category. The IDE will notify about each available update and will give the chance to automatically download the updates.
On the other hand, the Fishino library – along with the FishinoWebServer one and other possible ones, belongs to the second category – but that’s a particular choice we made; in fact, this library depends on the WiFi module’s firmware version (and not on the board itself), therefore it must be updated according to it. Placing it in the system libraries would have compelled the user to update it – and therefore to update the firmware – for each update of the system libraries, which is not strictly needed. This library must be directly downloaded from fishino website (under the download section), as with all the previous boards; under that section you will also find some sample programs, such as FishinoHomeAuto.

The libraries under the download section are provided as .zip files, to be unpacked in the “libraries” folder, that is found inside the folder that contains all the sketches.
Once this procedure has been carried out, it is possible to try all the samples related to the WiFi module, as with the previous boards.
As for them, their functioning is the same as in the previous boards; you will just notice that the performances are remarkably better ones and, obviously, that the space occupied in the memory is certainly far from the board’s limits!
Now that you have all the power of Fishino 32 in your hands, you are ready to develop!
From openstore

[…] A 32-BIT FISHINO board with WiFi, SD card, RTC, audio codec, LiPo and more – [Link] […]