

Since now on, it will be easy to provide your Arduino with Internet connectivity by using this shield. The shield sports a TCP/IP stack manager, in order to free up the Arduino from some basic tasks. It’s also essential to equip the board with a library, that communicates with the TCP/IP manager and makes it easier to program the Arduino and to let it communicate with other computers via the Internet.
The WiFi shield

Despite the proliferation of hardware to connect Arduino with the web, and especially despite YUN, we considered useful to design and propose a new WiFi shield for Arduino, which replaces the one already presented.
This time we indeed added an interface processor that manages the TCP/IP protocol: a definitely too challenging task for Arduino. Anyway a network interface card becomes really useful if it’s driven by software which simplifies as much as possible its use, especially in a context of reduced hardware resources such as with Arduino. For this reason we supplied the card with a Arduino library, that is easier than that for more complex hardware such as that of YUN.
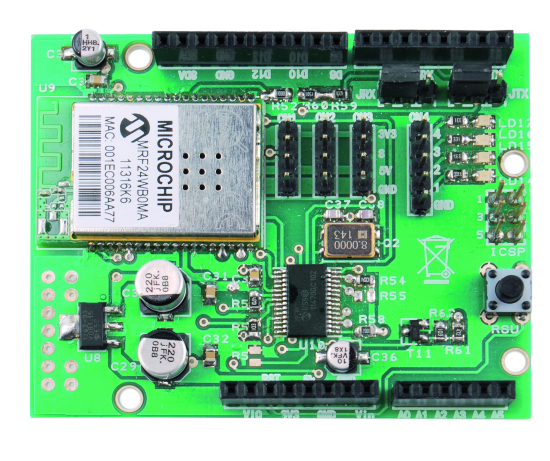
The hardware is essentially based on a radio element (MRF24WB0MA) and a MCW1001A processor by Microchip. The power supply is 3.3V (using a voltage regulator from the 5V of Arduino) but the processor also bears TTL levels. The radio element has also an antenna wired on its base. The processor is connected to the radio element via SPI lines (SDO, SDI, SCK) and other control lines such as CS, INT, RST, HIBERNATE, WP.
The board is then connected to the host (Arduino) with a two-wires serial interface in TTL logic (RX, TX). This forced us to use a software simulated serial port with a customized version of the SoftwareSerial library. The customization was necessary because of the two stop bits mode, but also to adjust the optimum speed and make the use of the library transparent. In fact, this version of the SoftwareSerial is included in the library. But this mode of connection precludes the possibility of using the standard SoftwareSerial library for other uses in the same sketch.

Simulated serial port could be connected to different Arduino pins. By two jumpers you can choose whether to use D2 or D11 for RX (default D2) and D3 or D10 for TX (default D3). In case you decide to change the default values, you must edit the file MWIFI.h and change the following lines:
#define RXPIN 2
#define TXPIN 3
Hence, chosen pins, along with the D7 pin used to reset the WiFi card, cannot be used for other purposes. Anyway the MCW1001A processor provides additional digital pins. The first four are connected to as many LEDs, while the other three are connected to as many connectors along with power (5V or 3V) and GND. In fact, these three pins (GPIO5, GPIO 6, GPIO7) can also manage levels of 5V with a current of about 25 mA maximum (in/out). The GPIO pins can be activated by the library functions, but the first two LEDs are reserved to the library to indicate booting and network connection.
As mentioned, the MCW1001A processor manages the TCP/IP stack, running the basic protocol by using its internal RAM for transmission and reception buffers, as well as for storing various parameters. Anyway the processor, not having a non-volatile memory available, must be reconfigured each time you reboot it.
In any case, the low-level management is handled by the library that provides a set of functions to open network sockets or manage the HTTP protocol.

The library covers both Server and Client functionalities. It can be used when we want to give to Arduino the task of server, so that it reacts and responds to messages from another computer. Or the library can be used to give to Arduino the ability to connect on its own initiative to a server computer to send, for example, sensor measurements. The connection is established in TCP/IP via entities named network sockets that correspond to the concept of the socket to which connect a communication cable. So there is a network socket for each of the two computers that want to talk. A network socket is created as part of a port number. The port numbers are application sub-addresses in an IP address. Numbers less than 1000 are reserved for services publicly recognized as the Mail, FTP, Web (port 80) etc..
The MWiFi library
Download the Library for WiFi shield
The MWiFi library should be positioned (after decompression) in the “libraries” folder of the Arduino IDE, like other libraries. It must be used including the file <MwiFi.h> in the sketches. At this point it should be instantiated as an object and can be used. The first function to recall is begin() which is used to initialize the board:
#include <MWiFi.h>
MWiFi WIFI;
void setup()
{
WIFI.begin()
The start-up of the board determines the lighting of the first LED. Now try to connect the Arduino to the network using an access point that could be that of the home WiFi router, for example with name (SSID)
WIFI.ConnSetOpen (“your-SSID”);
in case the line is not-protected, or:
WIFI.ConnSetWPA (“your-SSID”, “your-pwd”);
in case the line has WPA protection with password “your-pwd“.
Previous functions are used to prepare the card to connection. But the real connection is given by calling the function:
WIFI.Connect();
If the connection is made, the second LED will light. Be careful though, because in case of a protected network, the connection may take also more than half a minute, as the controller of the card must encode the key using the password. The current version of the library provides an automatic reset of Arduino in case the connection is lost. Even errors detected by the controller cause an automatic reset. In this way, a blockage is avoided and the system can be “unattended”.
For your convenience, direct functions connection have also been added: these prepare the connection and perform it in a single step. Also the ability to generate the numeric key from the password, in order to then use it instead of the password, has been added. In fact the access with password, needing every time to process the numeric key, may take up to a minute, while the key access is very fast.
The router assigns a dynamic IP address to the Arduino, because this is the default behavior of the board. But, if you want, you can impose a fixed address. The address assigned may be required by a function of the library.
At this point choose to let Arduino act as server. First, call the function openServerTCP(), which creates the listener on a certain port (for example 5000), and then put in loop the receiving of a possible link request:
int ssocket=WIFI.openServerTCP(5000);
void loop ()
{
int csocket=WIFI.pollingAccept(ssocket);
The integer variables ssocket and csocket are references (handle) respectively to the server and connection network socket to any computer that wants to make the link. The function pollingAccept() returns a number less than 255 if the connection has been requested, or 255 if there is no incoming connection request.
If the connection is established you will be able to send or receive messages referring to this csocket. For example, to receive a record, that is a string ending with a line-feed, you can use the function:
char*line=WIFI.readDataLn(csocket);
A “null-terminated string” will be returned but without the line-feed. In this case, the library uses a default buffer of 81 characters (but its length can be modified in its define). So you do not need to provide it. However, there are other possibilities. If you want to respond you can use the function:
WIFI.writeDataLn(csocket,answer);
The variable named “answer” corresponds to a char buffer. But it must be a “null terminated string”. NOTE: when you use a “null-terminated string” means that you do not have to provide the length of the useful characters in the array, because the function automatically calculates it, being based on the null terminating character. Most of the functions manage and produce this kind of string, not to be confused with the String object also present in the language reference of Arduino.
In this simple way you have established and used a Wi-Fi connection with a remote computer. In the library, among the examples given, there’s one of a server called CommandServer that allows to control Arduino by using a telnet program on the remote computer. To simplify the testing, a Java program that works as telnet has been added.
If you want to make Arduino act as a “client” that connects to a server, the situation is even simpler, because you only have to create a connection network socket:
int csocket=WIFI.openSockTCP(“192.168.1.2”,5000);
And if csocket is valid (less than 255), it means that the connection with the computer, at the address 192.168.1.2 on port 5000, has been established. At this point you can use the reading and writing functions previously seen. Among the examples, there’s one (SendData) that connects to a remote server to send at regular intervals readings of sensors. Obviously a server program on the remote computer is needed. To ease testing, along with the library, a Java program that receives the data and downloads them on a file by adding a time-stamp (to overcome the lack of an RTC-real-time clock on Arduino) was provided.
In addition to these base features, the library has all the necessary functions to define various parameters such as: the masquerading address of the network (default 255.255.0.0), any Gateway address, the reading of the board’s MAC etc.. In particular, there are functions to detect the access-points present and visible in the environment. For example, to detect all the networks present:
int nn=WIFI.scanNets()
The nn, integer, variable will contain the number of the detected networks. While the function:
char*net=WIFI.getNetScanned(i)
will return the characteristics (as records) of the i-th detected network. Finally, for convenience, a function that returns the name of the more powerful (in terms of signal) unsecured network has been provided.
With the library documentation all the features available will be described. The library contains a help and is documented in the code files (in particular the.h files).
But the library is not only about connection and network socket management. It includes a derived class (and therefore specialized) that handles the HTTP protocol: the Web protocol.
The HTTP protocol is a protocol that contemplates request and response, always. Both request and response let travel in the network packets composed by some headers and out-and-out data (such as HTML pages, images, videos or even only text).

To free up the user from this whole issue, the Http library creatres these packages using the PROGMEM mode, i.e. the possibility to put constants and texts in the flash area. NOTE: The HTTP protocol is a text protocol: it only uses characters. The use of flash memory for the texts saves the small ram of Arduino.
The HTTP library
Being a subclass of MWiFi, the Http library inherits all the features of MWiFi, but if you want to use the new functions must include the file HTTPlib.h (instead of MwiFi.h) and instantiate an HTTP object:
#include<HTTPlib.h>
HTTP WIFI;
Regarding the connection with an access point, and the management of network sockets everything is as described before (maybe now we will choose the port 80). Anyway also this time we have to decide whether to make Arduino act as a server (this time Web Server) or as a client accessing a web server application (such as Tomcat, GlassFish, JBoss, PHP etc.. .)
Suppose you want to create a Web Server to be queried with any browser. To make Arduino operate as Web Server you have to prepare the resources that it can provide. That is the response html pages. These pages will be stored in PROGMEM areas for the reasons mentioned above. For example:
prog_char pageIndex [] PROGMEM =
“<html> <head>”
“<title> Index </
title>”
Now you must link these buffers in memory with the names of the resources to be invoked via the browser. Resources names are the local path part of the URL (or URI), i.e. the file name into a complete URL (eg: http://www.my.com/mypage.html ). In this minimal context, the resources to be invoked will be identified only by the name, with no extension. So it comes to associate a page stored with its corresponding Internet name (eg “/ index”).
Actually this page need to be sent, hence you must connect the resource name with a function which will send it. To make the mechanism as automatic as possible, a structure or, better a tipedef named Webres, has been prepared. This structure is formed by the union of two fields: the resource name and the function name (which in C, corresponds to an address). It is, therefore, to form so many name-function pairs to be passed to the function getRequest(),which will launch the correct function (call-back function), or send a standard response “Not Found” message, in case the name does not match up with any of those predefined.
This code shows the example of the construction of an array of 8 Webres structures and its insertion in the getRequest() call.
WEBRES rs[8]=
{
{“/index”,pindex},
{“/Analog”,panalog},
{“/RDigital”,rdigital},
{“/Wdigital”,wdigital},
{“/wdig”,wdig},
{“/Pwm”,pwmpage},
{“/PwmSet”,pwmset},
{“/End”,sessend}
};
void loop()
{
WIFI.getRequest(csocket,8,rs);
:
Every second field of the structures corresponds to the call-back function that getRequest () will launch. The call-back function you will send the buffer corresponding to the selected page and its prototype expected to be of void type (ie it returns nothing) and has a single argument, a pointer to a null-terminated string supplied by the caller (see below):
void pindex(char *query)
{
WIFI.sendResponse(csocket,pageindex);
}
Summarising: placing getRequest() in the loop, it will take care of the entire management of the request. It will detect the used mode, GET or POST, behaving accordingly (the data are contained in a different way) and will launch the function corresponding to the request (or a message “Not Found”).
The call-back function pindex() described above, however, does not but to send in response a static HTML page, that is defined in a fixed way. Arduino Web Server so defined it is not very useful, because it was presumed that it can be used to read values from sensors or switch outputs. To achieve this, the html response page must be built at the moment containing the values that you want to read. That is a dynamic page. But it would be too expensive to build, within the call-back functions, the entire page. To simplify the task it was provided to define the page “one-off” as a static page, but being able to create tags inside (labels placeholders) in the position that you want to complete by the moment. For this purpose there is an alternative to sendResponse(), that is the sendDynResponse()function, which tracks down and replaces the tags and sends the page. The replacement is done sequentially going to run an array of strings arranged at the moment. Hence: the first tag encountered is replaced with the first string of the array, and so on. The tag used is the ‘@’ character. Only one should be used regardless of the length of the string that will replace it.
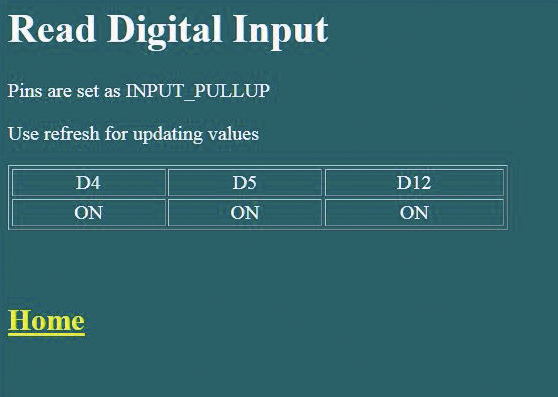
In the example, three tags will be replaced by three strings that represent the values of three digital inputs.
prog_char pagerdigital[] PROGMEM=
:
“<tr>”
“<td><div align=’center’>@</div></td>”
“<td><div align=’center’>@</div></td>”
“<td><div align=’center’>@</div></td></tr>”
:
void rdigital(char *query)
{
char *val[3];
if(digitalRead(4)) val[0]=ON;else val[0]=OFF;
if(digitalRead(5)) val[1]=ON;else val[1]=OFF;
if(digitalRead(12))val[2]=ON;else val[2]=OFF;
WIFI.sendDynResponse(csocket,pagerdigital,3,val);
}
You must pass to the function sendDynResponse() the array of strings and its size. To make Arduino act following commands launched from browser (for example, by the form buttons), you must read the data sent by the Request along with the name of the resource. The situation is different if the request came in the form of GET instead of POST (the two cornerstone methods of the http protocol). It is, in any case, about using that argument passed to the call-back function by getRequest().
In the first case, the data are represented by name-value pairs that identify a parameter. The parameters are appended to the name of the resource in a format that encodes spaces and special characters, which can be named query-string. The query-string is always provided (even if zero-length) to the call-back function (it’s part of its prototype). Then we can use the getParameter() function to retrieve the value (always a string) of the parameter with a certain name.
void pwmset(char *query)
{
char *pwmval;
pwmval=WIFI.getParameter(query,strlen(query),”PWM10″);
if (pwmval!=NULL)
{int pv;sscanf(pwmval,”%d”,&pv);
analogWrite(10,pv);d10=pv;}
pwmval=WIFI.getParameter(query,strlen(query),”PWM11″);
if (pwmval!=NULL)
{int pv;sscanf(pwmval,”%d”,&pv);
analogWrite(11,pv);d11=pv;}
pwmpage(query);
}
In the second case, instead, the query-string contains values that may be in the query-string format (as generally the forms do) or in a whatsoever format. However, you must consider that the buffer which contains the query-string is provided by the library and has a length of 64 characters (but you can redefine it using “define” on HTTPlib.h). The data in excess are lost.
In the examples there is a complete Web Server that allows to read analog values and digital values, enable and disable digital output and then adjust two PWM outputs. The sketch is very compact (half consists of html pages in PROGMEM) thanks to the automation produced by functions getRequest() and sendDynResponse().
If, instead, you want to use Arduino as a client of a Web Application Server (or a more simple CGI), you will use the functions sendRequest() and getResponse(). SendRequest is actually composed by two separate functions depending on which mode you want to use: GET or POST.
If you use SendRequestGET() it will provide both the name of the resource and parameters in a single query-string. If you use sendRequestPOST() it will separately provide the name of the resource and the data placed in a buffer of null-terminated string kind , in this way:
WIFI.addParameter(query,128,”/TestClient”,NULL);
WIFI.addParameter(query,128,”A1″,sa1);
:
WIFI.sendRequestGET(csocket,query);
Or this:
sprintf(rec,”%d %d %d %d”,an1,an2,d1,d2);
WIFI.sendRequestPOST(csocket,”/TestClient”,rec);
In case of using sendRequestGET(), the query-string was formed with the help of the function addParameter(). First time initializing the query-string with the name of the resource (null), and then with the name-value pairs for the individual parameters.
Function getResponse(), is used to retrieve the response from the server. This can also be formed by a number of data in various formats: from HTML page to data in XML, JSON or CSV (comma separated values).
If the data cannot be contained in a single buffer, you can call the function getNextResponseBuffer() in a loop until it returns 0.
This is an example of elemental connection to receive and dispatch records.
#include <MwiFi.h>
MwiFi WIFI;
setup()
{
WIFI.begin();
WIFI.ConnectWPAwithPSW(“MioAcp”,”pippo”);
server=WIFI.openServerTCP(5000);
}
loop()
{
if (!OpenCom)
socket=WIFI.pollingAccept(server);
if(socket<255) OpenCom=true;
if (OpenCom)
record=WIFI.readDataLn(socket);
WIFI.writeDataLn(socket,”……..”);
}
Sketch example
/*
* This example makes a simple WEB server.
* There is a menu as home page.
* Home page can be reached using /index url or just reaching the node.
* Server is addressed by its ip on net (usually dynamic) and port
* For example http//192.168.1.5:5000/index
* You don't need to use port if decide to set port 80 (default for browsers)
* From home page menu you can reach these pages:
* - Analogical page to read analogical value
* - Digital reading page to read digital pin D4,D5,D12 (D2,D3,D7 occupied by WIFI shield)
* - Digital setting page to switch on/off pin D6,D8,D9
* - PWM page to power up/down pwm pin D10,D11
*
* Pages are stored in program-mem and a dynamic response compilation is used for values reading.
* Each parameater is represented by a tag @. This tag is substituded with a string found in a prepared
* array of strings. (Substitution takes place by sequential order)
*
* The getRequest() function automatically activates the function corresponding to a demanded page (resource)
* For this purpose you have to populate an array of WEBRES type defined.
* Each WEBRES is a struct of 2 element:
* - URL name : just last name with a slash prefixed (ex. /index)
* - function name : the function that has to manage request and send response
*
* Console print is done just for controll (you can delete)
*
* Library error management have reset policy at present.
* So, socket problem or net connection lost produces automatic reset.
*
* Author: Daniele Denaro
*/
#include <HTTPlib.h> // include library (HTTP library is a derivate class of WiFi)
#include <EEPROM.h> // to store key
#define ACCESSPOINT "xxx" // access point name
#define PASSWORD "xxx" // password if WAP
#define PORT 80 // server listening port (if you prefere set as 80)
char mac[18]; // buffer for mac address of shield
char name[8]; // char for shield name on net
char ip[16]; // buffer for (dynamic) ip address as string
char remip[16]; // buffer for remote ip asking link wit us
boolean fc=0; // flag connection
boolean fs=0; // flag socket open
int ssocket; // server socket handle
int csocket; // client socket handle
byte key[32]; //key buffer on ram
boolean fkey=false; //buffer of EEPROM(0) flag . It means key in memory
HTTP WIFI; //instance of MWiFi library
#define VERBOSE 1 // if 1 some information will be printed on console
#define ERRLOG 1
int d6=0; // output default values
int d8=0;
int d9=0;
int d10=0; // pwm default values
int d11=0;
#define GREY "#666666" // off color
#define RED "#FF0000" // on color
#define ON "ON" // on text
#define OFF "OFF" // off text
/**************** HTML pages *****************/
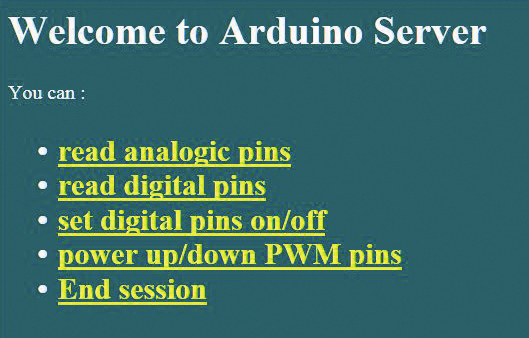
prog_char pageindex[] PROGMEM=
"<html><head>"
"<title>Index</title>"
"<style type='text/css'>"
"body,td,th {color: #FFF;}"
"body {background-color: #066;}"
"a:link {color: #FF0;}"
"a:visited {color: #FF0;}"
"</style>"
"</head>"
"<body>"
"<h1>Welcome to Arduino Server</h1>"
"<p>You can :</p>"
"<h2><ul>"
"<li><a href='/Analog'>read analogic pins</a></li>"
"<li><a href='/RDigital'>read digital pins</a></li>"
"<li><a href='/WDigital'>set digital pins on/off</a></li>"
"<li><a href='/Pwm'>power up/down PWM pins</a></li>"
"<li><a href='/End'>End session </a></li>"
"</ul></h2>"
"</body></html>";
prog_char pageanalog[] PROGMEM=
"<title>Analogic Reading</title>"
"<style type='text/css'>"
"body,td,th {color: #FFF;}"
"body {background-color: #066;}"
"a:link {color: #FF0;}"
"a:visited {color: #FF0;}"
"</style></head>"
"<body>"
"<h1>Analogic reading (0 to 1024)</h1>"
"<h2>"
"<table width='400' border='1'>"
"<tr><td width='232'>A0</td><td width='152'>@</td></tr>"
"<tr><td>A1</td><td>@</td></tr>"
"<tr><td>A2</td><td>@</td></tr>"
"<tr><td>A3</td><td>@</td></tr>"
"<tr><td>A4</td><td>@</td></tr>"
"<tr><td>A5</td><td>@</td></tr>"
"</table>"
"<p><a href='/index'>Home</a></p>"
"</h2>"
"</body></html>";
prog_char pagewdigital[] PROGMEM=
"<html>"
"<head>"
"<meta http-equiv='Content-Type' content='text/html; charset=utf-8' />"
"<title>Untitled Document</title>"
"<style type='text/css'>"
"body,td,th {color: #FFF;}"
"body {background-color: #066;}"
"a:link {color: #FF0;}"
"a:visited {color: #FF0;}"
"</style>"
"</head>"
"<body>"
"<h1>Set Digital ON/OFF</h1>"
"<p> </p>"
"<table width='400' border='1'>"
"<tr><td width='%33'><div align='center'>D6</div></td><td width='%33'>"
"<div align='center'>D8</div></td><td width='%33'><div align='center'>D9</div>"
"</td></tr>"
"<tr><td bgcolor='@'> </td><td bgcolor='@'></td><td bgcolor='@'></td></tr>"
"<tr><td><form id='form6' name='form6' method='get' action='/wdig'>"
"<div align='center'>"
"<input type='submit' name='D6ON' id='D6ON' value='ON ' /> "
"<input type='submit' name='D6OFF' id='D6OFF' value='OFF' />"
"</div></form></td>"
"<td><form id='form8' name='form8' method='get' action='/wdig'>"
"<div align='center'>"
"<input type='submit' name='D8ON' id='D8ON' value='ON ' /> "
"<input type='submit' name='D8OFF' id='D8OFF' value='OFF' />"
"</div></form></td>"
"<td><form id='form9' name='form9' method='get' action='/wdig'>"
"<div align='center'>"
"<input type='submit' name='D9ON' id='D9ON' value='ON ' /> "
"<input type='submit' name='D9OFF' id='D9OFF' value='OFF' />"
"</div></form></td></tr>"
"</table>"
"<p> </p>"
"<h2><p><a href='/index'>Home</a></p></h2></body></html>";
prog_char pagerdigital[] PROGMEM=
"<html><head>"
"<meta http-equiv='Content-Type' content='text/html; charset=utf-8' />"
"<title>Untitled Document</title>"
"<style type='text/css'>"
"body,td,th {color: #FFF;}body {background-color: #066;}"
"a:link {color: #FF0;}a:visited {color: #FF0;}"
"</style></head>"
"<body>"
"<h1>Read Digital Input</h1>"
"<p>Pins are set as INPUT_PULLUP</p>"
"<p>Use refresh for updating values</p>"
"<table width='400' border='1'>"
"<tr>"
"<td width='%33'><div align='center'>D4</div></td>"
"<td width='%33'><div align='center'>D5</div></td>"
"<td width='%33'><div align='center'>D12</div></td></tr>"
"<tr>"
"<td><div align='center'>@</div></td>"
"<td><div align='center'>@</div></td>"
"<td><div align='center'>@</div></td></tr>"
"</table>"
"<p> </p>"
"<h2><p><a href='/index'>Home</a></p></h2></body></html>";
prog_char pagepwm[] PROGMEM=
"<html><head>"
"<title>PWM page</title>"
"<style type='text/css'>body,td,th {color: #FFF;}"
"body {background-color: #066;}a:link {color: #FF0;}"
"a:visited {color: #FF0;}"
"</style></head>"
"<body>"
"<h1>Set Digital ON/OFF</h1>"
"<h3>"
"<p>Insert values from 0 to 255</p>"
"<form id='FPWM10' name='form1' method='get' action='PwmSet'>"
"<label for='PWM10'>PWM on pin 10 >>> </label>"
"<input name='PWM10' type='text' id='PWM10' value='@' size='10'/>"
"<input type='submit' name='D10' id='D10' value='Set PWM 10' />"
"</form>"
"</br>"
"<form id='FPWM11' name='form2' method='get' action='PwmSet'>"
"<label for='PWM11'>PWM on pin 11 >>> </label>"
"<input name='PWM11' type='text' id='PWM11' value='@' size='10'/>"
"<input type='submit' name='D11' id='D11' value='Set PWM 11' />"
"</form>"
"</h3>"
"<p> </p>"
"<h2><p><a href='/index'>Home</a></p></h2>"
"</body></html>";
prog_char pageend[] PROGMEM=
"<html><head>"
"<title>ENDe</title>"
"<style type='text/css'>body,td,th {color: #FFF;}"
"body {background-color: #066;}a:link {color: #FF0;}"
"a:visited {color: #FF0;}"
"</style></head>"
"<body>"
"<h1>Session END!</h1>"
"<h2>Server ready for another client</h2>"
"<h2><p><a href='/index'>Back to new session</a></p><h2>"
"</body></html>";
/******************** end HTML Pages *********************/
void setup()
{
WIFI.begin(); // startup wifi shield
#if VERBOSE
Serial.begin(9600);
WIFI.getConfig(); // reads default info from shield
WIFI.getMAC(mac); // gets string mac of shield
WIFI.getName(name); // gets name of shield on net
// print information on console
Serial.print("MAC: ");Serial.println(mac);
Serial.print("Name: ");Serial.println(name);
#endif
WIFI.setNetMask("255.255.255.0"); //modify default
WIFI.setGateway("0.0.0.0"); //modify default
if (EEPROM.read(0)==1) // If EEPROM key flag is OK then reads key stored
{fkey=true; int i;for(i=0;i<32;i++) key[i]=EEPROM.read(i+1);}
else fkey=false; // else uses password
pinMode(6,OUTPUT); // pin 6 as output
pinMode(8,OUTPUT); // pin 8 as output
pinMode(9,OUTPUT); // pin 9 as output
pinMode(4,INPUT_PULLUP); // pin 4 as input with pullup (1 if not closed to GND)
pinMode(5,INPUT_PULLUP); // pin 5 as input with pullup
pinMode(12,INPUT_PULLUP); // pin 12 as input with pullup
pinMode(10,OUTPUT); // pin 10 as output for pwm
pinMode(11,OUTPUT); // pin 11 as output for pwm
}
/************************ end setup ***************************/
int netConnect()
{
fc=0;
if (PASSWORD=="") {fc=WIFI.ConnectOpen(ACCESSPOINT);} // if passw= empty string connect in open mode
else // else connect in WAP mode
{
if (!fkey) // with password and compute new key
{
fc=WIFI.ConnectWPAandGetKey(ACCESSPOINT,PASSWORD,key);
EEPROM.write(0,1);
int i;for(i=0;i<32;i++) EEPROM.write(i+1,key[i]);
}
else {fc=WIFI.ConnectWPAwithKey(ACCESSPOINT,key);} // with key if already calculated
if (fc==1) {fkey=true;}
}
return fc;
}
void netConnection() // connection to network
{
int i;for(i=0;i<5;i++) {fc=netConnect(); if(fc==1) break;} // try to connect for 5 times
if (fc==0) {delay(60000);return;} // wait for new try
WIFI.getIP(ip); // get dynamic ip
#if VERBOSE
Serial.print("Net Connected as ");Serial.println(ip);
#endif
ssocket=WIFI.openServerTCP(PORT);// open server socket. Listen for connection from remote (just one connection)
// we must poll in loop routine to see if connection asked from remote
if (ssocket==255) //socket non valid. No server open.
{
WIFI.Disconnect();fc=0;
#if VERBOSE
Serial.println("Socket problem. Disconnected!");
#endif
wdt_enable(WDTO_1S); // reset
delay (1000);
}
#if VERBOSE
Serial.print("Server active on port ");Serial.println(PORT);
#endif
}
void socketConnection() // link with remote client
{
// verify if someone asks for connection on port PORT
csocket=WIFI.pollingAccept(ssocket); if(csocket<255) fs=1; //csoccket is the client socket to communicate
#if VERBOSE
if (fs) {Serial.print("Server connected with : ");WIFI.getRemoteIP(remip);Serial.println(remip);}
#endif
}
/*
* Make an array of WEBRES elements. Heach of them are made by a couple of URLname-routinename.
*/
WEBRES rs[]={{"/index",pindex},{"/Analog",panalog},{"/RDigital",rdigital},
{"/WDigital",wdigital},{"/wdig",wdig},{"/Pwm",pwmpage},{"/PwmSet",pwmset},{"/End",sessend}};
/*************************** loop *******************************/
void loop()
{
if(!fc) netConnection(); // if not connection yet, make it
if(fc) // if server active (connection established)
{
if (!fs) socketConnection(); // if no one is connected listen for any connection try
if (fs) WIFI.getRequest(csocket,8,rs); // if someone is connected listen for any http request
// array of WEBRES elements is provided, with its dimension
} // correspondig function is automatically called
// if no risource corresponds, "not found" response is sent
if (fs){ WIFI.closeSock(csocket);fs=false;}
}
/********************* Page Functions ***************************/
void pindex(char *query) // index page
{
#if VERBOSE
Serial.println("Index...");
#endif
WIFI.sendResponse(csocket,pageindex); // send response: pageindex
}
void panalog(char *query) // analog page
{
#if VERBOSE
Serial.println("Analog...");
#endif
char *val[6];
// dynamic response: a set of values string populates an array of 6 positions
// corresponding to 6 tags @ in pageanalog
char val0[5];snprintf(val0,5,"%d",analogRead(0));val[0]=val0;
char val1[5];snprintf(val1,5,"%d",analogRead(1));val[1]=val1;
char val2[5];snprintf(val2,5,"%d",analogRead(2));val[2]=val2;
char val3[5];snprintf(val3,5,"%d",analogRead(3));val[3]=val3;
char val4[5];snprintf(val4,5,"%d",analogRead(4));val[4]=val4;
char val5[5];snprintf(val5,5,"%d",analogRead(5));val[5]=val5;
WIFI.sendDynResponse(csocket,pageanalog,6,val); // send dynamic response
}
void rdigital(char *query) // digital readyng page
{
#if VERBOSE
Serial.println("RDigital...");
#endif
char *val[3];
// as previous function but for just 3 tags
if(digitalRead(4)) val[0]=ON;else val[0]=OFF;
if(digitalRead(5)) val[1]=ON;else val[1]=OFF;
if(digitalRead(12))val[2]=ON;else val[2]=OFF;
WIFI.sendDynResponse(csocket,pagerdigital,3,val); // send dynamic response
}
void wdigital(char *query) // digital writing page (has form and buttons)
{
#if VERBOSE
Serial.println("WDigital...");
#endif
char *val[3];
if (d6) val[0]=RED; else val[0]=GREY;
if (d8) val[1]=RED; else val[1]=GREY;
if (d9) val[2]=RED; else val[2]=GREY;
WIFI.sendDynResponse(csocket,pagewdigital,3,val); // send dyn. response: pagewdigital
}
void wdig(char *query) // function called by form in pagewdigital
{
#if VERBOSE
Serial.println("Setting...");
#endif
// request has parameters
// these parameters activate pins
if (WIFI.getParameter(query,strlen(query),"D6ON")!=NULL) {digitalWrite(6,1);d6=1;}
if (WIFI.getParameter(query,strlen(query),"D6OFF")!=NULL){digitalWrite(6,0);d6=0;}
if (WIFI.getParameter(query,strlen(query),"D8ON")!=NULL) {digitalWrite(8,1);d8=1;}
if (WIFI.getParameter(query,strlen(query),"D8OFF")!=NULL){digitalWrite(8,0);d8=0;}
if (WIFI.getParameter(query,strlen(query),"D9ON")!=NULL) {digitalWrite(9,1);d9=1;}
if (WIFI.getParameter(query,strlen(query),"D9OFF")!=NULL){digitalWrite(9,0);d9=0;}
wdigital(query); // refresh page with new values
}
void pwmpage(char *query) // pwm page (has form and buttons)
{
#if VERBOSE
Serial.println("Pwm...");
#endif
char *val[2];
char val10[5];sprintf(val10,"%d",d10);val[0]=val10;
char val11[5];sprintf(val11,"%d",d11);val[1]=val11;
WIFI.sendDynResponse(csocket,pagepwm,2,val); // send response: pagepwm
}
void pwmset(char *query) // as wdig this function is called by form in pagepwm
{
#if VERBOSE
Serial.println("Pwm Setting...");
#endif
char *pwmval;
// reads parameter and set pins
pwmval=WIFI.getParameter(query,strlen(query),"PWM10");
if (pwmval!=NULL) {int pv;sscanf(pwmval,"%d",&pv);analogWrite(10,pv);d10=pv;}
pwmval=WIFI.getParameter(query,strlen(query),"PWM11");
if (pwmval!=NULL) {int pv;sscanf(pwmval,"%d",&pv);analogWrite(11,pv);d11=pv;}
pwmpage(query); // refresh page with new values
}
void sessend(char *query) // page to close session
{
WIFI.sendResponse(csocket,pageend);
WIFI.closeSock(csocket);
fs=false;
}
/********************** End page functions ************************/
BOM
R1: 10 kohm (0805)
R2: 4,7 kohm (0805)
R3: 100 kohm (0805)
R4: 10 kohm (0805)
R5: 1 Mohm (0805)
R6: –
R7: –
R8: 1 kohm (0805)
R9: 1,5 kohm (0805)
R10: 4,7 kohm (0805)
R11: 10 kohm (0805)
R12: 330 ohm (0805)
R13: 330 ohm (0805)
R14: 330 ohm (0805)
R15: 330 ohm (0805)
C1: 100 nF (0805)
C2: 220 µF 6,3 VL (D)
C3: 22 pF (0805)
C4: 22 pF (0805)
C5: 100 nF (0805)
C6: 100 nF (0805)
C7: 10 µF 35 VL (B)
C8: 10 µF 35 VL (B)
C9: 100 nF (0805)
C10: 220 µF 6,3 VL (D)
U1: MRF24WB0MA/RM
U2: MCW1001A
U3: TC1262-3.3 (SOT-223)
T1: BC817
Q1: 8 MHz (HCX-7SB)
RST: switch
LD1: LED (0805)
LD2: LED (0805)
LD3: LED (0805)
LD4: LED (0805)
The Store
This WiFi shield for Arduino is available in our store

[…] Since now on, it will be easy to provide your Arduino with Internet connectivity by using this shield. The shield sports a TCP/IP stack manager, in order to free up the Arduino from some basic tasks. It’s also essential to equip the board with a library, that communicates with the TCP/IP manager and makes it easier to program the Arduino and to let it communicate with other computers via the Internet. The WiFi shield Despite the proliferation of hardware to connect Arduino with the web, and especially despite YUN, we considered useful to design and propose a new WiFi shield for Arduino, which replaces the one already presented. This time we indeed added an interface processor that manages the TCP/IP protocol: a definitely too challenging task for Arduino. Anyway a network interface card becomes really useful if it’s driven by software which simplifies as much as possible its use, especially in a context of reduced hardware resources such as with […] […]
46EUR for a wifi shield? You can get tplink 703 with a full 400mhz mips cpu and a full linux for 20EUR. Why bother with an arduino, except for power consumption?
Where can I buy that one for 20,-EUR? Link please.
http://www.aliexpress.com/item/Portable-Mini-Tp-link-TL-WR703N-150M-WiFi-Wireless-3G-Router-Pocket-size-Wifi-HongKong-post/1499635016.html
http://www.aliexpress.com/item/Portable-Mini-Tp-link-TL-WR703N-150M-WiFi-Wireless-3G-Router-Pocket-size-Wifi/1633360326.html
http://www.aliexpress.com/item/3G-Router-repeater-Wireless-150M-Mini-Wifi-New-Portable-TP-LINK-TL-WR703N-150Mbps-Pocket-size/1557959742.html
Thanks!
What WIFI Encryptions does it support in total? (WEP, WPA(1,2) Personal/Enterprise, …)? ??
WAP and free
So WPA2 isn’t supported? Using this shield, arduino doesn’t detect any wireless network, even if it is very near at router.
No WPA2 is not supported
Can anyone explain why buying this shield if Arduino Yun provides WiFi interface?
This is very different from YUN.
In some ways it is better yun, but if you do not know Linux, this shield is much easier to use
MWifi Library doesn’t work with Arduino 1.5.8: prog_char data type is deprecated in recent avr-libc. Please update library with new code.
Any news on update lib for 1.5.8?
I would buy a dozen shields tomorrow if the code was updated.
Please advise if you have new code and where I can get a copy.
Thank you
At the moment we create a repository
https://github.com/open-electronics/MWiFi
it is possible connect with this shield one smartphone and arduino using WIFI-DIRECT???
Thanks
check the example.
You can modify the library
If you plan to use the SAM3X processor, then forget throwing the money on this because it’s a waste of time. And also it forces you to remove the protection of your wireless connection.
Look here. This is the last version of your MWiFi(24.zip).
In file included from CommandServer.ino:22:0:
E:ArduinolibrariesMWIFI/MWiFi.h:45:21: fatal error: avr/wdt.h: No such file or directory
#include
^
compilation terminated.
Error compiling.
OK, let’s switch because last time I checked my board there was no AVR but a SAM3X8E.
SURPRISE – in the new version of arduino there’s no longer a “wdt.h” for the SAM3X.
Don’t do my mistake and throw away your money.
Also – nobody, but absolutely NOBODY specifies that this product comes as a kit. Imagine the surprise when I opened the package while I was located on top of a oil drilling well, 30 meters above ground, and parts started to fall from the bag inside the box.
Go hire someone who is able to program a proper library, who is able to write a complete product description and – most important – if he is unable to write a program, at least to specify which boards are supported by the library. Only after that you are allowed to start selling toys on the internet.
My rating for this mistake – ZERO.
When I will get some free time to add the proper stuff to the library, I will come and post the results allthough nobody will pay me to do this like I did for the board.