[youtube id=”MKQlys-z7SM” width=”620″ height=”360″]
[bctt tweet=”The first 3D printer that creates three-dimensional chocolate objects” username=”OpenElectronics”]
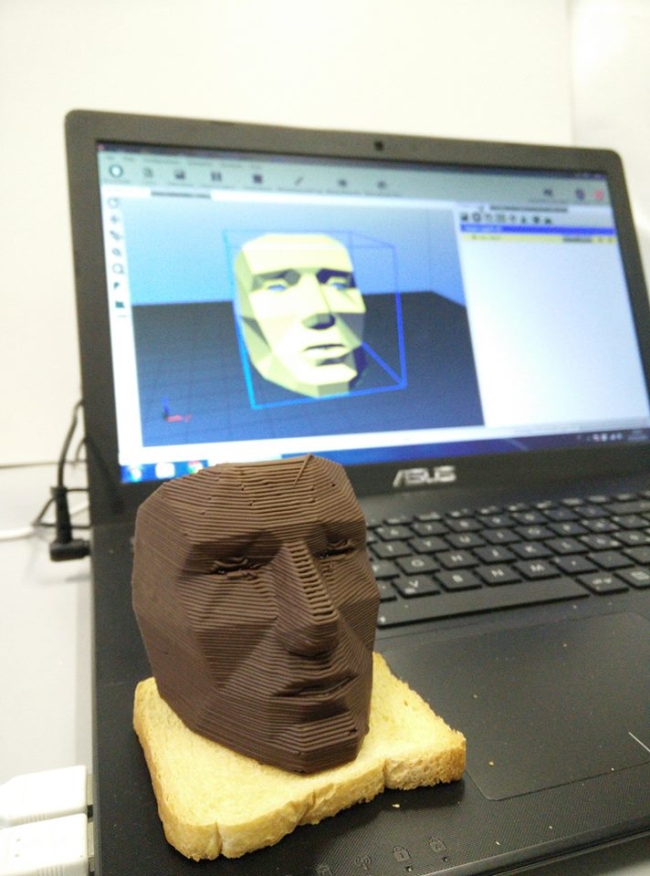
Maitre Chocolatier is born or made? Well, when it comes to creating original chocolate mixes you will probably be born, but if you want to succeed in the art of pastry, then everyone can be made: you just need to have the right tools and equipment. One of these is our 3Drag printer, that modified with a real pastry bag for precision work or a heated syringe is suitable for plotting lettering and lines using any type of chocolate: milk, white or dark. All this, with the advantage to design the object or the pastry directly in computer graphic.
The 3Drag is a FDM 3D printer, but its mechanisms are liable to print not only with plastic, but also with any other material provided: it is sufficient that its melting point is at relatively low temperatures.
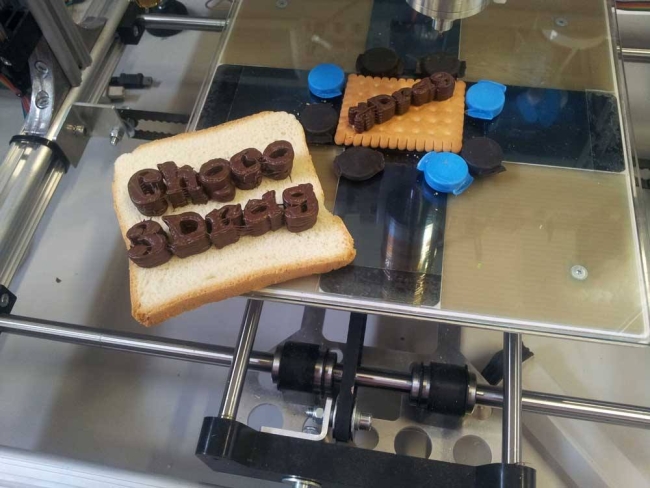
Replacing the print head with something able to inject into an extruder a moldable food, such as cream, chocolate, jellies, but also soft batters, allows to produce sweet and savory products with decorations and shapes also particularly challenging.
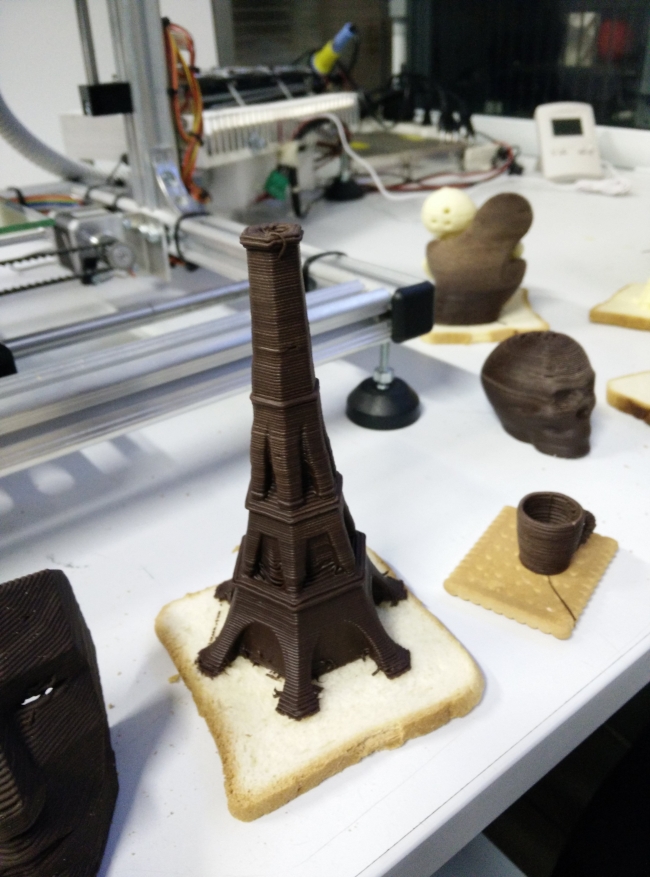
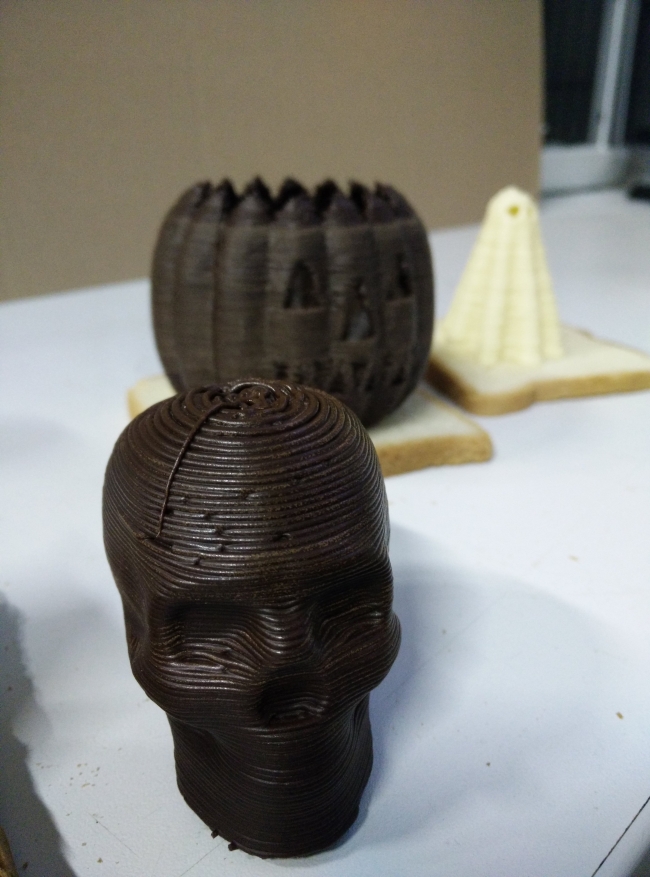
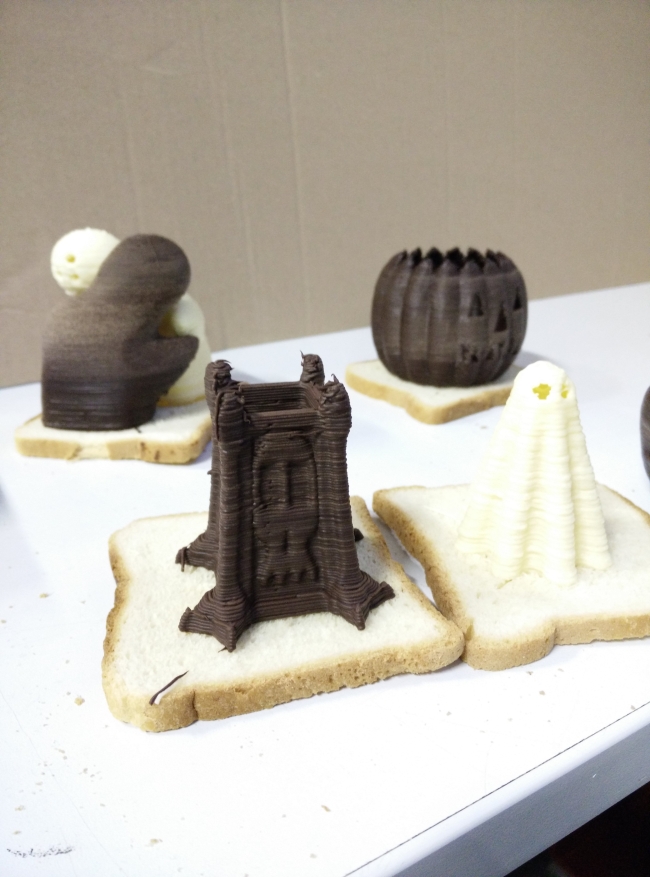
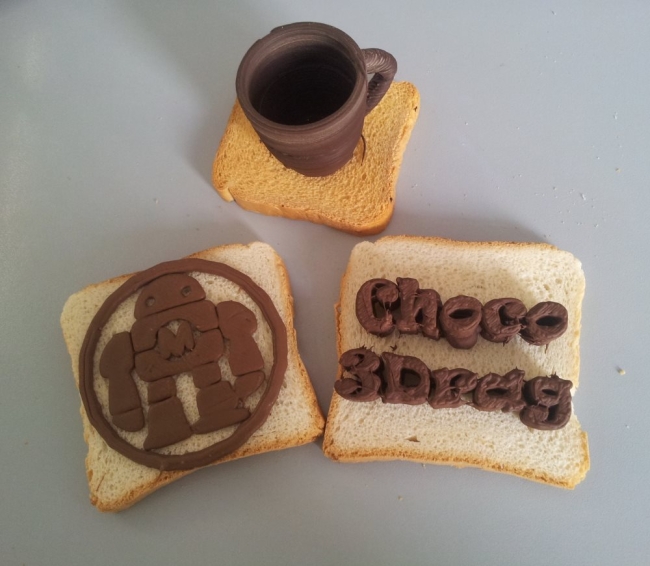
Hence, the idea of using chocolate, which is easily moldable and allows you not only to create objects quite “tough” and funny, but also to decorate cakes with shapes and letterings without causing any stress that could deform the mechanics of 3Drag or make them loose. More difficult would it be to depose materials such as dough made of flour or something.


Working with Chocolate
To use chocolate for decoration, for instance to sprinkle it on a cake or to make chocolates of various shapes, you need to “melt” it and sometimes to “temper” it. “Melting” means obviously to melt the chocolate, make it malleable, while “tempering” chocolate is a more complex operation and involves a thermometer (preferably digital).
Our 3Drag is designed only to melt chocolate, keeping it at a high enough temperature to melt chocolate but without altering its physical structure.
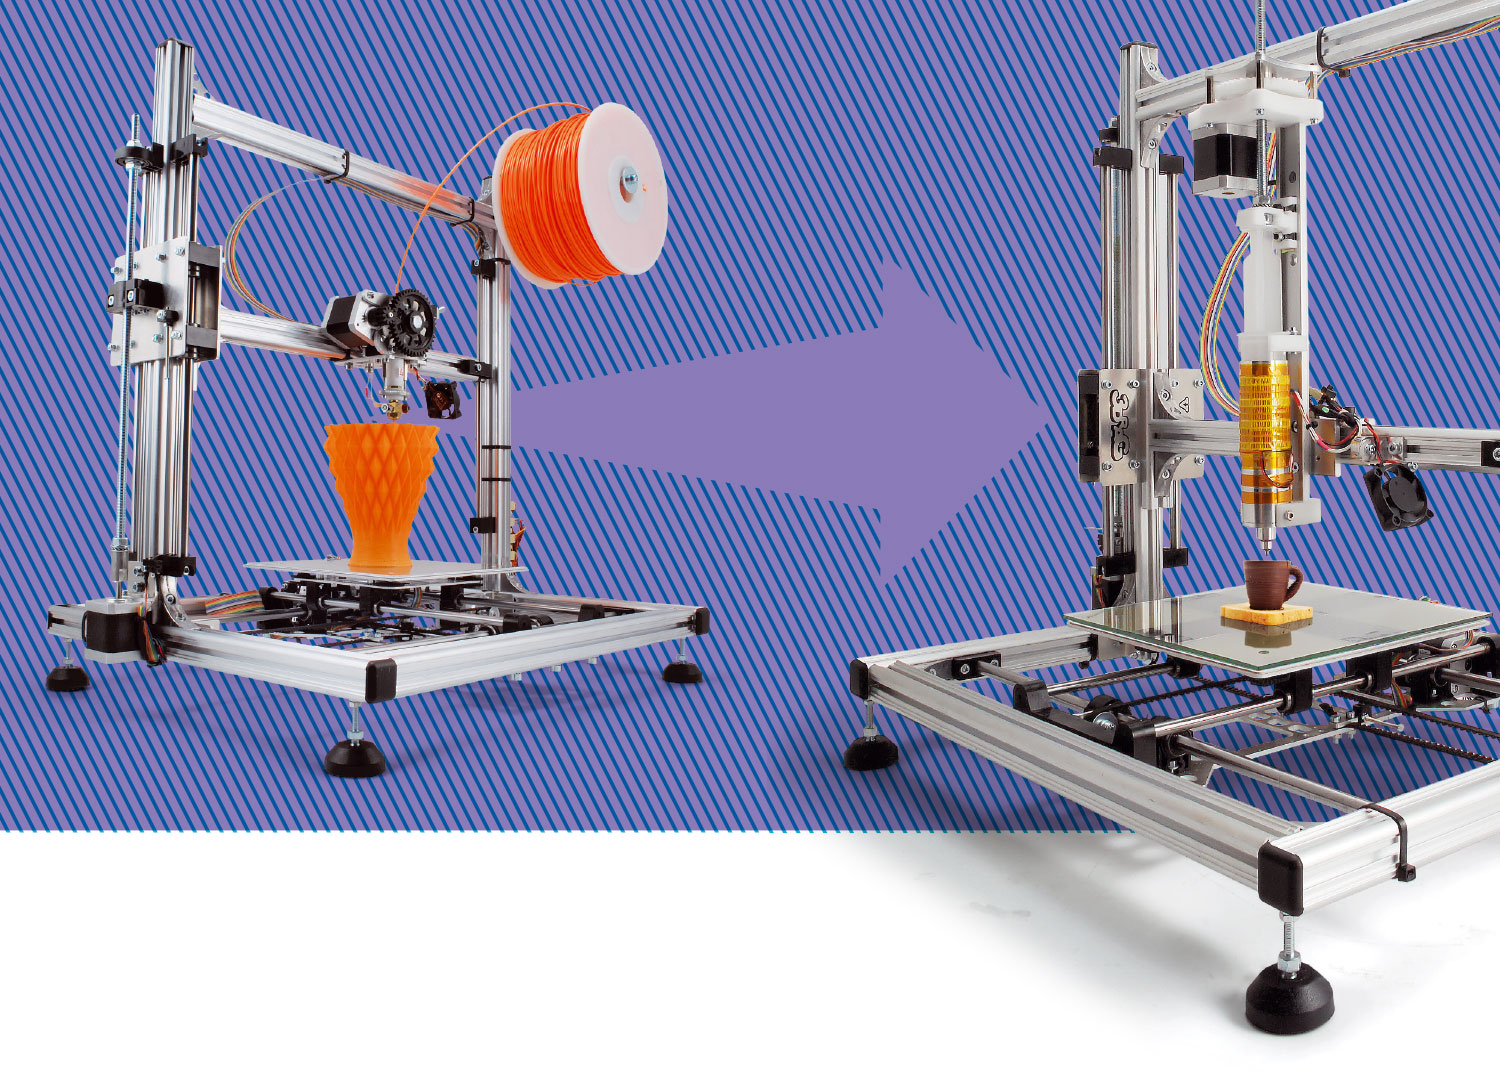
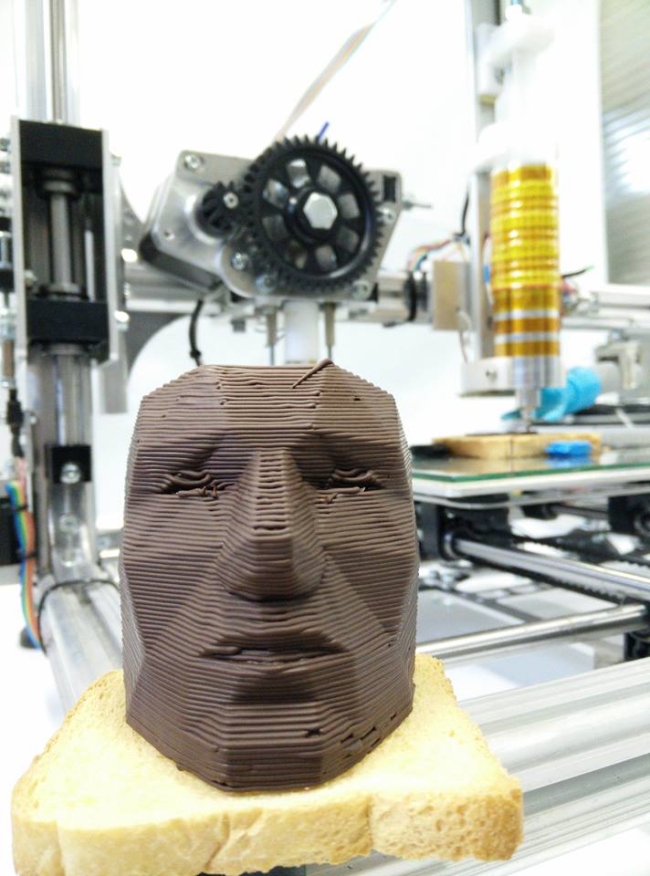
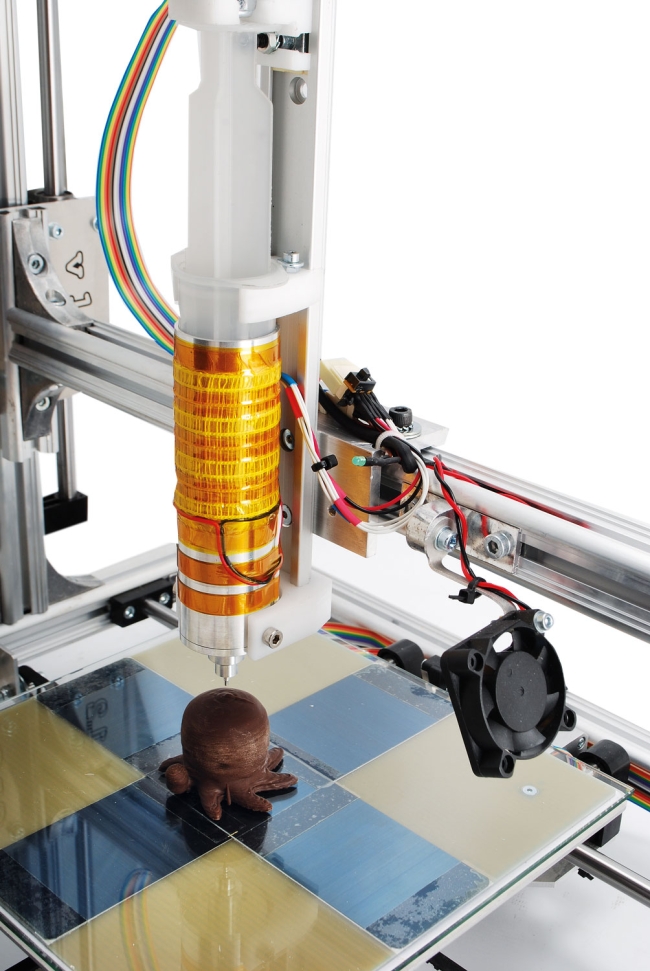
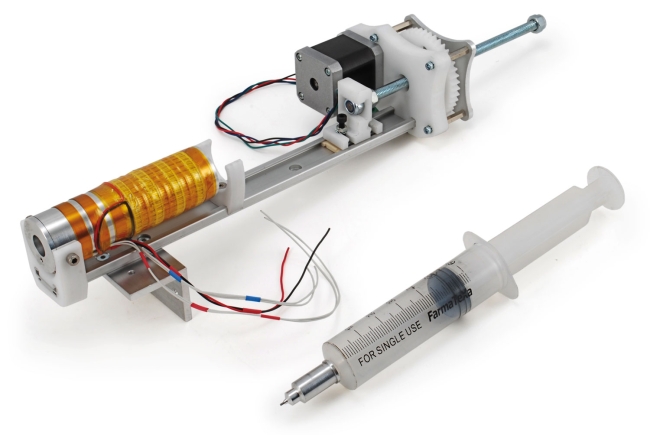
To have the 3Drag printing chocolate objects we assembled a special extruder (to replace that used for extruding plastic materials) starting by a very common 60 ml syringe. A NEMA17 stepper motor drives its piston and a heater to maintain the chocolate contained in the syringe at a temperature of about 32 ÷ 33 ° C wraps the cylinder.
Chocolate must be melted before being extruded through the syringe needle (having an internal diameter of 0.9 mm); its fusion is achieved by activating the heater in which is inserted the syringe, without exceeding the threshold of 33 ° C (so keeping the chocolate “tempering”). For this reason, the control board constantly detects the temperature of the heater thanks to a NTC 100 kohm thermistor installed directly on the body of the aluminum cylindrical heater.
The loss of “tempering” of the chocolate would make impossible to print objects that develop in height, and then the chocolate itself would not be able to solidify at room temperature (24 ÷ 27 ° C).
Aside from maintaining the temperature below that threshold, you have to deal with the chocolate cooling time, which affects the printing speed. In fact, depositing a layer of melted chocolate (it’s hot) on a lower layer not yet solidified can deform the object; so the application of a layer must be carried out only when the underlying one is cool enough to bear both the weight of the chocolate above and the heat supplied by the melted chocolate deposed.
Let us say that if you are working with a relatively small chocolate amount, like the quantity that can come out of a needle with an internal diameter of 0.9 mm as that used in our tests, you can go fast. In any case, you have to choose, basing on your experience, the appropriate printing speed testing adequately the functions and settings of the printing software (Repetier-Host, Heal, etc).
To speed up the chocolate cooling process we decided to use Peltier cells, to realize a compact airflow cooling system blowing directly to the zone where the melted chocolate is deposited; this solution has proven to be the best.
How to extrude the chocolate
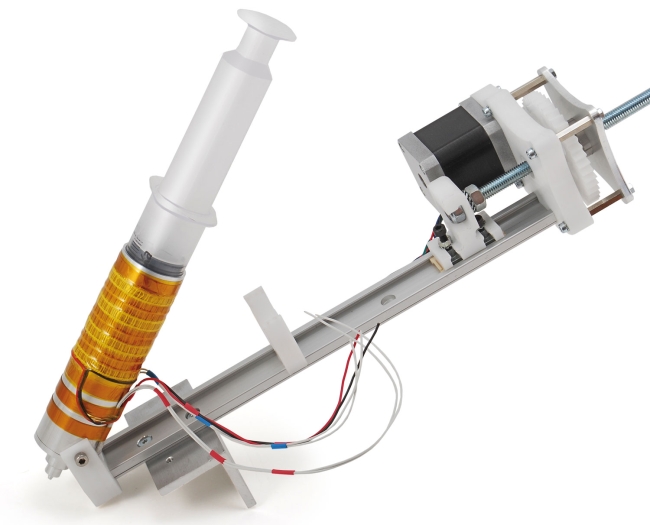
The system that we use to depose the melted chocolate consists on heating the body of the syringe and the needle even more, through a special electric heater resistance. The needle is inserted into a perforated cylinder that let it pass through and hosts the coupling. The whole system is able to bring chocolate to the required temperature and keeps it stable. In this way, the chocolate close to the needle tip melts and can leak. For this to happen, you have to push the piston of the syringe by applying a regular and continuous pressure: here comes the activation of the feeder, which consists of an endless screw that pushes down the piston itself.
If all the chocolate in the syringe is “pre-softened”, that improves the whole process: this is the reason why the entire syringe body is inserted into an aluminum cylinder whose dual purpose is to support the syringe and transfer the heat from the heater (the one that heats the needle).
Since aluminum is a good heat conductor it transmits very well the heat to the syringe but on the same time its outer surface tends to waste heat; For this reason, we decided to wrap the outside of the cylinder with a heater in Kapton film.
The syringe may be loaded in two ways: by pouring inside it the chocolate already melted at low temperature before inserting the syringe into the cylinder, or by putting inside the syringe chocolate flakes and melt them thanks to the syringe heater.
Modify the 3Drag: print head for chocolate
To print with chocolate it is necessary to make some modifications to the printer, but just limited to the replacement of the original print head (and its feeder) with an extruder ad hoc.
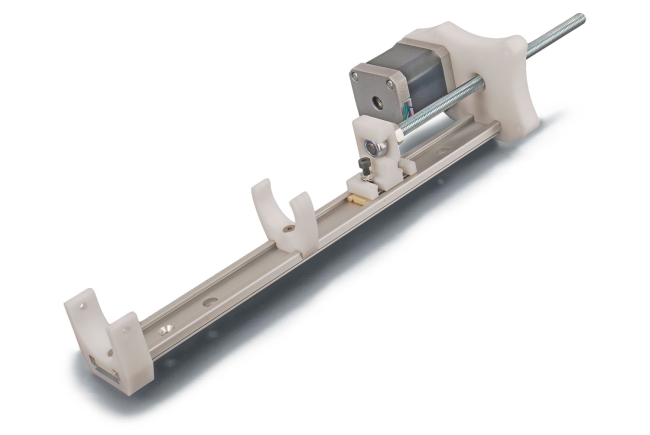
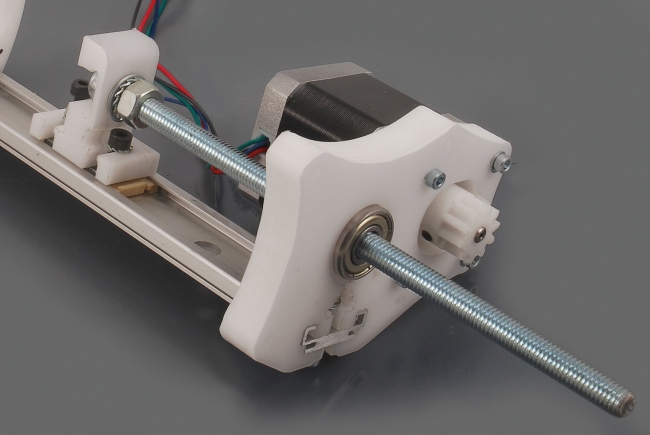
Therefore, you have to remove the original head from the horizontal rail of the print head holder and fit the new head, which consists of a syringe and its special housing that has the dual responsibility to support and heat, as well as the endless screw mechanism that presses on the piston to control the injection of the melted chocolate. The completely new head is supported by a guide, which is then anchored to the horizontal profile of the 3Drag.


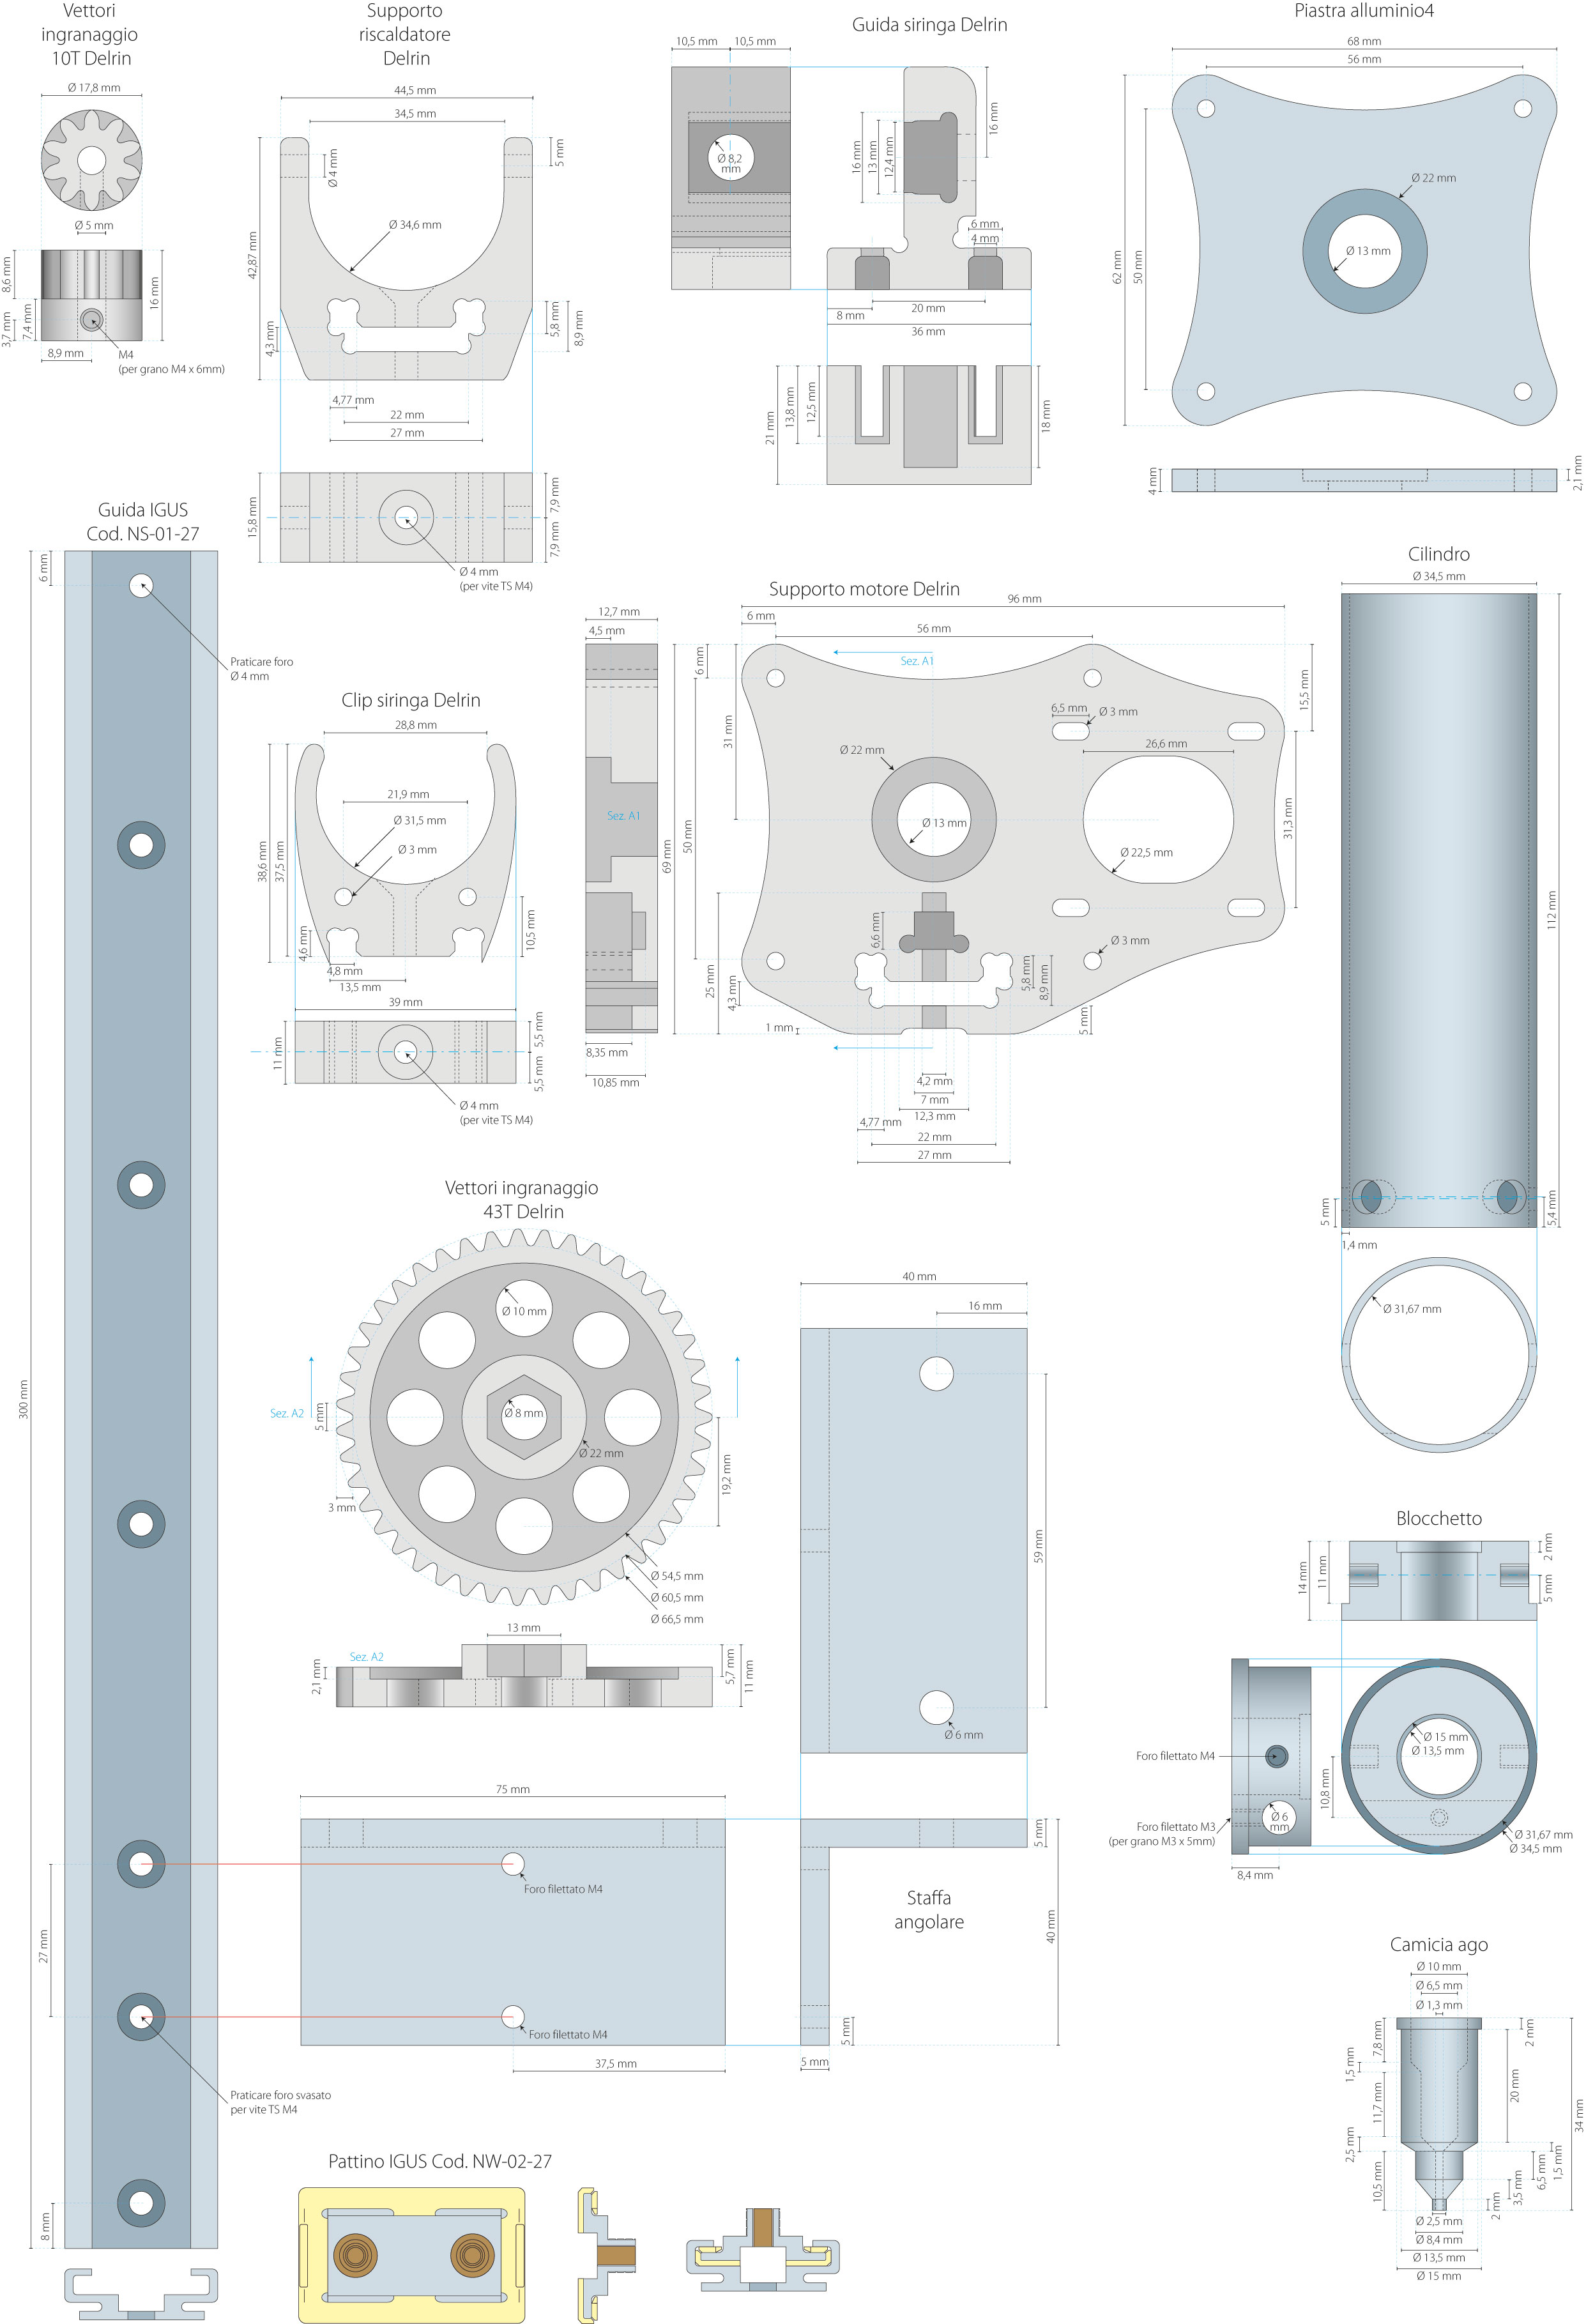
The chocolate extruder is composed of the following elements:
- 60 ml syringe for medical use with central needle attack “Luer Lock” which is applied to a standard needle of 1.2 mm diameter (0.9 mm internal), suitably shortened to 33.5 mm;
- Cylindrical aluminum body with outer diameter of 35mm and inner of 31,6 mm, suitably drilled on which is wound a “flat” heating cartridge with a supply voltage of 5 V DC;
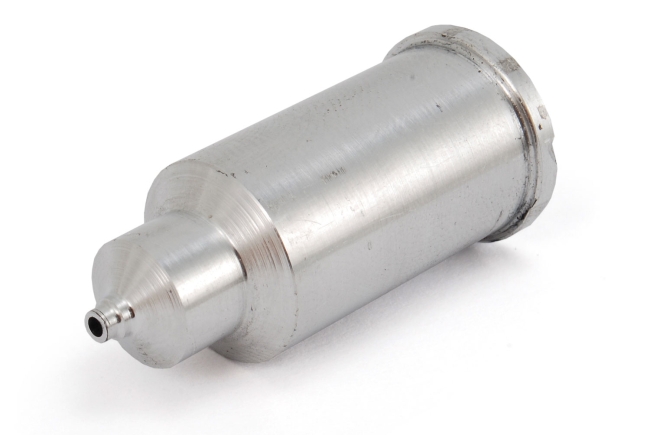
- Cylindrical aluminum block (on which is fitted a cylindrical heater cartridge 15V / 33W) properly drilled;
- Needle sleeve (made from a rod of aluminum) that “keeps warm” the needle of the syringe during printing;
- The extruder system so assembled, attaches to the printer structure and is completed by:
- Aluminum rail IGUS (cod. NS-01-27) from 27x300mm which also represents the backbone of the whole extrusion unit;
- Skid IGUS (series 27 cod. NW-02-27) which is anchored to the syringe piston through a bracket made of Delrin;
- Aluminum plate, 4 mm thick, for the fixing the gear wheel;
- Aluminum angle bracket for mounting the extruder to the arm of the 3Drag printer;
- M8x190mm threaded rod to drive the syringe piston;
- 2 ball bearings 8x22x7 mm with dust protection;
- Supports for the fixing of the heater, the syringe and the motor, gear wheel with 43 teeth (Ø66,2mm) and 10 teeth pinion (Ø 17,6mm) made of Delrin;
- A NEMA17 2.5A stepper motor, the same used for the extruder for plastic, drives the feeder that pushes on the piston of the syringe. The heating element to be inserted in the cylindrical aluminum block is 15V / 33W, while to coat and heat the cylinder you have to apply the “Flat” heating element coupled with a NTC axial 100 KOhm thermistor.
Assembling the extruder


Once in possession of all the necessary elements you can proceed to the assembly of the various elements of the extruder, as follows:
- Insert the cylindrical block in the holed end of the aluminum cylinder;
- Insert the cartridge heater in the cylindrical block after it has been sprinkled with thermal paste, then lock it with a M3 grub screw;
- Slide the skid into the aluminum rail and then attach to it, with M4 screws: the support for syringe, that for the heater and finally the one for the motor;
- Insert the two bearings in their housings;
- Mount the Delrin bracket on the skid using two M4 screws. On the bracket you shall fix the M8 threaded rod with a self-locking nut on one side and a classic nut with lock washer on the other;
- Insert on the threaded rod (engine support side) a 8×16 washer, then the Delrin gear wheel and M8 nut; put the Delrin pinion on the motor shaft, then attach the motor to its support after checking the correct coupling between the gears;
- Fix the pinion with grub screw;
- Then assemble on the motor support four spacers by 20 mm;
- Fix the aluminum plate to the spacers using four nuts;
- Fix the aluminum angle bracket to the guide by using two M4 screws with countersunk head;
- Now you need to take up the aluminum cylinder port-syringe and apply the NTC thermistor on its outer surface, and then secure it with Kapton tape;
- Wind up on the cylinder also the “flat” heating element fixing it with Kapton narrow tape;
- Fix the full cylinder to its support using two M4 screws and then insert the needle in the appropriate “aluminum sleeve”; then insert the syringe into the cylinder until you get the position; by doing this, make sure that the syringe is free to swing front to about 45 °.

You have succeeded in assembling the new print head that allows printing with chocolate; now you have to mount it on 3Drag. To do this, you must remove the standard installed extruder for plastic, and then proceed as follows:
- Insert two square nuts M5 in the upper slot of the printer arm, and then attach it to the chocolate extruder using two M5 screws
- Connect in series the two cartridge heaters and make the electrical connections for the heating element thus obtained and the extruder NTC
The mechanical modifications to the printer end here. In order to use the printer as 3Drag for chocolate you must also update the firmware of the electronic board.
The firmware “Marlin V1 (LCD ON, Choco ON)” can be downloaded directly from here.
Obviously, the firmware can be changed to your preference every time you wish, depending on the extruder mounted on the printer.

Changing the firmware
To operate with chocolate it is necessary allowing the heater to reach much lower temperature than that usually used with plastics. We must remember that the Marlin firmware comes for the control of FDM 3D printers using plastic filament and includes a whole series of protections including that one which prevents to extrude the material below 170 ° C. Having to melt the chocolate at a temperature of about 33 ° C we have to change the statement:
#define EXTRUDE_MINTEMP 170
Into:
#define EXTRUDE_MINTEMP 10
This change moves the protection threshold from 170 ° C to 10 ° C.
Another necessary firmware change concerns the steps/mm of the extruder motor, because of its different mechanic conformation. The instruction to modify is:
#define DEFAULT_AXIS_STEPS_PER_UNIT {64.25, 64.25, 2560, 600}
The last parameter (600) indicates the rotation speed of the motor.
To obtain a right extrusion speed, allowing thus fluid extrusion of chocolate, this value must be reduced by 10 times so the correct instruction will become:
#define DEFAULT_AXIS_STEPS_PER_UNIT {64.25, 64.25, 2560, 60}
Another change relates to the PID that controls the temperature: to prevent excessive fluctuations, we modify the parameter P:
#define DEFAULT_Kp 22.2
Becomes
#define DEFAULT_Kp 32.2
This value has been calculated empirically but gave great results on real printing.
The modified firmware is available for download. You can use the Arduino IDE to program the 3Drag Controller (like Arduino Mega2560).
To disable the hot bed you have to insert a 120Kohm resistor on THERM2.

Precautions for printing
As already mentioned at the beginning of this post, we must remember that the cooling time of chocolate layers is much longer than that used when printing with plastic. We therefore recommend a printing speed of maximum 20 mm / sec to have individual layers of chocolate cooling down properly.
In the Slicer parameters, we must set the nozzle diameter to 0.9 mm (you can also set it to 0.8mm to “cheat” the slicer and then make higher definition prints), the layer height to 0.7mm and the extruder temperature not exceeding 35 ° C.
As for the 3D prints with plastic, it will take several tries to get the best results.
The configuration parameters also depend on the shape of the object, the type and quality of the chocolate used and the ambient temperature environment in which the printer operates.
Therefore, the determination of the parameters is the result of personal experience gradually gained into this field.
Configuration files
Download the configuration file to setting Repetier Host
From the Store
You can buy all the extruder component from our Store

[…] Para montar e montar sua própria extrusora de chocolate, basta seguir os 15 passos completos você pode encontrar em seu tutorial aqui. […]
is it the same 3d printer listed here? http://goo.gl/EHTmIB
because it’s called K8200, I want to buy one but because of the upgrade opportunities for chocolate/pasta extruder or mounting a Dremel on it. Any tips?
We have developed the 3Drag. In collaboration with Velleman we started mass production and they have called it K8200
Tips for dremel?
Yes, of course. check the top menu
Hi, I have sent a request regarding the 3Drag Printer and Choco Extruder but it seems like there is no reply.
Any advise?
What request?
In the store they are available.
https://store.open-electronics.org/index.php?_route_=3D/Printer/3Drag%203D%20printer%20KIT
[…] 3Digital Cooks, I came across a post about Open Electronics’ method for modifying a RepRap 3D printer, specifically a 3Drag, to 3D […]
[…] Electronics je nedanvno objavilo metodu modificiranja RepRap 3D printera, točnije 3Drag koji može printati 3D objekte od […]
[…] die zich bezig houden met het 3D-printen van chocolade. Sinds kort heeft het Italiaanse bedrijf Open Electronics de markt van het 3D-printen van voedsel ook […]
Hi, I have just come across a link with very good and detailed instructions on how to build the Chocolate Extruder in Italian…….
http://3dprint.elettronicain.it/3drag-stampante-per-cioccolato/
Hope that this will be of help to you all…..
Walis
This helped a lot! @Open-Electronics: I would recommend to include this link into the official manual. The photos are much more detailed. Thanks :-)
Via Google translation is easy to get a native translation.
Thank you for turning terrible instructions into really clear instructions! Your’s should be the official ones
Hi chocchef……
Many thanks for your feedback…..
Just to make clear though, I found the link online……
It was not me that prepared the instructions!
All our thanks should go to the original authors of the article…….
The italian instructions were translated:
http://www.open-electronics.org/assembling-the-choco-3drag-printing-syringe/
Thanks guys
[…] We are now to the final greetings, with one more recommendation! How will a real Maker prepare the Christmas cake? Of course, using our 3Drag Choco Printer!! […]
Can anybody give me a hint how to connect the chocolate extruder to a 3d printer with 24 V power supply?
For the heater cartridge I have 12, 15 or 24 V available. For the flat kapton heater there’s only the 5V offered by OE.org. Is it possible to connect 15 V + 5 V in series or is it better to go with 24 V + 5 V in series?
THANKS!
Florian
Hi, the flat kapton heater is an optional, you can use onle the 24V cartridge
Hello, I have assembled the extruder but in the end when im trying it out i realized that it retracts instead of extruding… what can I do?
Revert the motor connection
Is there a way to change it via software or firmware? I am using the same motor so i didnt want to switch cables everytime i change extruder
Yes of course, you can change from firmware (marlin)
very interesting article. We are manufacturers of chocolate cups for champagne or to make desserts. http://www.chocolatmagic.com
[…] amazing 3D printer known as 3Drag, outfitted with a pastry bag or a heated syringe is capable of printing using any type of […]
I have a problem,I don`t know how to set the proper speed for the motor.I tried several speed ,and I found if the speed was too high may cause the jam of gear and stop the motor.if the speed was too low the volume of the chocolate was not enough to print.Can someone give me some tips?
Normaly the extrude for plastic works with 600 step/mm, for the chocolate set 60 step/mm
Thanks,I will have a try~
hye, can ur chocolate extruder being assembled in standard reprap prusa i3 3d printer?. What are the additional parts or modifications that i need to do for ur chocolate extruder kit in ur store to perfectly work with my standard prusa i3?
Hi, I’m sorry, but this extruder is for 3Drag
is this printer capable of retractions?
in all the axis?
can you put up a better version of the 2d plans for the extruder. Its too blurry and hard to read.
This product is shipping to Brazil?
Yes of course, you can find 3Drag and choco in our store
https://store.open-electronics.org/index.php?_route_=3Drag%203D%20printer%20KIT&search=3drag
Hello guys
I just got syringe to print choco from 3 drag , my motor was working well with the filament but once I changed it to print choco it stops working
I have followed the structures step by step but nothing changed
am not sure I may have a problem in updating the electronic board or in the firmware for marlin choco ??!
I would appreciate if someone can assist
Regards
Have you changed the firmware?
You can download the right firmware here:
http://3dprint.elettronicain.it/wp-content/uploads/2015/04/Marlin_LCD_Alfanumerico_Choco.zip
Thanks BorisLandoni for quick replay , I would really appreciate if you could tell me what shall I do exactly after download the firmware
Regards
You have to use Arduino IDE to upload the firmware (sketch) inside the main board.
In IDE select the Atmega2560
Dear BorisLandoni
Do you recommend me any website that explain in more detailed ?
I mentioned to you before that I followed every thing step by step .
I updated the firmware of the Microcontroller (ATmega 2560) from Arduino website + downloaded the Marlinchoco ,I made the changes of the ( Configuration.h) file
But still have stepper motor not working , its written in the 3d Repiter- host that ( cold extruded prevent ) >>??
is there anything I can do to overcome that ?
Ho comprato il kit da piu’ di 3 mesi e ancora non sono riuscito a fare un oggetto di cioccolato che uno. Ma non ci sarà il trucco? Poi, alle email e ai tweet non rispondete, cosa devo fare ancora per la vostra attenzione?
Ho comprato il kit da piu’ di 3 mesi e ancora non sono riuscito a fare un oggetto di cioccolato che uno. Ma non ci sarà il trucco? Ho seguito tutte le vostre istruzioni le modifiche del firmware e le configurazioni di slic3d ma non c’è niente da fare a meta si blocca e non esce piu il cioccolato
What’s your problem?
(please write in english here)
I also sent to you an email last friday. However i tried many many times to print chocolate things but everytime there are various problems, like stop to extrude chocolate when the printing is reach 3 or 4 cm of height. It seems there is no control of chocolate flow, also i found solid chocolate on the plastic funnel of the needle so make me think that there is also no control of heating, must put thermal paste on needle because there is space between needle and aluminium socket? must use complete metal needle? Which kind of chocolate need? can you tell me where to buy the same chocolate? Thanks
Chocolate inside the syringe should already be loose.
The extruder heater only serves to keep loose, not to dissolve it.
Be sure to put the aluminum jacket around the needle. The needle should be ours and must extend from aluminum for a millimeter.
We use normal drops of dark chocolate (from Iper….)
Sorry but i follow every steps as you describe on this page:
http://3dprint.elettronicain.it/3drag-stampante-per-cioccolato/
But everytime i obtain this result (i progressive reduce the speed as the chocolate flow decreases to maintain the continuity how much i can and i must check every minutes) :
Are you using the cooling system? If you need to print high 3D object I suggest you tu use a cooling system
Yes of course. I bought and built the suggested cooling system with peltier cells. I think you never read the email I sent to you 18 days ago. In anycase i have a theory that explains why the chocolate flow decrease. Because the chocolate flow has no control (when the chocolate is melted then flows down by the gravity force, maybe it needs a valve synchronised with the step motor) it creates an empty space like a inverted cone just between the rubber piston and the hole at the bottom of syringe. I notes this many times after I toke out the syringe for cleaning.
You can reduce the flow rate. If you are try to close the upper layers yu have to create an infill (as a normal plastic 3D printer).
i’ve done another attemp, following your advices and i completed the model but there is still the problem i mentioned. If you take a look at the photo i attached, you can see from the “arms” layers i encountered many problems to try to complete the printing, as i reduce the speed, as i stop and play the printer and extrude the chocolate in other zone of bed until the flow become more fast and then resume, but the flow tend is the same, in other words, i need to reduce the speed from initial 75% to 20% at the last layers. https://uploads.disquscdn.com/images/6f5e1bfd0e43ad6742af42224e0df9c3538dee7a415dd7d2b9b61ef97f52163f.jpg
Do you have a stl file of the cup printed in the example above?
You can find some cup here
http://www.thingiverse.com/search/page:7?q=mug&sa=
Hi Boris, thanks for this. However, I guess what I’m looking for is an stl that contains the printing instructions. Do you have some recommended settings for the slicr that I can use? I don’t manage to get this cup to print correctly.
Thanks,
Maria
Hi, has anyone had problems with the connection to the printer being dropped all of the sudden? The board starts blinking red and the computer cannot find the USB port any more. Anyone that might know what causes this?
Hello,
We got many problem with this printer and we don’t know how to resolve those problems, I tried sent many email through this website (CONTACTS) but unfortunately till now no answer!!!!.
I’m wondering how to sell this machine without good custom services ?!!
Please don’t buy this product, I would advise you don’t buy it.
Many problem many bugs.Further, no service customer!!!!
The board was damaged I bought new one, I got documentations in Italian I sent email written in the manual all are wrong!!!!
You can find all info in this site. We don’t receive any mail. We have also a RMA service.
In this same page where you replied there is my first post and in the same time I sent you many messages through CONTACT.
And I bought new board due that the first was damaged and I tried to upload the choco firmware can you help me ?!!
Can you give me any email that of custom services?!!
Please write to info@open-electronics.org
I tried to contact them using the address which you gave to me but unfortunately any answer!!!.
Please can you help me and answer to my questions?
I have not received anything
I sent email to :info@open-electronics.org
https://uploads.disquscdn.com/images/f1644f79bbdcb93697a5758fd6ccec7ac20493a01b2ec945d92d9a4444871ed6.jpg
Can I ask you my questions here?
Give me your mail, I’ll try to write you
sbenyoucef@ksu.edu.sa
sbenyoucef79@gmail.com
info@open-electronics.org
Or use this module
http://www.open-electronics.org/contacts/
Yes this I used a lot, and I tried to sent using two different email address but no feedback?
Hi, I test your cooling system, but it seems to
be not powerful enough. It is possible to get the stl files of the cooling
system in blue (with the horn) we see in the video?
Thanks
We are using this one http://www.thingiverse.com/thing:596508
Hi, i just tested your printing machine. The cooling system seems to be not
powerful enough.
It is possible to get the stl files of the system see in the video (the blue horn?)
I think it will be better than the one with the ring.
Thank,
We found it on http://www.thingiverse.com/
Could you ship the product to UAE?
How long does it take the printer make for example a chocolate cup?
Hello I needed to know what is the velocity of printing and and the lifetime of the printer thank you
[…] 3Drag, la stampante di Futura Elettronica che stampa oggetti di cioccolato 3D; […]