
In the past months we presented the Arduino Yun and Arduino Galileo boards. Today we present you a new board, quite more powerful, but still Arduino compatible and powered with GNU/Linux. It’s an all Italian board called UDOO.
Indeed, now almost every month we see the birth of a new platform that integrates processors capable of hosting GNU/Linux with the Arduino architecture, in emulated form, or with a dedicated microcontroller. Now is the time to UDOO but we already see looming on the horizon the availability of Arduino Three, and who knows what other boards in the meantime.
UDOO project comes from the idea of the founders to provide a tool for digital learning: high computing power combined with the world of microcontrollers with maximum ease of use, will form a new generation of designers, makers and developers with the knowledge necessary to develop projects in the fields of digital / physical computing, multimedia, interactive arts, the Internet of things, and so on.
All this with an affordable price.
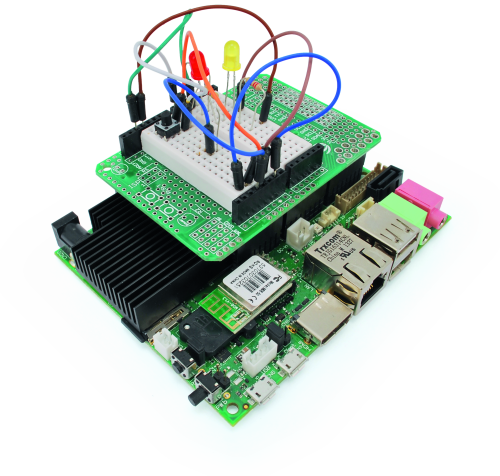
The UDOO project offers three alternatives for its product. UDOO is a mini computer that combines a powerful Freescale chip (two or four cores made of ARM Cortex-A9 processor clocked at 1GHz) which can accommodate both GNU/Linux and Android, with the Atmel SAM3X8E ARM Cortex-M3, that of the Arduino Two, in a general purpose platform. In fact UDOO also has sports video output, a graphics accelerator, audio input/output, 1 Gbit Ethernet, 1 GB DDR RAM, 76 I / O modules, a WiFi module and more.

SPECIFICATIONS
The UDOO board is available in three versions, the UDOO Dual Basic, the UDOO Dual and UDOO Quad. We wanted to test directly the Quad, which is the most complete and powerful but also the most expensive. The three versions, give the possibility to choose a suitable board the project in development, based on the best combination of power and ease, functionality and price. All three cards can accommodate both the operating system GNU / Linux, Ubunto Linaro, Debian, and Android version 4.4.4 Jelly Bean.
Let’s look at the main features that differentiate the three boards. The Quad sports a SATA connector for connecting an external hard drive. In this way we can transform UDOO into a real PC, complete with a desktop interface, video, mouse and keyboard. The other two boards do not have SATA connector. The other notable difference between one card and the other is the processor: in the Quad you’ve a Freescale Cortex A9 CPU with four i.MX6 while the other mount a Freescale Cortex A9 CPU with two i.MX6DualLite. Finally, the difference between the Dual and Dual Basic board lies in the presence of the WiFi module (not available in the Basic)
UDOO Quad full specs
Freescale i.MX6Quad, 4 x ARM® Cortex™-A9 core @ 1GHz
GPU Vivante GC 2000 for 3D + Vivante GC 355 for 2D + Vivante GC 320
Atmel SAM3X8E ARM Cortex-M3 CPU
RAM DDR3 1GB
76 pin GPIO
HDMI e LVDS + Touch
2 Micro USB (1 OTG)
2 USB 2.0 tipo A e 1 USB 2.0 internal pin header (requires adapter cable)
Analog Audio and Mic jacks
CSI Camera Connection
on board Micro SD card reader (boot device)
Power Supply (6-15V) and External Battery connector
Ethernet RJ45 (10/100/1000 MBit)
WiFi Module
SATA connector with power header
UDOO Dual full specs
Freescale i.MX6DualLite, 2x ARM® Cortex™-A9 core @ 1GHz with ARMv7A instruction set
GPU Vivante GC 880 for 3D and 2D (vector graphics) + Vivante GC 320 for 2D (composition)
Atmel SAM3X8E ARM Cortex-M3 CPU (same as Arduino Due)
RAM DDR3 1GB
76 fully available GPIO with Arduino-compatible R3 1.0 pinout
HDMI and LVDS + Touch
2 Micro USB (1 OTG)
2 USB 2.0 type A and 1 USB 2.0 internal pin header (requires adapter cable)
Analog Audio and Mic jacks
CSI Camera Connection
on board Micro SD card reader (boot device)
Power Supply (6-15V) and External Battery connector
Ethernet RJ45 (10/100/1000 MBit)
WiFi Module
SATA connector with power header
UDOO Dual Basic full specs
Freescale i.MX6DualLite, 2x ARM® Cortex™-A9 core @ 1GHz with ARMv7A instruction set
GPU Vivante GC 880 for 3D and 2D (vector graphics) + Vivante GC 320 for 2D (composition)
Atmel SAM3X8E ARM Cortex-M3 CPU (same as Arduino Due)
RAM DDR3 1GB
76 fully available GPIO with Arduino-compatible R3 1.0 pinout
HDMI and LVDS + Touch
2 Micro USB (1 OTG)
2 USB 2.0 type A and 1 USB 2.0 internal pin header (requires adapter cable)
Analog Audio and Mic jacks
CSI Camera Connection
on board Micro SD card reader (boot device)
Power Supply (6-15V) and External Battery connector
We’ll describe now how the sharing of resources between the processor and the Freescale microcontroller Atmel happens. The “direct” communication between the two is made through the connection of the respective serial ports. UART serial pins “0” and “1” from Arduino are physically connected to the KEYROW0 and KEYCOL0 pins of the Freescale processor, at a 115200 bps speed. From the GNU / Linux side, the serial connection has the name of device/dev/ttymxc3. This is not assigned to the system console, as in the case of Arduino Yun, but it’s a direct serial connection that can be used to communicate between the Arduino sketch and any program on the Gnu/Linux. The other notable feature is the sharing of I/O pins. Both sections of UDOO work with levels 3.3 V and the Arduino pins are physically connected to as many pins of the Freescale I/O processor. This means that, under certain conditions, all pins can be read and written by both an Arduino sketch or any program running within GNU/Linux. With regard to the design of “embedded” applications this allows a remarkable capacity for parallel processing and, consequently, a great deal of flexibility in the design.
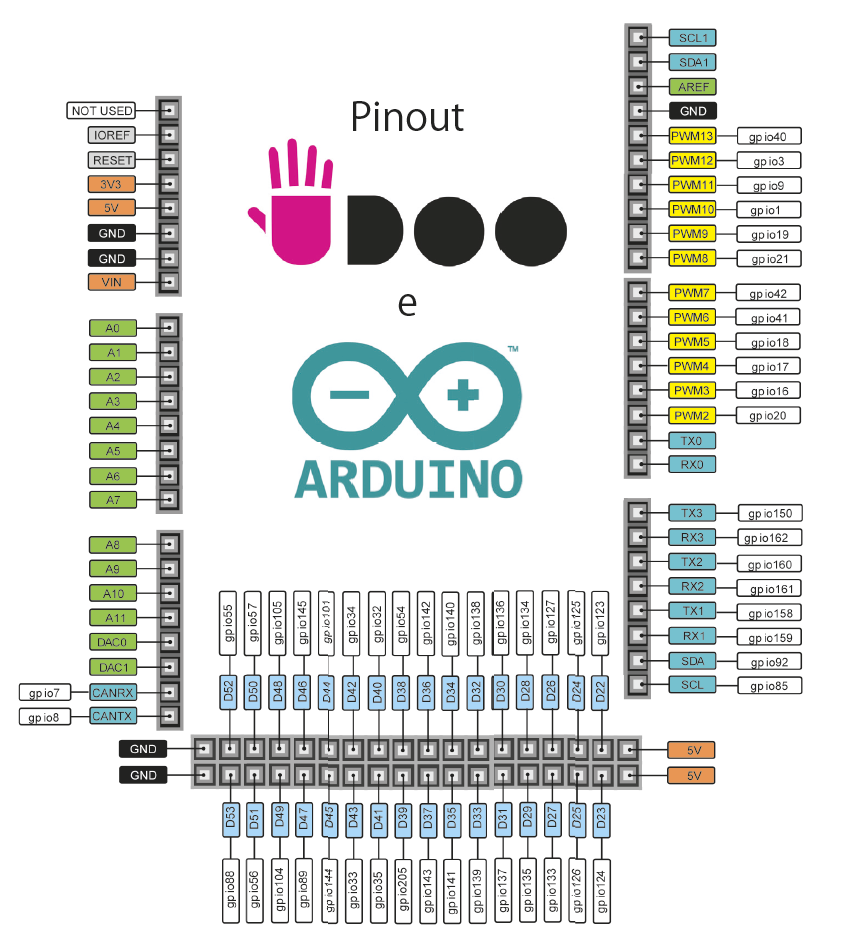
From the Arduino side the use of I/O pins corresponds to the use made of it in the Arduino Due. From the GNU/Linux side, as we have experienced so far, te use corresponds to the that of the pins of the GPIO connector of Rasperry Pi, with the difference that the pins here are 76 and the computing power is more than twofold (at least). In the map we can see the correspondence between the Arduino pins and the pins connected to the Freescale processor. The figure shows the “rules” to be respected in sharing the pins between the two sections. To give you an example, take the D13 pin that is connected to pin Freescale processor’s GPIO40. The different configuration options can be summarized as follows.
-
Arduino Sees D13 as an output while the Frescale processor sees the GPIO40 pin connected as an input: in this way programs running in GNU/Linux can be notified about changes made by Arduino, in this configuration an external load can be connected, such as a relay, always controlled by Arduino;
-
Arduino Sees D13 as an input while the Frescale processor sees the GPIO40 pin connected as an output. In this case, programs being executed in the GNU/Linux are in charge. The Arduino sketch can only read the status of the pin. Even in this configuration, an external load can be connected, controlled by GNU/Linux;
-
Both environments see the corresponding pins as inputs: we connect a sensor externally, which, in this configuration can be “read” at the same time by both environments. A good way to achieve a “trigger” for events that have to be intercepted simultaneously by both the Arduino sketch and the of GNU/Linux programs;
-
All other configurations generate conflicts and cannot be used.
Various configurations are summarized graphically in diagrams.

Configurations allowed

Configurations not allowed
Conclusion
We didn’t have time to investigate further the several functions of the UDOO board. In particular, the access to the serial port from the outside of the board for example to communicate with GNU/Linux or to program the Arduino microcontroller from the outside. Similarly, it is also possible to control the access to micro USB ports. All this is made by configuring the jumpers on the board.
For now we must congratulate the designers of this board: you should totally consider it if you want to delve into the world “embedded” applications, at a professional extent or more in general if you’re considering more complex applications.

[…] UDOO: a Linux/Arduino compatible board on Steroids […]
[…] In the past months we presented the Arduino Yun and Arduino Galileo boards. Today we present you a new board, quite more powerful, but still Arduino compatible and powered with GNU/Linux. It’s an all Italian board called UDOO. Indeed, now almost every month we see the birth of a new platform that integrates processors capable of hosting GNU/Linux with the Arduino architecture, in emulated form, or with a dedicated microcontroller. Now is the time to UDOO but we already see looming on the horizon the availability of Arduino Three, and who knows what other boards in the meantime. UDOO project comes from the idea of the founders to provide a tool for digital learning: high computing power combined with the world of microcontrollers with maximum ease of use, will form a new generation of designers, makers and developers with the knowledge necessary to develop projects in the fields of digital / physical computing, multimedia, interactive arts, the Internet of […] […]
[…] UDOO: a Linux/Arduino compatible board on Steroids […]
Arduino GSM shield works with UDOO?
Our GSm shield is for 5V Arduino