Once experimented with REST technology and with the “Bridge” communication mode, we can introduce a project that achieves something difficult so far with an Arduino board: writing a web page, to be run by Linino’s internal web server uHttpd, to manage the pins of Arduino with REST, but via a web page.
We will show you this and more: we also want our website to be updated both when we perform some direct action or when something happens on the Arduino side to show you a template for any given sensor measuring or actuation page.
This project will show the differences between a microcontroller system – typically mono-program – and an embedded system equipped with an operating system as GNU/Linux.
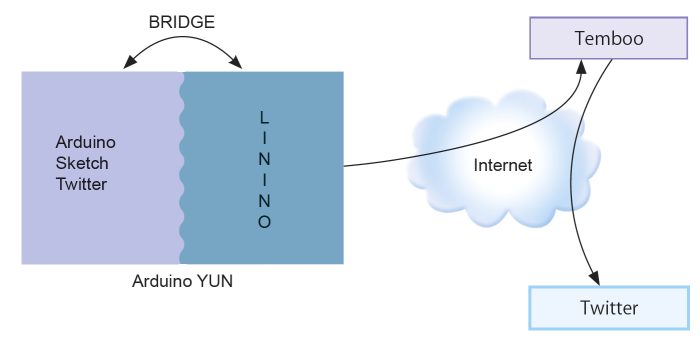
The Arduino Yun board incorporates both “souls ” with a good bridge solution to integrate them.
The web page of the project
We want to create a web page that allows us to control the sensors of the shield and, simultaneously, to receive the notifications of the changes that take place on the Arduino section of the board.
Just place the HTML code of your page in the folder
/mnt/sda1/arduino/www
that actually sends to the folder
/arduino/www
present in the Micro SD Card. Hence the web pages are on the micro SD, they do not take up nand memory space and, a precious memory space dedicated to the sketch.
To recall the page, type into a web browser the URL:
http:// <Address_Arduino_Yún>/sd/
followed by
/<page_name>
or nothing if the page is called “index.htm”.
In the Arduino Yun “logic”, HTML pages are automatically inserted by the development IDE into a folder inside the folder
/mnt/sda1/arduino/www
With the same name of the folder containing the sketch. So you can reach them with the address:
http:// <Indirizzo_Arduino_Yún>/sd/<sketch _ name>
We’ll make the page using HTML language. To do this we must make sure that the HTML page can perform its own actions, independent from the server. We will use the JavaScript language that allows to insert instructions (script), within the HTML code of the web page, that will run on the client (browser) after the specific requests. The use of JavaScript in the HTML page is one of many techniques that go under the name of Dynamic HTML (DHTML). JavaScript allows to perform actions within the web page without the need to involve the server. To update the contents we use AJAX technique (Asynchronous JavaScript And XML) that allows us to manage the data exchange in the background, asynchronously.

For simplicity, we’ll use JavaScript and AJAX in the most basic way possible, just to give notice of their existence. In the diagram we see the index.htm page that is called as first and that is the coordinator of all the other features. When an external user requests the page, this request is intercepted by the server uHttpd that returns the page shown in Figure 11.
In the bottom of the page we have included a field where are the messages that the programs activated with Ajax technology send back, very useful for the execution of the tests.
The web page becomes “alive” with Javascript
Let’s explore the AJAX mechanism achieved in Javascript . In the HTML code there is a tag <script type=”text/javascript> to which follows a long list of instructions, ended by the tag </script>. The instructions in the block are the those of JavaScript, which deals with the management of the interactive part of the HTML page . These instructions are transferred to the browser inside the HTML page to be run, on request, directly within the browser. JavaScript is a scripting language and then requires an interpreter to be executed. As you can see, the JavaScript modules are organized into functions, each of which can provide whether or not for the parameters. Looking at the structure of the code you’ll see that some methods begin with the prefix “on”. These are the methods and functions that are activated when something happens and after that this type of programming is named “event driven”. Event mean, for example , pushing a button but also receiving a response message or the elapse of a certain time interval.
Below we see the snippet of HTML code that achieve the functionality of changing the status of the pin 13 of the Arduino which is connected to the relay. We can change the status of the relay by clicking the image that reproduces the front of a switch, that symbolically indicates the activation status whether or not of the relay. Compared to a standard code of a HTML page, here we see the tags “id” within the sections of the description of the elements, text boxes and button. In addition, in the tag of the element “button” there is the management of the event onclick, which triggers the JavaScript function “sendrelay”.
Let’s face the problem step by step. Start to analyze the AJAX mechanism related to the button that changes the status of the relay 13.
The section of the HTML code that describes the graphic of the button is the following:
<td align="center">
13
<br>
<input type="hidden" name="pin" value="13" id="pin13" />
<input type="hidden" name="action" value="0" id="action13" />
< img src = " off.jpg " width = "50" id = " image13 "
onclick = " sendrelay( document.getElementById ('pin 13').value
document.getElementById ('action13').value); "
/>
</ td>
Giving unique names to the elements of the HTML page allows to use them as references within the JavaScript code and also change their values, states and references. Later we will use this opportunity to change the image associated with the status of the relay, depending on whether it is active or not. Onclick event is associated with the command “sendRelay(…) ” that invokes the JavaScript function of the same name, passing it as parameters the values of the fields pin13 and action.
function spedisciRele(Pin,Azione){

document.getElementById(“descrizione”).innerHTML = “--- Attendi ... ---”;

server = “/arduino/digital/” + Pin + “/” + Azione;

richiesta = new XMLHttpRequest();

richiesta.onreadystatechange = updateasincronoRele;

richiesta.open(“GET”, server, true);

richiesta.send(null);

}
The “sendRelay” function insert the waiting message in the text box “description” at the bottom of the page, which shows messages of communication between the AJAX “actors”, then instantiates a request to the web server, against which books the execution of the function “updateasincronoRele” that will be activated when a reply from the server will be received. Finally it makes the call to the server with GET method.
The null string in the send method is required by the fact that we performed the call with the GET method.
The server usually answers quickly and very rarely you will see the message — Wait — , unless there are problems. Once got a valid response message, function “updateasincronoRele()” (“updateasynchronousRelay()”) is activated: if there are no errors – i.e. the response status is equal to “4” and the status of the request is equal to “200” – it intercepts the return message, composed by fields separated by commas (we will build it by changing the sketch of the Arduino side, as we will soon see).
function updateasincronoRele(){
if ((richiesta.readyState == 4) && (richiesta.status == 200))

{
esito = richiesta.responseText;
document.getElementById(“descrizione”).innerHTML = esito;
iparr = esito.split(“,”);
PinType = iparr[0];
PinNum = iparr[1];
PinStato = iparr[2];
ActNum = “action” + PinNum;
ImgNum = “image” + PinNum;
if (PinStato == 0)

{

PinAct = “1”;
Immagine = “off.jpg”;

}

else

{

PinAct = “0”;
Immagine = “on.jpg”;

}
document.getElementById(ActNum).value = PinAct;
document.getElementById(ImgNum).src = Immagine;
document.getElementById(“descrizione”).innerHTML = esito;

}
}
The function updateasincronoRele() first “unpacks” the message in an array and then extracts the single fields in significant variables for each type of message. In the case of relays, it updates the values in the fields PinAct and Image with the values received in return. If the status of the relay is deactivated (Variable PinStatus = 0) we have to see that, next time you’ll click on the appropriate button, the relay will be activated , then we will set to “1” the value of the hidden field (type=hidden) “action” corresponding to the relay in reference, for example “action13” . Similarly we set the image corresponding to the status of the relay. Actually we set only the name of the .gif image that we want to be shown. This will then be taken directly from the browser that requests it directly to the web server. We put the images in the same folder where is the HTML page (/mnt/sda1/arduino/www).
The final instructions physically changes the objects “actionx” and the source of the image “imagex” where “x” is the pin number reported to the relay on modification.
Then it returns back the entire message in the field “description”. You can also delete this information writing ” ” in the field or whatever you prefer. As you will notice, during all this work, the page is never updated, but remains in place.
Now we look at another peculiarity of our web page. To change the values on the analog output pins 3, 5 and 6, we used one of the new objects included in HTML5, the “Slider”, defined in the language as “range” object. This object creates on the web page a slider that allows to set the value of a variable, making slide the relative “Slide”. All this with little more than a line of HTML code. The object of course has attributes and methods that can be used easily in JavaScript.
Let’s see the code snippet that creates the cell in the grid on the web page that controls the PWM pin number “3”.
<td align=”center”>

3

<br>
<input type=”hidden” name=”pin” value=”3” id=”pin3” />
<input type=”range” style=”width: 50px; height: 30px;” id=”dac3”

min=”0” max=”255” value=”0” step=”1”
onchange=”spedisciDac(document.getElementById(‘pin3’).value,
this.value);”

<br>
<span id=”ValoreDac3”>0</span>
</td>
We named the pin with the name (id) “pin3” to which we associate the value “3”: this value will be sent to the server in the AJAX call.
The real “slider” is described in the tag “input” with “type = range”. The specifications of the slider are the value “min”, which is what takes the slider with the slider all the way to the left, the value “max “, slider all the way to the right, and the “step ” or increase, which sets the change in value corresponding to a unit shift of the cursor. To change the position of the slide, and thus the associated value, use the mouse, click on the slide, drag to the new position and release. Upon release of the mouse the event “onchange” is activated, event that recalls the function “spedisciDac” (“sendDac”) passing the value of the field “pin3” (contains “3”) and the value set by the slider “this.value”.
function spedisciDac(Pin,Valore){
ValNum = “ValoreDac” + Pin;
document.getElementById(ValNum).innerHTML=Valore;
document.getElementById(“descrizione”).innerHTML = “--- Attendi ... ---”;
server = “/arduino/dac/” + Pin + “/” + Valore;
richiesta = new XMLHttpRequest();
richiesta.onreadystatechange = updateasincronoDac;
richiesta.open(“GET”, server, true);
richiesta.send(null);
}
The first two instructions of the function “spedisciDac()”(“sendDac()”) set the field “ValoreDac3” (“ValueDac3”) with the past value in order to give visual evidence of the value set, in the text field below the slider. Then the URI REST is sent to the server, as in the case of the relay and, after the response has been received, the values of the slider and of the text field are re-updated, as you can see in the code. Anyway, why, given that it is a analog output pin the return value can only be equal to the starting value? For several reasons. First: from the beginning we decided to build an interactive page, which was updated without need to recharge it every time, and thus requires mechanisms to update the values of the objects without human intervention, as we shall see shortly. Second, the DAC value of the pin may be modified, without our knowledge, by a function of the sketch and then we need to devise a mechanism to be notified.
For both feature the mechanism is the same. We need to see that the content of the page is updated autonomously, so as to present the real status of the sensors of Arduino and of the peripherals connected to it, in our case the shield.
<html>
<head>
<title>Arduino Yún I/O shield</title>
<script type=”text/javascript”>
window.onload=CaricaStatoPin;
function CaricaStatoPin(){
leggiStato();
}
function leggiStato(){
setTimeout(leggiStato, 2000);
document.getElementById(“descrizione”).innerHTML = “--- Attendi ... ---”;
server = “/arduino/stato/99”;
richiesta = new XMLHttpRequest();
richiesta.onreadystatechange = updateasincronoStato;
richiesta.open(“GET”, server, true);
richiesta.send(null);
}
function updateasincronoStato(){
if ((richiesta.readyState == 4) && (richiesta.status == 200))
{
esito = richiesta.responseText;
document.getElementById(“descrizione”).innerHTML = esito;
pippo = esito.split(“#”);
document.getElementById(“descrizione”).innerHTML = pippo;
for(i = 1; i < pippo.length; i++){
PinPair = pippo[i];
iparr = PinPair.split(“=”);
PN = iparr[0];
PinStato = iparr[1];
if (PN > 7)
{
ActNum = “action” + PN;
ImgNum = “image” + PN;
if (PinStato == 0)
{
PinAct = “1”;
Immagine = “off.jpg”;
}
else
{
PinAct = “0”;
Immagine = “on.jpg”;
}
document.getElementById(ActNum).value = PinAct;
document.getElementById(ImgNum).src = Immagine;
}
if (PN == 2 || PN == 4 || PN == 7)
{
ImgNum = “image” + PN;
if (PinStato == 1)
{
Immagine = “led_off.jpg”;
}
else
{
Immagine = “led_on.jpg”;
}
document.getElementById(ImgNum).src = Immagine;
}
if (PN == 3 || PN == 5 || PN == 6)
{
PinVal = parseInt(iparr[1]);
DacNum = “dac” + PN;
ValNum = “ValoreDac” + PN;
document.getElementById(DacNum).value = PinVal;
document.getElementById(ValNum).innerHTML = PinVal;
}
if (PN.substr(0,1) == “A”)
{
PinVal = parseInt(iparr[1]);
AnalogNum = “analog” + PN.substr(1,2);
document.getElementById(AnalogNum).value = PinVal;
}
}
}
}
function spedisciRele(Pin,Azione){
document.getElementById(“descrizione”).innerHTML = “--- Attendi ... ---”;
server = “/arduino/digital/” + Pin + “/” + Azione;
richiesta = new XMLHttpRequest();
richiesta.onreadystatechange = updateasincronoRele;
richiesta.open(“GET”, server, true);
richiesta.send(null);
}
function updateasincronoRele(){
if ((richiesta.readyState == 4) && (richiesta.status == 200))
{
esito = richiesta.responseText;
document.getElementById(“descrizione”).innerHTML = esito;
iparr = esito.split(“,”);
PinType = iparr[0];
PinNum = iparr[1];
PinStato = iparr[2];
ActNum = “action” + PinNum;
ImgNum = “image” + PinNum;
if (PinStato == 0)
{
PinAct = “1”;
Immagine = “off.jpg”;
}
else
{
PinAct = “0”;
Immagine = “on.jpg”;
}
document.getElementById(ActNum).value = PinAct;
document.getElementById(ImgNum).src = Immagine;
document.getElementById(“descrizione”).innerHTML = esito;
}
}
function spedisciDac(Pin,Valore){
ValNum = “ValoreDac” + Pin;
document.getElementById(ValNum).innerHTML=Valore;
document.getElementById(“descrizione”).innerHTML = “--- Attendi ... ---”;
server = “/arduino/dac/” + Pin + “/” + Valore;
richiesta = new XMLHttpRequest();
richiesta.onreadystatechange = updateasincronoDac;
richiesta.open(“GET”, server, true);
richiesta.send(null);
}
function updateasincronoDac(){
if ((richiesta.readyState == 4) && (richiesta.status == 200))
{
esito = richiesta.responseText;
iparr = esito.split(“,”);
PinType = iparr[0];
PinNum = iparr[1];
PinVal = parseInt(iparr[2]);
DacNum = “dac” + PinNum;
ValNum = “ValoreDac” + PinNum;
document.getElementById(DacNum).value = PinVal;
document.getElementById(ValNum).innerHTML = PinVal;
document.getElementById(“descrizione”).innerHTML = esito;
}
}
function updateasincronoAnalog(){
if ((richiesta.readyState == 4) && (richiesta.status == 200))
{
esito = richiesta.responseText;
iparr = esito.split(“,”);
PinType = iparr[0];
PinNum = iparr[1];
PinVal = parseInt(iparr[2]);
AnalogNum = “analog” + PinNum;
document.getElementById(AnalogNum).value = PinVal;
document.getElementById(“descrizione”).innerHTML = esito;
}
}
function updateasincronoDigital(){
if ((richiesta.readyState == 4) && (richiesta.status == 200))
{
esito = richiesta.responseText;
document.getElementById(“descrizione”).innerHTML = esito;
iparr = esito.split(“,”);
PinType = iparr[0];
PinNum = iparr[1];
PinStato = iparr[2];
ImgNum = “image” + PinNum;
if (PinStato == 1)
{
Immagine = “led_off.jpg”;
}
else
{
Immagine = “led_on.jpg”;
}
document.getElementById(ImgNum).src = Immagine;
document.getElementById(“descrizione”).innerHTML = esito;
}
}
</script>
</head>
<font face=”Arial”>
<table name=”Titolo” border=”1” style=”width: 456px;” cellpadding=”6”>
<tr> <th align=”center” colspan=”6” >Arduino Yún I/O shield</th></tr>
</table>
<table name=”Tabella” border=”1” cellpadding=”6”>
<tr> <th align=”center” colspan=”6” >Uscite Rele’</th></tr>
<tr>
<td align=”center”>
13
<br>
<input type=”hidden” name=”pin” value=”13” id=”pin13” />
<input type=”hidden” name=”action” value=”0” id=”action13” />
<img src=”off.jpg” width=”50” id=”image13”
onclick=”spedisciRele(document.getElementById(‘pin13’).value,
document.getElementById(‘action13’).value);”
/>
</td>
<td align=”center”>
12
<br>
<input type=”hidden” name=”pin” value=”12” id=”pin12” />
<input type=”hidden” name=”action” value=”0” id=”action12” />
<img src=”off.jpg” width=”50” id=”image12”
onclick=”spedisciRele(document.getElementById(‘pin12’).value,
document.getElementById(‘action12’).value);”
/>
</td>
<td align=”center”>
11
<br>
<input type=”hidden” name=”pin” value=”11” id=”pin11” />
<input type=”hidden” name=”action” value=”0” id=”action11” />
<img src=”off.jpg” width=”50” id=”image11”
onclick=”spedisciRele(document.getElementById(‘pin11’).value,
document.getElementById(‘action11’).value);”
/>
</td>
<td align=”center”>
10
<br>
<input type=”hidden” name=”pin” value=”10” id=”pin10” />
<input type=”hidden” name=”action” value=”0” id=”action10” />
<img src=”off.jpg” width=”50” id=”image10”
onclick=”spedisciRele(document.getElementById(‘pin10’).value,
document.getElementById(‘action10’).value);”
/>
</td>
<td align=”center”>
<br>
<input type=”hidden” name=”pin” value=”9” id=”pin9” />
<input type=”hidden” name=”action” value=”0” id=”action9” />
<img src=”off.jpg” width=”50” id=”image9”
onclick=”spedisciRele(document.getElementById(‘pin9’).value,
document.getElementById(‘action9’).value);”
/>
</td>
<td align=”center”>
8
<br>
<input type=”hidden” name=”pin” value=”8” id=”pin8” />
<input type=”hidden” name=”action” value=”0” id=”action8” />
<img src=”off.jpg” width=”50” id=”image8”
onclick=”spedisciRele(document.getElementById(‘pin8’).value,
document.getElementById(‘action8’).value);”
/>
</td>
</tr>
<tr> <th align=”center” colspan=”6” >Ingressi ADC</th></tr>
<tr>
<td align=”center”>
1-A0
<br>
<input type=”text” style=”text-align: center;” name=”analogA0” id=”analog0” value=”0” size=”3” readonly/>
</td>
<td align=”center”>
2-A1
<br>
<input type=”text” style=”text-align: center;” name=”analogA1” id=”analog1” value=”0” size=”3” readonly/>
</td>
<td align=”center”>
3-A2
<br>
<input type=”text” style=”text-align: center;” name=”analog3” id=”analog2” value=”0” size=”3” readonly/>
</td>
<td align=”center”>
4-A3
<br>
<input type=”text” style=”text-align: center;” name=”analog4” id=”analog3” value=”0” size=”3” readonly/>
</td>
<td align=”center”>
5-A4
<br>
<input type=”text” style=”text-align: center;” name=”analog5” id=”analog4” value=”0” size=”3” readonly/>
</td>
<td align=”center”>
6-A5
<br>
<input type=”text” style=”text-align: center;” name=”analog6” id=”analog5” value=”0” size=”3” readonly/>
</td>
</tr>
<tr> <th align=”center” colspan=”6” >Ingressi digitali (2 4 7) e DAC (3 5 6)</th></tr>
<tr>
<td align=”center”>
2
<br>
<img src=”led_off.jpg” width=”50” id=”image2” />
</td>
<td align=”center”>
3
<br>
<input type=”hidden” name=”pin” value=”3” id=”pin3” />
<input type=”range” style=”width: 50px; height: 30px;” id=”dac3” min=”0” max=”255” value=”0” step=”1”
onchange=”spedisciDac(document.getElementById(‘pin3’).value,
this.value);”
/>
<br>
<span id=”ValoreDac3”>0</span>
</td>
<td align=”center”>
4
<br>
<img src=”led_off.jpg” width=”50” id=”image4” />
</td>
<td align=”center”>
5
<br>
<input type=”hidden” name=”pin” value=”5” id=”pin5” />
<input type=”range” style=”width: 50px; height: 30px;” id=”dac5” min=”0” max=”255” value=”0” step=”1”
onchange=”spedisciDac(document.getElementById(‘pin5’).value,
this.value);”
/>
<br>
<span id=”ValoreDac5”>0</span>
</td>
<td align=”center”>
6
<br>
<input type=”hidden” name=”pin” value=”6” id=”pin6” />
<input type=”range” style=”width: 50px; height: 30px;” id=”dac6” min=”0” max=”255” value=”0” step=”1”
onchange=”spedisciDac(document.getElementById(‘pin6’).value,
this.value);”
/>
<br>
<span id=”ValoreDac6”>0</span>
</td>
<td align=”center”>
7
<br>
<img src=”led_off.jpg” width=”50” id=”image7” />
</td>
</tr>
</table>
<br><br>
<br><br>
<p id=”descrizione”> - </p>
</font>
</html>
Self-updating of the values in the page
The main logic of our auto-update mechanism is based on two functions. When you load the web page for the first time, require updating the state of all pins with the function:
window.onload=CaricaStatoPin; (window.onload=UploadPinStatus;)
This function in turn calls CaricaStatoPin(), which makes the AJAX call to update the values of all the pins. Looking inside the code, we see two peculiarity compared to what we have described until now.
function CaricaStatoPin(){
leggiStato();
}

function leggiStato(){
setTimeout(leggiStato, 2000);
document.getElementById(“descrizione”).innerHTML = “--- Attendi ... ---”;
server = “/arduino/stato/99”;
richiesta = new XMLHttpRequest();
richiesta.onreadystatechange = updateasincronoStato;
richiesta.open(“GET”, server, true);
richiesta.send(null);
}
One is the function
setTimeout(leggiStato, 2000);
that, after the first page load, requires an update every two seconds. The second feature is the REST message we use to update the status of all pins:
http:// <indirizzo_Arduino_Yun>/arduino/stato/99
Also this message is not among those provided in the implementation of Arduino Yun, therefore, also in this case , we have to create it. To request the status of all pins we must use a single message, which responds with the status of all the pins in one single long string. We call it “status” and it will have to respond with a sequence of pairs KEY=VALUE, one for each pin of the shield . A message in the form:
stato#2=1#4=1#7=1#8=0#9=0#10=0#11=0#12=0#13=1#3=0#5=0#6=0#A0=162#A1=0#A2=0#A3=0#A4=0#A5=885
where each KEY = VALUE pair is separated by a “#” character and within each couple the KEY is separated from its value by an “=”. The value ” 99″ has been added to respect the REST formalism. Actually its not really needed, but the whole chain expects a value in this position. We see the management of the update message of all the states in the script “updateasincronoStato”. This example will be useful all the time you’ll want to manage a REST message composed of several pairs of data KEY=VALUE.
When we receive the message, need to unpack it in the original pairs KEY, VALUE and then treat each pair according to the type of pin that represents.
First we “unpack” the couples. We then use a group “for” to scan the array of pairs obtained. We can see the instructions in the Listing 1. For each pair we separate the pin number from its corresponding value and, with a cascade of “if” instructions, we see to properly treat each type of pin. The notations “||” are for the operator “OR” in JavaScript . In summary, if the pin number is greater than “7” it is a relay, then we manage the value of status exchange and the name of the image .gifs to be used to represent the status. The pin “2”, “4” and “7” are the digital input pins: can not be modified and then we handle only the image .gif that represents the status. The pins “3”, “5” and “6” are the pin corresponding to the analog output: for these pins we must set the value in the text field and properly position the cursor of the slider. Finally, if the first character of identifier of the pin is an “A”, we are in the presence of an analog input pin and we have to update the corresponding text field on the page.
With this long description you should be able to understand the rest of Listing 1 that creates the HTML page of our project.
Now is time to create the Arduino sketch so that it responds with the messages that we expect.
The Arduino sketch
To create the sketch for Arduino, which must read and drive the pins on the card and talk with our web page, we have chosen to use as basis the example sketch called “Bridge”, that we’ll change to do so to respond coherently to the requests from the web page.
The Bridge library allows to activate the bridge between the Arduino sketch and Linino. The library YúnServer allows to activate the server on the Arduino side on the port “5555”, where the web server uHttpd of Linino re-routes the messages addressed to the folder “/arduino”, as the URI REST, in our case. Finally, the library YúnClient allows to accept and process messages from the server re-routed by the uHttpd server.
#include <Bridge.h>
#include <YunServer.h>
#include <YunClient.h>
int dac[] = {0, 0, 0, 0, 0, 0, 0};
int DigitalPin[] = {2, 4, 7, 8, 9, 10, 11, 12, 13};
int DacPin[] = {3, 5, 6};
YunServer server;
void setup() {
pinMode(3,INPUT);
pinMode(4,INPUT);
pinMode(7,INPUT);
pinMode(8,OUTPUT);
pinMode(9,OUTPUT);
pinMode(10,OUTPUT);
pinMode(11,OUTPUT);
pinMode(12,OUTPUT);
pinMode(13,OUTPUT);
digitalWrite(13, LOW);
Bridge.begin();
digitalWrite(13, HIGH);
server.listenOnLocalhost();
server.begin();
}
void loop() {
YunClient client = server.accept();
if (client) {
process(client);
client.stop();
}
delay(50);
}
void process(YunClient client) {
String command = client.readStringUntil(‘/’);
if (command == “digital”) {
digitalCommand(client);
}
if (command == “analog”) {
analogCommand(client);
}
if (command == “dac”) {
dacCommand(client);
}
if (command == “stato”) {
statoCommand(client);
}
}
void digitalCommand(YunClient client) {
int pin, value;
pin = client.parseInt();
if (client.read() == ‘/’) {
value = client.parseInt();
digitalWrite(pin, value);
}
else {
value = digitalRead(pin);
}
client.print(F(“analog,”));
client.print(pin);
client.print(F(“,”));
client.println(value);
}
void dacCommand(YunClient client) {
int pin, value;
pin = client.parseInt();
if (client.read() == ‘/’) {
value = client.parseInt();
dac[pin] = value;
analogWrite(pin, value);
}
else {
value = dac[pin];
}
client.print(F(“dac,”));
client.print(pin);
client.print(F(“,”));
client.println(value);
}
void analogCommand(YunClient client) {
int pin, value;
pin = client.parseInt();
if (client.read() == ‘/’) {
value = client.parseInt();
analogWrite(pin, value);
client.print(F(“analog,”));
client.print(pin);
client.print(F(“,”));
client.println(value);
}
else {
value = analogRead(pin);
client.print(F(“analog,”));
client.print(pin);
client.print(F(“,”));
client.println(value);
}
}
void statoCommand(YunClient client) {
int pin, value;
client.print(F(“stato”));
for (int thisPin = 0; thisPin < 9; thisPin++) {
pin = DigitalPin[thisPin];
value = digitalRead(pin);
client.print(F(“#”));
client.print(pin);
client.print(F(“=”));
client.print(value);
}
for (int thisPin = 0; thisPin < 3; thisPin++) {
pin = DacPin[thisPin];
value = dac[pin];
client.print(F(“#”));
client.print(pin);
client.print(F(“=”));
client.print(value);
}
for (int thisPin = 0; thisPin < 6; thisPin++) {
value = analogRead(thisPin);
value = analogRead(thisPin);
client.print(F(“#A”));
client.print(thisPin);
client.print(F(“=”));
client.print(value);
}
client.println(“”);
}
After loading the sketch on our Arduino YUN, open the browser and type the path
http://<Indirizzo_Arduino_Yún>/sd
with the name of the folder of the sketch.
In our case :
http://<Indirizzo_Arduino_Yún> l/sd/BridgeEff/
The page is opened and, at the bottom, we see that begins to flash messages to update the status of the single pins. Approximately every two seconds, the values of all pins are updated with the values provided by the Arduino sketch. Click on the buttons representing the relays and move some sliders. Move the position of the physical button and hold down the button. To see the changes of the status of the button we have to keep it pressed for a few seconds, the average time to update the page. We observe also the behavior of the page when we modify the value of potentiometer resistance, rotating the pivot.
The variation on the page of the values associated with the last three inputs confirm that the page is automatically refreshed. Now try to connect to the same address in the same time with another browser window, a smartphone or a tablet, in more than one person and argue about who drives the pin and the slider. Move the switch and press the button and you will see all the browsers updated every two seconds. Try to change the timing of the upgrade until you find the best for you. Try to provoke conflicts and adapt the page and the sketch to your needs.
By switching off Arduino Yun leaving the browser open, the word “— Wait —” will let you know that something is wrong. When you’ll turn it back on you will see the status of the pins comes back and updates. Nothing bad, isn’t it?

[…] Once experimented with REST technology and with the "Bridge" communication mode, we can introduce a project that achieves something difficult so far with an Arduino board: writing a web page, to be run by Linino’s internal web server uHttpd, to manage the pins of Arduino with REST, but via a web page. We will show you this and more: we also want our website to be updated both when we perform some direct action or when something happens on the Arduino side to show you a template for any given sensor measuring or actuation page. This project will show the differences between a microcontroller system – typically mono-program – and an embedded system equipped with an operating system as GNU/Linux. The Arduino Yun board incorporates both "souls " with a good bridge solution to integrate them. The web page of the project We want to create a web page that allows us to control the sensors of the shield and, simultaneously, to receive the notifications of the […] […]
it can use with uno :D
How? can you explain or show as uno don’t have SD slot.
sorry. It a question =(
No you need a 32bit processor
Hey there, trying to set up a similar system, but my XMLHttp request isn’t working. Any advise? I can get to the device by putting the IP address and then the appenders in my browser, but when I try to incorporate that into a webpage, it’s a no-go. Please help!
Are you using this example? Our code?
Thanks for the informative and great article.
Why i cant see the slider / images ?
Also buttons are not functioning , any idea?
thanks
Thanks Boris. When copying and pasting the code, I get that long list of errors. All of the single and double quotation marks that you used are unrecognized by the IDE and I had to replace them to compile. Also, the html file calls on jpegs that are not included here. Is there a github link with any of these resources to avoid simple things like incorrect font pasting?
At the moment thw firmware is here. I’ll create a github repository
Also interested in this. Keep us posted!
Sorry guy, I have to create it…
By chance were you able to create a GitHub repository containing the files needed to try the example?
good idea but your software not work.
can you debug the IDE ?
Find the files here
https://github.com/open-electronics/YunAndAjax
Hi Boris, very interesting. However I have the same error of the macro “F” someone already pointed out. Could you put the arduino code on github? thanks in advance!
Repleace ” “, with the ones you normally use in your computer
https://github.com/open-electronics/YunAndAjax
I get ISO C++ forbids comparison between pointer and integer [-fpermissive]. Any suggestions would be greatly appreciated! Thanks and Thanks for the great tutorial!!
Did you get a github link?
download any button.jpg from the net
one of the best tutorial ever read. Simply amazing! Complete cases and well structured, It show in simply words hard concepts, It works like a charm (for those who experienced troubles, try to find and replace all single and double quotes with standard ones.. I think that snippet code change in some way some characters, in this case english style quotes..)
Grazie! È davvero ben fatto!
Paolo
OK, I give up. How do you get the html file on to the sd card ? Tks Gary
does anyone have a working sketch i can check out ?
https://github.com/open-electronics/YunAndAjax
Thanks for sharing the details!i would like to more information from your side!please added more then tips!Am working in used laptop dealer in chennaishould you need for any further clarification do not hesitate to reach us back.044-421 27512
Hi there, I know that has been a lot of time since you post this, but I’m trying to implement this thing for a project I’m working at. But trying to compile the INO Arduino File it shows an error: macro “F” passed 2 arguments, but takes just 1
and I do not know how to fix it. Please if you can help me it would be great! :)