After the Yun presentation post, we are going to present a simple hacking project that is cool to get familiar with the Yun features.
In this post, as first taste of using Arduino Yun, we propose an example about using the Temboo API, coupled with the Bridge library to send a Tweet in correspondence of particular events coming from Arduino’s I/O. To do this we will prepare an arduino sketch to be compile and transferred to the flash memory of the Arduino section of the Yun.
The Arduino IDE
We can download the Arduino IDE for the Yun from the arduino website, as always. You must to download IDE 1.5.4 or later and install it.
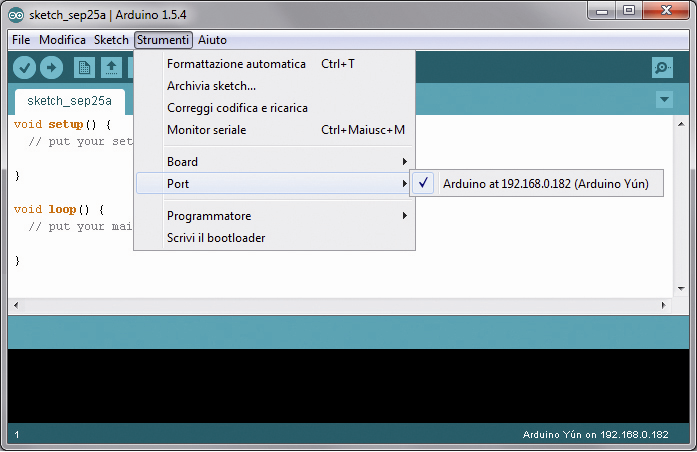
After the installation, just launch the IDE from the desktop or from the “Start” menu. This will bring up the usual IDE interface with some new features. In the figure, you can see the communication port configuration: the IP address of the board is shown. Just pick it and activate the communication channel (without the need to connect USB cables and install drivers). Keep in mind that this method works, of course, even if the card is connected wirelessly.
Again, this is a big innovation than in the past, in fact, in this way we can program and configure the Yun even if a hidden or mounted inside a more complex device, such as for example a robot. Once the choice of the communication port is done we just have to configure the device type in the “Tools” >> “Board” menu (of course “Arduino Yun”). The rest of the process is the usual for Arduino boards.
The Twitter Interface
The application we propose today is picked from the examples provided with the IDE and allows you, by using Temboo libraries, to send the Twitter messages when a particular event occurs, in this case the push of a button connected to Yun’s pin 5. To achieve this we have to make a communication chain such as that visible here:
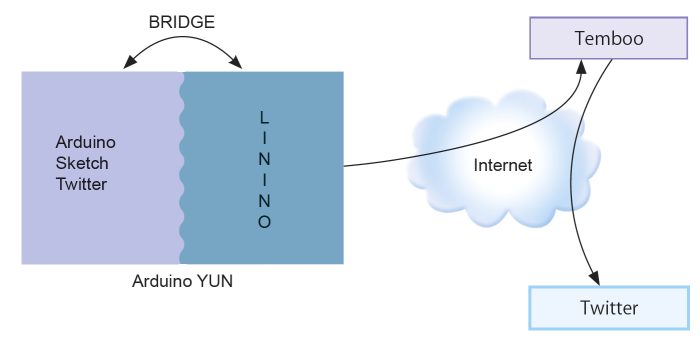
Temboo offers the capability to connect, send and receive messages and commands to and from different internet services such as social networks, payment services such as PayPal, weather information channels, medical and fitness measuring websites and many many more (more than one hundred). You connect to Temboo, instantiate objects using the classes made available by Temboo itself, you’re done. Free registration allows you to send/receive a number of command messages per month (1000), you’ve also a paid plan if you need more.
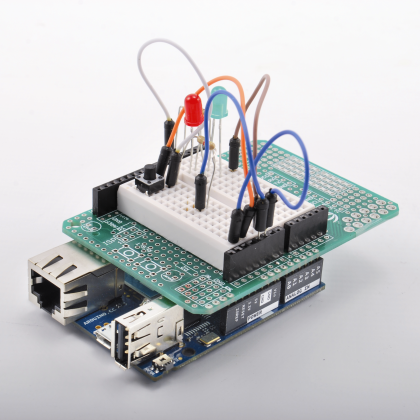
The program that “runs” on the Arduino section prepares the connection to the Temboo service that includes both Temboo and Twitter credentials. In the “setup” section the necessary object for the connection with Twitter is instantiated. At the end of the setup, the program enters the main loop, where, for each cycle, button presses are checked. If the button is pressed, the program is ready for a new cycle. Otherwise, it began the process of sending Twitter the message, which involves compiling object data (initialization of the message, credentials) and invocating “run” on the object responsible of the execution of the actual message sending. At this point in time the program is suspended until it receives the response message with potential anomalies. To control the behavior of the program, we have added two LEDs, one is green and stays on after the button is pressed, for all the time necessary to send the tweet, while the other LED is red and lights up intermittently, in case of error, stuck in this state until the error is solved.
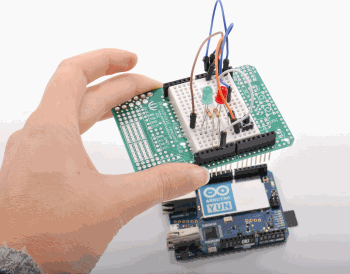
To realize the simple circuit of our application we used the experimental shield available in our store and a simple breadboard.

Configuration Twitter and Temboo
For this example to run, you must obviously have a Twitter account, you want to send Tweets to and you configure (within our sketch) the specific application which will use the login credentials. You ‘also must register to Temboo to get credentials to use the service and configure the sketch.
Let’s start with Twitter: if you do not have a Twitter account make one, following the instructions from the registration procedure. Once you have your credentials got to https://dev.twitter.com/apps/new: on the page that shows up create an application by filling in the required fields.

With regard to the “website” field, just invent one: fill in the captcha and confirm. In “Settings” in the “Application Type” section choose “Read and Write” option. Move on to the next page where we are finally given the first set of codes that we can incorporate into our sketch. In particular: “Consumer key” and “Consumer secret”.
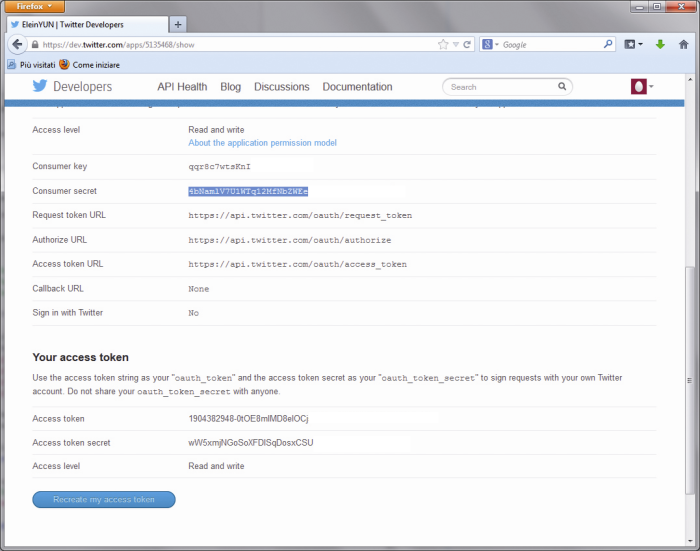
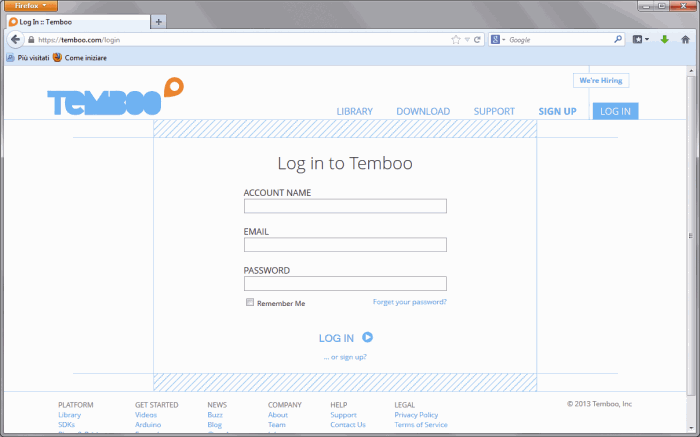
In the section dubbed “Your access token” press the blue button to create the pair of access tokens needed. Keep this page open, open a new tab in your browser and go to Temboo signup page https://temboo.com/signup. Registerand await Temboo confirmation. Once you received the email and click on the link provided in the registration confirmation page, choose a user name and password, which we will use to log into your account page at https://temboo.com/login.
Log in to your account page and select the menu item “APPLICATION KEYS”: once inside, click on the “(show)” under the heading “KEY”. In this way we get the latest information neede to personalize our sketch, basically the equivalent of the userid and password needed to use the libraries and the API calls made available from Temboo.
Arduino The sketch
Let’s now describe the Arduino operation sketch.
Let’s copy the code in the IDE and cut and paste your credentials from web pages that we left open (Temboo and Twitter) in the corresponding fields of the sketch.
We have chosen to upload the code to the Arduino via the Ethernet. Configure “Board” and “Port” and press “Upload”. The code is compiled and then loaded onto the Yun board. That’s it.
Once done just press the button on the breadboard: the green LED will light up all the time necessary for Tweet delivery, after the light ges off and you can press the button again and send another tweet. In case of error the red LED will light up and sending will be retried. We can cause the error for testing purposes, by unplugging the network cable after pressing the button
Here follows the code
Sketch
/ *

 Send a Tweet

* /

#include <Bridge.h>

#include <Temboo.h>

/*** NOTE - INSERT YOUR CREDENTIAL ***/

const String TWITTER_ACCESS_TOKEN = "xxxxxxxx";

const String TWITTER_ACCESS_TOKEN_SECRET = "xxxxx";

const String TWITTER_CONSUMER_KEY = "xxxxxx";

const String TWITTER_CONSUMER_SECRET = "xxxxx";

const String TEMBOO_ACCOUNT = "xxxxxx";  // your Temboo account name

const String TEMBOO_APP_KEY_NAME = "myFirstApp";  // your Temboo app key name

const String TEMBOO_APP_KEY  = "xxxxxx";  // your Temboo app key

int numRuns = 0;   // counters to manage error in sending

int maxRuns = 1;

int led_rosso = 4; // error LED

int led_verde = 3; // TWEET sending LED

int buttonPin = 5; // Sending TWEET  Button

int buttonState = 1;

void setup() {

 pinMode(led_rosso, OUTPUT);

 pinMode(led_verde, OUTPUT);

 pinMode(buttonPin, INPUT);

 Bridge.begin();    // initializes communication with the LINUX section via shared serial

}

void loop()

{

  buttonState = digitalRead(buttonPin);

  if (buttonState == LOW) {              // The button is pressed

     while (numRuns < maxRuns) {         // retrieve send until all goes well

       // Testo del messaggio TWEET

       String tweetText("Someone pushed the button- "  + String(millis()) );

       digitalWrite(led_verde, HIGH);

       TembooChoreo StatusesUpdateChoreo;  // Instantiate the object for sending TWEET

       // Invoke Temboo client

       StatusesUpdateChoreo.begin();

       // Set Temboo credetials

       StatusesUpdateChoreo.setAccountName(TEMBOO_ACCOUNT);

       StatusesUpdateChoreo.setAppKeyName(TEMBOO_APP_KEY_NAME);

       StatusesUpdateChoreo.setAppKey(TEMBOO_APP_KEY);

       // Set API library (Twitter > Tweets > StatusesUpdate)

       StatusesUpdateChoreo.setChoreo("/Library/Twitter/Tweets/StatusesUpdate");

       // Set Twitter credetials

       StatusesUpdateChoreo.addInput("AccessToken", TWITTER_ACCESS_TOKEN);

       StatusesUpdateChoreo.addInput("AccessTokenSecret", TWITTER_ACCESS_TOKEN_SECRET);

       StatusesUpdateChoreo.addInput("ConsumerKey", TWITTER_CONSUMER_KEY);

       StatusesUpdateChoreo.addInput("ConsumerSecret", TWITTER_CONSUMER_SECRET);

       // Message to be sent

       StatusesUpdateChoreo.addInput("StatusUpdate", tweetText);

       // Execute sending

       unsigned int returnCode = StatusesUpdateChoreo.run();

       // Return code (0) means sending process is ok

       if (returnCode == 0) {

          numRuns = numRuns + 1;

          digitalWrite(led_verde, LOW);

       } else {

          // In case of error the sending is retrieved

          while (StatusesUpdateChoreo.available()) {

            char c = StatusesUpdateChoreo.read();

            }

       digitalWrite(led_rosso, HIGH);

       delay(5000);

       digitalWrite(led_rosso, LOW);

       delay(5000);

       }

     StatusesUpdateChoreo.close();

     }

  numRuns = 0; // All ok, it stads for another button press

  }

}

[…] Press a button and Send a Tweet thanks to Arduino YÚN […]
[…] Press a button and Send a Tweet thanks to Arduino YÚN […]