
An area of application of Computer Vision, one that has always fascinated people, concerns the capability of robots and computers in general to determine, recognize and interact with human counterparts. In this article we will take advantage of the availability of cheap tools for computing and image acquisition, like Raspberry Pi and his dedicated video camera, Camera Pi, and of open source software products for image acquisition and processing, such as OpenCV and SimpleCV, that allow a high level approach to this discipline, and therefore quite a simplified one.
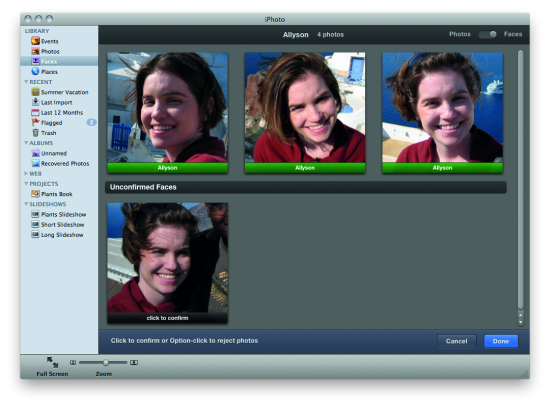
In this post we present the possibility to locate, within the context of pictures, human beings or their parts like faces, eyes, nose, and so on. This functionality is available in the most advanced photo gallery applications, and it is currently in the implementation phase as for social network applications. Once photos are loaded, the system will scan them to search for people’s faces, will find them out and will give a chance to associate a name. If, by chance, the same person is present in different pictures, he/she is recognized and automatically “ registered ”, notwithstanding privacy concerns. This last functionality is the one we previously cited as the one for identification or recognition.
The Recognition Method
To recognize real objects like, in our case, people and their features, a method known as “ Haar feature cascade ” or Viola-Jones method is supplied in SimpleCV, and in OpenCV as well. The method, in fact, was proposed in 2001 by Paul Viola and Michael Jones in their article “ Rapid Object Detection using a Boosted Cascade of Simple Feature ”, which actually means that it is possible to rapidly identify objects by means of a cascade of consecutive combinations of simple features. The method is a combination of four key components:
- Comparison characteristics, materializing from rectangular pixel matrices, and known as Haar features;
- Integral image calculation, starting from the image to process, so to speed up the features detection;
- The application of the learning method, as for AdaBoost Computer Vision systems;
- A cascade classifier, so to speed up the detection process.
The algorithm to extract the features comes from the Haar wavelet (http://en.wikipedia.org/wiki/Haar_wavelet): simplifying up to the point of being ridiculous, the wavelet is represented by two square matrices, one representing the upper part of the wavelet, the other one representing the lower part.
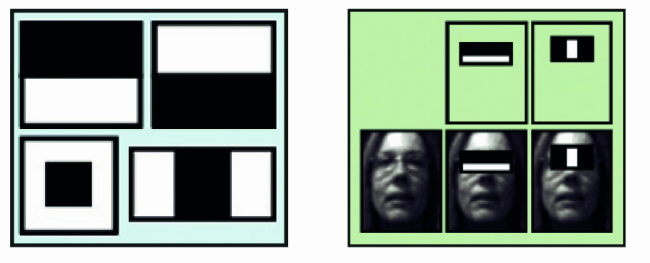
In the model employed for the extraction of the features from the images, the reference matrices have different shapes, such as the ones that can be seen in figure, that are more suitable for determining the shapes belonging to the human body, like the eyes or the nose. From this comes their denomination of Haar Features, to distinguish them from their original meaning. The same picture shows the shape of the features used by OpenCV and SimpleCV. The presence or not of a Haar “ feature ” in a portion of the picture happens by subtracting the median pixel value that are present in the black “ mask ” portion, from the median value of the pixels that are present in the clear part of the “ mask ”. If the difference is above a certain threshold value, the feature is considered as present. The threshold value is determined, for each feature, during the function training, to detect particular objects or parts of the human body. The learning process materializes itself when “ presenting ” to the Vision System the highest possible number of images concerning the “ objects ” family that we want to identify, and the highest possible number of images that have nothing to share with the object itself. From the amount of data that are “ studied ”, the threshold values are calculated, for each of the features that, in the case of OpenCV and SimpleCV, are memorized as a file in .xml format.
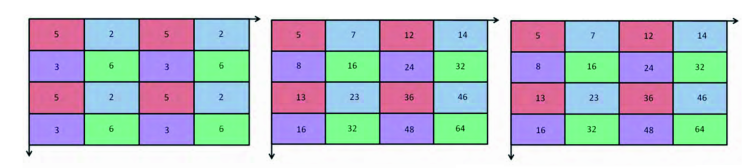
The portions of the picture that are analyzed are usually formed by 24×24 pixel matrices, that have to be “ compared ” with all the expected features. Here a first problem arises. By processing a 24×24 pixels matrix, something like more than 160.000 features are obtained. The gentlemen mentioned before have introduced a simplification in the calculation that is based on the integral image, allowing to represent the whole matrix with just four pixels. Incidentally, this method has been developped mathematically in 1984. You may expand your knowledge on the method at this link
The process consists in assigning to a certain pixel with a certain position within the matrix (image) the sum of all the pixels that are there in the area above and on the left of its position. Starting from the pixel up and on the left and continuing to the right and downwards, the incremental calculation process of the value for each pixel is definitely efficient.
Despite the simplification, the processing volume is still too big to be efficient. The authors of the method noticed that certain features were more significant than other ones, for the purpose of recognizing certain parts, e. g.: the eyes, but were not at all significant to detect, e. g.: the cheeks. Some other features are not at all significant. How to select the most significant features and discard the other ones? It can be done by means of a mathematical algorithm for “ machine learning ”, created to optimize the performances of other learning algorithms.
In extremely plain terms, that would horrify purists, its purpose is to research the smallest possible set that would grant a given percentage (for example, 75%) of accuracy as the result for detecting or discarding the required object. The paper mentioned in the beginning shows that with 200 features it is possible to obtain a degree of localization with an accuracy percentage of 95%.
For the sake of completeness and greater accuracy, the implementations of the method employ about 6.000 features from the 160.000 initial ones. If we had stopped here, for each 24×24 pixels matrix we should compare 6.000 features. Still definitely too long.
Luckily, another intuition of the mentioned authors has supplied a solution to this problem. In most cases, the greatest part of an area within a picture doesn’t contain the sought items. For this reason it is appropriate to define a simple method, able to understand if a portion of the picture belongs to the sought item or if it is surely not part of it. In this second case, the portion is discarded immediately and will not be processed anymore. The method will instead concentrate on those parts that in some way seem to be part of the sought items, and will analyze them thoroughly.
This led to introduce the idea of “ cascade ”, that is to say of classifiers’ cascade. Instead of applying all the 6.000 features to each portion of the image, the features themselves are grouped under different classification levels and applied one level at a time. If a matrix is discarded by the first level classifiers, it will no longer be processed. If it passes the first level, it will be compared with the features belonging to the second level. If an image’s portion passes all levels, it belongs then to the sought item.
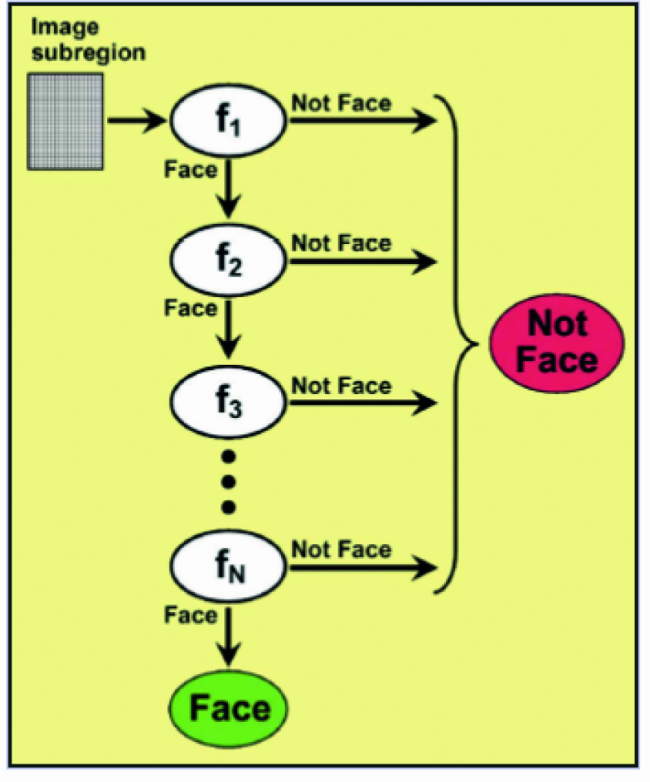
The proposed classification method subdivides the amount of about 6.000 features in 38 classification levels. The first five levels are composed respectively by 1, 10, 25, 25 and 50 features. This way, on average, it is needed to compare each image portion with about 10 features (on average!). Before getting on to some practical example, let’s remember that to work, the method has to be trained with a great quantity (600 and more) of images containing different versions of the sought items, and as many images not containing them. Luckily, at least for the main shapes associated with the human body, we find that the work is already done and coded within the OpenCV and SimpleCV packages. This allows us to start immediately with some experiments.
Stand up for it, with your face
After a long conversation introducing the object recognition method, based on the Haar Features Cascade algorithm, let’s experiment, practically, with some examples. Let’s take advantage of the occasion to update the Raspberry Pi operating system as well, and to install a new library to help us manage Camera Pi. Let’s power Raspberry Pi, and verify that the monitor works, and then connect ourselves by means of PuTTY (or however you may want) with the “ root ” user. Let’s update the operating system, since at the moment of writing this article, many improvements appeared, and let’s do it by means of the commands:
apt-get update
apt-get upgrade
apt-get dist-upgrade
If your distribution is not really one of the latest, it will need some time to complete the updates. In cases like this one, before starting it is always right to perform a good:
reboot
Let’s install now the “ picamera ” library, purposely developed for the python environment to interface Camera Pi. The documentation of the “ picamera ” library, along with other useful information concerning the available functionalities and Camera Pi’s running, can be found at the address:
http://picamera.readthedocs.org/en/release-1.5/
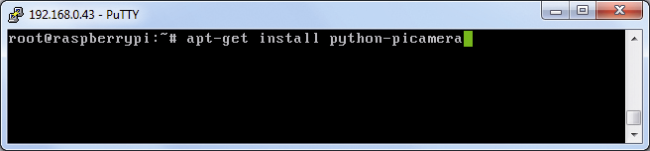
Let’s install the library, with the command:
apt-get install python-picamera
In the following examples, we will concentrate on the recognition of faces and body parts, by using the “ HaarCascades ” that are available. Which ones are they? They are the ones for which the OpenCV and SimpleCv developers have provided the execution of the training process and made both libraries available.

We find them in the folder:
/usr/local/lib/python2.7/dist-packages/SimpleCV/Features/HaarCascades/
We will now disclose a pair of warnings, just in case you’d run into some problems. For the moment, do notice that the SimpleCV library is installed under the python2.7 folder, therefore you have to make sure to be using this python version to follow the examples. If you launch the examples under python3 you will probably get some errors. Secondly, to reach the .xml file within the said folder, the name is usually enough, e. g.: “ face ”, as indicated by the greatest part of the examples that can be downloaded from Internet. If in this way you get some errors, you need only to use the complete path. In our case we have found that it works fine to name the “ Features ” with their extension, e. g.: “ face.xml ”. In the said folder we find the following files, that can be different in the case you installed a SimpleCV version that is different from the 1.3 version that we have installed:
eye.xml fullbody.xml mouth.xml two_eyes_big.xml
face2.xml glasses.xml nose.xml two_eyes_small.xml
face3.xml left_ear.xml profile.xml upper_body2.xml
face4.xml left_eye2.xml right_ear.xml upper_body.xml
face_cv2.xml lefteye.xml right_eye2.xml
face.xml lower_body.xml right_eye.xml
Each .xml file contains the features that are the result of the training process, aimed at identifying a particular data, that we may directly use to process our images. The names recall the detail they are able to recognize. For certain body parts they are present in more than one version. Some “ Features ” are more selective than other ones, other ones are better at detecting certain very obvious shapes within the image, some other ones are more suitable to recognize portions of smaller images. In the context of actual applications, more features are applied to the same picture, so to “ try them all ”. In the most particular cases, or to recognize objects that are different from faces and body parts, it is needed to proceed in creating your own Features files, with the due learning processes. But that is another story.
#!/usr/bin/python2.7

# Programma test Haar Features

import picamera
from SimpleCV import Image
import time

with picamera.PiCamera() as camera:
    camera.resolution = (640, 480)
    camera.start_preview()
    time.sleep(10)
    camera.capture('foto.jpg')
    foto=Image("foto.jpg")

    print(foto.listHaarFeatures())
    trovati=foto.findHaarFeatures('face.xml')
    if trovati:
       for trovato in trovati:
           print "Trovato alle coordinate : " + str(trovato.coordinates())
           trovato.draw()
    else:
       print "Non trovato"
    camera.stop_preview()
    foto.save('foto1.jpg')
    foto.show()
    time.sleep(10)
Just a small curiosity: in the SimpleCV version that we installed, the lefteye.xml file has been written without underscore. Let’s remember this anomaly if we have to recall it in the programs. To start, copy the program, as a file in the /home folder. This program executes the following tasks:
- Importing the picamera library to manage Camera Pi, directly from python language;
- Importing the Image function from the SimpleCV library and the “ time ” function to manage the delays and let us “ see ” the images;
- The “ with ” instruction allows a “ clean ” management of the resources it is associated with, generally being external resources as our Camera Pi. The resource is employed at the moment the instruction is executed, and is properly released, be it at the time of the program termination or in the case of its termination because of errors. The second part of the instruction creates the “ camera ” item, as instance of the Picamera class, supplied by the library we installed before;
- Sets up the Camera Pi resolution;
- Starts the “ preview ” of the picture taken by the video camera (do you remember “ raspistill ”?);
- “ Time sleep ” keeps the active preview for 10 seconds: this way we have the time to place ourselves before the camera in a proper way. We may also use photos or pictures from magazines. Try different alternatives. You will convince yourself that probably this is not the best way to have your home door open;
- Capturing a photogram and saving it as a file;
- Recalling the file as Image item to make it available for SimpleCV;
- With the listHaarFeatures() function, we print to console the list of the available “ Features ”;
- We finally execute the research of the “ anatomic ” detail, indicated by the corresponding “ Feature ” recalled in the function;
- For each “ detail ” that has been determined, we print to console the coordinates of the “ center ” of the detail, and highlight with a rectangle the area where the detail is present;
- At the end of the process, we interrupt the preview and save the image with the recognized details being highlighted, then show it on video for 10 seconds.
By modifying the instructions of this simple program, we may experiment with the whole range of the recognizable details and get an idea, from a practical point of view, of the weight of the size of the framed picture, of the lighting conditions and of the direction, for example, of the face in the picture. One thing is to recognize a nose from a face taken in frontal position, while it is very different to recognize a nose from the profile.
While you have your face being framed by the camera and recognized, you will notice that even the face of your grandpa in the photo on the cupboard in the small dining room is being recognized. For all these tests, you may always use this program, by simply modifying the parameter of the findHaarFeatures() function. We shall give some examples below.
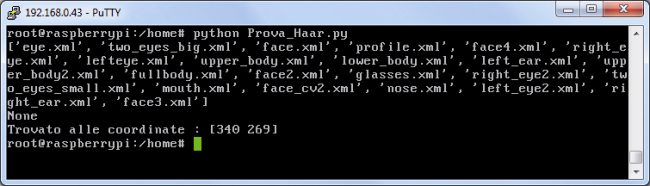
In figure we see the recognition process console, as for the face in the picture.
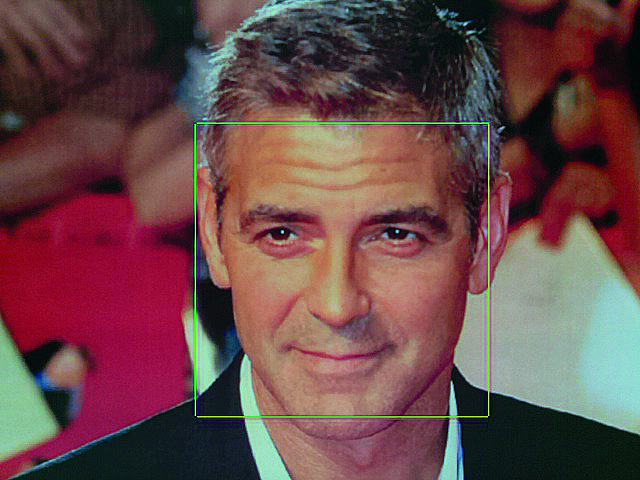
Here you will see the detected face. Can you recognize it?

We shall use the program of Listing 1, with the lefteye.xml features, to recognize the left eye and highlight it with a box.
trovati=foto.findHaarFeatures(‘lefteye.xml’)

In figure the result of the program is shown, with the nose.xml features.
trovati=foto.findHaarFeatures(‘nose.xml’)

The two_eyes_big.xml features allow us to locate the areas within the image where both eyes are present.
trovati=foto.findHaarFeatures(‘two_eyes_big.xml’)
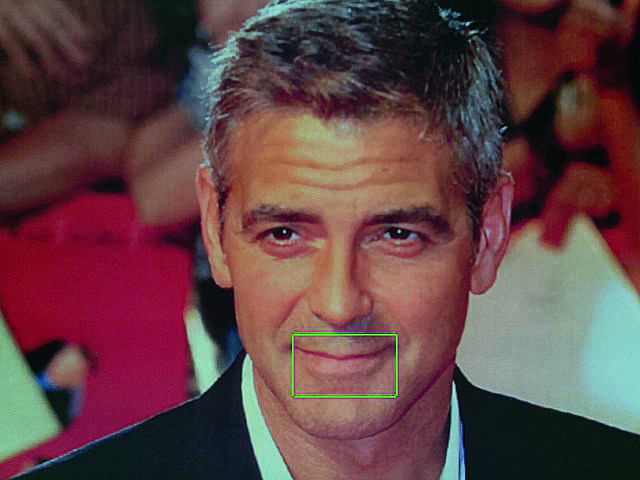
The result of the program is shown, with the mouth.xml features.
trovati=foto.findHaarFeatures(‘mouth.xml’)
In the case the program doesn’t detect the wanted detail, try with the alternative Features: for example, in the case of the eyes, try two_eyes_small.xml. Modify the program to acquire an already memorized image and search inside of it for the details you’re looking for: full or medium shot, faces, eyes, ears, people with glasses or not. To finish, we will propose another program, one that is a bit more complex and that will allow you to memorize a face and verify if the faces that are shown the following times are the same or not. A sort of “ human password ” that could be used, for example, to allow or not the access to a place or a computer. We recommend you to not use it, if not for fun or as a demonstration. For the moment, the program is very simple and for demonstration purposes only. It is “ trained ” with a single image that remains in jpeg format. Consequently, to be recognized you need to be taken from a camera angle and with a position that have to be very similar to the ones used for saving the reference picture.
After having trained the program, try to have it “ recognize ” a photo depicting yourself, or train it directly with the said photo. You will be surprised by the behaviour of such a system. One thing is to consider teaching systems as the ones we show, another one is the management of the security of accesses to places and systems. This last one is a very serious matter, and has to be managed with professional systems, that are projected and manufactured by specialists in the field. Let’s see the program:
#!/usr/bin/python

import picamera
import time
from SimpleCV import Color, Image, np
import wiringpi2 as wiringpi

pin_base = 65
i2c_addr = 0x20

quality = 400     # Parametro "quality" per la funzione findKeypointMatch
minMatch = 0.3    # Parametro "minDist" per la funzione findKeypointMatch

try:
    password = Image("password.jpg")
except:
    password = None

mode = "unsaved"
saved = False
minDist = 0.25

wiringpi.wiringPiSetup()
wiringpi.mcp23017Setup(pin_base,i2c_addr)
wiringpi.pinMode(65, 1)         # imposta GPA0 come output
wiringpi.digitalWrite(65, 0)    # imposta GPA0 a 0 (0V, off)
wiringpi.pinMode(72, 1)         # imposta GPA7 come output
wiringpi.digitalWrite(72, 0)    # imposta GPA7 a 0 (0V, off)

with picamera.PiCamera() as camera:
 while True:
    camera.start_preview()
    time.sleep(10)
    camera.capture('pifacepw.jpg')
    image=Image("pifacepw.jpg")
    camera.stop_preview()
    faces = image.findHaarFeatures("face.xml") # Riconosce il viso mediante il file HaarCFeatures "face"
    if faces:
        if not password:
            faces.draw()
            face = faces[-1]
            password = face.crop().save("password.jpg")
            print "Salvataggio volto di riferimento eseguito"
            print "Termino il programma"
            break
        else:
            faces.draw()
            face = faces[-1]
            template = face.crop()
            template.save("passwordmatch.jpg")
            keypoints = password.findKeypointMatch(template,quality,minDist,minMatch)
            if keypoints:
                print "Bentornato - mi sembri il viso giusto"
                wiringpi.digitalWrite(65, 1)
                wiringpi.digitalWrite(72, 0)
                domanda = raw_input("Desideri utilizzare l'ultima foto come password? Y/N").strip()
                if domanda == "Y":
                    image = cam.getImage().scale(320, 240)
                    faces = image.findHaarFeatures("face.xml")
                    tryit = 1
                    while not tryit == 10 or not faces:
                        image = cam.getImage().scale(320, 240)
                        faces = image.findHaarFeatures("face.xml")
                        tryit += 1
                    if not faces:
                        "Non trovo nessauna faccia"
                        break
                    else:
                        faces.draw()
                        face = faces[-1]
                        password = face.crop().save("password.jpg")
                        face.crop().show()
                        print "Salvataggio eseguito"
                        print "Termino il programma"
                        time.sleep(1)
                        break
                else:
                    print "OK..."
                    break

            else:
                print "Non ti riconosco"
                print "Attivo l'allarme"
                wiringpi.digitalWrite(65, 0)
                wiringpi.digitalWrite(72, 1)
                break
    else:
        break
The original version of the program is available here
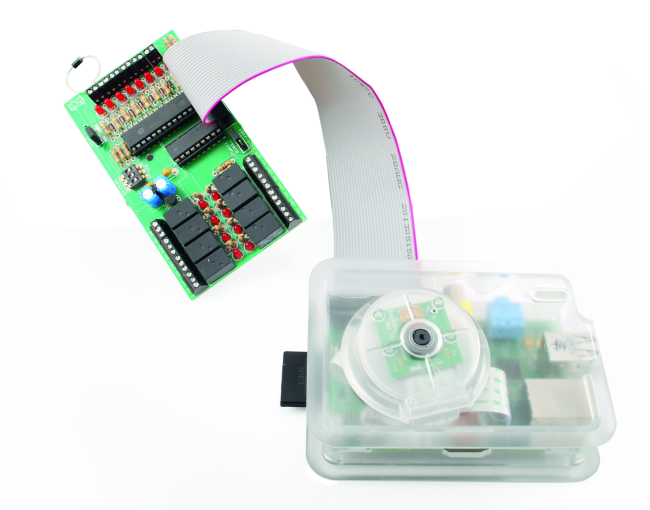
We have adapted it to run under Raspberry Pi and with Camera Pi, and to inferface the i2C expansion shield, equipped with eight relay outputs, so that it is possible to activate a green light relay in case of positive detection, or an alarm output in case of failed recognition.

The shield requires a separate powering, with a voltage of 9V. The jumper for the powering selection has to be plugged into the 5VR position (separate powering). Let’s briefly summarize the operations that have to be performed for the installation of the shield management software. As a first thing, “ free ” the i2C management driver, by commenting it in the raspi-blacklist.conf placed in the /etc/modprobe.d. folder. Perform then a “ reboot ”, to make the new configuration effective. Give then the command to load the i2C bus management driver:
modprobe i2c-dev
Install the “ wiringpi2 ” library, with the command:
pip install wiringpi2
At the beginning of the program, it imports the libraries that are needed for the image and the expansion shield management. It then imports the parameters to configure the function that identifies the most significant points, needed to compare the reference image with the one framed by the video camera. It then initializes the expansion shield output pins, that we will use as OK or alarm outputs, depending on the recognition result. Respectively, it will be the outputs numbered as “ 0 ” and “ 7 ”. After the initial statements, the program will look for a file containing the reference image, to be used for the recognition of the framed face. If it doesn’t exist, the “ password ” item is set to “ None ”. Under this condition, the face showing to the video camera for the first time is memorized as a reference face and the program ends its execution. As a reference image, the clipping that frames the face alone is memorized. If, on the other hand, a previously memorized reference image is found, the following processings are executed:
- The findHaarFeatures function (that we previously described) verifies if within the picture the framed face is present. In the case that no face is detected, an error message is sent and the program is terminated;
- A close-up of the face within the picture is selected (the one that in the frame appears to be of a bigger size, in practice a close-up) and the “ template ” item is created;
- The identified face is clipped and the “ clipping ” is saved with the passwordmatch.jpg name;
- The “ password ” (that contain the reference face) and “ template ” (that contain the face just identified) items are compared by the findKeypointMatch(), that compares the significant points that are extracted from the two images, and verifies the overlapping level of the two images;
- In the case of a positive outcome, the recognition message is printed, and the relay corresponding to the “ 0 ” output is activated. At this point it is also possible to insert any additional instruction connected to the recognition, for example the sending of a message by mail or Twitter. You will be asked if you want to use the last face as new reference one;
- In the case of positive outcome, the new face is saved as the “ password.jpg ” file. In any case the program is then terminated;
- In the case that the comparison between the reference face and the just acquired face gives a negative outcome, an error message is then sent and the relay corresponding to the “ 7 ” output is activated.
At this point it is also possible to insert any additional instruction connected to the failed recognition, such as the sending of a message by mail or Twitter. The program is then terminated.
More or less, relays aside, this is the method that is used by the software for archiving pictures that we mentioned in the article, to identify, give a name and then recognize successively the framed characters in our pictures. Before the conclusion, we present an examination of the keypoints that are mentioned by the matching method used by the program in Listing. The keypoints are significant points that allow us to “ register ” an image: they are calculated and extracted by the findKeypoints() function.
#!/usr/bin/python

import time
from SimpleCV import Image, Color

immagine = Image("password.jpg")
keys = immagine.findKeypoints()
keys.draw(color=Color.BLUE)
immagine.show()
immagine.save('foto_2.jpg')
time.sleep(10)
You may have fun experimenting with the results of this function by launching the program in Listing and changing the filename. Use them with the “ password.jpg ” and “ passwordmatch.jpg ” images. Do they correspond?
That’s all, for now! Hopefully we managed to communicate the complexity of the topic: identifying items, and especially details of human bodies, it’s no easy task. All this have been made easy thanks to a deep research for algorithms and image processing methods.
In particular, we saw how the SimpleCV library allows us to concentrate, in just one or very few instructions, a large amount of ideas and processings that until a short time ago were within the reach of a few specialists. The evidence comes also from the time spent by Raspberry Pi to execute the calculations and to produce the results. To examine the subject in more depth, since we touched it only superficially, you may refer yourself to the many articles and books available on the subject.

สุดยอดนวัตกรรมฟ้องด้วยภาพ
[…] 用树莓派和相机模块进行人脸识别 阅读原文 » […]
[…] the details of the project and give you everything you need to know to build your own. Planning. Raspberry Pi and the Camera Pi module: face recognition tutorial. An area of application of Computer Vision, one that has always fascinated people, concerns the […]
awesome idea
[…] 《树莓派的人脸识别教程》 […]
would this work on a pi noIR camera Board?
Yes, it is the same
I’ll just try it.
[…] Raspberry Pi and the Camera Pi module: face recognition tutorial In this tutorial for a facial recognition system, Boris Landoni shows you how to locate human parts like faces, eyes, noses, and more. […]
Thanks for the tutorial!
One question though: Is it possible to train the algorithm with several pictures of a person to get more robust results? (e. g. from different angles)
if you have code related to”several pictures of a person to get more robust results ” please send me shubham.samarth007@gmail.com“
Hi I would like to ask if we can compare the image with an image in database to see if it’s the same person. Meaning I want to identify a person through face recognition, is it possible??
Yes, there are different method to recognize a face. We published one
Hi Boris, Thanks for the tutorial,
One Question :- I got Error :- cam is not defined on Line No. 58
Kindly guide me further where i am going wrong ??
for open cv where to find codes of same procedures?
help me on that…..
hello sir i want to do real time face recognition, it will not take more than 2-3 sec, how do i do it ?? could you send me details on whole programming,as i m new in this programming world..at email:- abhigolliwar9@gmail.com
[…] 《树莓派的人脸识别教程》 […]
thanx for great explanation Boris.
[…] Raspberry Pi and the Camera Pi module: face recognition tutorial […]
[…] 《树莓派的人脸识别教程》 […]