Someone had already imagined, someone else hoped for that, days ago, finally one of the most prominent actors of the Makers ecosystem, Makerbot, announced a commercial desktop 3D Scanner.

The good news, for those concerned with the openness of such a system, is that, well before that move, developers already created it: it only takes a Microsoft Kinect and a computer to scan things and create models of sufficient quality to be 3D printed.
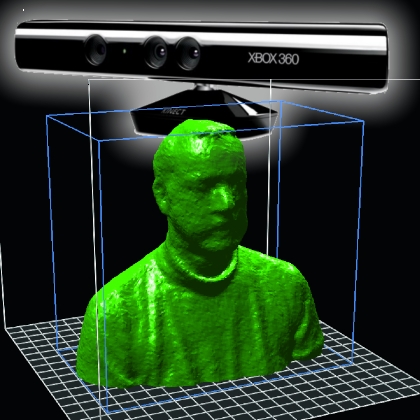
There are a lot of well known approaches based on laser, video projectors, cameras to create “point clouds” of a 3D surface (thanks to partially open softwares). Now, we have a cheap dedicated hardware that is ready to provide a 3D representation of what’s in front of it. Microsoft Kinect, hacked thanks to some tenacious developers, is now emerging as a simple and effective tool to acquire three-dimensional models. From desktop size stuff up to furniture or the whole person, Kinect can be miraculous on its own.
This is not the right solution to duplicate small object: it’s “resolution” and the volume in which Kinect works best, make the Kinect not suitable for small items such as figurines or small, detailed, objects .
The ingredients
You need a Kinect (Xbox, PC versions or the “compatible” Asus Xtion Pro), a personal computer with ATI or NVIDIA graphics accelerator card and then the ReconstructMe software with the appropriate driver.
Unfortunately, this is not a fully open source solution: it’s a free SDK for non-commercial use (a license fee applies for professional purposes).
Size Matters
As said before, since the purpose of Kinect was to capture the whole person in order to identify movements, the tool is good for objects of a comparable size.

As an example Kinect can scan a chair or an umbrella, but will not be able to to scan a lighter with sufficient definition for details.
ReconstructMe software correlates each point cloud to the following, recognizing the already acquired spots in the surface and linking them up with the rest of the map.
Use of different GPU cards implies limits for compliance but there’s a well maintained list of compatibility. SDK operates in two modes: normal, with one squared meter divided into 256 elements, or high-resolution, same volume, but with 512 elements.
Prepare the software
You can download ReconstrucMe from here http://reconstructme.net/projects/reconstructme-console/ which is composed of an SDK, a console mode interface and a set of drivers for the different versions of Kinect .
Few batch files will allow you to start the various acquisition modes.

Download the file “ReconstructMe_Installer_NonCommercial_405.exe” and the your driver kit (in our case “OpenNI Sensor Driver Package x86 1.5.2. zip “) and proceed with the installation (driver first and then the software). In the package you will find the right installation guide for your specific driver.
You also need to have drivers with OpenCL support (beware: it’s CL, not GL!): might be a good idea to check on the manufacturer website, to download the latest ones. As shown in the table of compatibility, some video cards don’t have these drivers.
| Chart Legend | ||
| Smooth realtime experience | ||
| Jerky realtime experience | ||
| Does not work at all | ||
| Model | Standard | Highres |
| ATI FirePro V3800 | 3 | 1 |
| ATI FirePro V4800 | 3 | 1 |
| ATI FirePro V5900 | 3 | 3 |
| ATI Radeon HD 2600 Pro | 2 | 1 |
| ATI Radeon HD 4570M | 1 | 1 |
| ATI Radeon HD 4870 | 1 | 1 |
| ATI Radeon HD 5145M | 1 | 1 |
| ATI Radeon HD 5650M | 3 | 2 |
| ATI Radeon HD 5700 | 3 | 3 |
| ATI Radeon HD 6490M | 2 | 1 |
| ATI Radeon HD 6570 | 3 | 2 |
| ATI Radeon HD 6850 | 3 | 3 |
| ATI Radeon HD 7640G | 2 | 1 |
| ATI Radeon HD 7850 | 3 | 3 |
| INTEL Dual Quadcore | 2 | 2 |
| INTEL HD Graphics 3000 | 2 | 1 |
| NVIDIA Geforce 9500GT | 2 | 1 |
| NVIDIA Geforce 9800GT 3D | 3 | 3 |
| NVIDIA Geforce 9800GTX | 3 | 3 |
| NVIDIA Geforce G 102M | 2 | 1 |
| NVIDIA Geforce GT 240 | 3 | 2 |
| NVIDIA Geforce GT 330M | 2 | 1 |
| NVIDIA Geforce GT 430 | 3 | 3 |
| NVIDIA Geforce GT 440 | 3 | 3 |
| NVIDIA Geforce GT 555M | 3 | 3 |
| NVIDIA Geforce GT 630M | 3 | 3 |
| NVIDIA Geforce GTX 220 | 2 | 2 |
| NVIDIA Geforce GTX 280 | 3 | 2 |
| NVIDIA Geforce GTX 295 | 3 | 1 |
| NVIDIA Geforce GTX 460 | 3 | 3 |
| NVIDIA Geforce GTX 550Ti | 3 | 3 |
| NVIDIA Geforce GTX 560 | 3 | 3 |
| NVIDIA Geforce GTX 560M | 3 | 3 |
| NVIDIA Geforce GTX 570 | 3 | 3 |
| NVIDIA Geforce GTX 590 | 3 | 3 |
| NVIDIA Geforce GTX 660M | 3 | 3 |
| NVIDIA Geforce GTX 670M | 3 | 3 |
| NVIDIA Geforce GTX 680 | 3 | 3 |
| NVIDIA GT 540M | 3 | 3 |
| NVIDIA Quadro 2000 | 2 | 2 |
| NVIDIA Quadro 3000M | 2 | 2 |
| NVIDIA Quadro 4000 | 3 | 2 |
| NVIDIA Quadro FX 2800M | 3 | 1 |
| NVIDIA Quadro FX 3500M | 3 | 1 |
| NVIDIA Quadro FX 4800 | 3 | 3 |
| NVIDIA Quadro FX 580 | 3 | 1 |
| NVIDIA Quadro NVS 140M | 1 | 1 |
| NVIDIA Quadro NVS 295 | 2 | 1 |
| NVIDIA Quadro NVS 3100M | 2 | 1 |
| NVIDIA Quadro NVS 4200M | 2 | 1 |
Be quick
When you use the non-commercial version of the software, above all other limitations, a technical limitation applies. You loose the tracking at regular intervals. Basically you have a limited time to try to get to the end of the scan before the software begins to make your life very complicated.
First, you must become familiar with the scanning system: volume acquired, object rotation speed, keyboard commands.
Make sure that Kinect is firmly secured to the stand and that this can be easily raised to allow scanning from two different vertical angles.
A rotating stool will do for the test: behind that, the more neutral and linear scene as possible (a distant wall is perfect)
Starting one of the batch files in the ReconstructMe folder, you can quickly see how the sensor behaves and, at the same time, become familiar with the active area.
You’ve three batch types: Record, Scan and Scan Hires.
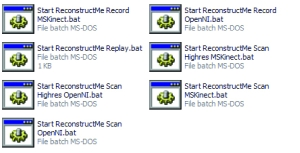
As stated before, you might have a problem scanning with high resolution, so try both the normal batch,and the Hires to figure out where you should focus your efforts.
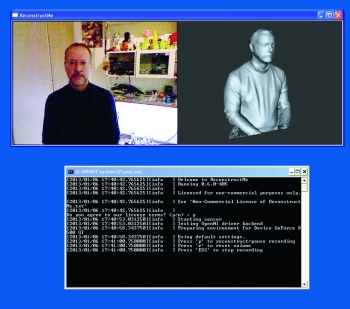
You have three keyboard commands: “p” starts or stops the acquisition, “r” deletes the points clouds and restarts the process, “esc” ends the acquisition phase and allows you to save the file PLY format (a pretty common one). For the tests, it is therefore essential to press at least once “p” after accepting the terms of use.
The most important thing, is to find the best sensor position: just practice trying to turn the subject, hitting “p” and scanning from another vertical angle. With a little practice, you will be able to acquire the model in stages, moving the height and aim the sensor within the same scan attempt.
When you hear a “beep “, you lost subject tracking. This is not always caused by moving too fast, but it’s part of the crazy “limitations” of the non-commercial version: at regular the software goes off-tracking intentionally. You must learn how to discern what are true problems related to wrong or fast movement around the subject (or the subject rotation in case in front of a fixed sensor). When in pause (“p”) you can check the window, turning and inspecting the model obtained so far.
If the subject changes shape or position, the scanner will not be able to find the tracking and the model will be distorted or corrupted.
Let’s film!
Go with a “p” and after a moment of stabilization, press “r” to start with the acquisition. The subject of the bust (let’s try with that), must rotate with at a speed previously proved to be the best one. After one turn move the sensor in a different vertical position and repeat for the second time. Press “esc” to stop and save.
Repeat this process two or three times before moving on to the next steps.
First processing: MeshLab
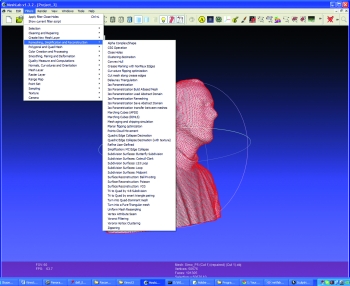
Is freely available on http://meshlab.sourceforge.net/: it’s a kind of open source Swiss boxcutter for 3D formats processing.
For our specific application, we need two MeshLab filters: one that fills the holes in the point cloud and on that softens and smoothes it as with sandpaper.
Alternatively, you can use the function activated by clicking on the third icon to the right of A in a yellow circle (it’s a H in a point cloud)
When satisfied you can go for -> Export Mesh As and create a OBJ type of your model.
A refinement with Sculptris

As the model captured by Kinect it’s not so detailed, if you have a bit of practice with the program, you can use Sculptris and add a little ‘missing details on the model. You can also add pieces to the model, if necessary.
And now, Netfabb

We are approaching the end of preparing the file, still in OBJ format, already repaired and made smoother thanks to the steps in MeshLab and Sculptris. Now with Netfabb we can well fix the base and possibly correct the orientation.
With Netfabb we can rotate the model -20 degrees in the X (these values arise from our experiments and it is very likely that they are also suitable to your acquisitions). Now act on the rotation value in order to correct it, remembering that if the chin is not horizontal, but is slightly bent upwards, it will be possible to print without supports, while if it is straight, we will have to activate supports.
The second thing you need to do with Netfabb is cutting of the base with a plane aligned on the Y axis. This only applies if you have not already done rotations to the model, as the way it is created by Kinect and RecostructMe, is in fact lying on the plate. The base should preferably be flat and extended, so as to ensure a good grip on the plate of the press.
Exporting also goes with the STL file format, abandoning the OBJ used so far.
Printing approaches
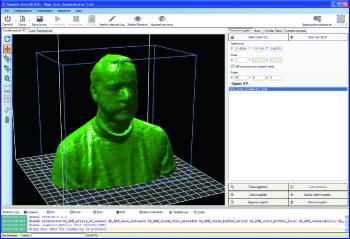
With the file finally cleaned up, cut and in STL format, we can move to the last phase. That phase uses Repetier Host as the slicing and printing application. The upload will certainly generate an error because our printer handles a print volume of 20 x 20 x 20 cm, while if you have acquired a bust of person, this will be at least 60 x 60 x 40. Repetier Host does not prevent loading, but puts the model in a ‘alarm’ state. Use the resize function and set the scale to “0.2” to begin. Use the “Center Object” and “Drop item” to put it in the center of the printing zone. The rotation to put the bust “standing” is 90 degrees on the X axis. Repeat the centering and alignment. With the bust placed correctly you can work on the percentage of reduction to get the best result. Depending on the appearance of the subject, you can in fact have different dimensions and proportions.
Inspect the pattern to be printed using camera rotation (the first icon on the top left with the circular arrow) looking especially at the inclinations behind the neck and under the chin to see if there are potential printing problems.
The slicing step, could take up to fifteen minutes since the model will certainly have a large number of triangles. Limit the perimeters to 2 or 3 and keep the fill to small value, such as 15 or 20% as not to lose too much time in filling the bust.
Now it only takes patience

If your acquisition is similar to ours, get ready for approximately 5 hours of printing setting speed of extrusion to 90 mm / sec. You can use a higher speed if you are able to intervene in the last printed layers and you have a cooling fan: surely the top of your head will be critical to be printed in speed without distortion because it is made of very small perimeters and layers. Just slowing down and cooling prevents each layer from collapse on the following not yet sufficiently cold and stable.

[…] Someone had already imagined, someone else hoped for that, days ago, finally one of the most prominent actors of the Makers ecosystem, Makerbot, announced a commercial desktop 3D Scanner. […]
[…] As attention to the 3D scanners appearing on crowdfunding sites such as Kickstarter and Indiegogo and the announcement from MakerBot about their scanner development project, here is a fun introduction to one form of DIY 3D scanning already starting to reach wide circulation: 3D scanning with the Kinect. From Open Electronics: […]
[…] Boris Landoni shared an introduction to Kinect for 3D Scannings: “Now, we have a cheap dedicated hardware that is ready to provide a 3D representation of what’s in front of it. Microsoft Kinect, hacked thanks to some tenacious developers, is now emerging as a simple and effective tool to acquire three-dimensional models. From desktop size stuff up to furniture or the whole person, Kinect can be miraculous on its own.” (read more) […]
[…] Re: 3D scanners? With two XBOX kinects you can use some freeware to create pretty decent models. here is the one kinect solution: Kinect for 3D scans | Open Electronics […]
[…] need a 3-D scanner, not just a printer. While hackers have answered the 3-D-scanning challenge by repurposing a Kinect to take 3-D printer-quality scans, it’s still chained to your desk. But no more! Occipital’s Structure sensor device turns your […]
[…] Someone had already imagined, someone else hoped for that, days ago, finally one of the most prominent actors of the Makers ecosystem, Makerbot, announced a commercial desktop 3D Scanner. […]
[…] Using Kinect for 3D Scans […]
How do you print? Nice work, but I don’t see support in your print, how do you make?
Using 3Drag and repetier host
Hi, I want to do this with my kinect. I think the print is lacking details, how can I improve details to make it a recognizable face? Thx
In google there are a lot of improvements for this project ;-)
The new v2 Kinect shipping with XBOX One might have the resolution you need.
[…] Kinect for 3D scans | Open Electronics – Someone had already imagined, someone else hoped for that, days ago, finally one of the most prominent actors of the Makers ecosystem, Makerbot,… […]
[…] Kinect for 3D scans | Open Electronics – Someone had already imagined, someone else hoped for that, days ago, finally one of the most prominent actors of the Makers ecosystem, Makerbot,… […]
[…] Kinect for 3D scans | Open Electronics – Someone had already imagined, someone else hoped for that, days ago, finally one of the most prominent actors of the Makers ecosystem, Makerbot,… […]
[…] Kinect for 3D scans | Open Electronics – Be quick. When you use the non-commercial version of the software, above all other limitations, a technical limitation applies. You loose the tracking at regular … […]
[…] Kinect for 3D scans | Open Electronics – Someone had already imagined, someone else hoped for that, days ago, finally one of the most prominent actors of the Makers ecosystem, Makerbot, announced a … […]
[…] Kinect for 3D scans | Open Electronics – Be quick. When you use the non-commercial version of the software, above all other limitations, a technical limitation applies. You loose the tracking at regular … […]
[…] Kinect for 3D scans | Open Electronics – Open Source Electronics is the brainchild of a world leader in hobby electronics Futura Group srl. Open Source Electronics is devoted to support development, hacking … […]
[…] Kinect for 3D scans | Open Electronics – Open Source Electronics is the brainchild of a world leader in hobby electronics Futura Group srl. Open Source Electronics is devoted to support development, hacking … […]
[…] Kinect for 3D scans | Open Electronics – Open Source Electronics is the brainchild of a world leader in hobby electronics Futura Group srl. Open Source Electronics is devoted to support development, hacking … […]
[…] Kinect for 3D scans | Open Electronics – Be quick. When you use the non-commercial version of the software, above all other limitations, a technical limitation applies. You loose the tracking at regular … […]
[…] Kinect for 3D scans | Open Electronics – Someone had already imagined, someone else hoped for that, days ago, finally one of the most prominent actors of the Makers ecosystem, Makerbot, announced a … […]